Delamination - Transom

ondarvr

Supreme Mariner
Joined
Apr 6, 2005
Messages
11,527
Re: Delamination - Transom

Dark wood is the start of rot, even if its dry.

Do a search here on "rotten transom" and you'll see many other examples of rotten trasnoms and how to do the repair. After that you'll have more questions.
 

Joker757

Petty Officer 2nd Class
Joined
May 13, 2009
Messages
134
Re: Delamination - Transom

I understand. But if the wood has not rotted yet and I kill the rot fungus won't that stop it? The fungus needs moisture, low light and oxygen. If I dry it out and keep a light in there plus the antifreeze can it be salvaged. The parts in the corners and edges is where I got too aggressive with my chisle and the wood was wet and I took some of the wood off with the glass.

I'm a novice when it comes to fiberglass repair. I just want to ensure that I do this right so I'm not back at it a few years later. On the other hand I also don't want to do work that's unecessary.

So far it looks like I will replace. Just need more info as to how far to go. Can I just cut out the affected wood? How far out do I go? What tools will I need, etc.

How many hours of labor do you think this will take?
 

jonesg

Admiral
Joined
Feb 22, 2008
Messages
7,198
Re: Delamination - Transom

no-one can tell you , its up to you.
I know what I'd do.:p

Yacht doc can't do it my way because he's paid to do it and doesn't need any comebacks. Comebacks cost money, lots of it.

There comes a point where you have to rip everything out , grind the hull sides and hull bottom to accept new glasswork for the whole new transom.

Many marine repair shops will not replace a piston in a 6 cyl outboard, they insist on changing all 6 of them and charge $3600 , they can't afford the comebacks that statistically go up if changing just one piston.
But most of us will do just one piston and the factory service manual says you can.!

Same thing with transom work, sometimes it makes sense to gut it all out.
I'll say this, when I drilled holes there were no wood chips, just black soil.

If you decide to cut it all out just set the depth on a circular saw and cut it into squares, then use a wonder bar or chisel and mallet to start prying it off in chunks. Try not to slice through the outter skin.:eek:
 

Joker757

Petty Officer 2nd Class
Joined
May 13, 2009
Messages
134
Re: Delamination - Transom

makes sense Jonesg. I took this into consideration. After further inspection and poking around I'm leaning towards my orignal plan of drying it out, killing the fungus and reglassing. The deciding factor will come tomorrow. My next door neighbor's brother builds custom fishing boats for a living. He's coming by tomorrow and his decision will decide. I'm no fiberglass expert but am fairly knowlegeable when it comes to wood. As stated the wood is still solid and stable. I know that the blackness is the START of rot but is just that. Rot fungus is a living organism that needs low light, moisture (20-30%) and oxygen. Take any one of those away and you stop the fungi from doing any further damage. I used to keep the boat in the water at a marina but a few months back had a drive poured on the side of the house bought a trailer and now it's dry when not in use (could no longer justify the cost). Just manipulating the fungi's environment doesn't necessarily kill it but makes it go dormant. That's where the antifreeze comes in. Also with the boat out of the water the moisture levels should stay low. Given that I also have a moisture meter (one of my woodworking tools) I can keep an eye out for moisture and take corrective action before any further damage is done. I've seen wood in homes (from my days as a carpenter) where there was once the onset of rot but the problem was fixed and the wood lasted for many years (10+). I'll let you know what my neighbor's brother says and send pics as I progress. Thanks for the input and advise.
 

Joker757

Petty Officer 2nd Class
Joined
May 13, 2009
Messages
134
Re: Delamination - Transom

Here are some pics. Note where the transom meets the floor. Is this the correct method? I feathered about 2" back. Do I need to go further? The core has not delaminated and is realy solid. the dark color is on the surface only. I have a box fan in the bilge and I'll let it run for a day. I'll keep posting pics of my progress.

Thanks to all for your comments/suggestions. Keep them coming. I can use all the help I can on glassing this in.
 

Attachments

  • Dsc01697.jpg
    Dsc01697.jpg
    75.6 KB · Views: 1
  • Dsc01694.jpg
    Dsc01694.jpg
    60.3 KB · Views: 1
  • Dsc01695.jpg
    Dsc01695.jpg
    57.8 KB · Views: 1
  • Dsc01700.jpg
    Dsc01700.jpg
    77.1 KB · Views: 1
  • Dsc01702.jpg
    Dsc01702.jpg
    92.3 KB · Views: 1

jonesg

Admiral
Joined
Feb 22, 2008
Messages
7,198
Re: Delamination - Transom

I would grind the hull further out, 12 iches will give you room...
the strength comes from spreading the load out from the transom onto the hull with successively wider strips of glass.
Start with putty to form a radius at the 90 deg corner (transom to hull joint), glass doesn't like to turn sharp corners.
resin/cabosil/chopped fiber.
Trowel it on and work quickly.
Just use a spoon to make a quick radii, don't try to make it perfect, its the bilge after all,
I like to slap a coat of resin on with a 3 inch disposeable wooden brush immediately and lay 4 inch glass tape =before= the putty goes off, get another coat of resin on the tape to wet it out and ensure chemical rather than mechanical bond.
If I have resin left I keep going with wider strips.
Use mat between cloth layers.
Build the thickness up to the original, might take 6 layers....or 4.
Its just a matter of pre cutting cloth, pre-measuring resin and catalyst then being able to form the radii AND mix the fresh batch of resin in the alloted time. A second person would help if they can be mixing resin for you.

If your resin calls for a catalyst range of between 10 to 17cc per quart I like to go with the lower range 10-12 cc of mekp , the bigger the batch the hotter it gets during mixing, unless the weather is in the 50's.

On mine I didn't form a putty radius for the vertical joint, I just stipled a 4 inch strip of mat into the corner with the brush and stayed with it until it went off. I did the bottom joint first then the sides.
 

Joker757

Petty Officer 2nd Class
Joined
May 13, 2009
Messages
134
Re: Delamination - Transom

So it sounds like when I grind down the hull bottom I need to take quite a bit more off if I'm laying four layers of glass. In the pics I just took off the top layer of paint/resin until I saw pink (probably only 1/8" thick). How much material should I be taking off?

The skin I took off the transom was no more than 1/8" thick. How thick would 4 layers be?

What kind of cloth do you recommend for the transom? Also most of what I've read says to pour the resin on then spread. Obiously with the verticle surfice I can't do that. Should I brush it on, let it tack then put my first layer of cloth on and repeat?

Sorry for so many questions but this is my first wack at this.
 

jonesg

Admiral
Joined
Feb 22, 2008
Messages
7,198
Re: Delamination - Transom

yeh get it out of the mixing pail asap, pour it out if possible or do smaller batches for the verticals, first one side then the other.

don't wait for it to tack!, brush resin on, slap the glass on and get the glass wetted out immediately then decide if you have enough resin and time to do the next layer. If not, rinse the brush and pail with acetone and mix the next batch. Don't try to mix more without rinsing brush and pail, it will gel up almost immediately, save rinsing acetone in a jar and reuse for rinsing.

I like 10oz cloth and 1 1/2 oz mat.
I think outboards put more strain on transoms , an inboard sets the engine on mounts that are bonded to the hull so my experience is to use more glass than you had on yours as mine is an outboard (150hp).
More glass will not hurt anything, 1/4 inch thick will not hurt but feather it out with larger successive layers.

Read thru Ooops thread, you can see where he added larger and larger layers of cloth to spread the load out.

Look at the suspension springs on your trailer, they start small and get bigger, exact same thing.
 

Joker757

Petty Officer 2nd Class
Joined
May 13, 2009
Messages
134
Re: Delamination - Transom

questons:

  1. on the hull bottom how deep should I grind? I just took off the white until I saw the pink you see in the pic. This was about 1/8". If I lay 4 layers it would be thicker than the rest of the bilge, won't feather out and I believe there would be a very obvious transition. I don't know for sure just trying to visualize the process. Or do I go thicker and stop short of where it's feathered and fill in the rest with resin to blend it all in?

    2. on the vertical transom when applying glass as I get thicker and I get past the point where the bare wood is I would eventually be on the existing glass. Is there something special I must do to get good adhesion to the existing glass?

    3. What is the difference between cloth and mat?
 

jonesg

Admiral
Joined
Feb 22, 2008
Messages
7,198
Re: Delamination - Transom

all the layers don't all stop at the same point, you start with small strips or tape, then cut each successive strip wider, that way it feathers itself out, the last peice will only stick up about 1/16th inch tops.

Not sure why you're worried about fairing anything in cosmetically.

"Is there something special I must do to get good adhesion to the existing glass?"

same as anything, grind til you see fresh smooth glass ( or wood) , wipe with acetone and its ready to go. If you don't mind grinding just remove it all.

cloth is woven like fabric, matting looks like pressed straw with strings of glass going in all directions, its good for building up thickness in a hurry.
When the resin hits the matting it dissolves the binding agent and it starts to come apart, I prefer to stipple it like stucco rather than dragging a brush back and forth, you'll see as soon as you start to play with it. The idea is to get the resin INTO the mat, brush strokes back and forth aren't as effective as pushing it straight in with the brush, I basically stomp it with the brush very quickly, on wider flat areas such as a deck a roller is faster or a plastic scraper working it like a squeegee then push the air bubble out with a special roller.

theres a bunch of glassing tutorial vids on youtube.
http://www.youtube.com/watch?v=2_qY...C51FA356&playnext=1&playnext_from=PL&index=31
 

ondarvr

Supreme Mariner
Joined
Apr 6, 2005
Messages
11,527
Re: Delamination - Transom

Have you read any of the other threads on this subject? I ask this because the majority of your questions will be answered (with pics) in those other threads, it will give you a much better understanding of what you're trying to do.
 

Joker757

Petty Officer 2nd Class
Joined
May 13, 2009
Messages
134
Re: Delamination - Transom

Have you read any of the other threads on this subject? I ask this because the majority of your questions will be answered (with pics) in those other threads, it will give you a much better understanding of what you're trying to do.

I've spent hours reading the treads. Most are kinda general though and not actually detailed enough for a newbie to fiberglass such as myself. I have a general idea of what I need to do but just need the details. I want this repair to last and look professional. If I ever decide to sell the boat I don't want it to look like an unreliable repair even if it isn't.
 

redfury

Commander
Joined
Jul 16, 2006
Messages
2,657
Re: Delamination - Transom

yeah, did you see how fast he was going at the end of the 2nd video?! :D

After watching that video though, it certainly makes me feel better about working on my boat and doing the glass work.
 

jonesg

Admiral
Joined
Feb 22, 2008
Messages
7,198
Re: Delamination - Transom

hahah yeh time lapse, surprised he brushed the tooling resin on, I did that myself and was told it needs to be sprayed, my molds came out ok.

pity they didn't show him popping the mold off.
 

ondarvr

Supreme Mariner
Joined
Apr 6, 2005
Messages
11,527
Re: Delamination - Transom

Because of the emission regulations in Europe many gel coats are formulated to be brushed on, even on large hull molds its done this way, if you're experienced at it, its not bad. Gel coats in the US are formulated to be sprayed, so while they can still be brushed on, it just isn't as easy.

There is more to brush on gel coat process than was shown in the video, so don't expect good results if you only do what was shown.
 

Joker757

Petty Officer 2nd Class
Joined
May 13, 2009
Messages
134
Re: Delamination - Transom

my neighbor's brother stopped by this evening (he's a custom boat builder) and took a look at my transom. He said that the inegrity of the wood is fine and as long as I seal it well and keep things dry I will be okay. He recommended that I also remove the trim tabs and the rear eyes and make sure that everything is properly sealed.

The inside dried very well with the box fan blowing in the bilge and the Florida heat. I spayed some anti-freeze this eve and will let it soak in for a few hours before I turn the fan back on (didn't want to dry it out before it had a chance to soak in). I'm traveling for business starting tomorrow and will leave the fan running for the rest of the week. Should be bone dry for glassing in this weekend. I'll post pics of my progress. I feel much better now. The first night I found the moisture it kept me up all night.

Looks like I caught this in time before it turned into a full transom replacement.
 

jonesg

Admiral
Joined
Feb 22, 2008
Messages
7,198
Re: Delamination - Transom

Because of the emission regulations in Europe many gel coats are formulated to be brushed on, even on large hull molds its done this way, if you're experienced at it, its not bad. Gel coats in the US are formulated to be sprayed, so while they can still be brushed on, it just isn't as easy.

There is more to brush on gel coat process than was shown in the video, so don't expect good results if you only do what was shown.

I had some good and some not great results brushing it on, I think waiting too long before applying the first layer of mat was a problem, the tool gel looked like orange peel, it puckered up in places.
I was surprised the guy didn't apply some putty to the corners before the mat, whenever I did that I had air pockets under the tool gel.

I learned you can't do a temp fix on a mold with wax too.!
The resin gets under it or into it somehow.
 

jonesg

Admiral
Joined
Feb 22, 2008
Messages
7,198
Re: Delamination - Transom

my neighbor's brother stopped by this evening (he's a custom boat builder) and took a look at my transom. He said that the inegrity of the wood is fine and as long as I seal it well and keep things dry I will be okay. He recommended that I also remove the trim tabs and the rear eyes and make sure that everything is properly sealed.

The inside dried very well with the box fan blowing in the bilge and the Florida heat. I spayed some anti-freeze this eve and will let it soak in for a few hours before I turn the fan back on (didn't want to dry it out before it had a chance to soak in). I'm traveling for business starting tomorrow and will leave the fan running for the rest of the week. Should be bone dry for glassing in this weekend. I'll post pics of my progress. I feel much better now. The first night I found the moisture it kept me up all night.

Looks like I caught this in time before it turned into a full transom replacement.

can't beat first hand experience to walk you thru the process in person, this medium is great but has its limitation especially if you have never used resin before.
 

Yacht Dr.

Vice Admiral
Joined
Feb 26, 2005
Messages
5,581
Re: Delamination - Transom

Hello again ..

I 1st suggested might just need a scab..

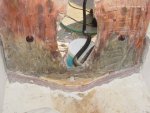
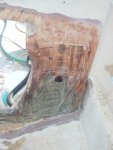
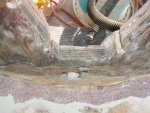
IN you first set of pics It does look like the whole bottom half was not in the best shape ( I can only tell by pics..)

I dont understand the whole antifreeze thing..but If it were me and just the skin of wood was dark..Id just sand to good wood..not lam on special treated wood. If the wood is good..lay it up m8.

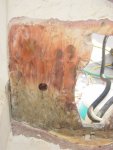
You dont need ( nor want ) to grind out fiberglass to incorporate the layers of new glass..step your glass as stated and will look factory. grind till raw glass as you all ready seemed to have done..

Now onto that Vid on Youtube linked..

1. That is mold skin coating.. The RED was gelcoat..( totally different of what you will be doing..).

2. If you work that slow in your layups.. you will not finish b4 it gels. ( when it starts to gel..YOUR DONE.. wash all the rollers and brushes you can NOW :) ) wait till it starts to cool down and have some 40 grit to knock off the burrs..and start laying up again ( no need to acetone)

3. Nice that he is wearing a suit and some heavy gloves.. but IMO he is a Moron. WHERE is the resporator ?

You know...Anyone doing this as a profession.. and wanting to help or show there cool flicks on youtube etc. should know that Smell it..your dying..wear it..not good.. ( Do they even know how many DIYers out there that might have a health problem ?

Now I enjoy others helping, teaching, showing, passing knowledge.. Most of the time as a first time DIY will make a mistake even with good guidance.

But Man.. I will get unplugged when I see somebody teaching and not using basic safety equip when using these chems !

YD.
 
Top