Fiberglass layup part project***March 29-Doghouse primered!****

Boomyal

Supreme Mariner
Joined
Aug 16, 2003
Messages
12,072
Re: Fiberglass layup part project***PHASE 2, MOCKUP***

Re: Fiberglass layup part project***PHASE 2, MOCKUP***

Dunaruna said:
[colour=blue]I watch in anticipation..................................

I am about to begin a major hull repair which includes some tight angles. I'm thinking 2 ounce chopped mat. I noted that you used cloth, easy to use on flat surfaces, not so easy on bends - no?

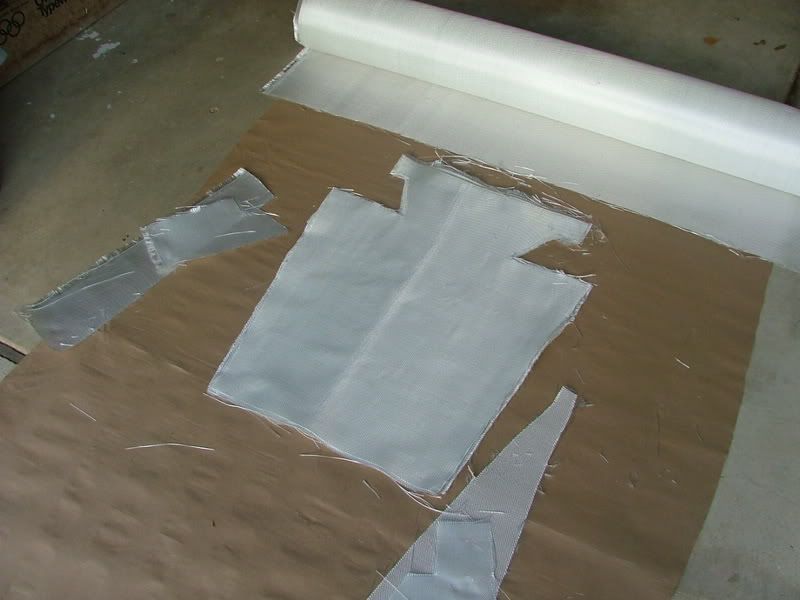
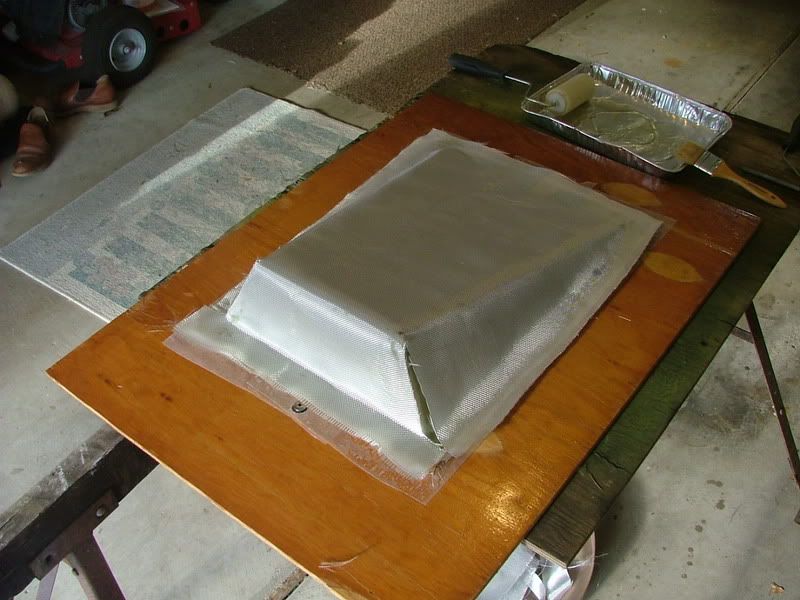
I asked about some mat at the local Tap Plastics store. They said it was no good with epoxy, only with polyester resin of which I have none. I thought that the roving mat would be more flexible than the cloth and mold to the contours better. That would be a good way to build some bulk, then surround it with cloth.

Be that as it may, I ended up buying a lifetime supply of 10 oz cloth for about $2.12 a square yard/shipped. I guess I better use it up.
 

i386

Captain
Joined
Aug 24, 2004
Messages
3,548
Re: Fiberglass layup part project***PHASE 2, MOCKUP***

Re: Fiberglass layup part project***PHASE 2, MOCKUP***

Update?
 

Boomyal

Supreme Mariner
Joined
Aug 16, 2003
Messages
12,072
Re: Fiberglass layup part project***PHASE 2, MOCKUP***

Re: Fiberglass layup part project***PHASE 2, MOCKUP***

i386 said:

Maybe tomorrow i. I had the project set up on saw horses out on the side drive. I would tend it as I had time. This last week, the weather has turned to snot and I had to stow the project for lack of undercover space to conduct it. Tomorrow I'm gonna clear Mrs. Boomyals car out of the garage and set up in her parking space.
 

Dunaruna

Admiral
Joined
May 2, 2003
Messages
6,027
Re: Fiberglass layup part project***PHASE 2, MOCKUP***

Re: Fiberglass layup part project***PHASE 2, MOCKUP***

[colour=blue]The solution to your lack of undercover workspace is glaringly obvious.................THE KITCHEN TABLEd:)
 

Boomyal

Supreme Mariner
Joined
Aug 16, 2003
Messages
12,072
Re: Fiberglass layup part project***PHASE 2, MOCKUP***

Re: Fiberglass layup part project***PHASE 2, MOCKUP***

Dunaruna said:
[colour=blue]The solution to your lack of undercover workspace is glaringly obvious.................THE KITCHEN TABLEd:)


I'm gettin' too old to want to be a batchelor Aldo.

I tried to get back to the project on Sunday, even had it all set up in the Mrs' garage parking place. But I also started to build a new side gate frame at the same time. Net result? End of day, one new side gate frame, fiberglass project still sitting on the saw horses, untouched. Had to pack it up and stick it in the corner.

It's been raining here since last Wednesday. Over six inches so far. I'm beginning to think I live in Borneo or something. I sure miss being able to set projects up in the side yard and leaving them till they are done.
 

Zamboni

Petty Officer 2nd Class
Joined
Jan 29, 2005
Messages
151
Re: Fiberglass layup part project***PHASE 2, MOCKUP***

Re: Fiberglass layup part project***PHASE 2, MOCKUP***

Watching this closely-hope it goes well. There is lots of info on vacumn bagging on woodworking sites-we use this method with veneers. Anyone else exploring this may want to look on those sites also-lots of what not to do's.
 

Dunaruna

Admiral
Joined
May 2, 2003
Messages
6,027
Re: Fiberglass layup part project***PHASE 2, MOCKUP***

Re: Fiberglass layup part project***PHASE 2, MOCKUP***

[colour=blue]Send some of that rain down here, the science boffins have just announced that we are in the middle of a drought that comes around every 1000 years.

Damn, now I'm thirsty..............
 

Boomyal

Supreme Mariner
Joined
Aug 16, 2003
Messages
12,072
Re: Fiberglass layup part project***UNQUALIFIED SUCCESS!!***

Re: Fiberglass layup part project***UNQUALIFIED SUCCESS!!***

Finally the confluence of three factors came together to allow me to go to the final phase of my project. The three factors were a) it was not grey, ugly, cold and wet outside b) I did not have to work today so I had several hours to play with the project c) Mrs Boomyal's car was not in the garage.

The bagging was an unqualified success. I had my doubts at the outset that I did not have enough vacuum and that my bag did not fit well enough. Neither was the case. After some heat assisted curing time, I just peeled back the edges of the bag and you can see that the vacuum sucked down the glass, gave it a thorough uniform wetting and gave excellent adhesion to the 4 layers.

In the first picture, I finally unpacked my 66 yards of $2.02 sq yd (shipped) 10 oz fiberglass cloth. What a deal, so far any imperfections are very minor.

DSCF0499.jpg


The next picture shows four layers of patterned cutouts for application to the plug. I decided that I would make seams that I would augment with glassfiber peanut butter. This I did before I bagged the part.

DSCF0500.jpg


The next picture, I am applying the layers. I used a 4" roller to apply the resin, layed the glass then used the roller, wetted as necessary til the glass was wet. I then applied the next layer of glass and repeated the resin application and pressing. When I was done with the four layers, I mixed up the glassfiber putty and applied it to the seams. Then I carefully applied and taped down the green bag then started the vacuum pump.

DSCF0502.jpg


I did not want to have to run the vacuum pump for a prolonged period of time so I built one of my handy little drying ovens and placed the little heater in front of the opening. This little heater/oven combo has speed dried more painted parts than I can count. Now it has fast cure fiberglass added to its accomplishments.

DSCF0503.jpg


After an hour, I removed the part from the heater, removed the bag and trimmed the edges of the still lightly cured part.

DSCF0504.jpg


The results are quite heartining. There are a few minor wrinkles and some sanding will be necessary on the forward corners where I applied the paste. I will probably do 4 more layers to get the thickness I want. I am, however, out of resin so it will be a while before I finish it.

The four layers are so much better layed than the previous two, singlely applied layers. The bagging really fully wetted out and compressed the layers. If you had to do this on a flat surface patch, it would be a breeze.

Now I have to find some 3.5" diameter tubes to lay up the two cup holders.

I'll post as I progress.
 

Boomyal

Supreme Mariner
Joined
Aug 16, 2003
Messages
12,072
Re: Fiberglass layup part project***UNQUALIFIED SUCCESS!! NEW PICTURES***

Re: Fiberglass layup part project***UNQUALIFIED SUCCESS!! NEW PICTURES***

New pics above.
 

i386

Captain
Joined
Aug 24, 2004
Messages
3,548
Re: Fiberglass layup part project***UNQUALIFIED SUCCESS!! NEW PICTURES***

Re: Fiberglass layup part project***UNQUALIFIED SUCCESS!! NEW PICTURES***

Cool. It will be interesting to see the finished part. I'm still a little fuzzy about where it's going to go. The "mold" looks to be made of solid wood glued up. I bet it's heavy. Did you make it like that because that's just what you had laying around or was there a special reason? Looks like that mold/form would make a serious wheel chock when you're done with it. :p

Off topic:

Nice tape measure. I have one just like it. I can't find 'em like that anymore and I don't like those new "FatMax" ones.

I hope I can get some of that cloth before they run out. You think 10oz cloth is too think to cover my floor? That stuff looks pretty stout. I want it to be strong but not add any unnecessary weight.
 

Boomyal

Supreme Mariner
Joined
Aug 16, 2003
Messages
12,072
Re: Fiberglass layup part project***UNQUALIFIED SUCCESS!! NEW PICTURES***

Re: Fiberglass layup part project***UNQUALIFIED SUCCESS!! NEW PICTURES***

Are you talking about that green tape measure, in various shots, on the floor? That was a Harbor Freight cheapy. They might have gone fancier and thicker too.

The part will go on the front of the doghouse to cover up the hole I had to cut for pulley clearance. The wide part will face up and have two 3.5" holes cut in it for the cupholders. I will show pictures of the dog house later.

For the plug, I visited a house construction site and grabbed a bunch of 2 x 6's out of the scrap lumber heap. I cut the profile of each piece then glued and clamped them together. I then took the belt sander, with a 36 grit belt, and ground it all even and smooth.

I would have prefered to use a single piece from a gluelam beam, but I would not have had a saw with a big enough blade to cut it.

For floor covering, I think the 10 oz is perfect. I might even be inclined to do two layers over half inch ply, just for good measure. Once you wet it out it really compressses it. I've heard people here using, IMHO, way to light of cloth for the floor. Here is my Gulfstream with just one coat on it. (probably sufficient)

1373.jpg
 

i386

Captain
Joined
Aug 24, 2004
Messages
3,548
Re: Fiberglass layup part project***UNQUALIFIED SUCCESS!! NEW PICTURES***

Re: Fiberglass layup part project***UNQUALIFIED SUCCESS!! NEW PICTURES***

Ok I can kinda see how that's gonna work now.

That's good news about the 10oz glass. I can't imagine even using 25 yards of the stuff. Maybe I can make some stuff out of my extras. No telling what I'll get into once I get some stuff to get into. :p

My mistake, I thought it was a

th_84418.jpg
 

Boomyal

Supreme Mariner
Joined
Aug 16, 2003
Messages
12,072
Re: Fiberglass layup part project***UNQUALIFIED SUCCESS!! NEW PICTURES***

Re: Fiberglass layup part project***UNQUALIFIED SUCCESS!! NEW PICTURES***

i386 said:
http://www.hantover.com/datasurge/img/images/th_84418.jpg[/img]


Mine only cost $1.99. How about yours?;)

I probably should have bought the 25 yd roll, but at the price, I couldn't resist. I'll also be helping a friend re-floor his 24 ft SeaRay. I always like to make things so I also figured that I would find other uses for it.
 

i386

Captain
Joined
Aug 24, 2004
Messages
3,548
Re: Fiberglass layup part project***UNQUALIFIED SUCCESS!! NEW PICTURES***

Re: Fiberglass layup part project***UNQUALIFIED SUCCESS!! NEW PICTURES***

Boomyal said:
Mine only cost $1.99. How about yours?;)

Probably a dollar a foot give or take. :'(

Do you think a shop vac would suffice for a quick and dirty vacuum pump for bagging small parts? I need to go back and re-read. I forgot what details you gave about your pump.
 

Boomyal

Supreme Mariner
Joined
Aug 16, 2003
Messages
12,072
Re: Fiberglass layup part project***UNQUALIFIED SUCCESS!! NEW PICTURES***

Re: Fiberglass layup part project***UNQUALIFIED SUCCESS!! NEW PICTURES***

actually I was talking about your tape measure. $1.99 for the HF cheapy.

10 oz x 50" wide glass cloth at US Composites is almost $7.00 a sq yd. + shipping.

You could use a shop vac but I think it might heat up quite a bit if you had to leave it on very long. It would be like a pump deadheading. Even with my little Thomas Pump, I was afraid of building up heat. That is why I used my little oven to get the epoxy to set quickly.

For most applications, like floors, you wouldn't need to bag it, but for smaller items where maximum strength and integrity of your application is required, it is the only way to go. Especially for things like hull patches. You want that glass down tight and stong.
 

i386

Captain
Joined
Aug 24, 2004
Messages
3,548
Re: Fiberglass layup part project***UNQUALIFIED SUCCESS!! NEW PICTURES***

Re: Fiberglass layup part project***UNQUALIFIED SUCCESS!! NEW PICTURES***

Boomyal said:
actually I was talking about your tape measure. $1.99 for the HF cheapy.

I know... I was saying my 25' tape measure cost a dollar a foot +/- :p

Nah, I wouldn't try to bag a floor, just small parts like you're making. No idea what I'd make at this point but I'm sure I'll think of something. A little large for bagging, but I haven't completely abandoned the idea of making my own center console if the boats design will allow for it. Sorry, I have taken this way off topic.
 

CalicoKid

Lieutenant Commander
Joined
May 27, 2002
Messages
1,599
Re: Fiberglass layup part project***UNQUALIFIED SUCCESS!! NEW PICTURES***

Re: Fiberglass layup part project***UNQUALIFIED SUCCESS!! NEW PICTURES***

Interesting project Boomyall and nice outcome so far. Do you really allow your wife to park in your workshop though? ;)

I have heard of people using a shop vac for vaccum bagging before. There are cord plug motor speed controls that I imagine you could use to slow the vac down, one could also plug it into a timer so it kicks off when you want it to. Never tried any of that myself though..
 

JasonJ

Rear Admiral
Joined
Aug 20, 2001
Messages
4,163
Re: Fiberglass layup part project***UNQUALIFIED SUCCESS!! NEW PICTURES***

Re: Fiberglass layup part project***UNQUALIFIED SUCCESS!! NEW PICTURES***

Looks great so far. I too have employed the custom box/heater drying technique on occasion to success. Can't wait to see the finished product.
 

sport15

Petty Officer 3rd Class
Joined
Jun 1, 2006
Messages
95
Re: Fiberglass layup part project***UNQUALIFIED SUCCESS!! NEW PICTURES***

Re: Fiberglass layup part project***UNQUALIFIED SUCCESS!! NEW PICTURES***

GREAT THREAD!!! That mold is a piece of art.

The vacuum bag has once again proven its worth! I had never thought of an “automotive” pump before but it is a lot cheaper than using an old single stage air compressor pump with the intake manifold turned around.. The old air tank does work great as a “reservoir” to help keep the vacuum up. I know of a case where a ShopVac was used but burned up the shopvac motor (it needs air to cool) and a goobed up mess resulted because the glass pulled away..

Instead of ten layers of glass, why not core with thin multiply or luan? The wetting out and bagging will seal the wood core to prevent water intrusion and you will get the buildup dimension that you desire and could save the weight? I have heard of folks using foam insulation sheets in bagging projects to form a wood/foam/wood/glass composite but have no idea how it worked out. I have always wondered if the foam would crush.

Again, what a great job, many thanks for the time and effort to post the results!!

Regards, Dave
 
D

DJ

Guest
Re: Fiberglass layup part project***UNQUALIFIED SUCCESS!! NEW PICTURES***

Re: Fiberglass layup part project***UNQUALIFIED SUCCESS!! NEW PICTURES***

GREAT Thread. I'm learning a bunch.
 
Top