Floor replacement question

62cruiserinc

Petty Officer 1st Class
Joined
Oct 30, 2009
Messages
295
Re: Floor replacement question

This weekend I am going to Lowes to buy the 1/2"" Arauco plywood for the stringers, transom and deck. Lowes will also supply the 2x8s for bracing the hull to the trailer, and the PL for stringer bedding.

The stringers will be 2 layers of ply for a total thickness of 1" (the same as the old stringer thickness) and they will be 12' long.

The transom will be 2 layers of ply for a thickness of 1" of ply on the whole transom. I will have to then add a piece in the outdrive area that tapers in thickness from 3/4" at the top to 1/2" at the bottom (because of the transom skin thickness variation I mentioned before). The transom will then be a consistent 2" thickness everywhere at the outdrive cutout.

The PL is much cheaper to buy in the large cartridges, even when you factor in buying the large gun ($10).

With the US Composites order scheduled to arrive today, I should have everything I need to start the rebuilding this weekend.

I will probably take 3 or 4 days off from work so I can work all day on the glassing to finish it ASAP.

Steve
 

Cadwelder

Lieutenant Commander
Joined
Aug 30, 2010
Messages
1,780
Re: Floor replacement question

Sounds like a solid plan, good luck with her, and we're here if you run into anything along the way...

You can use Titebond III to glue the 1/2" plywood together for the stringers, get you a good clamping method and you're good to go..


CW
 

62cruiserinc

Petty Officer 1st Class
Joined
Oct 30, 2009
Messages
295
Re: Floor replacement question

At Lowes, I bought 6 sheets of 1/2" Araucoply plywood, 1 gallon of Titebond III glue for plywood laminating, 3 large tubes of PL (and a large gun), and application rollers. The US Composites order arrived last Friday also. The 5 gallon resin pails, even though they are closed and sealed still emit quite an odor which permeates my shop. Actually the smell is kind of pleasant, compared to some other chemicals I have worked with.

A few more questions:

1) Will the white foam rollers work as resin applicators, or will the resin dissolve the foam? I think I read somewhere on the forum to use the gray or black rollers, but I didn't see any at Lowes.

2) Is there any cheaper place to buy acetone than Lowes/Home Depot, which charges $17/gal?

3) After looking at my transom, there are only two spots of wood rot. These are the two spots outside the bilge area (on either side) where the wet foam under the deck held water against the plywood transom, which was poorly glassed to the hull. Each spot is roughly 6x6 inches and the wood is rotted, but now dry. Is it still better to replace the whole transom core, or is there another way to fix this? If I replace the whole core by removing it from the inside, how hard will it be to separate the plywood from the outer skin, since the plywood won't be weakened or rotted?

Thanks
Steve
 

Woodonglass

Supreme Mariner
Joined
Dec 29, 2009
Messages
25,929
Re: Floor replacement question

My advice is to replace it all. Use a circular saw set just shy of the depth of the wood and cut crisscross pattern across the transom and then remove with hammer and chisel as best you can. Finish by grinding with 4 1/2 " grinder with backing pad and 24 grit resin coated sanding discs.
 

Cadwelder

Lieutenant Commander
Joined
Aug 30, 2010
Messages
1,780
Re: Floor replacement question

Sounds like your ready to get your feet wet in boat restoration, and yes there is a smell right out of the box on resin.

Question #1: I've never used rollers to apply resin, I just pour it out and spread with my air rollers, and use chip brushes to get it small places (hope you ordered air rollers from US Composites too), but the regular rollers for polyuretanes should be fine, I don't think the foam will hold up too well with styrene resins.

Question #2: Around here AutoZone is $15.00 a gallon, but I buy in 5 gallon cans from my whoesale supplier for $8.22 a gallon, so yes shop around there are cheaper prices for Acetone.

Question #3: That is your choice, I'm not a fan of a "patch" when you're this far down in a restore. Personally I'd replace the wood in the transom. Now as far as getting the old wood out, when it still has solid places in it, well it's no easy task. Pry bars and chisels work well, and then grinding when you get almost there. I'll have to leave that call up to you, if you feel a patch will sufice then go for it, but again, I wouldn't.


I've been following this thread pretty close, but don't remember the mention of safety gear, be sure and stay safe while working with the materials..


CW
 

62cruiserinc

Petty Officer 1st Class
Joined
Oct 30, 2009
Messages
295
Re: Floor replacement question

I'm still not sure what to do about the transom. If I do a patch it will be a small "V" shaped part at the bottom that will include the bilge area along with the part that had foam against it above both sides of the bilge. When I remove the lower part of the wood core I'll be able to see the extent of the rot, but it appears most of the transom is fine. I would rather replace the whole core, but it might be a lot of extra effort to pull the good wood of the outer skin glass without damaging the skin. I guess I'll make a decision on the fly next week when I start work on it.

If I do end up replacing only the bottom part, how should it join the existing wood core? half-lap? scarf?

One of the compelling reasons for replacing the whole core is that the old transom is 1" thick, which would be 2 pieces of ply 1/2" thick laminated together. Unfortunately, the new plywood is not 1/2" thick, but typically 15/32" which would mean that two layers would be 7/8" thick instead of 1" thick. This creates more issues trying to shim up the new section to match the old thickness. I run into this all the time in home remodelling every time the manufacturers decide the shave off a 32nd from a previous standard dimension:mad:.

Thanks
Steve
 

Woodonglass

Supreme Mariner
Joined
Dec 29, 2009
Messages
25,929
Re: Floor replacement question

Once again, the finished transom thickness is extremely critical on an I/O boat. You need to check the MFG's specs to ensure that your final thickness meets their specs. It is also imperative that the inner and outer skins are perfectly parallel with each other. This ensures proper motor/outdrive alignment.
 

Cadwelder

Lieutenant Commander
Joined
Aug 30, 2010
Messages
1,780
Re: Floor replacement question

Woody is correct in the importance of the proper thickness for Inboard/Outboards. You can alway add a layer of 1708 and CSM to the thinner areas to bring them up to specs.....

As far as splice the wood together in the transom, I really don't know as I've never spliced part of a transom in. I would think a half lap would be good, but I can forsee some serious words in the future trying to cut a half lap into an exisiting piece of plywood...:eek:

CW
 

62cruiserinc

Petty Officer 1st Class
Joined
Oct 30, 2009
Messages
295
Re: Floor replacement question

One question:

I bought cabosil and chopped fibers to mix with the resin to make peanut butter. After reading some posts, it looks I overlooked the glass bubbles for the PB. Fo some reason I thought all I needed was the cabosil and fibers. I need the glass bubbles, is that that correct? Is there something else I could use instead of the glass?

Thanks
Steve
 

Woodonglass

Supreme Mariner
Joined
Dec 29, 2009
Messages
25,929
Re: Floor replacement question

No, you do NOT need bubbles for PB, ONLY if you want to make Fairing filler. The bubbles make the mix easier to sand. PB is for structural usage, therefore the cabosil and the fibers. Bubbles and resin make fairing paste for fixing gouges and scratches.
 

62cruiserinc

Petty Officer 1st Class
Joined
Oct 30, 2009
Messages
295
Re: Floor replacement question

Thanks, woodonglass!

Now I am ready to start the transom and stringers.

I just have to remember to buy a couple of gallons of acetone. I tried local chemical supply places, but they wanted more per gallon for a 5-gal container than Lowes wanted.

Steve
 

93bayliner1800

Petty Officer 1st Class
Joined
May 9, 2011
Messages
239
Re: Floor replacement question

Well I capped my stringers and bulks with 1708. Normally I wipe down with acetone....wet out with resin apply 1708,csm, etc....however if you cover your fresh wood with resin and let harden....then just before wipe with acetone heavily it makes it very sticky. I did not wet out with resin first on my capping. The 1708way stuck to the side then I pulled it up and over just taught and applied resin in several passes as it did take more working in the finish, but it gave me no air bubbles. Also I should mention most of my stringers had a 2x2shorter deck cleat that I shaved the side not against the stringer at a 45?. Just saying it worked well and is incredibly strong. Of course I am also the guy that used pb and then 1708go tape and glassed in entire seam of top cap from the inside .after
 

62cruiserinc

Petty Officer 1st Class
Joined
Oct 30, 2009
Messages
295
Re: Floor replacement question

Well, I'm finally hoping to get back on the boat. The last week has produced a series of appliance failures at home that I had to fix, along with a large tree that fell across my fence that I had to cut up.

I made a rolling dolly for the engine using four HF $4 10"pneumatic wheels, a pair of 5/8" diameter steel rods for axles, and some 4x4s and 2x8s that I had lying around for a total expense of $30. I have an engine stand from previous car engine swaps, but the small steel wheels won't roll very far on my barn's dirt floor. Now I can wheel the engine around easily without bogging down the wheels in dirt.

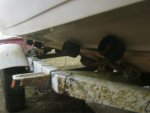
I also worked on the hull supports that will keep the hull in the proper shape when I remove the stringers. My boat is on a trailer with rollers, so I had to modify the support method. I used 2x6s that I shimmed against the roller support arms. The method was to add shims to each support until the rollers could be turned by hand, indication that the rollers were unloaded and the hull was now supported by the flat 2x6s. Here are a few pictures (not the best lighting):

Lar 002.jpg

Lar 003.jpg

The only roller left that is supporting the boat is the keel roller up front about 4' back from the point. I am going to work on that one tonight.

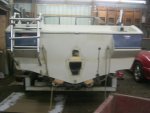
Then I am going to dig into the transom core to see how much is rotted near the bottom. Even though I think only a few spots near the bottom on each side of the bilge is rotted, I would still like to replace the whole core. If you look at the transom picture below you can see that only a small width of the transom goes completely across the boat from port to starboard. The projections from the transom on each side at the top are hollow and foam filled. There is no core there. Even in the center part of the transom between the projections the wood stops about 6 inches short of going all the way to the top. So I don't really have a lot of wood in the transom, which compels me even more to replace the entire core to provide more strength. The glassing of the core to the skin also varies. At the bottom it's pretty well done, but as you go up there is less an less glass and tabbing at the perimeter. Looking at the top edge of the core it looks like there is no fiberglass on the plywood surface (looks like black painted plywood) or tabbing at the top to the outer skin.


Lar 004.jpg
 

62cruiserinc

Petty Officer 1st Class
Joined
Oct 30, 2009
Messages
295
Re: Floor replacement question

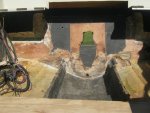
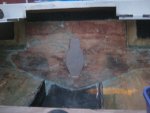
The series of events that kept me from working on the boat continued this week as work sent me on a trip to the west coast for 3 days. Finally, yesterday I was able to work on the transom core (after an overnight redeye flight across the country). Here is a picture of the core exposed after most of the glass was removed from the inside ( the sun was at a bad angle and affects some of the picture clarity):

Lar2-14 011.jpg

In the picture you can see how the stringers "flare out" at the top near the transom. This allows engine parts to clear the stringers. In this area the stringers are notched out 1 1/2" at the top and then a freehand dished out area created with the glassing.

After seeing the exposed core, I am glad I chose to replace the whole thing as there is a quite large area with at least some water damage. In the center of the core you can see where the added rectangular piece of 1/2" ply was located (to thicken the transom for the outdrive). This piece was stapled to the transom core and not glassed except for the part in the bilge area at the bottom edge. On the new transom, this piece will taper from1/2" thick at the bottom to 3/4" thick at the top so that the transom cutout will be a consistant 2" thick everywhere instead of 2" at the bottom and 1 1/2" at the top as it was.

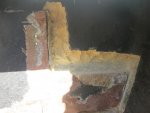
The transom core extends only to the edge of the two projections that stick out of the transom outer skin. These projections are foam-filled as you can see in the picture (again, sorry about the sun glare):

Lar2-14 015.jpg

When I tab the new core in this area, it will be tabbed in a 90 degree direction where the 1708 will go inside the hollow areas and attach to the walls (as the factory did it).

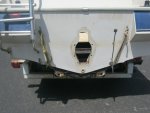
Here is an outside view of the projections on the transom (they are painted blue and located at either side):
IMG_3586.JPG

Do these projections serve any purpose or are they just a styling element?

One other interesting note is how the core is tabbed to the hull at the port and starboard ends. The hull has a thin (about 1/2") layer of foam applied to it and then glassed over. The transom core is tabbed to this layer of glass on top of the foam. This doesn't seem to be as good as tabbing directly to the hull itself. Should I tab the transom core ends directly to the hull? I have already removed the foam from the hull in this area. Does the transom core need to be cut slightly undersize and the PL applied where it mets the hull (like the stringers do)? I hope not, as I don't want to wait another 72 hours for the PL to outgas.

After making a cardboard template of the transom core, I will be removing the transom core this weekend. The rotted/weakened ply areas will probably come off pretty easily. To remove the plywood that is in good shape, I plan to cut parallel grooves about 2" apart with a circular saw set to a depth of cut slightly less than the plywood thickness (1"). Then I will use a chisel to knock the narrow pieces of plywood out. Finally, I will grind off the very thin layer of plywood off. At least that is the plan. I have found that you have to flexible and alter your methods as you go along.

Thanks
Steve
 

Woodonglass

Supreme Mariner
Joined
Dec 29, 2009
Messages
25,929
Re: Floor replacement question

Am I undestanding you correctly...You are going to use PL to attach the transom to the outerskin of the Boat instead of PB??
 

rickryder

Commander
Joined
Jun 24, 2010
Messages
2,722
Re: Floor replacement question

I PB everything.....PL is for subfloors when building a house :D Just PB the transom to the skin and fillet your sides with the PB It will go much faster ;)
 

62cruiserinc

Petty Officer 1st Class
Joined
Oct 30, 2009
Messages
295
Re: Floor replacement question

Am I undestanding you correctly...You are going to use PL to attach the transom to the outerskin of the Boat instead of PB??

I was going to use PB (with a notched trowel) to attach the wood core to the outerskin. What I was unsure of was the joint between the edge of the plywood and the hull (port, starboard, and bilge area). Can I butt the plywood against the hull directly (tight fit), or do I need something (like PL) to avoid the "hard spots" in that area (similar to the recommended type of stringer-to-hull joint)?

Thanks
Steve
 

Woodonglass

Supreme Mariner
Joined
Dec 29, 2009
Messages
25,929
Re: Floor replacement question

Most commonly the transom is attached to the hull using PB not PL. Check the first link in my signature below for drawings and info on how to fabricate and install your Stringers, Transom and deck. PL can be used for Bedding the stringers but that's about all I would use it for. Not saying you can't but for me it's not the way to go for attaching the transom to the outer skin. You want that to be strong and you don't have to worry about hard spots on the transom.
 

93bayliner1800

Petty Officer 1st Class
Joined
May 9, 2011
Messages
239
Re: Floor replacement question

I agree with wood and Rick. PB is so much better....stronger, and faster. I debated and they advised me to use PB. So glad I did!
 

62cruiserinc

Petty Officer 1st Class
Joined
Oct 30, 2009
Messages
295
Re: Floor replacement question

Thanks for the replies. I am going to use PB to attach the new core to the skin.

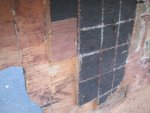
I removed the old core yesterday. The rotted and weakened parts of the core came off pretty easily. The good sections ( about 2/3 of it) were another story. After trying several methods, I settled on a method that worked very well for me. I used a circular saw with a carbide blade set to a depth of cut equal to the plywood thickness (1"). I then made a series of vertical and horizontal cuts 3" apart, which created a checkerboard pattern of 3x3 inch blocks in the core. A chisel was then used between the skin and the block, which popped off the block easily and only left a thin layer of wood (about 1/32") attached to the skin, which will be sanded off later.

Here is a picture taken during the removal with blocks:
IMG_3936.JPG


Here is a picture of the transon after the whole core was removed, before final sanding:

IMG_3937.JPG

There was only one hiccup. When I was using an earlier method of prying off large sections of core, a large piece of core pulled off the top layer off glass and csm from the skin at the left side. I will have to make sure there is enough PB in this area to make up the extra layer thickness when I attach the new core. Here is a picture of the pulled-off layer part:

IMG_3935.JPG

The next step will be to sand off the thin layer of wood and make a cardboard template for the new core.

Thanks
Steve
 
Top