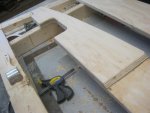
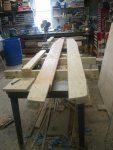
Floor replacement question

62cruiserinc

Petty Officer 1st Class
Joined
Oct 30, 2009
Messages
295
Re: Floor replacement question

Since I had chosen not to remove the cap, I was going to splice the stringers just under the front bow section.

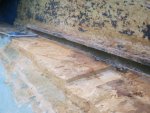
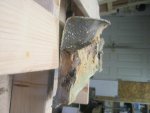
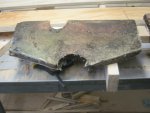
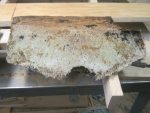
On the left side stringer, there was a large cutout for the fuel filler hose near the area where I was going to splice. I did not feel a splice here would have been very strong, so i removed the whole stringer by crawling under the bow section with a HF multi-tool. Here is a picture of the stringer removed with the cutout section:
IMG_4284.jpg

As you can see most of the stringer was cut out, leaving less than an inch of stringer width in the narrowest section. The factory added a 3/8" thick piece of plywood as a gusset in this area. I am going to add an extra 1/2 layer of arauco ply in this area. The outer side of the stringer at the bow end is an area where the hull goes sharply vertical, and it appears that the factory poured in a bunch of resin and fibers to fill the area. There is a "glass wall" up against the side of the stringer for the last 8" of stringer. I think I am going to put PB against this side of the stringer to glue it to the existing glass since it is not possible to access this area after the stringer is in place. I will tab the inside edge as usual.

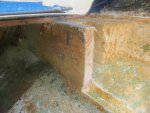
The other stringer is in perfect shape for the part under the bow section:
IMG_4282.JPG

This is where the splice is going to go. I plan on using a 3/4" plywood gusset that will be screwed to the old and new stringers and also have a layer of PB on the contact surfaces for extra holding power.

I did notice one other thing when removing the stringers. Both stringers had areas where the bottom 3/8" or so was black or rotted. Since this area would not have bben accessible to core sampling, there was no way to tell that there was rot here. Apparently water had gotten into the slot formed by the stringer tabbing and travelled down the slot. I am glad that I decided to remove the stringers and replace them.

Steve
 

62cruiserinc

Petty Officer 1st Class
Joined
Oct 30, 2009
Messages
295
Re: Floor replacement question

I started the grinding today.

My question is how much of the old tabbing do I grind away? Should I grind until the area of new tabbing (6" on each side of the stringer) is at the same level as the bottom of the "slot" where the old stringer was?


Here is a picture before grinding:

IMG_4285.JPG


Here is a picture after grinding:

IMG_4286.JPG

Is that OK?


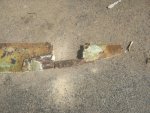
If you look closely at the picture below, you can see tiny bits of foam embedded in the cloth (this occurs in a few places that I have ground down). Do I keep grinding down until all of it is gone? I am afraid of making the hull too thin or grinding through.

IMG_4288.JPG

It looks like Larson put foam here and there and then glassed over it.

Its 90 degrees and very humid here. I can only go about an hour or two at a time in the tyvek suit and full-face respirator before having to go into the house (air conditioning) to cool down and get a drink. This means taking everything off because I don't want to bring the glass dust into the house.

Steve
 

Woodonglass

Supreme Mariner
Joined
Dec 29, 2009
Messages
25,929
Re: Floor replacement question

It looks fine to me. Wash it all down good with acetone before tabbing. If the hull is a little thin in spots, lay a strip of 1708 down to beef it up after the stringers are tabbed in.
 

62cruiserinc

Petty Officer 1st Class
Joined
Oct 30, 2009
Messages
295
Re: Floor replacement question

Today I did some more grinding of the hull. I am about 70% done. I was hoping to finish it but the temperatures were just too high at around 93 degrees and high humidity. The longest I could go in one shot was about an hour before starting to overheat badly inside the suit. Not to mention the HF grinder which was at about the temperature of a barbecue grill. I even got up early this morning and started early, but it was in the high 80s before 10AM.

On the positive side, I did get the other stringer, the bulkheads, and the flat deck supports laminated from the 1/2" Arauco ply. The only part left to laminate is the 15" x 15" motor mount, which requires four layers of plywood to get the 2" thickness of the original. The motor mount is glassed directly to the hull in the bilge. It doesn't attach to the stringers at all.

One thing I have to do real soon is evaluate the gas tank. It's a 28 gallon aluminum tank that wasn't leaking and had about 10 gallons of old gas in it. I drained out the old gas the best I could through the fill fitting. The tank still needs to be flushed out and I have to check it out for any defects.

I think I saw a thread in which someone refurbished their old aluminum tank by patching and painting it, but I can't find it. Anyone remember who it was?


Also, should I leave a full-size access door to the tank in the deck, or just some access fitting for the level indicator and the connections?

Steve
 

jbcurt00

Moderator
Staff member
Joined
Oct 25, 2011
Messages
25,109
Re: Floor replacement question

I don't remember him patching his tank much, but if you mean painted black w/ red & yellow splatter paint by his grandkids, it was Trooper82's Ebko thread......

That's the most recent painted tank I recall. There may be others:rolleyes:
 

Old Yeller Boater

Petty Officer 2nd Class
Joined
May 17, 2010
Messages
191
Re: Floor replacement question

Steve...for what it's worth, in the motorcycle world we deal with rusted or pitted tanks regularly. there are products that I've used that do a good job of sealing. POR 15 is one. if done properly, I've found them to work well. I'm not sure if it's cost effective for a 28 gallon tank though. Seems like getting something as a replacement might be better in the long run. Since you're going to this much trouble with all this fine work, would be best not to scrimp, huh?
 

62cruiserinc

Petty Officer 1st Class
Joined
Oct 30, 2009
Messages
295
Re: Floor replacement question

I read through Trooper82s Ebko thread and found the gas tank parts.

He did patch the tank "weak spots" with JB Weld. My tank appears to be in the same shape as his was.

I am planning to pressure test the tank to check for leaks (especially around the level indicator, where he had a leak), then use a self-etching primer, followed by a final coat of rustoleum or maybe POR-15.

My tank is not a flat bottom tank but has a partial V-shape. It originally sat on the hull with some foam betwen them (If I remember correctly). I am planning on using 5200 to attach some plastic or hard rubber strips to the tank to keep water away from it. These strips would run vertically every foot or so. Then I am planning on running some horizontal strips of plastic about 1/2" thick the length of the tank that would be attached to the hull with either 5200 or PB. This would help distribute the forces from the tank full of gas. Then I would use the pink or blue foam from Lowes between the tank and stringers/bulkheads to keep the tank located horizontally. The rubber strips attached to the tank would keep the foam away from the aluminum so water couldn't be trapped there. Finally, wood strips from stringer to stringer across the top of the tank would keep the tank pressed down so it couldn't bounce up and down. Again, these strips would contact rubber strips glued to the tank top to keep moisture from being trapped against the aluminum. This plan would be altered depending on the height available when I install the tank.

Does this plan seem OK? Am I overlooking anything?


I am a little leery of pressure testing the tank with gas fumes in it. What should I wash out the tank with to prevent any kabooms while I am pressure testing and sanding the tank? I have heard about using detergent and water, but how would you make sure it was completely dried out?


Thanks
Steve

 

Woodonglass

Supreme Mariner
Joined
Dec 29, 2009
Messages
25,929
Re: Floor replacement question

Just use Dawn dishwashing soap and hot water put in two gallons of hot water and 1/2 cup of the soap. Put a couple of hand full of small nuts and bolts in and start sloshing it around. it will clean the tank up very nicely.
 

62cruiserinc

Petty Officer 1st Class
Joined
Oct 30, 2009
Messages
295
Re: Floor replacement question

Tonight I finished most of the grinding for the stringers. After grinding in very hot temperatures, working at a temperature of 73 degrees outside was almost relaxing. I still have a few small spots to touch up with a smaller wheel, but I finished the big stuff and then vacuumed it to see how it looks. I am surprised how erratic some of the factory tabbing was. In some places they put a thin layer of foam and then tabbed over it, while in other places no foam. Some areas had what appeared to be thick layers of resin only, while other areas appeared to have chopped strands installed fairly "dry" with little resin. I decided to grind the whole bilge area to make it smoother, as it was pretty rough with uneven chopped strands all over.

Here are a couple of pics after grinding and vacuuming:

IMG_4303.JPG

IMG_4306.JPG


I will still have to do more grinding later to remove the deck tabbing and grind the hull. To get enough room to tab the deck I am going to need to remove the wood that is tabbed about 3" above the deck for the storage shelf that runs down the hull. You can see it in this picture:


IMG_4309.JPG

I left a strip of the old foam along the hull so I will know how high the deck was placed since it was laid directly on the foam.

The grinding dust from the stringer tabbing removal and cleanup filled a 5 gallon pail full.

This weekend I hope to cut the stringers to the proper profile and prepare them for bedding with PB or PL (still deciding).

Again, thanks everyone for the help and suggestions. They have saved me a lot of time, labor, and money.

Steve
 

62cruiserinc

Petty Officer 1st Class
Joined
Oct 30, 2009
Messages
295
Re: Floor replacement question

When you cut the stringers so there is a 1/4" gap at the bottom for bedding (PL or PB), what do you do about the hull angle? In the aft section, there isn't too much angle, but up front the angle is sharper. Do you angle the bottom of the stringer to match the hull? If not, where do you leave the 1/4"? If you leave 1/4" at the high side, then the gap at the low side could be 1/2" or more. If you leave 1/4" at the low side, then the stringer could be close to touching the hull at the high side.

Thanks
Steve
 

jbcurt00

Moderator
Staff member
Joined
Oct 25, 2011
Messages
25,109
Re: Floor replacement question

You can cut the bottom of the stringer at a bevel to get it to more closely contour the hull. As long as you space & cut the stringers the same on both sides of the center line, so that the tops plane across to where your deck will fit flat & contact all the stringers, and allow some space for bedding, your good. BTW large gaps w/ PL will tend to sag & run pretty badly, plus the long (48hr+) cure time is a problem.

Although, I had planned to bed w/ PL based on it's flexibility, I don't have to replace my stringers. PL has it's uses, but I am now leaning towards the use of PB for bedding instead of the PL. PB has a much quicker cure time, so less sag & allows you to move on to the next step much sooner, even if not tabbed wet on wet. Wet on wet would be possible if your stringers are well secured via bracing & etc.....
 

62cruiserinc

Petty Officer 1st Class
Joined
Oct 30, 2009
Messages
295
Re: Floor replacement question

It's been a while since I posted because I haven't had much time to work on the boat. Camping with the family and soccer tournaments (finally over!) occupied most of my time.

I did have some time to work on the boat and here's the results:

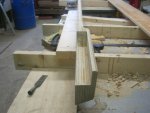
The original stringers were cut down 1 3/4" from the top for a length of 10 1/2" at the transom end. They did this to clear parts of the engine. Unfortunately the deck was cut back and was unsupported by the stringer in this area and the deck was held up only by the foam. They bridged the gap with fiberglass. Here is a picture of the original stringer (cut off) in this area:

IMG_4327.JPG

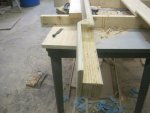
I did not like the idea of unsupported deck anywhere, so I modified the end of the stringers to allow the engine clearance area but still support the deck. Here are the pictures:

IMG_4330.JPG

IMG_4331.JPG

These mods only added a few pounds to the stringers but provided much more support.

The bow end of one stringer is cut out for the fuel fill and vent lines. I added another 1/2" of ply to this area for more strength since the cutout was so deep:

IMG_4332.JPG


Steve
 

62cruiserinc

Petty Officer 1st Class
Joined
Oct 30, 2009
Messages
295
Re: Floor replacement question

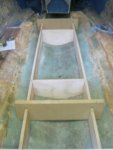
Here is a picture of the completed stringers next to each other:


IMG_4334.JPG

The next step is to make a pair of bulkheads to replace these two which were on either end of the gas tank:

IMG_4335.JPG

IMG_4336.JPG

I have them laminated and cut to width, but need to cut out the exact shape. I am going to install them in the boat first to make sure they get cut to the exact profile to fit.

Meanwhile the gas tank also has to be addressed so it will be ready when needed. It needs a flush/washout with water/dawn, a pressure test, and external cleaning. It looks to be in pretty good shape.


Steve
 

62cruiserinc

Petty Officer 1st Class
Joined
Oct 30, 2009
Messages
295
Re: Floor replacement question

Some more progress today. I put the stringers in the boat to check their fit and to find out the cut needed on the bulkhead pieces.

The stringers fit well and they were about 1/4" below the foam when sitting on the hull, which means there will be the required 1/4" gap at the hull when I am ready to bed them. I made a couple of temporary particleboard pieces to hold the stringers the proper distance apart (20") and square to each other. I then marked the bulkhead pieces and cut them.

For the first time on this project I am starting to feel like I have turned the corner and can see some light at the end of the tunnel:).

Here are a few pictures of the stringers and bulkheads temporarily installed in the boat for fit:

IMG_4344.JPGIMG_4345.JPG

The top of the two bulkheads will be 1" below the top of the stringer and the stringers will be cut out for a flat board (two 1/2" ply pieces laminated) that goes from port to starboard (and sits on top of the bulkheads) like the original factory design was. These two flat boards support the deck plywood joints. The front board is 3" wide, while the rear board is 4 5/8" wide. Before I attach any boards or bulkheads or do any cutouts, I need to make sure the gas tank will fit properly and the deck seams will fall on the support boards.

I had previously bought the PL for bedding, but I'm thinking about going with PB for bedding and the filleting. I keep going back and forth on this one, PL vs PB for bedding. If I bed with PB I need to order more cabosil from USC.

Steve
 

62cruiserinc

Petty Officer 1st Class
Joined
Oct 30, 2009
Messages
295
Re: Floor replacement question

I have to make a decision on how to allow access to the fuel tank. The original design (or at least the way it was when I got it) had a removable plywood panel to access the whole fuel tank. This requires me to double up the stringer width in that area to allow the joint to be supported (plywood deck butting the access panel). I notice that almost all the restorations here don't use a full access plywood removable panel, but instead use access fittings for the tank connections (fill, vent, sending unit, output connection). This would be a lot easier to do so I am going to do it that way. Any opinions on this matter?

Thanks
Steve
 

Old Yeller Boater

Petty Officer 2nd Class
Joined
May 17, 2010
Messages
191
Re: Floor replacement question

Mine is still original Steve, and is set up the way you describe. The one primary reason I prefer how mine is set up is just in case of a tank replacement. I'm gun-shy on that because I have a friend with a newer boat that had the tank sealed under the floor. It went bad...only option was to cut it out or, as he is doing, getting another above deck. Do you have the smaller storage opening forward of the tank like on mine?
 

Old Yeller Boater

Petty Officer 2nd Class
Joined
May 17, 2010
Messages
191
Re: Floor replacement question

PS. I'm bringing my boat up to you to do next. You're doing a fantastic job!
 

62cruiserinc

Petty Officer 1st Class
Joined
Oct 30, 2009
Messages
295
Re: Floor replacement question

Yes I have the smaller storage opening in front on the othe side of the tank bulkhead.

I may go with covering the tank with plywood and the access plates. This would result in a more rigid floor structure but have the tank replacement problem that you described. I would do a very accurate dimensioned drawing of the location of the stingers and tank so it would be "easy" to cut it out later.

Thanks for the compliment on the work. If you bring your boat up here, my wife can then get rid of both boats as she is already miffed at the time I am spending on the boat resto. I have slowed the amount of time spent on the boat so we can try to enjoy more of the summer with the kids. Unfortunately, that means its less likely I'll have the boat in the water this year.

Steve
 

Old Yeller Boater

Petty Officer 2nd Class
Joined
May 17, 2010
Messages
191
Re: Floor replacement question

If you bring your boat up here, my wife can then get rid of both boats as she is already miffed at the time I am spending on the boat resto. I have slowed the amount of time spent on the boat so we can try to enjoy more of the summer with the kids. Unfortunately, that means its less likely I'll have the boat in the water this year.

Steve

I can relate to that in spades!!!! lol
 
Top