I have returned... with a Starcraft this time!

BWR1953

Admiral
Joined
Jan 23, 2009
Messages
6,278
More good stuff happening today!

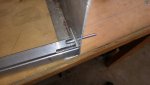
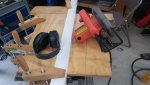
The boy and I made more brackets for the seat box bases. Taught him how to quickly find the center of the squares and then let him do the hole punching with the drill press. Also taught him how to use the depth stop as well. He's learning and doing great!

1.jpg


2.jpg

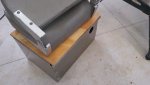
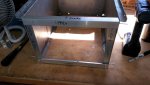
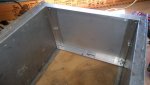
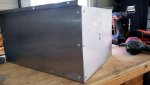
Sixteen brackets, 32 holes, 2 sheets of aluminum at the ready and the seat box standing by. Might get 'em done tomorrow!
3.jpg

In the evening my young buddy came over and we talked about the trailer welding job. He's in! Said he may be able to get some work done on it tomorrow. He brought his 4 month old son (17 pounds!) with him and we had a good visit. He said his boy likes being in his shop and generally naps well when there! :lol:


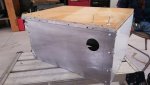
But best of all was this! :D


Watermann

Starmada Splash of the Year 2014
Joined
Jan 12, 2013
Messages
13,822
There's nothing like seeing a heavy tracked vehicle run over a rotten glasser :lol:
 

BWR1953

Admiral
Joined
Jan 23, 2009
Messages
6,278
Got one seat box riveted up today and the wood cut to shape.

And in the process, my cheap carp circular saw gave up the ghost. Completely shot. Only had it 14 months and used it maybe a couple of dozen times. :yell:

Rivet rivet! :frog:
4.jpg
 

Attachments

  • 01.jpg
    01.jpg
    387.2 KB · Views: 1
  • 3.jpg
    3.jpg
    397.2 KB · Views: 1
  • 2.jpg
    2.jpg
    380.1 KB · Views: 1

BWR1953

Admiral
Joined
Jan 23, 2009
Messages
6,278
Got the second seat box riveted up and the wood cut this morning.

Oh yeah, my young buddy came over yesterday and picked up the KF trailer to do the extension welding.

Moving along here... :D

I took a different approach to framing the seat box end this time. Instead of using the little brackets (to save material) I went ahead and boxed the end in with full length brackets. Much easier and even stronger! Quite frankly, the small bracket method was a PITA and I'm glad I made the switch for this second box.


Framed up and mocked into place.
05.jpg
 

Attachments

  • 1.jpg
    1.jpg
    397.8 KB · Views: 0
  • 2.jpg
    2.jpg
    410.5 KB · Views: 0
  • 4.jpg
    4.jpg
    359.7 KB · Views: 0
  • 3.jpg
    3.jpg
    356.6 KB · Views: 0

BWR1953

Admiral
Joined
Jan 23, 2009
Messages
6,278
So last night I changed my sleep pattern in an effort to get outside earlier when it's "cooler" in the garage. Didn't work out too well. :rolleyes:

Yes, I was out there and working at 0630 but by 10:00 I was too sleepy to work. I toughed it out for another 45 minutes then gave up and went back in the house to shower.

I got the hinges on one seat box drilled and mocked into place this morning. Then I cut relief areas in the inside portion of the hinge as well as in the plywood seat support. It actually took awhile to do just the one box, so I'll do the other tomorrow. I also need to remove the seat swivels from the seats and get them cleaned up and lubed so that I can "locate" them on the plywood seat supports.

1.jpg
 

Attachments

  • 1.jpg
    1.jpg
    930.2 KB · Views: 1

BWR1953

Admiral
Joined
Jan 23, 2009
Messages
6,278
After my shower, a FedEx truck showed up with a package and the driver got stuck in my yard. Silly southern boy didn't know how to drive in the "snow" around here. Gave me an hour of entertainment while he and another driver tried to get going.

I finally got involved and helped to physically push the stuck truck loose. Bad BWR! :eek: :lol:

1.jpg
 

Watermann

Starmada Splash of the Year 2014
Joined
Jan 12, 2013
Messages
13,822
Oh man no way I would try to push one of those rigs, good way to blow out an o ring. :eek:
 

BWR1953

Admiral
Joined
Jan 23, 2009
Messages
6,278
I worked on the second storage box today and found a much faster and neater way to drill the hinge and relief holes.

I just clamped the assembly into place and made a single pass with the drill, going through all 3 layers of aluminum plus into the plywood. Simple. :rolleyes:
Click image for larger version  Name:	2.jpg Views:	1 Size:	321.4 KB ID:	10645149


I got all the hinge relief cuts made. The relief areas are quite over sized but at least that way I know that there will be room for the rivet deformation to follow.
Click image for larger version  Name:	5.jpg Views:	1 Size:	100.8 KB ID:	10645150
Click image for larger version  Name:	8.jpg Views:	1 Size:	306.5 KB ID:	10645151

I still need to drill the rivet holes to mount the hinges to the wood support. I'll also cut rivet head recesses into the upper part of the plywood using a Forstner bit.
Click image for larger version  Name:	9a.jpg Views:	1 Size:	593.8 KB ID:	10645152


Before I tighten everything down I'll thoroughly clean the boxes and sand the wood in preparation for OTF and painting the whole kit and kaboodle. The boy suggested using the light gray porch paint that I have leftover for the metal part of the boxes. It'll match the interior sides of the boat. I'll likely use the dark gray paint on the wood to match the wood deck and provide some contrast.
 

BWR1953

Admiral
Joined
Jan 23, 2009
Messages
6,278
Yesterday we went to a birthday party for an 11 y.o. Pretty neat that it was on this 30 foot pontoon boat with dual water slides on the stern! :D

The whole thing went really well and both my wife and the boy had a great time in and on the water. Met some new folks, had some food, listened to music. The usual non-fishing boat stuff. We did bring fishing gear but it didn't get used.

The boat.
1.jpg


We went out to "the flats" about a mile from shore. The water was at low tide when we arrived and was about 18" deep. It's apparently quite the thing to do for lots of folks. While we were there I saw a Starcraft Islander! Looked to be about a 1987 model. It was traveling at speed and I didn't have time to grab my phone/cam before it was gone.
2.jpg

There were a couple of other nice Asian ladies there and they and my wife hit it off really well. They have sons close to the same age as "The Boy" so we're anticipating more kid activities together.The color coordination was completely accidental but fun for them.
3.jpg


My wife and the boy had a great time riding on the pull toy, as did the others.
4.jpg

8.jpg


But where's the rice?? :lol:
9.jpg


Lunch break.
10.jpg


Let's move out!
18.jpg


Hmmm... time to head back to shore!
19.jpg


My wife's smile says it all. :)
20.jpg
 

BWR1953

Admiral
Joined
Jan 23, 2009
Messages
6,278
This morning I tried to cut the grass. Got it partly done but sadly my old Craftsman GT3000 garden tractor failed on me. Again. Steering system broke. Sigh. :blue:

So we went out to the garage and did a little KF work! :D

I'd realized the other day that I'd forgotten to add rivets across the top and bottom of the new box framing for the storage seats. So we did that as a start.

1.jpg

2.jpg

After the riveting, I had the boy cut a 2" ventilation hole into the side of the box. His first effort at doing such. Came out fine.
3.jpg

5.jpg
 

Attachments

  • 4.jpg
    4.jpg
    357 KB · Views: 0

FIGMO

Petty Officer 1st Class
Joined
Jun 18, 2017
Messages
321
Hey BWR,

Looks like you had a great day with the family out on the water! I'm jealous....I always seem to be in the garage.

Good to see you getting your boy involved with the restoration. Its a great character builder for him, and good for you too! Its one of those experiences that he will carry with him for the rest of his life.
 

MTboatguy

Fleet Admiral
Joined
Jul 8, 2010
Messages
8,988
Boy I sure can understand that statement "Where is the rice"! My first wife is oriental, my daughter is 1/2 and my current wife of 30 years fixes rice 4 or 5 times a week, so when I go to a picnic and there ain't no rice I am pretty much lost.

Looks like all had a great time, glad to see the boy getting involved, you never know where it will lead!
 

No-AH

Petty Officer 1st Class
Joined
Oct 20, 2016
Messages
234
Looks like a great time was had at the "floatilla"
They're also very popular here, on our sandy shores of the St-Lawrence river.
 

BWR1953

Admiral
Joined
Jan 23, 2009
Messages
6,278
Hey BWR,

Looks like you had a great day with the family out on the water! I'm jealous....I always seem to be in the garage.

Good to see you getting your boy involved with the restoration. Its a great character builder for him, and good for you too! Its one of those experiences that he will carry with him for the rest of his life.
It was definitely good to get out on the water again. Been awhile for us! :nod:


Boy I sure can understand that statement "Where is the rice"! My first wife is oriental, my daughter is 1/2 and my current wife of 30 years fixes rice 4 or 5 times a week, so when I go to a picnic and there ain't no rice I am pretty much lost.

Looks like all had a great time, glad to see the boy getting involved, you never know where it will lead!
Yah, around here rice is required at every meal for my wife and mostly for the boy too, although he’s adapting somewhat. ;)


Looks like a great time was had at the "floatilla"
They're also very popular here, on our sandy shores of the St-Lawrence river.
It was my first time doing “the flats” thing and that was probably enough. I’m just not the type to stand around in knee deep water and drink. Meh. :rolleyes:

I’d much rather be fishing! :fish2: :D
 

BWR1953

Admiral
Joined
Jan 23, 2009
Messages
6,278
Today I tried to get more seat base work done but got side-tracked. My neighbor bud called me to help him out with his truck. What should have taken 10 minutes took over 2 hours... plus lunch. :lol:

While we were out and about, we discussed his progress on my KF trailer welding job. He hasn't started yet. :cool: But that's okay, he's a very busy guy. He did say that it won't take long once he starts. Okay then. :joyous:

Meanwhile, back in the garage...

I had the boy do major cleanup on the shop while I worked on filing, sanding and cleaning the seat bases. That's when I discovered that one side of each of the new end panel sheets was covered with a clear plastic backing. Ah, jeez. :mad: Took me nearly an hour to get that plastic off each of the aluminum sheets, but both are done now.

Maybe tomorrow I can get the extra holes filled with JB WaterWeld. I hope. :rolleyes:

When I first stated sanding, it didn't work right and I was like "WTH?" So I tried a heat gun, which did nothing.
1.jpg

Ended up using a razor scraper. Note to self: Pay attention when buying aluminum stock!
2.jpg

Believe it or not, the garage is much, much cleaner than it was when the boy started working this afternoon!
3.jpg
 

Renderwurx

Petty Officer 2nd Class
Joined
Aug 14, 2017
Messages
189
I admire your work on the storage seats... I'm making mine from 1/2" ply and using a tote cut in half as the container. I lover the aluminum, but it starts to get pricey. I am making mine movable so perhaps next year I can focus on some upgrades.

Very nice work! Love that you have the little helper. I so could have used an extra set of hands... especially a pair that could wriggle into tight spaces under the front deck... :p
 

BWR1953

Admiral
Joined
Jan 23, 2009
Messages
6,278
I admire your work on the storage seats... I'm making mine from 1/2" ply and using a tote cut in half as the container. I lover the aluminum, but it starts to get pricey. I am making mine movable so perhaps next year I can focus on some upgrades.

Very nice work! Love that you have the little helper. I so could have used an extra set of hands... especially a pair that could wriggle into tight spaces under the front deck... :p
Yepper, the boy definitely comes in handy. I work him hard but he's far more capable than any of his peers and friends. I've also taught him to cook a little and now he can make us breakfast! ;) :D

I was lucky that the KF already had that 3 foot long aluminum storage box. All I did was cut it in half and then buy the end panels.

Speaking of end panels, I did do just a little more work today while my old neighbor buddy stopped by for a visit. We were just sitting in the garage yakking so I fiddled with the seat boxes a bit. And every little bit counts... even if it takes forever! :lol:

I drilled holes for the rivets and then counter-bored using a Forstner bit.
1.jpg

Rivets test fitted.
4.jpg
 

Attachments

  • 2.jpg
    2.jpg
    260.6 KB · Views: 1
  • 3.jpg
    3.jpg
    383.1 KB · Views: 0
  • 3.jpg
    3.jpg
    383.1 KB · Views: 0

BWR1953

Admiral
Joined
Jan 23, 2009
Messages
6,278
Well guys, another medical procedure behind me today. Been a tough month for me. :rolleyes:

Keeps slowing my boat progress! :lol:

Anyway, I have a question. I'm at a point where I need to fill areas of the plywood seat supports and treat the wood prior to painting.

So... do I fill the wood then treat with OTF?

Or treat the wood first then fill?

My concern is that the epoxy I'll be using may not bond well to the wood if it's already treated with the OTF.

This is the epoxy filler I'll be using.


wAAACH5BAEKAAAALAAAAAABAAEAAAICRAEAOw==


Yesterday I started marking off the area where the hinges are, prior to starting the filling process. Then I got side tracked.

Today I was offline so to speak. So what sequence will work best?

wAAACH5BAEKAAAALAAAAAABAAEAAAICRAEAOw==
 
Top