I have returned... with a Starcraft this time!

BWR1953

Admiral
Joined
Jan 23, 2009
Messages
6,278
Still no trailer here. Sigh. It'll come back someday. :blue:

Plenty of medical and family obligations keeping me busy as well. Two more "down-the-road" doc appointments coming up this week. Ugh.

But I've been going out to the garage for 1/2 hour or so in the mornings doing seat box stuff a little at a time. Meh. I've documented it all but it's really boring. :rolleyes:

A couple days ago the boy and I did some configuration testing.


Laid the deck out on the garage floor with moving blankets underneath.
1.jpg


Once we did that, the boy just HAD to take it for a spin! :lol:
3.jpg
 

classiccat

"Captain" + Starmada Splash Of The Year 2020
Joined
Dec 20, 2010
Messages
3,412
I have a feeling you're going come out to the garage one morning and the boy will have the boat completely back together, gassed-up and rods loaded!!

fetch
 

BWR1953

Admiral
Joined
Jan 23, 2009
Messages
6,278
Been busy with medical stuff this week but have a few updates from last week and a little more work today.

I needed to get a bolt template from the seat bottom.
2.jpg

Why lock a swivel into place? Just delete the swivel and replace it with a spacer and call it good. I cut the spacers last week from some old oak lumber that I had laying around.
5.jpg

Today I sanded, drilled and filled the spacers with the epoxy I mentioned in a previous post.
1.jpg

The bigger the glob, the better the job! :lol:
2.jpg

Filled the big cracks.
4.jpg
 

Attachments

  • 1.jpg
    1.jpg
    465.3 KB · Views: 0
  • 1.jpg
    1.jpg
    92.7 KB · Views: 0
  • 2.jpg
    2.jpg
    117.6 KB · Views: 0
  • 2.jpg
    2.jpg
    117.6 KB · Views: 0
  • 3.jpg
    3.jpg
    132.7 KB · Views: 0

BWR1953

Admiral
Joined
Jan 23, 2009
Messages
6,278
When my buddy was visiting the other day, he suggested adding a board seat that would fit between the two main seats but which would be stowable (on its side along the gunnel) when not in use. Interesting idea that I'm going to explore a little. ;)


Sorta like this:​​​​​5.jpg
 

BWR1953

Admiral
Joined
Jan 23, 2009
Messages
6,278
A little more progress this morning. Slow but steady.


Sanded the epoxy filler on the seat box spacers from yesterday. The epoxy smoothed out nicely. :joyous:
01.jpg

Sanded and filled the seat box lids/bases.
02.jpg

Cleaned and marked the hinges prior to painting.
03.jpg

Applied a drop of oil to the hinge pins to prevent binding while being painted.
05.jpg
 

Attachments

  • 04.jpg
    04.jpg
    128.1 KB · Views: 0

BWR1953

Admiral
Joined
Jan 23, 2009
Messages
6,278
Well, I wanted to do more boat work this evening but I got out voted! My wife said if we went fishing that she'd buy us pizza on the way. DEAL! :lol: :pizza:

3.jpg
 

Attachments

  • 2.jpg
    2.jpg
    194.1 KB · Views: 2
  • 1.jpg
    1.jpg
    311.7 KB · Views: 2

BWR1953

Admiral
Joined
Jan 23, 2009
Messages
6,278
Miserably hot out there this morning. 90+ degrees and humidity through the roof. Ugh. :blue:

But we got a little more done in spite of the heat. Toughed it out until lunch time.

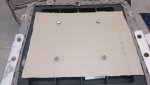
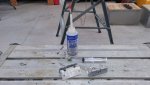
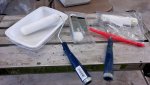
Did some hole filling in the seat boxes using JB WaterWeld. Will have to sand it tomorrow. The humidity was just too much for today.


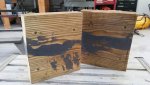
I color painted the hinges this morning. Yesterday was just the SE primer. Black hinges to blend in with a trim stripe I'm going to use on the seat bases.
1.jpg

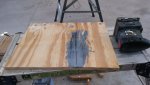
Sanded the filled seat lid/base.
4.jpg

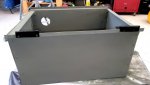
Moving the seat forward leaves a little area behind the seat.
5.jpg

Forward flush gives better leg room though.
6.jpg
 

Attachments

  • 3.jpg
    3.jpg
    268 KB · Views: 0
  • 2.jpg
    2.jpg
    134.5 KB · Views: 0

BWR1953

Admiral
Joined
Jan 23, 2009
Messages
6,278
Progress for today. Not a lot of pictures but we made our goals. We were quite busy for much of the day.

Chugging along... :)


Got the seat base/lids and spacers aligned and drilled. We test fit with the seats and it all worked correctly.
3.jpg


While the boy was applying the OTF, I was busy painting the aluminum seat boxes with SE primer. I'll FINALLY be able to apply the color coats tomorrow! :D
4.jpg
 

Attachments

  • 1.jpg
    1.jpg
    113.4 KB · Views: 1
  • 2.jpg
    2.jpg
    102.7 KB · Views: 1

Renderwurx

Petty Officer 2nd Class
Joined
Aug 14, 2017
Messages
189
One thing to keep in mind is that the back of the seat leans back beyond the back of the box (most likely) and depending on where you want to sit the boxes, you could end up with them not fully going back if they hit the splashwell brace. I chose to go with seat forward a bit. It's onlya couple inches either way, so whatever fits your design best.

RSjRcWU.jpg
 

BWR1953

Admiral
Joined
Jan 23, 2009
Messages
6,278
Thanks. My seat boxes will be mounted amidships; at the helm and passenger locations, so no worries about the lean-back problem.

Kingfisher Layout.jpg
 

BWR1953

Admiral
Joined
Jan 23, 2009
Messages
6,278
Today's work. I did prep stuff for what I'm going to do tomorrow but I'll wait until then to post that up.


I placed the now painted black hinges onto the SE primer gray green boxes "just because." I do like the look.
2.jpg
 

Attachments

  • 1.jpg
    1.jpg
    85.9 KB · Views: 1
  • 3.jpg
    3.jpg
    858.1 KB · Views: 1
Top