Let there be light - added a light to my Motorguide W75 Wireless trolling motor

donberry

Petty Officer 3rd Class
Joined
Dec 27, 2010
Messages
94
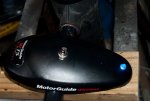
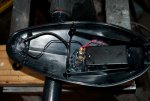
Love my new Motorguide W75 wireless trolling motor. Only thing I did not care for was there wasn?t a light on it so when fishing at night, I did not know which direction it was pointed until I started going that way or shined my head lamp on the motor. Forget about seeing it if I was using it from the back of the boat. I was putting on a longer column so thought it would be a good time to add a light to it. Only problem with using the existing wiring was it only has 12v when the motor is on and I thought it might be nice if I am fishing in close to something to be able to see where the motor is pointed before I applied power. Fortunately there was plenty of room under the cover. So I ran to Radio Shack and bought a 3V Blue LED (only color they had in stock actually) and a 2 AA battery holder. I thought their toggle switches were pretty cheap so I ran to my local hardware store for that. Just epoxied the battery holder in place, drilled the holes for the LED and the toggle switch and then siliconed the heck out of it. It?s not too pretty inside the cover, but I put silicone on a few places on the wires themselves to keep them from moving around plus on the end of the LED so there wouldn?t be any stress on the wires coming out of it. Of course I also put it around the toggle switch and the LED so water can not leak inside. I let it dry and tested it under the sink, then wired her up. I am pretty happy with the result. I would guess 2 AA batteries will run one LED light a pretty long time but to change the batteries I just have to remove the 6 screws holding on the cover. Let there be light.
inside-cover.jpgled-light.jpgfinished.jpg
 

NYBo

Admiral
Joined
Oct 23, 2008
Messages
7,107
Re: Let there be light - added a light to my Motorguide W75 Wireless trolling motor

Clever idea! You should consider replacing that toggle switch with a water-resistant one.

Love my new Motorguide W75 wireless trolling motor.
I hope you don't need repairs under warranty, because I don't think you have one anymore.:eek:
 

donberry

Petty Officer 3rd Class
Joined
Dec 27, 2010
Messages
94
Re: Let there be light - added a light to my Motorguide W75 Wireless trolling motor

Clever idea! You should consider replacing that toggle switch with a water-resistant one.

I hope you don't need repairs under warranty, because I don't think you have one anymore.:eek:
well, as far as the led light, would take a whole couple of minutes to put the old cover back on - I bought a new cover and decal when I bought the new column. As far as the new column - well, I guess I could have paid someone $100 or more to do it for me, but I am guessing there is a pretty good chance they would not have done a better job. All wires have been soldered back together with shrink tubing covering the connections.
I would personally rather have the satisfaction of doing it myself. I guess I can just put the money i saved back if the motor blows up huh ?

waterproof switch - reason i bought the switch from the hardware store was I also have a rubber boot that goes over the switch - making it waterproof. I just have not put it on yet. You take off the threaded ring holding the switch on and the rubber boot has it's own ring so you just screw it on - presto - waterproof
 

M9.9

Petty Officer 2nd Class
Joined
Dec 4, 2011
Messages
152
Re: Let there be light - added a light to my Motorguide W75 Wireless trolling motor

Ditto NYBo. You can buy the silicone boots which screw on the switch thread, I'd even say you would probably have to do No further mods. Just screw it on.
 

CheapboatKev

Vice Admiral
Joined
Oct 4, 2008
Messages
5,813
Re: Let there be light - added a light to my Motorguide W75 Wireless trolling motor

Could also have run 12v wires off your trolling battery, tied into the trolling motors cables, and rigged a toggle switch in line and zip tied the light source to the motor
 

donberry

Petty Officer 3rd Class
Joined
Dec 27, 2010
Messages
94
Re: Let there be light - added a light to my Motorguide W75 Wireless trolling motor

Could also have run 12v wires off your trolling battery, tied into the trolling motors cables, and rigged a toggle switch in line and zip tied the light source to the motor
Sure. I had actually thought about that. I ended up going with the battery just because I thought it would be "cleaner" - no extra wires to mess with. As far as battery life, while I did get a bigger LED light, my head lamp has either 5 or 7 leds in it (I forget) and runs off of 2 AAA batteries and it literally lasts for months, as I am sure most already know. I am figuring worst case scenario is I have to pop the top to replace the batteries every couple of months, BUT (always a but), it seriously could not be any easier - just 6 phillip head screws holding it on - easier than changing batteries in some of my grandkids toys :).
I have zero doubt that a whole bunch of people can come up with a much better solution/implementation. As you can see i was really liberal with the silicone also .......tho i was not too concerned about looks on the inside. I just didn't like not having a light on it at night.
Actually, I would think the way to do it would be to just tie in to the power wires already there and just have it on when the motor is on, but I believe i wanted it on all of the time. If not, I can just flip the switch and turn it off. Also, i never checked the power with my meter, but i would guess the voltage off the main power either pulses or changes values depending on the speed it is on - so good chance if you tied into that wire the light would change luminosity depending on the speed setting. Guess i should have taken a moment and checked the voltage while i was there........
 

John_S

Rear Admiral
Joined
Jun 21, 2004
Messages
4,269
Re: Let there be light - added a light to my Motorguide W75 Wireless trolling motor

Should work fine.

How was removing the old composite shaft from the motor? Was heat the trick? or other method?
 

donberry

Petty Officer 3rd Class
Joined
Dec 27, 2010
Messages
94
Re: Let there be light - added a light to my Motorguide W75 Wireless trolling motor

Should work fine.

How was removing the old composite shaft from the motor? Was heat the trick? or other method?
truthfully - a real pain in the bottom. I was using a big pipe wrench and a heat gun. At first I was trying to be careful and not scratch the old shaft - that did not last long. I could not get a good enough grip on it - maybe if I used something made of rubber.
I ended up not trying to save the old shaft and put the pipe wrench directly on the shaft. Heated it up pretty well with the heat gun - nothing. I could not get it to budge. I was holding the heat gun on the motor end for a LONG time, so long I was actually a tad concerned about warping soemthing - still nothing. I messed with it for quite some time and could not get it to budge. By now, where I had the pipe wrench was all cracked and messed up. Figured I would break the shaft off close to the bottom and then just break what was threaded and pull it out in pieces.
Laid it on the floor on a piece of 2 x 4, grabbed my hand sledge hammer and started whacking the heck out of it. Nothing like taking a sledge hammer to that expensive motor you just bought.
Now before I bought this, I was reading other people's opinions and came across a few posts where people said they hated Motorcraft, they had a wireless and kept bending the shaft - sorry, but I call b.s.
I was hitting that shaft as hard as I could and it would not break - it dod get all cracked up, but because it is composite, it would not break off. There is no possible way you could bend this shaft.
I am seriously going to make a short video sometime of me hitting the shaft with my sledge hammer. I am by no means a Motorcraft apologist, but those that are saying they bent the shaft on one of these can not be telling the truth.
Anyway, could not break it off with the sledge hammer but it did get all cracked up. So now actually getting kind of worried but left with no choice, the way i ended up having to break it off was by pounding a screwdriver through small sections of the wall and using leverage, break off the small pieces at a time. must be fiberglass in there as I did get some 'glass in my hands that bugged me for a good day.
Needed to be careful doing this too as the wires go thru the shaft - did not want to pound the screwdriver thru the wires.
Anyway, it eventually broke off this way and I broke it off pretty close to the threads.
Then I took the screwdriver and pounded it thru the shaft where it threaded in - obviously at an angle so I did not mess up the threads.
Believe it or not it worked.
Then I had to clean out the threads from the compound they used - i forget off the top of my head what it is, but it seemed like it was JB Weld. I don't have any taps even close to that size, so I started out by trying to scrape off as much as I could with a small screwdriver, being careful with the threads. I still had to heat it up to clean it off - that stuff was seriously rock hard.
Still could not get it all off and the new shaft would not twist in all of the way, so then I took a real heavy gauge wire and grinded a sharp flat edge on it, bending it at a 90" angle - again heating it up with the heat gun while scraping that off. i also used a brass gun brush i have for my 12 gauge.
It was a royal pain to be honest. Before I started I was thinking what a ripoff to pay someone $100+ to change the shafts. After a while I changed my mind and totally understood why they charge so much - they earn it. The whole time i was doing this I did have the motor itself resting on some foam insulation so it would not get all scratched up. I was seriously thinking after a while that I might have to end up taking it in to a machine shop and have them get it off.
If I had to do it over again, i would just immediately go for the screwdriver, break it off near the threads and then break it off inside the motor part. Would have saved me a whole bunch of time and aggravation if I knew they basically used JB Weld on those things (I know they don;t but i am serious, that stuff was rock hard - granite rock hard)

When installed the new one, I did mess up a bit. My new shaft did not have the hole drilled in it for the bottom cover. Not thinking, I went ahead and installed the new column, thinking i would drill the hole next.
For the new column, I figured there was a reason they used such a hard epoxy, so after insuring it screwed in all of the way, I ran my now spliced wires thru (I soldered them and used heat shrink tubing plus for good measure still put some electrical tape around the splice) then put some 2 part epoxy on the bottom half of the threads, being careful not to have too much so it wouldn't be squeezed out and into the motor, and on the top half of the threads I am sure i did not need to, but I went ahead and put on some clear silicone - then using a rubber jar opener pad, screwed it all of the way in and called it quits for the day.
Came out the next day to finish it up - remember i did not drill the hole before I installed the shaft ? I did not think that thru very well - of course the wires were now inside the shaft - 2 12 gauge wires in not all that big a hole. If I just drilled thru, I would screw up the wires and of course now the 2 part epoxy was dry.
Hmmmm, so happened i had a plastic funnel that was taperd with the end a bit smaller than the inside diameter of the hole. So keeping the wires to the sides of the funnel, I pushed the funnel in - which now had them out of the way of the drill bit as it came thru. Ruined a good $2.00 funnel, but that is what I get for not thinking ahead.....:)

Would I do it again, sure would, in a heart beat. Sure it would be nice to pay someone $100-$125 to do it for me, but I would be thinking I could buy myself a decent spinning reel, pole, tackle etc.
If I would have immediately went to breaking it with the screwdriver, i am guessing it would have taken 10-15 minutes - NOT counting cleaning the threads. Took me well over 30 minutes, probably closer to an hour to just clean the threads. I would guess if you could get it to screw out you would not have that problem, but I really could not get that thing to budge and was seriously worried about over heating the case of the motor. I had no problem screwing up the shaft, it was not going to be used anyway - but the motor - now that I was always very, very aware of not doing any damage.

LED lights - not counting drying time for the epoxy i used on the battery holder, i don;t know, start to finish maybe 15 minutes.........that was a piece of cake. The column - that did get me pretty frustrated BUT, I am loving it now and can not wait to get on the lake. I have a fish & ski, the shaft was 48" - if i stood in the back of the boat the motor would start cavitating. The whole point of me getting the wireless is so I could be fishing anywhere in the boat.
Now I can. 60" is perfect
long enough.....sorry, my drugs just kicked in a bit ago
 

John_S

Rear Admiral
Joined
Jun 21, 2004
Messages
4,269
Re: Let there be light - added a light to my Motorguide W75 Wireless trolling motor

A good ending to a fustrating journey. I never would have thought it would be that much of a fight.

The composite shaft will bend and go back. I have caught some rocks in the current. The MG metal shafts bend and stay that way.

Can you do a test for me on your old shaft? On a spot that hasn't chipped, wrap some tape around it, and saw all the way through the shaft. I have the reverse problem. I have a 54" shaft, I'd like to cut down to 48" if it proves to get in the way on a new boat layout. I'd like to make sure the composite doesn't splinter from the cutting operation.
 

donberry

Petty Officer 3rd Class
Joined
Dec 27, 2010
Messages
94
Re: Let there be light - added a light to my Motorguide W75 Wireless trolling motor

John_S - okay, did my test cuts. Feel free to hack away on that thing. I did not even put tape around it.
First I cut it with my tablesaw. Blade is just a regular wood blade, nothing special at all. Nary the tiniest crack anywhere, smooth as a baby's bottom. Then I grabbed my jig saw. It happened to have a fine toothed blade on it, again it cut through it without making a mark - i did not tape it for that either.
I feel very safe in telling you that it is not going to splinter in any way shape or form. I did not bother trying to cut it by hand. If it will not crack or splinter on the table saw with a wood blade, I don;t think you have to worry about a thing.
May want to wear a dust mask. I would guess there is some fiberglass in it. Had some "stuck" in my hands for a day or so after I broke up the old one and there will be some micro dust when you cut it - with the table saw anyway.
Of course I did just probably dull the heck out of my table saw blade
 

John_S

Rear Admiral
Joined
Jun 21, 2004
Messages
4,269
Re: Let there be light - added a light to my Motorguide W75 Wireless trolling motor

Thanks for squashing that worry. While I am hoping I don't have to cut it, now I know its not that much of a deal. I would also be able to do a couple of test cuts before getting to my minimum length. Practise to make sure I get it square. No table saw, so probably the circular saw with carbide blade. Thx again.
 

donberry

Petty Officer 3rd Class
Joined
Dec 27, 2010
Messages
94
Re: Let there be light - added a light to my Motorguide W75 Wireless trolling motor

John - just my opinion. It probably would not hurt if it was not perfectly square. You will also have to drill a new hole for the bottom cover. My new column did not have that whole in it, which I thought was a tad strange. I just used a cordless drill and cheap drill bit, nothing fancy. The drill will get "caught" when it punches thru, I had to reverse the drill to get the drill bit out. Because of that was not a "clean" hole on the other side so just flipped it over and drilled thru the other side to clean it out. Again, don;t see any chance of it splitting and i did not tape it or anything. You do want to make sure that you drill perfectly level tho so the hole on the other side is not at an angle or else when you put the bottom cover on, the bolt will not go all of the way thru. I have a drill press but was lazy and still used the cordless drill and it was almost off just a hair too much. I used a drill bit pretty much the same size as the bolt so did not have much wiggle room. Not nearly as hard as I am making it sound, just don;t plop it down and drill it , just keep it as straight as possible.
Good luck - u should have no problems......
 
Top