Lone Star Medallion Restoration Project

WeatherEye

Seaman Apprentice
Joined
Aug 18, 2015
Messages
41
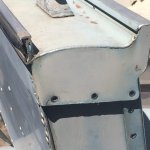
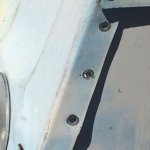
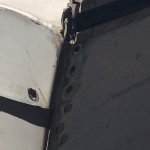
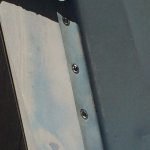
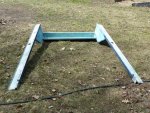
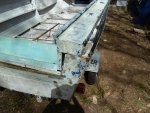
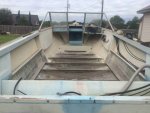
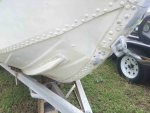
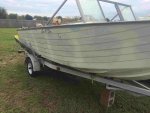
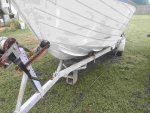
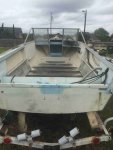
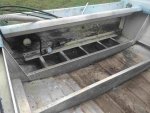
A few weeks ago I bought this 1964 Medallion as my project. The boat has plenty of faults; dents, dings, no interior and needs new paint, all are fixable and I am up for the challenge. I plan to do my best to document the progress over time. I'm sure I will need plenty of advice and suggestions along the way since this is my first boat restoration, so feel free to toss in your 2 cents worth.
 

Attachments

  • photo239026.jpg
    photo239026.jpg
    246.1 KB · Views: 1
  • photo239027.jpg
    photo239027.jpg
    249.7 KB · Views: 0
  • photo239028.jpg
    photo239028.jpg
    245.5 KB · Views: 0
  • photo239029.jpg
    photo239029.jpg
    228.8 KB · Views: 1
  • photo239030.jpg
    photo239030.jpg
    247.3 KB · Views: 1
  • photo239031.jpg
    photo239031.jpg
    241.3 KB · Views: 1
Last edited:

gm280

Supreme Mariner
Joined
Jun 26, 2011
Messages
14,605
Well you started out with a good idea and that is to post pictures of your project. That way we can see what you are dealing with and offer better suggestions and ideas. First I'd like to say, I've certainly seen much worst. So you may have an easier time rebuilding this boat. Secondly, I see a transom that looks toast. The wood I can see looks like it has seen its better days. So that will have to be replaced. But keep posting the pictures and any progress shots as well and keep asking questions. There are some very good folks on these forums that can answer most anything you could ask. JMHO!
 

redneck joe

Supreme Mariner
Joined
Mar 18, 2009
Messages
11,463
Hey weather eye, nice loking boat! I know you checked out my thread so dont make my mistakes....

Hey on the floor, i had another memeber hit me up while i was doing mine and i made him patterns to mail him. I'll see if i still have the pmand maybe he kept them. a
 

WeatherEye

Seaman Apprentice
Joined
Aug 18, 2015
Messages
41
No Title

Well you started out with a good idea and that is to post pictures of your project. That way we can see what you are dealing with and offer better suggestions and ideas. First I'd like to say, I've certainly seen much worst. So you may have an easier time rebuilding this boat. Secondly, I see a transom that looks toast. The wood I can see looks like it has seen its better days. So that will have to be replaced. But keep posting the pictures and any progress shots as well and keep asking questions. There are some very good folks on these forums that can answer most anything you could ask. JMHO!


Redneck Joe and 64Osby both suggested starting a new thread and include some photos.

You are correct about the transom! It is toast!! I started drilling the buck rivets out already...unfortunately I have not been able to find any other threads elsewhere that indicates what needs to be drilled to access the rotten transom. I am posting pics of my progress so far. If anyone has any specific knowledge or experience that will be helpful...I am very willing to listen. Hope these new pics will help.

I'm at a stand still trying to figure out what other rivets need to be drilled out to access the transom.

Thanks for the comments and for following my thread.
 

Attachments

  • photo239040.jpg
    photo239040.jpg
    247.5 KB · Views: 0
  • photo239041.jpg
    photo239041.jpg
    247.8 KB · Views: 0
  • photo239042.jpg
    photo239042.jpg
    244.2 KB · Views: 0
  • photo239043.jpg
    photo239043.jpg
    238.3 KB · Views: 0

WeatherEye

Seaman Apprentice
Joined
Aug 18, 2015
Messages
41
Hey weather eye, nice loking boat! I know you checked out my thread so dont make my mistakes....

Hey on the floor, i had another memeber hit me up while i was doing mine and i made him patterns to mail him. I'll see if i still have the pmand maybe he kept them. a


Thank you RJ! Yes I did check out your thread...thank you! I will try not to make any mistakes..especially with you watching me like a hawk. :lol: Would love to hear about any changes you would make if you were doing your's all over.

RJ, I wish you had replaced your transom so you could be giving me instructions on what to drill next.

As per the floor, I will try to contact the fellow you sent the pattern to...I really like how your floor turned out. Pics look great.

Bill
 
Last edited:

WeatherEye

Seaman Apprentice
Joined
Aug 18, 2015
Messages
41
Ok unfortunately i deleted the pm that had his contact info, and it appears he doesnt visit here but you might be able to find him on fiberglassics.


Here is his thread. http://forums.iboats.com/forum/gene...ics/9955952-1962-lone-star-medallion-interior


Hey RJ, I posted a question about the transom on FiberGlassics and this same fellow responded. Maybe he will still have the patterns or at least make some for me. I think he also lives nearby. I will contact him for sure...not certain how far along he is on his restoration...but I found some of the back to back seats you could buy on the Medallion as an accessory. Mine have the base and good bones...just need new foam and vinyl. Thanks for sending the thread!

Bill
 

gm280

Supreme Mariner
Joined
Jun 26, 2011
Messages
14,605
Redneck Joe and 64Osby both suggested starting a new thread and include some photos.

You are correct about the transom! It is toast!! I started drilling the buck rivets out already...unfortunately I have not been able to find any other threads elsewhere that indicates what needs to be drilled to access the rotten transom. I am posting pics of my progress so far. If anyone has any specific knowledge or experience that will be helpful...I am very willing to listen. Hope these new pics will help.

I'm at a stand still trying to figure out what other rivets need to be drilled out to access the transom.

Thanks for the comments and for following my thread.

I seen you've been busy. One suggestion, when posting progress also post a little further back so we can see where on the hull you removed the rivets and can see more of the situation. I realize you are removing rivets on the transom area, but can't get a true idea of where you have removed them already. Just an idea.

Some times dealing with things is a new experience and you have to look and think about every possible setup the factory did. So remove any rivet that you see holding the transom together. BUT, before you get too much further, take tons of pictures and measurements so when it is time to replace parts, you have pictures to assist in that endeavor. You will be amazed how much those pictures will come in handy. JMHO!
 

redneck joe

Supreme Mariner
Joined
Mar 18, 2009
Messages
11,463
Hey RJ, I posted a question about the transom on FiberGlassics and this same fellow responded. Maybe he will still have the patterns or at least make some for me. I think he also lives nearby. I will contact him for sure...not certain how far along he is on his restoration...but I found some of the back to back seats you could buy on the Medallion as an accessory. Mine have the base and good bones...just need new foam and vinyl. Thanks for sending the thread!

Bill
Good deal. ...

I filled mine up with a few inches of water to find leaks and sealed with some fancy sprsy from home depot. It works for all when just sitting as i left in the water for a few weeks while repairing the trailer but when running down the river i still get a couple gallons thru the day, but i have a nice hilge so not worried about it.


I also got a deal on a 12 gallon tank and am wanting to make a bench or cover for that area. Been thinking about design last couple days. I'll post up what i decide /build on my thread so watch for that
 
Last edited:

redneck joe

Supreme Mariner
Joined
Mar 18, 2009
Messages
11,463
Oh and if you noticed on my thread i get 33 mph with just me and my 75 hp, so you should scream about 45 to 50 with your 115.
 

redneck joe

Supreme Mariner
Joined
Mar 18, 2009
Messages
11,463
I seen you've been busy. One suggestion, when posting progress also post a little further back so we can see where on the hull you removed the rivets and can see more of the situation. I realize you are removing rivets on the transom area, but can't get a true idea of where you have removed them already. Just an idea.

Some times dealing with things is a new experience and you have to look and think about every possible setup the factory did. So remove any rivet that you see holding the transom together. BUT, before you get too much further, take tons of pictures and measurements so when it is time to replace parts, you have pictures to assist in that endeavor. You will be amazed how much those pictures will come in handy. JMHO!
My foam was still good, but if yours isnt seriously look at replacing completely for cost reasons, unless you are shooting for an original resto.
 

redneck joe

Supreme Mariner
Joined
Mar 18, 2009
Messages
11,463
Checked out my transom this morning and i think what youve done plus some bolts thru the wood om the side and you can get to it. You would have to bend some aluminim out of the way, not sure if that is a good thing to do tho. Otherwise the rivets on theside panel gonna be a pia.
 

64osby

Admiral
Joined
Jul 28, 2009
Messages
6,826
Weather - Looks like a nice project.

I would look at the inside of the transom wood and what is holding it in. Remove the splashwell and the lower angle of aluminum. The pieces holding the sides of the wood in are what I have yet to touch on mine. I debate removing them or just bending them out on one side so the wood will pull out into the boat.

I don't think these hulls allow for the wood to be pulled up like the Starcrafts.

Keep the pictures coming.
 

WeatherEye

Seaman Apprentice
Joined
Aug 18, 2015
Messages
41
No Title

Foam between stringers and deck was removed by PO...so floatation foam will be replaced. I looked into Aluminite product at Hobby Lobby...mix 2 chemicals together...pour and watch it expand. Not going there...seems like a can of worms waiting to be opened. I'm not taking that bait...decided blue insulation foam from HD is best for me.

Foam in donor seats has deteriorated over the years in hot Texas sun. The frame and pedestal was in excellent condition. These are the back to back type that fold into a lounger. Found them on a fiberglass 1966 Chrysler after the name change took place...I suppose.

RJ, I know which bolts you are talking about...don't want to bend anything. I was studying the task at hand and it looks like I am going to have to remove about 30 to 40 buck rivet along the gunnel cap all the way to the back part of the windshield frame brace. This is a process that will have to be done to the port and starboard gunnel.

I found the attached "gunnel cap" pic somewhere. This looks like a PIA.

NOTE: The attached pics are NOT my boat...apparently someone else has boldly done this before!!
 

Attachments

  • photo239099.jpg
    photo239099.jpg
    146.6 KB · Views: 1
  • photo239100.jpg
    photo239100.jpg
    149.9 KB · Views: 0
  • photo239101.jpg
    photo239101.jpg
    146.5 KB · Views: 0

WeatherEye

Seaman Apprentice
Joined
Aug 18, 2015
Messages
41
64osby notice my last post. I was looking this morning on how to remove splash well...on the last set of pics I posted from someone else's resto I see the splash well comes off when you remove the gunnel.
 

64osby

Admiral
Joined
Jul 28, 2009
Messages
6,826
How is the vertical panel on the ends of the splashwell attached to the gunwale?

It looks like the lower part is welded. What about the upper portion?
 

redneck joe

Supreme Mariner
Joined
Mar 18, 2009
Messages
11,463
64osby notice my last post. I was looking this morning on how to remove splash well...on the last set of pics I posted from someone else's resto I see the splash well comes off when you remove the gunnel.
Yesh the rivets holing the side of the gunnel on are blind and not accessible to drill out. That said i find it hard to belivemine is original but do not see evidence of taking off the top cap.
 

WeatherEye

Seaman Apprentice
Joined
Aug 18, 2015
Messages
41
How is the vertical panel on the ends of the splashwell attached to the gunwale?

It looks like the lower part is welded. What about the upper portion?


I believe the top part of the panel is riveted...and will not be easy to get after with a drill.

I can drill the 30 or 40 rivets on the gunnels but that vinyl or rubber trim strip inside of the gunnel trim will be toast. Mine is rock hard anyway...and I can't slide it out from the bow or stern ends.

I could not find an inspection mirror on a telescoping shaft in my tool box...so I went to hunt one down. I plan to study behind the panels before I report back.
 
Last edited:

64osby

Admiral
Joined
Jul 28, 2009
Messages
6,826
Try taking pictures with your phone. No mirror required.

Personally I would look to remove a few rivets for the splashwell sides then remove most of the gunwale rivets.
 

redneck joe

Supreme Mariner
Joined
Mar 18, 2009
Messages
11,463
The rivets on the splashwell are attatched to the back side panel, in a blind kinda way. Im sure im not sayingit right.
 
Top