Mercruiser MR Sterndrive Inspection / Rebuild

nrasnake

Seaman
Joined
Aug 13, 2012
Messages
62
I started a boat restoration last year on a Conroy X-19 that had sat outdoors (covered) for an estimated 3 years. I am tearing into the sterndrive (Mercruiser MR [1985 improved Alpha I version], SN 6897253) and want to get an idea of what to be looking for and how much disassembly should be done at this time.

Important note #1: When I drained the gear oil last year, it did have some milky appearance, but no noticeable oil/water separation and no metal flakes were found.

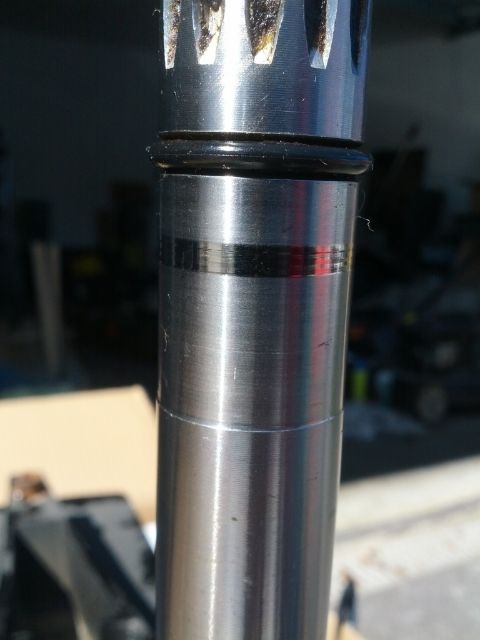
Today I got started and my first task was taking out the sea water impeller assembly from the lower unit. I plan to replace the entire assembly. However, I'm a bit concerned with the vertical drive shaft. Visible wear is apparent on the shaft where it rides in the upper housing bearing seal. Of course, looking in the upper housing, I found the bearing seal was torn and half missing. I also noted the bearing seal did not appear to be flush with the gear housing (one side was low) which is probably the reason for the failure.

d9da6f0e-0d23-4ef2-a61c-18cc047a3f9e_zpscf24226e.jpg


IMG_20130309_141912_zps91b3a2d1.jpg


1. How is the condition of my lower unit vertical drive shaft? Requires replacement, or should be fine?
2. Can I simply pry out the upper housing seal and put a new one in? (technically this seal is "Oil Seal, Lower Drive Shaft Housing" PN 26-96503)


On the lower unit, I engaged forward and reverse and rotated the drive shaft. It felt like the gears were engaging properly, there was little to no backlash, and there were no abnormal noises or skipping. However, I did note lateral play in the drive shaft tapered bearing (just below the impeller assembly) of maybe 1/16".

3. Is play in the tapered roller bearing normal/acceptable?

On the upper unit, the drive shaft looks to be in perfect condition, but the u-joints are a bit rusted on the outside surfaces. However, the gears and joints still operate smoothly.

IMG_20130309_142549_zps6afe76b8.jpg


4. Should I be concerned with the U-joints based on appearance, or can I clean them up, grease them, and be safe to move forward?

5. What else should be inspected/replaced at this point? Should I get into the gears?

Thanks!
 

FreeBeeTony

Captain
Joined
May 15, 2002
Messages
3,991
Re: Mercruiser MR Sterndrive Inspection / Rebuild

You can take the top cover off the upper to inspect the gears if you want.
 

dubs283

Vice Admiral
Joined
Jul 27, 2005
Messages
5,333
Re: Mercruiser MR Sterndrive Inspection / Rebuild

1. its fine, just clean it up with some emery cloth

2. yes, but keep in mind there is a seal just "above" that one that rides on the upper driveshaft too - depending how far you want to go you could reseal the upper half

3. yes, the bearing and race aren't sufficiently mated utnil the drive is reassembled and under a load

4. if the u-joints are smooth and have no slop you are fine - just make sure there is no water in the bellows or holes

5. as tony said to check the upper bearings, pull the top cap - to check lower bearings you have to pull the reverse bearing carrier

fully inspect the transom assy components, bellows, gimbal ring, senders, gimbal brg, engine alignment, etc... and grease all components that require it
 

ziggy

Admiral
Joined
Jun 30, 2004
Messages
7,473
Re: Mercruiser MR Sterndrive Inspection / Rebuild

1. How is the condition of my lower unit vertical drive shaft?
looks like a little wear there. to bad the seal was cocked a bit. it wore more shaft than what i've seen on the 2 mc-1 drives i've had. anyways. one of my drives i put a speedy sleeve on. i think it worked however that drive wasn't in service for long due to a whole boat disintegrateing before my eyes. the other drive is still in service right now. that shaft had seal wear too. on it i dropped the seal off in a slightly different location and got new surface for the seal to ride on that way.
2. Can I simply pry out the upper housing seal and put a new one in?
yep.
3. Is play in the tapered roller bearing normal/acceptable?
from what i understand, yep, it's normal.
4. Should I be concerned with the U-joints based on appearance, or can I clean them up, grease them, and be safe to move forward?
if it were mine, i'd replace them. since they're rusty that would lead ya to think that water may have intruded the bellows area. so i'd check the bellows and seal real good to be sure they are intact. also, pressure test the drive to be sure it's sealed. water in the bellows area isn't supposed to be there. the ft. seal of the drive seals to keep gear lub in the drive. not water out of the drive since water isn't supposed to be in that area. point is. water intrusion into this area can rust the drive gear yoke, thus ruining the ft. seal. on mine, it requred seal and drive gear yoke replacement.
5. What else should be inspected/replaced at this point? Should I get into the gears?
imho, if the gear lub drained out clean and metal fragment/dust free. i'd think gears are ok. when metal fragments/dust appear in the drained out gear lub is when ya should go looking to inspect gears and brgs. imho, if gear lub is clean and the drive passes a pressure test probably/likely all is well...
 

ktbarrentine

Lieutenant
Joined
Dec 12, 2011
Messages
1,296
Re: Mercruiser MR Sterndrive Inspection / Rebuild

Another additional note: As has been very widely discussed in this forum, it is highly recommended to remove and discard that O-ring that is shown on the vertical shaft in your photo. It is essentially not needed because of the shaft seal you are discussing, and in later alpha models they did away with the o-ring groove altogether (it has been known to be a weak spot in that shaft). The o-ring actually hinders reassembly of the drive and in many cases ends up distorting or getting caught in the seal it has to travel past during insertion.

I concur with ziggy...the shaft looks a bit worn, but looks smooth enough for reseal with a new seal, and you have the option of seating the seal in a slightly different location to get a different bite on the shaft (been there, done that). That seal is not actually an oil seal (the oil seal is actually above this one in the upper half); it's function is to keep water out of (and keep grease in) the shaft spline area. Good luck!
 

nrasnake

Seaman
Joined
Aug 13, 2012
Messages
62
Re: Mercruiser MR Sterndrive Inspection / Rebuild

Thanks everybody for all the helpful information!

Just curious, does anyone know if the vertical drive shaft in picture #1 has a step on the upper end (where mine has been worn/polished) like the step that is clearly just below? I assume the stepped down region is precision milled for the seal(s) and if there was a step in the worn/polished area I will need to avoid pressing the new seal in too far so that the new seal rides below (referenced to the picture) rather than above the worn/polished area. Hopefully that makes sense.

Also, I'm guessing you have to get to the upper oil seal (as ktbarrentine described) from the top. Looks like that means pulling the upper drive shaft and gears, right? Which also means I'd have to have at least the special wrench to reinstall the bearing retainer to 200ft-lbs!!! Obviously I'd like to avoid all of that, so should I do a pressure check first before I consider replacing that seal?

I plan to replace most of the gimbal housing components once I get to that, but for now I'm just focusing on the upper and lower units. One bit a time! More questions to come I'm sure :)

Thanks!
 

dubs283

Vice Admiral
Joined
Jul 27, 2005
Messages
5,333
Re: Mercruiser MR Sterndrive Inspection / Rebuild

no step on the driveshaft, just clean it up where the old seal rode and you will be fine

you are correct about the other seal and retainer wrench, pressure test after you replace the one seal
 

Augie56

Seaman
Joined
Feb 26, 2012
Messages
73
Re: Mercruiser MR Sterndrive Inspection / Rebuild

Yes, just re-built my MC-1 this winter and omitted the o-ring in the vertical shaft. I pressure tested the whole thing after assembly and it held 15 psi as long as I wanted it to (hours).

Just as a cautionary tale, I HAD to rebuild it this winter due to SNAPPING the vertical shaft of the ORIGINAL lower unit in this exact spot (o-ring groove). Long story short, I let my brother drive us in after a day on the lake, he takes us too close to shore trying to hug the shoreline and smacks some rocks with (what was) my nice, shiny stainless steel prop. Maybe lucky for me everything else survived without harm (upper unit and engine coupler still in perfect shape).
 

nrasnake

Seaman
Joined
Aug 13, 2012
Messages
62
Re: Mercruiser MR Sterndrive Inspection / Rebuild

Hi all, I've finally got back to the outdrive. I put a new water impeller assembly in, put everything back together, and did a pressure check at 15 psi. At first I thought I was home free because it was holding pressure even when I rotated the drive shaft, but as time went on and I continued cleaning the universal joints alas I heard bubbling and my pressure was gone. I pinpointed the leak to be at the lower shaft seals in the upper gear housing. Now I have to order the bearing retainer wrench and take all the gears out, yay! Apparently the bellows had a significant leak prior to me purchasing the boat so the universal joints and the bearing retainer were fairly rusted. Hopefully with the wrench and some heat I can break that nut loose.
Has anybody had issues with the aftermarket retainer wrenches? I hope to avoid buying a $65 wrench!
Here's inside of the bearing retainer nut:
IMG_20130701_215031_zpsfd04d406.jpg


The good news is that the gears and bearings look to be in nice shape. There are a few scratches/spots on the rollers, but I don't think it's anything that needs replaced now. The race in the cap also looked to be in good shape:
IMG_20130701_214702_zpsd2c8ea55.jpg

IMG_20130701_214638_zpsf72191a6.jpg


I also got the drive shaft splines nice a clean and noticed a little bit of wear. Should I be concerned with this much wear?
IMG_20130701_213521_zps7358ed1d.jpg


More to come... Thanks
 

nrasnake

Seaman
Joined
Aug 13, 2012
Messages
62
Re: Mercruiser MR Sterndrive Inspection / Rebuild

So I got the upper and lower drive shaft seals popped out of the upper gear housing, but looking at the new seals from Sierra Kit 18-2648, the lower seal looks different. The new seal doesn't have a metal housing like the old one did. Is this correct?
NEW:
IMG_20130714_220107_zps42018138.jpg


OLD:
IMG_20130714_220432_zpsb8636630.jpg


My next question is: Do I use Permatex Aviation Form-A-Gasket #3 when installing these seals (in place of Loctite 271 / Type "A" as the manual calls for)?

My next question is: Do I install both seals with the lip/spring facing upward towards the top of the outdrive as the manual says?

I have read several different opinions on how these are installed, but I believe the manual would be correct. I was killing some time and made a little cross section diagram (not to scale of course) of how I think they should be:
AlphaMR_SealDiagram2_zps743115ed.png

Green = Outdrive gear oil
Purple = Grease
Blue = Water/Exhaust gases
Dark Gray = Upper gear housing and Lower thrust bearing
Light Gray = Lower unit drive shaft
Black = Upper and Lower seals, Lower drive shaft o-ring, and Slinger(above water impeller housing)

My theory on how this operates is that the upper seal keeps the outdrive oil in the upper section and the lower seal keeps the grease in the spline section (the lip/spring usually faces towards the liquid it is sealing against because the liquid pressure presses the lip against the shaft, improving the seal). Since the grease (purple) does not have any pressure relative to the gear oil (green), the upper seal works fine. However, on the same note, relatively higher pressure water/exhaust could sneak by the lower seal which is why the oring is there to prevent any water/exhaust leaks from wicking into the spline area. For this reason, I can see the argument for installing the lower seal with the lip/spring facing downward and discarding the drive shaft oring. Not to mention the oring doesn't easily slide past the lower seal during installation and I wouldn't doubt many times that oring has gotten jammed and led to quickly destroying the lower seal... which I believe is the main reason people are saying to discard the oring. Also, it seams if you pack the grease in good, any water/exhaust that leaks by is not going to have much place to go, but I would believe it could wick up into the splines over time. I'm planning to follow the manual as in my diagram, but I might discard the oring to prevent any seal damage. Thoughts anybody?

P.S. - I bought the aftermarket bearing retainer spanner wrench on eBay for $19 shipped. I was nicely made and fit perfect. 4 hits with a rubber mallet and the nut was loose. I know putting it back won't be that easy.
 
Last edited:

muc

"Retired" Association of Marine Technicians...
Joined
Jul 7, 2004
Messages
2,170
Re: Mercruiser MR Sterndrive Inspection / Rebuild

Can’t answer your question about Sierra being different. Other than you can be sure it’s not better.
Use loctite unless Sierra gives a different recommendation.
Both seal lips face up.
The top seal (you have colored green) can be tough to install without the correct seal driver.
MerCruiser did delete the O-ring groove but has never told us to not install an O-ring when the groove is still there. They still supply that O-ring in a reseal kit, so I have always put it back on.
 

ktbarrentine

Lieutenant
Joined
Dec 12, 2011
Messages
1,296
Re: Mercruiser MR Sterndrive Inspection / Rebuild

and the O-ring will go in as designed, provided you do the joining of the halves on the bench where you can see (and help) the O-ring go past the seal (with enough lubricant to help out). If you join the halves with the upper still on the boat, it is much more difficult. My rec: if you are having any problem nursing the O-ring into place, get rid of it as recommended by other senior members of this site.
 

nrasnake

Seaman
Joined
Aug 13, 2012
Messages
62
Re: Mercruiser MR Sterndrive Inspection / Rebuild

Well I can't find anything regarding my Sierra lower oil seal being all rubber and without a metal rim (from kit 18-2648). When I search the 26-96503 1 part number it shows both the metal framed seal and the solid rubber seal, but I can't find the metal seal in any kits. The all rubber seal I have seems like it is going to fit properly, but I'm a bit nervous about installing it and if Loctite will even adhere to it. Oh well, I've got a lot of work to do so I must press onward.
I have the outdrive off the boat and on a stand so I'll give it a shot using the oring.
Thanks
 

nrasnake

Seaman
Joined
Aug 13, 2012
Messages
62
Re: Mercruiser MR Sterndrive Inspection / Rebuild

Quick tid-bit of info: The yoke bearing nut on an Alpha I-MR should be torqued to 85 ft-lbs and NOT 200 ft-lbs, regardless of if you had to take the old nut off with an impact wrench. Triple check the manual for the correct torque spec and make sure you're looking at YOUR model as not all models have the same specs... trust me... :facepalm::faint2::embarassed:
IMG_20130802_190242_zpsc8ac5994.jpg


If anybody is interested in a brand new yoke with missing threads, let me know. I would guess you could weld over the threads and recut them, but I didn't have the capability. Lets hope things go a bit smoother from here on.
 
Last edited:

achris

More fish than mountain goat
Joined
May 19, 2004
Messages
27,468
Re: Mercruiser MR Sterndrive Inspection / Rebuild

Quick tid-bit of info: The yoke bearing nut on an Alpha I-MR should be torqued to 85 ft-lbs and NOT 200 ft-lbs, regardless of if you had to take the old nut off with an impact wrench. Triple check the manual for the correct torque spec and make sure you're looking at YOUR model as not all models have the same specs... trust me... :facepalm::faint2::embarassed: If anybody is interested in a brand new yoke with missing threads, let me know. I would guess you could weld over the threads and recut them, but I didn't have the capability. Lets hope things go a bit smoother from here on.

Actually, your drive might be different again. You need to determine if you have a small spacer in between the bearings on the yoke. Only if you have the small spacer do you torque the nut to 85... If you have no spacer, you MUST use the 'rolling torque' method....

Bearing pre-load

Chris.....
 
Last edited:
Top