My 85' Riviera Tri-hull Rebuild

Numlaar

Chief Petty Officer
Joined
Jul 9, 2009
Messages
633
Re: My 85' Riviera Tri-hull Rebuild

Oops I take that back!

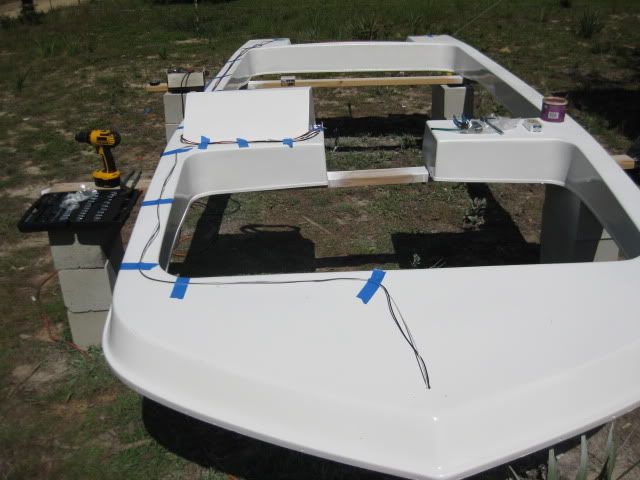
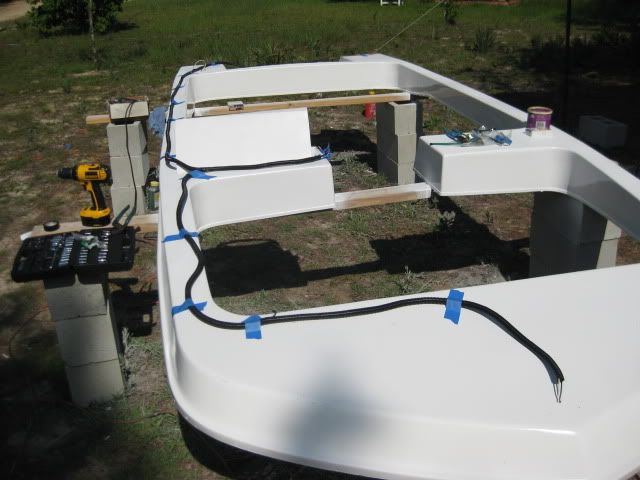
I forgot to mention that while the stripe on the boat was curing, I went ahead and pre-wired my cap.

I figured out what all I would need wires for, and to keep things neat, this is what I did.

I ran 10gauge primary wire from where the battery will go up to the dash for the main power to the switch panel (this will be drawing all the juice for the system so I went with a higher gauge).

I also ran the 10gauge up to the bow for a trolling motor plug. (I have a 12v 54lb thrust Motorguide Saltwater TM that I can use from my jon boat).

For the rest I laid out the wiring for the bow light, stern light, horn on the bow, and bilge pump. For this items I used 14gauge which is what the accessories themselves are wired up for.

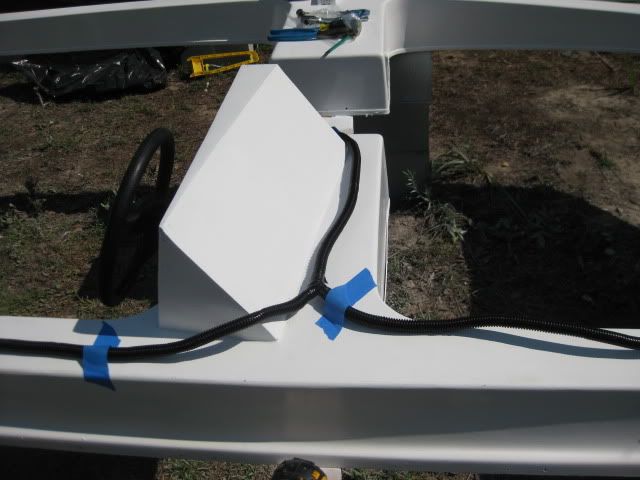
Here are some photos of how I laid it all out to keep it organized:

Aft view facing the bow:
86wiringrunaftview.jpg


Bow view facing the stern:
87wiringrunbowview.jpg


Starboard gunwale:
88wiringrunstarboard.jpg
 

Numlaar

Chief Petty Officer
Joined
Jul 9, 2009
Messages
633
Re: My 85' Riviera Tri-hull Rebuild

Once I had all the wire laid out and figured out for where it needs to go, I put it in the wire loom to keep it neat, and keep from having loose wires all over:

Aft view facing the bow:
89loomaftview.jpg


Bow view facing the stern:
90loombowview.jpg


Side view of the console "T" section:
91loomconsoleview.jpg


So with that, you are now officially caught up for the boat build parts hehe

I am also working on the outboard inbetween curing times, etc. and will get those pics up as well. I think I will save them for the end though, so that it doesn't interfere with the story of the rebuild for the boat itself.

Thanks

Num
 

Numlaar

Chief Petty Officer
Joined
Jul 9, 2009
Messages
633
Re: My 85' Riviera Tri-hull Rebuild

Man hardly any replies... I think I might cry :( /sniffle

Not even a wow thats a nice looking blue stripe! LOL
 

Rickairmedic

Commander
Joined
Apr 24, 2009
Messages
2,576
Re: My 85' Riviera Tri-hull Rebuild

OK Num I'm here :D. Looks like you are getting closer and the quality of work is great . I think you may beat me back to the water to :D.


Rick
 

redfury

Commander
Joined
Jul 16, 2006
Messages
2,657
Re: My 85' Riviera Tri-hull Rebuild

Man hardly any replies... I think I might cry :( /sniffle

Not even a wow thats a nice looking blue stripe! LOL

There's no crying in boat restoration!

I actually JUST saw this thread today, so it must not have made the rounds yet.

I like the hull flippin' device you devised, I may have to steal that idea when/if I flip mine. I'd love to do it once the floor is done, but the sides of my boat are so flimsy, I couldn't lay it on anything, I'd have to crawl underneath and support it with the floor once that is done... it's gotta be easier to paint a trihull this way.

Beyond that, the boat is looking nice! Can't say I'm a huge fan of the dash coming to a point like a cut of cheese, but if it's functional, who cares!

I like the way you are laying out the wiring...something that simple probably would have eluded me when I got ready to rewire mine, so thanks for those pictures...sometimes it's something that just seems so simple that you can't dream up the right way to do it without actually seeing it done. ;):D
 

Numlaar

Chief Petty Officer
Joined
Jul 9, 2009
Messages
633
Re: My 85' Riviera Tri-hull Rebuild

OK Num I'm here :D. Looks like you are getting closer and the quality of work is great . I think you may beat me back to the water to :D.


Rick

LOL maybe... it's still going real slow even though its pretty much all I do...

The wet sanding on the new gel coat is a total PITA!

I figure 2-3 weeks to finish it up. I have my sons birthday party next weekend, but other than that, I am mostly free.

I still have to finish the wet sand on the hull, flip it back over, finish the port side seat base, gelcoat the inside and finish that off then put the cap back on...

That doesn't include the work I still have to do to the outboard. Needs an impeller, shift rod housing, intake screen, various seals, sand/prime/paint.

Ugh it never ends!
 

Numlaar

Chief Petty Officer
Joined
Jul 9, 2009
Messages
633
Re: My 85' Riviera Tri-hull Rebuild

There's no crying in boat restoration!

I actually JUST saw this thread today, so it must not have made the rounds yet.

hehe ok sorry! :)

Just looking for some feedback (good or bad) :D

I like the hull flippin' device you devised, I may have to steal that idea when/if I flip mine. I'd love to do it once the floor is done, but the sides of my boat are so flimsy, I couldn't lay it on anything, I'd have to crawl underneath and support it with the floor once that is done... it's gotta be easier to paint a trihull this way.

Yeah it wasn't "that" sturdy I am surprised it actually worked... The good thing about the hull is with the foamed sides (instead of under the deck) its actually really sturdy. I was able to set it up on the pieces for the consoles, and those little tab things that stick up on the sides to hold the cap. It does make it easier to work on the bottom.

Beyond that, the boat is looking nice! Can't say I'm a huge fan of the dash coming to a point like a cut of cheese, but if it's functional, who cares!

hehe I actually agree... but again the way the boat is setup there wasnt a whole lot of choice if I wanted a taller dash, but still want to put the windshield back on... it works, the finish is nice, even if it is a bit odd looking LOL

I like the way you are laying out the wiring...something that simple probably would have eluded me when I got ready to rewire mine, so thanks for those pictures...sometimes it's something that just seems so simple that you can't dream up the right way to do it without actually seeing it done. ;):D

No problem, I was hoping that might help some folks who are having re-wiring questions... it made it a lot easier to figure it all out. I forgot to mention I used a label maker for the ends so I could keep track of what circuit was what... (used to install Cat5/Cat6 networks, so took the idea from that, makes a big difference, especially if you have a lot of circuits).
 

ezmobee

Supreme Mariner
Joined
Mar 26, 2007
Messages
23,767
Re: My 85' Riviera Tri-hull Rebuild

Nice looking blue stripe :)

In all seriousness, it looks great. Looking forward to see the interior finishes. Your dash looks real sharp and pre-wiring the cap is a great idea. Looks like you have a pretty nice unmolested hull to work with. Not a ton of extra holes and things.
 

singinout

Petty Officer 1st Class
Joined
May 20, 2009
Messages
339
Re: My 85' Riviera Tri-hull Rebuild

Hey just seen this thread! Nice trihull! Ur work is looking great! Keep it up! Hey its all worth it in the end! You get a nice boat with your own personal touch! ;-) O yes, and I do like your blue stripe! lol
 

Numlaar

Chief Petty Officer
Joined
Jul 9, 2009
Messages
633
Re: My 85' Riviera Tri-hull Rebuild

Hehehe Thanks so much for the replies guys! I'm happy now :)

EZ, Yeah the only things screwed into the hull, were an extra bow eyelet, and the kicker bracket on the back... probably the worse damage to the hull was on the transom where the outboard had punched through the glass... but that was repaired from the inside, then filled from the outside to level it back out, so should be good as new.

Glad you guys like the blue stripe! I LOVE it! Its really bright and bold compared to that nasty teal it had before.

As promised I got the pictures of the white gelcoat being sprayed and those are posted below.

Enjoy

Stern View facing bow:
92GelcoatTransomView.jpg


Angle view:
93Gelcoatangleview.jpg


Bow view:
94Gelcoatbowview.jpg


(in that picture you can see how well the keel came out compared to how damaged it was before, I am really pleased with it).

Ok well thats it for now... I probably won't have another update for a week or so... this week will be sanding, sanding, and more sanding of the gel coat then the compound/polish/wax so I can flip it back over.

Once I make some progress on the inside I'll post some more pics.
 

singinout

Petty Officer 1st Class
Joined
May 20, 2009
Messages
339
Re: My 85' Riviera Tri-hull Rebuild

Numlaar wrote:
Glad you guys like the blue stripe! I LOVE it! Its really bright and bold compared to that nasty teal it had before.

Dude the more I look at that stripe, the more I like it!! You're gonna soon make me wish I hada big bad blue stripe on my boat!!
 

lowkee

Lieutenant Commander
Joined
Dec 13, 2008
Messages
1,890
Re: My 85' Riviera Tri-hull Rebuild

I just found this thread.. no idea why I've not seen it before (I actually clicked on your sig link). Man, that hull looks a night and day difference! I can only hope mine turns out near that pretty. I agree, the blue stripe really makes the boat more vivid and classy. I don't see any deck pics, did you keep the existing deck? Also, what did you use to spray the gelcoat? I thought it required some crazy expensive sprayer, so I opted against it and went with paint. :(
 

bskye85

Seaman
Joined
Jun 19, 2009
Messages
56
Re: My 85' Riviera Tri-hull Rebuild

Very informative!!


I have a trihull im currently gutting, and was iffy on what to do about the tiny bow seats.....I LOVE the casting deck idea!! nice touch.:cool:

Keep it up and great work on that hull!
 

bigredinohio

Chief Petty Officer
Joined
Jun 18, 2009
Messages
604
Re: My 85' Riviera Tri-hull Rebuild

I was wondering on what you used to spray your gelcoat? It looks like it turned out great. Making good progress!
 

forgedin78

Seaman
Joined
Aug 2, 2009
Messages
50
Re: My 85' Riviera Tri-hull Rebuild

I am also interested in what you used to spray the gelcoat
 

Numlaar

Chief Petty Officer
Joined
Jul 9, 2009
Messages
633
Re: My 85' Riviera Tri-hull Rebuild

Hey guys,

Sorry I have been out of town a few days for my son's birthday...

I dont know about expensive equipment to do the spraying....

I already had a water seperator on my compressor to do automotive spraying...

I just got a cheapy siphon feed spray gun set from lowe's (was 59.95). Came with the sprayer, two cans, detail sprayer, and two detail cans, some other stuff...

I just cut it 25% with acetone for spraying. (the gel-coat said 10-15% but I read on another gel repair forum that cutting it by 25% makes it easier to spray).

I did 3 coats all told on both the white and blue and it came out probably an 1/16th - 1/8th inch thick.

I didn't need any special spray equipment at all... and even sprayed it outside... had a few bugs land in it LOL, but it touched up just fine. :D

Of course with spraying it on, you end up with some orange peel that you have to sand off, and thats where I am at now... the funny thing is, I used laminating gel-coat (no wax) and I had mold release to spray it with for it to harden for the final coat, but it seemed to harden right up, and I never used it... /shrug...

If you are "OK" with a textured look from the orange peel, you could have probably just left it like that...

Next time I think I will, cause my arms are gonna fall off from all this sanding LOL... painting would have been a lot easier I think... but I felt the old Gel was too thin in places to just paint over, thats why I decided to re-gel it.

Hope the info helps!
 

Numlaar

Chief Petty Officer
Joined
Jul 9, 2009
Messages
633
Re: My 85' Riviera Tri-hull Rebuild

I just found this thread.. no idea why I've not seen it before (I actually clicked on your sig link). Man, that hull looks a night and day difference! I can only hope mine turns out near that pretty. I agree, the blue stripe really makes the boat more vivid and classy.

Thanks Lowkee! :D

I don't see any deck pics, did you keep the existing deck?

No, I had to redo the whole boat, it was all completely shot... in fact there was no old "deck" to speak of (at least as far as wood was concerned). The inner fiberglass "liner" was a good 1/4" thick, so I was able to cut it out and re-use it (You can see some of this in the early on pictures). I will post more of the inside of the boat once I flip it back over and get the inside all finished off.. then you can see how the new inside deck looks, and how the casting deck up front came out.

Also, what did you use to spray the gelcoat? I thought it required some crazy expensive sprayer, so I opted against it and went with paint. :(

See post above, answered all you guys spraying question there :D
 

Numlaar

Chief Petty Officer
Joined
Jul 9, 2009
Messages
633
Re: My 85' Riviera Tri-hull Rebuild

Very informative!!


I have a trihull im currently gutting, and was iffy on what to do about the tiny bow seats.....I LOVE the casting deck idea!! nice touch.:cool:

Keep it up and great work on that hull!

Thanks!

Glad I could be of help! And good luck with your bow seats too! hehehe
 

bigredinohio

Chief Petty Officer
Joined
Jun 18, 2009
Messages
604
Re: My 85' Riviera Tri-hull Rebuild

Thanks for the info!

Again, it's looking really good and I'm sure it's well worth the sanding that you are putting in.
 

Numlaar

Chief Petty Officer
Joined
Jul 9, 2009
Messages
633
Re: My 85' Riviera Tri-hull Rebuild

UGH

OK well after a week of sanding, my arms are hurting bad...

I sanded a wee bit too much on one of the corners, and you can see the old gel-coat... so Im going to have to touch that up again... (I took a picture but it came out blurry, I'll try again tomorrow).

After the frustration of my sanding incident I decided to start working on the outboard... I know I said I would save it till the end, but I figured it would actually be better to document the progress as it happens... (yes I like variety, so I am constantly changing things up hehehe).

Anyhow, here is a pic of my outboard: (it's a 1977, 70HP 3cyl, Evinrude).

01midlowerunitoverview.jpg


The motor must have been tilted down in saltwater for quite some time because everything from the water line down is severely corroded...

Here is a close up picture of the Lower unit:

02lowerunitpitting1.jpg


I basically went to town on it, and stripped it back down to the bare aluminum...

I sandblasted the parts I couldn't get at with sandpaper, and sandpapered off the rest.

In this picture you can see how some of the sandblasting at the corrosion is going:

07midsectionshift.jpg


I'll continue more in the next post...
 
Top