My Retirement Project Chapter Five

jpmurphy

Petty Officer 1st Class
Joined
Jan 14, 2009
Messages
358
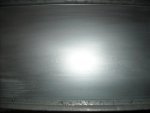
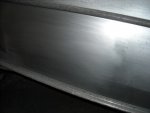
I'm about 75% done with the initial sanding and decided to pick one section to sand down to the finish just to see how things would look. I started with the high grit paper and worked down to 220, then 600 and finally 1500 grit hoping this would get the finish I want. The heavier grit papers are the regular color, the finer grits being 220, 600 and the 1500 are black paper.

Everything goes well until I start with the black 600 grit paper then I start to get black steaks. It gets worse with the black 1500 paper. Once I stopped sanding I washed the spot with 50/50 distilled vinegar, let dry, and there are still black streaks which are noticeable.

The pics don't show the streaks very well, probably due to the flash being so bright. But I can see them all the same. Other than washing after the last sanding, I am at a loss as to how to get rid of these streaks. I haven't done the steel wool polishing on this test section yet as I wanted to see what you folks had to offer concerning these streaks.

As always, I really appreciate your help. :redface:
 

Attachments

  • DSCN0029.JPG
    DSCN0029.JPG
    73.2 KB · Views: 0
  • DSCN0030.JPG
    DSCN0030.JPG
    80.6 KB · Views: 0
  • DSCN0031.JPG
    DSCN0031.JPG
    81.1 KB · Views: 0
  • DSCN0032.JPG
    DSCN0032.JPG
    75.7 KB · Views: 0

Bondo

Moderator
Staff member
Joined
Apr 17, 2002
Messages
71,095
Re: My Retirement Project

Re: My Retirement Project

Ayuh,...

I'm guessing you're looking for a Polished finish,..??

I believe the black streaks will go away as you move onto the various polishing compounds are used...
I believe they're nothing but displaced metal,+ oxidation...
 

jpmurphy

Petty Officer 1st Class
Joined
Jan 14, 2009
Messages
358
Re: My Retirement Project

Re: My Retirement Project

Ayuh,...

I'm guessing you're looking for a Polished finish,..??

I believe the black streaks will go away as you move onto the various polishing compounds are used...
I believe they're nothing but displaced metal,+ oxidation...

Many Thanks............:redface:

That relieves most all of my concern. I am hoping for a polished finish as I don't care much for the painted overall look. Clean alum just looks sleeker to me.

I really appreciate every one's guidance as I progress along this learning curve. :)
 

Bob_VT

Moderator & Unofficial iBoats Historian
Staff member
Joined
May 19, 2001
Messages
26,065
Re: My Retirement Project

Re: My Retirement Project

You are almost to the point to invest in a variable speed buffer. I purchased one from Noerthern Tool (their label) and it is strong enough and durable enough for homeowner use. If I was going to do polishing for a living I would have gone Milwaulkee or dewalt.
 

erikgreen

Captain
Joined
Jan 8, 2007
Messages
3,105
Re: My Retirement Project

Re: My Retirement Project

Just checking - are you wet sanding with that grade of paper? Depending on the quality of paper and the friction generated, it's possible that the abrasive could come off the paper and stick in the aluminum.

Most polishing techniques I know for aluminum make use of power tools and a polishing or buffing compound... those have built-in lubricants.

Note that the aluminum is going to re-form a less shiny layer on top once you're done... it's this aluminum oxide layer that protects the metal from corrosion (and makes it hard to paint, incidentally). Unless you cover the metal immediately with some sort of clear coat paint, it'll re-form. Which is generally what you want anyway.

Erik
 

jpmurphy

Petty Officer 1st Class
Joined
Jan 14, 2009
Messages
358
Re: My Retirement Project

Re: My Retirement Project

You are almost to the point to invest in a variable speed buffer. I purchased one from Noerthern Tool (their label) and it is strong enough and durable enough for homeowner use. If I was going to do polishing for a living I would have gone Milwaulkee or dewalt.

Before I started I bought a Ryobi from Home Depot. Single speed that isn't fast enough for me and the damn bonnets keep coming off. On an earlier test spot I applied the compound by hand and then buffed with the Ryobi which seemed to work fairly well. I just expect too much from a power tool.......:rolleyes:
 

jpmurphy

Petty Officer 1st Class
Joined
Jan 14, 2009
Messages
358
Re: My Retirement Project

Re: My Retirement Project

Just checking - are you wet sanding with that grade of paper? Depending on the quality of paper and the friction generated, it's possible that the abrasive could come off the paper and stick in the aluminum.

Most polishing techniques I know for aluminum make use of power tools and a polishing or buffing compound... those have built-in lubricants.

Note that the aluminum is going to re-form a less shiny layer on top once you're done... it's this aluminum oxide layer that protects the metal from corrosion (and makes it hard to paint, incidentally). Unless you cover the metal immediately with some sort of clear coat paint, it'll re-form. Which is generally what you want anyway.

Erik

I'm using "Gator" brand waterproof paper. Dry sanding. It's not warm enough in my shop to wet sand for very long, and I'm using a power sander.

If I read your response correctly; are you saying that I should "seal" every time I quit sanding for the day ? I'm sanding the entire hull in steps. First with coarse grit then graduating to finer grit as I progress. To clarify: I 'm sanding the entire hull with 40 grit, then the entire hull again with 60 grit and so on for about a total of 6 to 7 steps of sanding.

Should I be attacking just one spot, sand from start to finish, polish/buff w/compound on that one spot and then seal it ? Then start over on another spot ?

Looking forward to your reply. Thanks.
 

jqwhaler

Cadet
Joined
Nov 3, 2008
Messages
18
Re: My Retirement Project

Re: My Retirement Project

I tried the Gator paper. 3M Imperial paper is a world of difference, it will not tear near as easily, and it cuts better and for longer without getting gummed. A little more pricey and hard to find in those high grits, but worth it in my opinion.
 

buckeyboy

Seaman
Joined
Jan 10, 2009
Messages
60
Re: My Retirement Project

Re: My Retirement Project

Mc Master Carr sells metal polishing pads for grinders and buffers we use them at work. they leave a mirror finish.. great for aluminum and stainless steel. hope this helps great work best of luck;)
 

Utahboatnut

Senior Chief Petty Officer
Joined
Jan 15, 2009
Messages
785
Re: My Retirement Project

Re: My Retirement Project

The aluminum will start to oxidize pretty quick after its been sanded polished etc. If you want it to stay looking like it does when you finish polishing you will have to seal it with some sort of clear. I polished the tunnel on my snowmobile got it to almost a mirror looked awesome for about half the season then started to re-oxidize and once it starts to go it dulls up quick. Both Mothers and Meguires(sp) make great aluminum polishing and finishing products, they aren't the cheapest but they do work very well. Call a body shop and see what they reccomend you do with it or what products to use to seal it with. Good luck....
 

jpmurphy

Petty Officer 1st Class
Joined
Jan 14, 2009
Messages
358
Re: My Retirement Project

Re: My Retirement Project

The aluminum will start to oxidize pretty quick after its been sanded polished etc. If you want it to stay looking like it does when you finish polishing you will have to seal it with some sort of clear. I polished the tunnel on my snowmobile got it to almost a mirror looked awesome for about half the season then started to re-oxidize and once it starts to go it dulls up quick. Both Mothers and Meguires(sp) make great aluminum polishing and finishing products, they aren't the cheapest but they do work very well. Call a body shop and see what they reccomend you do with it or what products to use to seal it with. Good luck....


OK, that's better, Thanks.
I'll look for 3M paper, probably in an auto parts store.
I'll check the web for the McMaster Carr pads.

:)

Love this site.........................................
 

projecthog

Petty Officer 1st Class
Joined
Apr 20, 2008
Messages
272
Re: My Retirement Project

Re: My Retirement Project

I don't know if this will be of help, but i'll try anyway,

When I did my old wooden cruiser, I cleaned all the brass on it and had a really nice looking result.
The outside stuff lasted a month or so before it became darker and started to fade out.
Some one told me that waxes like futurewax (floorwax) or any other hard coating wax would slow that down to maybe twice a season for treatment.
I bought a couple of jugs and applied the wax with a rag and it worked pretty good.
Doing it on a large surface may not be acceptable though.

Learned to do it right the second time as I had missed a few spots and they came out blacker then coal on the second polishing that season.
I used a rag with floor wax stripper to ready it for another go and that was easy as well.

For all of that though, you could probably spray it with a clear synthetic coat of some kind just the same.
My worry with the clear coat finish was that it might peel and look like a disease, lol.

Good luck with it, I always wanted to do a polished clearcoated aluminum finish, but always shyed away from it due to the work involved and the chance of it dulling or peeling the finish again.

PH.
 

jpmurphy

Petty Officer 1st Class
Joined
Jan 14, 2009
Messages
358
Re: My Retirement Project

Re: My Retirement Project

I tried the Gator paper. 3M Imperial paper is a world of difference, it will not tear near as easily, and it cuts better and for longer without getting gummed. A little more pricey and hard to find in those high grits, but worth it in my opinion.


I found the 3M paper and you are right about it lasting longer and not tearing so easily. Thanks.. :)
 

jpmurphy

Petty Officer 1st Class
Joined
Jan 14, 2009
Messages
358
Re: My Retirement Project

Re: My Retirement Project

A few words of advice:

To anyone who either now has or aquires an alum boat that is badly oxidized and pitted and wants to restore it to a show room/new finish, reconsider painting it before you get into the sanding part. I keep track of my time when I work on my boat and after todays' shift I have 67 hours of just working on the outside of the hull. Almost finished with the entire hull with just a few tricky spots to hit. This is just the first sanding. Have to make another 3 to 4 passes before I get to the finish I want. Each pass being done with a finer grit paper. I anticipate the next pass overs will go much quicker than the first hard sanding did, but it will still take several hours for each pass. No idea how long it will require to buff and polish and then seal it all. Probably looking at over 100 hours on just the hull.

I am completely redoing my trailer as well. Have six days into the sanding and painting of that. Have to wait for the temp to warm enough to paint in the garage with no heat.

Then it's on to the interior of the boat. I have no idea how long that will take, especially if I buy and install all of the goodies I want.

So, to make a long warning shorter, give it a lot of thought before you lean on that sander because once you get into it your'e committed. And trying to go fast is only a waste of time because you have to go back over everything.

I am enjoying the work on the boat, but then again I have more free time than brains. So for you beginners, lilke myself, be prepared to spend about as much time on your boat as you did in the womb.

But it is a satisfying ride and the end results will hopefully be worth the journey. :):):):):)


See ya on the lake..............
 
Top