New owner 21 ft 74 Starcraft aluminum runabout jet

heyyou325

Chief Petty Officer
Joined
Feb 17, 2011
Messages
649
Re: New owner 21 ft 74 Starcraft aluminum runabout jet

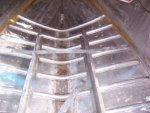
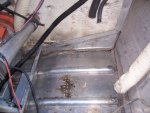
I guess I should update my work. Last weekend I borrowed a sandblaster and portapower. Spent more time working on them then with them. I hate borrowing tools. The trailer tongue is almost finished, can't find my pics of that tho. I just need to do a little welding. Borrowed the sandblaster again and was told the shop needs it next monday since it is working right again. I have most of the decking out in the boat finally. 100_3840.JPG100_3832.JPG 
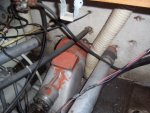
I still have to lift the engine to get that, and it's the softest. I guess I'll have to block it up somehow. I've got one more side panel to come out, and a little bit more of the engine compartment. And I've got almost 1/2 of the sandblasting finished. I wished I knew what sort of putty they used, as it doesn't want to come up.
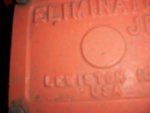
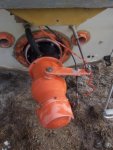
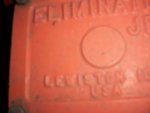
I checked and it was River City Marina that installed the motor. I e-mailed them about the eliminator jet drive and the woman said their parts manager knew all about them. I talked to him today, and he says he has never seen one, oh well another dead end. He did say American Turbine bought out Berkley and several other Jet drive makers and to check with them, during the week.100_3835.JPG100_3837.JPG
 

Attachments

  • 100_3839.jpg
    100_3839.jpg
    138.5 KB · Views: 0

ezmobee

Supreme Mariner
Joined
Mar 26, 2007
Messages
23,767
Re: New owner 21 ft 74 Starcraft aluminum runabout jet

You aren't planning on sandblasting the aluminum are you?
 

heyyou325

Chief Petty Officer
Joined
Feb 17, 2011
Messages
649
Re: New owner 21 ft 74 Starcraft aluminum runabout jet

I'm only using 40 to 50 lbs of air and cleaning off the outside seams and rivets. Except where the paint is already gone, I'm not going thru the grey bottom paint, or maybe even the primer. I've never had a problem before, as long as I keep the pressure down. I had this explained to me about 30 to 40 years ago. With high pressure and just staying in one place supposedly you can warp the aluminum, or I'm told really high, you can blast a hole in it. I've never experienced either one personally tho. Since I can't tighten the rivets with 2 hammers (double hull), I figure I'll give gluvit a try on them.
 

heyyou325

Chief Petty Officer
Joined
Feb 17, 2011
Messages
649
Re: New owner 21 ft 74 Starcraft aluminum runabout jet

I didn't quite think my last post thru I guess. I should have asked ezmobee about his reasons to not sandblast. I was taught back in the mid 70's by a guy in his late 60's or early 70's who redid boats as a hobby. We did several old aluminum row boats for a rental place and never had a problem, but things happen and the older I get the less I know for certain.
 

ezmobee

Supreme Mariner
Joined
Mar 26, 2007
Messages
23,767
Re: New owner 21 ft 74 Starcraft aluminum runabout jet

Well I am no expert by any means. I just know that there is a real danger of warping it if you aren't careful. Iboater Azlo blasted his bow deck and warped the s$%t out of it. Didn't want to see you accidently do that to your hull.
 

heyyou325

Chief Petty Officer
Joined
Feb 17, 2011
Messages
649
Re: New owner 21 ft 74 Starcraft aluminum runabout jet

I've heard of that happening, but it's never happened to me yet. I've also heard of people blasting a hole in it. My poor old air compressor can't even keep up at 40 to 50 lbs pressure, so I go as quickly as possible. I wonder how much pressure and how long it would take to put a hole in it. I think if people just go easy and just try to take some of the paint off, leave the primer to adhere to the aluminum, and roughen up the rest they probably won't have problems. But I've been wrong before, and will probably be again. The hull looks a bit warped anyway which is one reason I wanted to hammer it out. Thanks for the comeback I got to wondering if there were other problems I hadn't heard about.
 

djpeters

Lieutenant Commander
Joined
Jun 9, 2010
Messages
1,824
Re: New owner 21 ft 74 Starcraft aluminum runabout jet

FWIW, I checked into having mine soda blasted at a local sandblaster. He wanted about $400. He then said if he used sand it would be half that. I asked about warpage and he said both soda and sand could warp or put a hole in it if the operator doesn't know what they are doing. He said it was up to me, but they wouldn't warp it or put holes in it. Then my paint guy said he would take care of stripping it when the time comes.
 

heyyou325

Chief Petty Officer
Joined
Feb 17, 2011
Messages
649
Re: New owner 21 ft 74 Starcraft aluminum runabout jet

Well I finished my sandblasting, and no warpage, or holes. I have 4" of overhead welding left on the tongue, plus 1 4"X 1/2" bolt for the hitch, didn't have any in my bin. Got a couple more things out of the boat, and hit a new problem. The 2"X5" untreated boards under the motor mounts are rotten. And so is the 2' X 4' pieces of plywood on either side of the motor, and under the motor mounts. I think I have 2 4' pieces of 4"X5" treated cross arms from the power company taking down poles, and such a few years ago. Helps to have friends sometimes. I guess it depends on what side of the acquiring throwaways you're on. I can put them under the motor, and a treated 2X4 as spacers. I am thinking of getting a 4'X4' aluminum plate to split in half and r replace the plywood, no rotting there, and it will be under my fuel tanks too, and not where I will be walking on them. But how do I get the 350 ci motor picked and held up? Engine cherry picker isn't tall, or long enough to use. Plus I'm not sure how high I can lift without doing damage to the jet drive. There is a u joint, but that only allows so much movement, and has to be put back real close, or it will be out of balance (at least with cars, trucks, and hvy equipment). If I can find places to put say 4X4 s under the motor, will that damage the aluminum hull while I'm replacing the other stuff? I hate surprises. One fuel tank is out and drained, one to go. Still have one more side panel, and it supports the dash, motor controls, and a few other things. Not sure what star in the sky to hook them to when I pull that. I was hoping with some halogen lights, and an old heat lamp to start applying gluvit to the inside this week, but don't think I'll make that. I do have a couple extra days I'm taking off thursday and friday tho as I got to get away from work for awhile. Been a long winter maintaining roads up here. Now I'm fighting mud and snow at the same time.
 

GLG fishing

Chief Petty Officer
Joined
Dec 25, 2009
Messages
456
Re: New owner 21 ft 74 Starcraft aluminum runabout jet

Treated wood and aluminum boats don?t mix. The treatment will leach out and corrode your hull. Others have used stepladders on each side of the boat and a 4x4 across to lift motors in place of a sky-hook. I have also seen a-frames made out of 2x4?s to do the same job. Got a large tree or two to back the boat under? Lash a 4x4 across the two trees and use a come-along to lift the motor.
GLG
 

heyyou325

Chief Petty Officer
Joined
Feb 17, 2011
Messages
649
Re: New owner 21 ft 74 Starcraft aluminum runabout jet

I just ordered enough aluminum 2X4 rectangular tubing to do the job. Didn't want to spend that $100+ but I also don't want to have to replace this again. In 10 to 15 years, I'll be too old to do it myself probably. No offense to the over 75 crew. I figured I'd have to build a tripod out of Cedar poles, and use a come along to lift the motor, but I'd have to untarp it to do that. I doubt if the 1"X1" square tubing used to build a fence around the back before I bought it would support the engine. I could keep a tarp on that way tho. Whoda thought a new fishin boat could be this much trouble. And I'm not even sure yet how the jet drive is. I keep getting the runaround on finding info on the eliminator jet drive that I know has been out of production for awhile.
 

heyyou325

Chief Petty Officer
Joined
Feb 17, 2011
Messages
649
Re: New owner 21 ft 74 Starcraft aluminum runabout jet

It's also called the Seattle sewer pipe, but it was made in Lewiston, Idaho probably about 200 miles away. I haven't actually measured it, that's just a guess. I found a place in Lewiston where I can still get some used parts, and they have a machine shop that builds impellers and things for them. The guy I talked to said there are still a lot of them around, but parts are hard to come by, and forget about a repair manual.
Took the day off for my birthday to work on the boat. Almost have a new base to mount the motor on installed, and I did purchase plywood for the decking. The last side panel didn't want to come out, but 4 hrs later I got it in one piece. Have to reupholster and reuse them. Couldn't find my siphon pump, but I got my last 30 gal fuel tank out. More than 20 gal of 7 or 8 year old fuel in it. I cut some rubber washers out of and old truck mudflap to insulate between the cast iron engine and the aluminum boat. Now I need to find a right angle drill to have room to drill into my aluminum base to mount the engine. Inner hull all looks pretty good. Wished I could say the same about the outer. Can't find any obvious leaks tho. I still wished I knew what they sealed some of the seams with, like the keel guard, and the (boy I hate it when I can't think of names) the piece riveted on bottom on both sides of the keel to help with steering. Neither of which the seams go into the boat. Nothing on rivets, just all the seams, rubbery and won't come up. After I finish with the engine I get to wash inside and start to Gluvit, I have enough lights and propane heaters for that. Then I cut and epoxy the deck and transom. It's still sound. But one board in back needs replaced. Need to replace the eyebolt in front. Gluvit the outside seams. maybe putty some of the dings, thinking about epoxying the outside under the water line, and repaintingthe whole outside. Rebuild the cage for the top and get a new top made. Maybe install a heater for winter, late fall and early spring fishing. Oh and make a new engine cover. Piece of cake if it doesn't kill me first. Oh and I still have the 4" of overhead welding on the trailer and sometime moving the lights so they can be seen and worked on easier.
 

Attachments

  • 100_3837.JPG
    100_3837.JPG
    53.4 KB · Views: 0
  • 100_3835.JPG
    100_3835.JPG
    53.9 KB · Views: 0
  • 100_3839.JPG
    100_3839.JPG
    21.4 KB · Views: 0

yooperangler

Senior Chief Petty Officer
Joined
Sep 17, 2010
Messages
721
Re: New owner 21 ft 74 Starcraft aluminum runabout jet

Good idea pulling those tanks and getting them cleaned out . It sounds like you have a lot of work to do but also a plan which is better than me most of the time:D If its any consolation I really like the Holiday that is one sweet boat.
 

heyyou325

Chief Petty Officer
Joined
Feb 17, 2011
Messages
649
Re: New owner 21 ft 74 Starcraft aluminum runabout jet

When I bought the darn thing I had a plan to reseal the outside, get it on the lake, and then sell my Crestliner to pay for it. Some of the individuals on here convinced my I had to do more. Where do you stop.
 

yooperangler

Senior Chief Petty Officer
Joined
Sep 17, 2010
Messages
721
Re: New owner 21 ft 74 Starcraft aluminum runabout jet

Yeah I know the feeling been there with a few boats. The one I have now I bought as a project so no surprises or disappointments I guess. I figure when/if I ever get it done it will last me awhile ( I hope). I'm pretty much down to a bare hunk of aluminum with some missing rivets and a few cracks so guess I can stop the tearing down phase soon:cool:
 

heyyou325

Chief Petty Officer
Joined
Feb 17, 2011
Messages
649
Re: New owner 21 ft 74 Starcraft aluminum runabout jet

When I first started working on aluminum boats, I used a seam sealer that resembled varnish, in color, texture, and thickness. It was applied with a paint brush. I can't remember who made it, but I've never had a problem with it. Sold in boat stores here. Never used it on rivets tho. On this site everyone recommends Gluvit, so I bought some to try. I understand it's like epoxy resin which is considerably thicker than what I used previously. On this boat I'm working on, it has a white almost like a paste used on all the seams and the rivets rivets inside. A few patches have been added and all have this substance on. Real hard to get off. Anyone know what it is? I realize there is more than one right way to do things, and was wondering about leaving this stuff on, and maybe using gluvit over it. Some places it's coming up on it's own, but most places I can't even scrape it off. It since it is on all seams inside and out, and the rivets inside, and most of the recent work done on this boat was by professionals, I am assuming it was also. If I left the places that were stuck down tight, and either Gluvited over them, or epoxied over them on the outside, making sure I got to well past for places to adhere does anyone think it will seal. This stuff is inside of the seams. I have used epoxy over small patches of silicon caulk before with good results, as long as I use 2 coats and It is small patches. Granted I was unaware of them until I was painting the epoxy on for a friend and he said just go for it. It's lasted for 7 years so far. I'm not that worried about the epoxy, but I've never used the Gluvit before, and there are some large patches of this gunk on the inside. I think I know the answer, but would like to know what I'm dealing with. This stuff was even used to install plywood in the transom, so it must have some merit.
Finally got the engine reinstalled. Thought I had an unheated, no electricty, or water garage I could borrow, for putting on the Gluvit, epoxy, and paint, but it's too small to get the boat in. Boat and trailer is 29' 6" with tongue extension and jet drive. Garage is 20' with an 18" shelf in the back. Door is 8' wide, boat is almost 7. Door is 6' 8" high, boat on trailer is over 7. Not meant to be I guess. Predicting snow again in the morning, had it this morning too. Trying to get the inside of the boat cleaned up for the goluvit now, have maybe 1/4 of it. Got to some large patches of the gunky sealant that was used. Haven't washed it with vinegar water yet tho. I have old fashioned yard lights found for heat inside, plus a couple of propane heaters which I'm not sure is a good idea. If the gluvit has epoxy in it the fumes are apt to explode on fire with a flame next to it.
 

Daltonxj

Petty Officer 1st Class
Joined
Apr 25, 2010
Messages
244
Re: New owner 21 ft 74 Starcraft aluminum runabout jet

have you thought about putting a thick tarp over the boat and putting some heat lamps inside for a hour and let it heat up first then go out and start... the lamps might heat the hull and get it warm. may take a few though....
 

ezmobee

Supreme Mariner
Joined
Mar 26, 2007
Messages
23,767
Re: New owner 21 ft 74 Starcraft aluminum runabout jet

I don't think Gluvit is particularly explosive. It hardly smells at all.
 

heyyou325

Chief Petty Officer
Joined
Feb 17, 2011
Messages
649
Re: New owner 21 ft 74 Starcraft aluminum runabout jet

I guess it's time to finish on what I got accomplished, not as close to sealing as I thought. Have to pull the engine a fourth time as something moved, glad I remeasured. I have a pic of my mounting. The front is 1/2" off, back is right on. I finally found something that will help get that rubbery white gunk off, 50% simple green and 50% bleach sprayed on and left for 45 minutes. It got it started. I've got some more, and the corrosion in the very bottom yet. Garage was too small. Back to working in the snow with tarps.
 

Attachments

  • 100_3846.JPG
    100_3846.JPG
    56.3 KB · Views: 0
  • 100_3855.JPG
    100_3855.JPG
    50.9 KB · Views: 0
  • 100_3853.JPG
    100_3853.JPG
    52.9 KB · Views: 0

heyyou325

Chief Petty Officer
Joined
Feb 17, 2011
Messages
649
Re: New owner 21 ft 74 Starcraft aluminum runabout jet

Well, I guess it's I report on my lack of progress this weekend. Borrowed a pressure washer to try to get some of the gunk up inside the boat. 220 so it should have extra poop. Spent all of Saturday morning getting it ready, fixing wiring new pigtail, reattaching pressure hose, cutting a section out and splicing, etc. Raining like everything. Gave it a try, anyone want to know how to curl your hair? Went back thru all the wiring taping and sealing with caulk all wires not covered with outer sheath. decided to accomplish something so I cut out my decking, and drilled it. Sunday morning weather was nice, first time in I think a month tried pressure washer again. not a lot of pressure and would shut itself off after about 5 minutes. I epoxied the underneath side of the decking and used wire brushes on the inside of the boat. Afternoon had honey dos. Very productive weekend. I need to start on other chores soon so have to start getting things accomplished.
 
Top