New to iBoats: Starcraft Restoration Project

jennis9

Petty Officer 1st Class
Joined
Mar 22, 2008
Messages
396
Re: New to iBoats: Starcraft Restoration Project

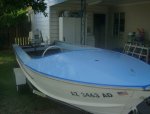
Wes... nice boat. I am in LOVE with the style of that year with the curved windshield. My husband and I just bought our first aluminum Starcraft together - 1985. and I have already shown him a listing for one like yours from craigslist for $450 - trailer and all in a gold color. he told me to buy it and restore it since i am so addicted to watching all of the progress on this forum. I told him if i was still as interested in it a year from now - i'll find another one and begin! next may will be here before you know it.

good luck! I'll be watching your progress...
 

WesMason

Petty Officer 2nd Class
Joined
Apr 15, 2008
Messages
107
Re: New to iBoats: Starcraft Restoration Project

INJUN - Thanks. I would have thought a roller, but I think I'll experiment with both a brush and roller first. I will be doing two coats.

GGILL - Fishing is a must. A fun run-about will be a close second...but still second. Good luck with your project. That looks like a lot of boat.

Jennis9 - I didn't think anything about the style of this boat until I parked it in my driveway. That's when I saw the nostalgic charm of this wonderful vessel...and when I decided to take the restoration seriously. My son and I have had hours of fun working on the boat and we are very excited about our first voyage in 4 weeks.

Coors - Water sucking foam huh...yup well I think I'll make sure it is supported. Question: do you think the deck will rattle and make too much noise if I only attach (some) support to the deck and not ground it to the stringers? I plan on running one long support up the keel and attaching to the stringers and deck.

Thanks All!
 

i386

Captain
Joined
Aug 24, 2004
Messages
3,548
Re: New to iBoats: Starcraft Restoration Project

How did you do the support under the deck? I am really looking for ideas here.

As for the actual deck I am using 1/2 inch ply and will be sealing it with a poly resin. I was thinking about using a glass mat at the joints to keep everything level.

My boat's a little weird compared to things I've seen posted here. It's a tri-hull but doesn't have stringers. I guess you could say the hull itself forms stringers of sorts. It does make a level surface to glue to. I just glued it down with PM Premium and laid about 90 bricks in there on top of the glue joints.
 

WesMason

Petty Officer 2nd Class
Joined
Apr 15, 2008
Messages
107
Re: New to iBoats: Starcraft Restoration Project

i386 - I went and looked at your project page and saw that your hull is different than what I am dealing with. How does the glue you reference hold up to moisture and water? That may be a better option than drilling and screwing into the stringers...at least for additional support areas.
 

i386

Captain
Joined
Aug 24, 2004
Messages
3,548
Re: New to iBoats: Starcraft Restoration Project

i386 - I went and looked at your project page and saw that your hull is different than what I am dealing with. How does the glue you reference hold up to moisture and water? That may be a better option than drilling and screwing into the stringers...at least for additional support areas.

It's a waterproof polyurethane glue. Some of us here have just started to use it on boats so there's no long term data yet. I see no reason why it would fail, besides I'm glassing the deck in. My flotation foam also has some adhesive properties. I don't think that deck is coming off.:D

I'm sure they'll chime in, but I think the guys with stringers still screw the deck down to the stringers even though they use some sort of adhesive.
 

Coors

Captain
Joined
Dec 8, 2006
Messages
3,367
Re: New to iBoats: Starcraft Restoration Project

Screw down can be done; Drill the holes oversize, fill with epoxy paste,(deck over sized drilled also, hole sealed with epoxy, a little dab od 4200, and screw it down.
As far as the spacing of supports, have you ever walked on your roof, and felt the 1/2 ply give? and it has spacer clips between the 24" o/c trusses. And you don't want them on your deck.
My boat has a 2.5 by 5 foot tank in the center; even after replacing the 1/2 ply, and the 1/4 braces underneath the cover, I still get flex when walking on it.
and the 1x's are the 2.5' span.
 
Last edited:

WesMason

Petty Officer 2nd Class
Joined
Apr 15, 2008
Messages
107
Re: New to iBoats: Starcraft Restoration Project

Screw down can be done; Drill the holes oversize, fill with epoxy paste,(deck over sized drilled also, hole sealed with epoxy, a little dab od 4200, and screw it down.
As far as the spacing of supports, have you ever walked on your roof, and felt the 1/2 ply give? and it has spacer clips between the 24" o/c trusses. And you don't want them on your deck.
My boat has a 2.5 by 5 foot tank in the center; even after replacing the 1/2 ply, and the 1/4 braces underneath the cover, I still get flex when walking on it.
and the 1x's are the 2.5' span.

Coors - Ok, hear you loud and clear.

i386 - Thanks for the knowledge.
 

FiVe_O_LiVe

Recruit
Joined
Mar 5, 2008
Messages
4
Re: New to iBoats: Starcraft Restoration Project

Hello everyone! I too have just recently picked up a 15' Starcraft 1962. The entire deck has been gutted, so i have no idea where to start. I've been following the forums and the posts here with hopes of finding a way to mount stringers to the existing aluminum rib structure? Is it possible for someone to post a couple pictures of there deck lay-up? I was planning for 1/2 exterior ply deck, resin coat, and carpet. I'd like to mount two captains chairs. Don't mean to hijack this post...just looking for a few photos? ;)
 

ezmobee

Supreme Mariner
Joined
Mar 26, 2007
Messages
23,767
Re: New to iBoats: Starcraft Restoration Project

FiVe_O_LiVe, you'd get a better response to your question by posting it as a new thread in the Boat Restoration forum. The mods get grumpy about "hijacking" as you said.
 

WesMason

Petty Officer 2nd Class
Joined
Apr 15, 2008
Messages
107
Re: New to iBoats: Starcraft Restoration Project

I am trying to locate some used back-to-back seats. Part of the restoration is getting the boat back to "somewhat orginal". eBay is still too expensive and Craigslist is coming up short.

Any ideas? Perhaps one of you has some they want to get rid of.
 

WesMason

Petty Officer 2nd Class
Joined
Apr 15, 2008
Messages
107
Re: New to iBoats: Starcraft Restoration Project

Quick update on the project:

* More sanding to the topside in preparation for paint (maybe this weekend)

* Removed 9.5 Rude from transom (later project)

* Removed throttle and gear cables for replacement)

* "Started" to address electrical wiring mess. Honestly, I'm surprised the darn thing didn't short out or shock someone at some point. Very creative approach to wiring. New battery cables are needed, and I'm thinking I will run everything from a fuse or bus up under the fore deck.

* Measured, cut, and first seal on the deck ply.

* Started messing with how I am going to support the deck. I brought the lumber home and have been staring at it for days, taking measurements, playing with parts of the ply decking. I think I have an idea on how I will do this and it involves supporting across two stringers every 3rd one (Thanks Coors). I'm thinking of shaping the support blocks to conform to the stringer in order to achieve a level fit. Nothing fancy. Then screw the blocks down onto the stringers, and the deck to the blocks. Does this make sense?

I have included a few pictures for reference. Pay no attention to the lengths of the 2x4 and 2x6. I have made no cuts at this point other than the deck ply. The electrical appeared daunting, but after sorting it out makes complete sense. I actually think I am seeing a light at the end of the tunnel. Once the deck is in and supported properly, the rest will come together quick.

Thanks in advance for your input.
 

Attachments

  • Deck support.JPG
    Deck support.JPG
    56.8 KB · Views: 0
  • Electrical mess.JPG
    Electrical mess.JPG
    55.5 KB · Views: 0
  • Motor & transom.JPG
    Motor & transom.JPG
    63.6 KB · Views: 0

WesMason

Petty Officer 2nd Class
Joined
Apr 15, 2008
Messages
107
Re: UPDATE: New to iBoats: Starcraft Restoration Project

Re: UPDATE: New to iBoats: Starcraft Restoration Project

I think I have made some good progress on the project. The deck is in and solid as a rock. All the time spent "thinking" about how to do it as well as some good input from this board has paid off. It is supported down the keel with a 2x6 tapered to the stern, then braced every 10-18 inches with 2x4 from stern to midship, and a couple 4x4 braces in the deeper area just before the foredeck. The deck was sealed with epoxy resin and glass. All supporting braces etc were sealed as well.

The paint went on beautifully. I have never done a roll & tip method (I'm an old car guy so spray is my thing), but was amazed with how it came out . Fear is definetly the enemy here. The key is to follow the mehtod and trust the paint to even out (flow). 2 coats, with a sanding in between.

Here's what's next:
- Carpet
- reinstall new cables (throttle and gear)
- reinstall new battery cables
- remover remaining electrical mess, instal bus
- reinstall topside hardware
- GET HER WET

See pics below. I'd appreciate any comments or suggestions you may have.

Thanks - Wes
 

Attachments

  • 60108-1.JPG
    60108-1.JPG
    73.1 KB · Views: 0
  • 60108-2.JPG
    60108-2.JPG
    78.1 KB · Views: 0
  • 60108-3.JPG
    60108-3.JPG
    84.6 KB · Views: 0

ezmobee

Supreme Mariner
Joined
Mar 26, 2007
Messages
23,767
Re: UPDATE: New to iBoats: Starcraft Restoration Project

Re: UPDATE: New to iBoats: Starcraft Restoration Project

Looks fantastic. Great work. I don't what kind of condition your "dash" board is in but mine was pretty well rotted. I replaced it with a PVC trim board from Lowes which worked great. It has a nice smooth finish and will never rot. I also coated the inside of my splash well with liquid bedliner which looks nice and adds some more waterproofing. I actually just got back from Lowes buying some stainless hardware to reinstall my swim ladder and kicker bracket now that my new transom is in.
 

WesMason

Petty Officer 2nd Class
Joined
Apr 15, 2008
Messages
107
Re: UPDATE: New to iBoats: Starcraft Restoration Project

Re: UPDATE: New to iBoats: Starcraft Restoration Project

Thanks for the kind words. Your boat is one of a couple on this board I have studied at length...so I really appreciate your feedback.

The dash is in really good condition, but I am uncertain if it is the original. The vinyl covering on it is shot and most of the "cutouts" were for things I won't be using. I will replace the dash soon. I like the PVC trim board idea. I'll have to go look at that soon.

Post some pics of your swim ladder project. I was thinking about adding something like that as well.

Thanks - Wes
 

WesMason

Petty Officer 2nd Class
Joined
Apr 15, 2008
Messages
107
Re: UPDATE: New to iBoats: Starcraft Restoration Project

Re: UPDATE: New to iBoats: Starcraft Restoration Project

I also coated the inside of my splash well with liquid bedliner which looks nice and adds some more waterproofing.


Was the bedliner covering a roll-on application and was it expensive?
 

ezmobee

Supreme Mariner
Joined
Mar 26, 2007
Messages
23,767
Re: New to iBoats: Starcraft Restoration Project

The liquid bedliner came in a can from Wal-Mart and wasn't too expensive. I did buy the roller and tray kit they sell to go with it because the roller gives it a nice texture. It stinks to high-heaven though!
 

WesMason

Petty Officer 2nd Class
Joined
Apr 15, 2008
Messages
107
Re: New to iBoats: Starcraft Restoration Project

It's been a while since I posted any progress of the project. I did hit a mile marker in the project that I was shooting for (June 5th), which was a planned camping/fishing trip. A lot of late nights getting things ready so we could fish ON the lake instead of from the shore or in a rental. Not exactly lofty goals...however, the boat had not been on water since 1993 and getting to a place where she would float and catch fish was key. I am happy to report that she does in fact float and catch fish.:cool:

Attached are some pics of completed deck. I'm kicking myself for not taking more photos of the support under the deck as that is where the real work lies. Very solid support, without much weight gain. :D

Wes
 

Attachments

  • Deck1.JPG
    Deck1.JPG
    81.5 KB · Views: 0
  • Deck2.JPG
    Deck2.JPG
    49.8 KB · Views: 0
  • Deck3.JPG
    Deck3.JPG
    76.5 KB · Views: 0

WesMason

Petty Officer 2nd Class
Joined
Apr 15, 2008
Messages
107
Re: New to iBoats: Starcraft Restoration Project

I have been working on the 40 to get it ready for operation. The folks on the Outboard forum are terrific. That coupled with a local shop who really knows these old boats & motors has helped.

Done:
  • Throttle & Shift Cables installed
  • Lower unit inspected and impeller replaced
  • Carb kit purchased

Next:
  • Complete carb kit
  • Redo steering (new Teleflex or restore org.)
  • Back to Back seats

I'd like opinions on the seating. On the Fiberglassics site, I saw several seating configuraitons. I would like to keep it somewhat original, but flexible. I was thinking about putting in back-2-back seats but make them removable for more room if all I'm doing is fishing. Having all that space to move around is great when fishing, but probably not wise when cruising at WOT. :eek:

Ideas...thoughts?

Thanks - Wes
 
Top