PlayDoh’s 16 SS resto underway

PlayD0h

Petty Officer 1st Class
Joined
Apr 23, 2009
Messages
326
So looks like I’m getting another tool! Shrinker -Stretcher will make the bends in angle aluminum for the compartment door ‘jams’. I’ll have to do an angle and a flat stock piece, then weld them once shaped, to get the Z channel for the jams and only an angle for the door trim if I want some.
Tool is $250 but at the price of compartment doors, it’ll pay for itself and I’ll get to make all the custom hatches I want. That will come later but just learned about them.
 

Watermann

Starmada Splash of the Year 2014
Joined
Jan 12, 2013
Messages
13,822
So looks like I’m getting another tool! Shrinker -Stretcher will make the bends in angle aluminum for the compartment door ‘jams’. I’ll have to do an angle and a flat stock piece, then weld them once shaped, to get the Z channel for the jams and only an angle for the door trim if I want some.
Tool is $250 but at the price of compartment doors, it’ll pay for itself and I’ll get to make all the custom hatches I want. That will come later but just learned about them.

Come on, where's the pic of your new tool? :rolleyes:
 

ShoestringMariner

Lieutenant Commander
Joined
Apr 18, 2015
Messages
1,605
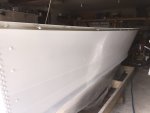
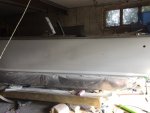
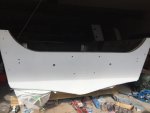
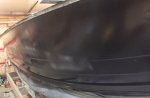
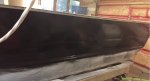
these pics are of the 2018 Starcraft Renegade 16’. I was thinking along these lines, as the original Splashwell wastes more space than needed, and doesn’t need to be as big. Maybe if you do lots of backtrolling and or fishing the Great Lakes you’d ‘need’ that much well. Yet wave whackers would be a nicer option IMO.
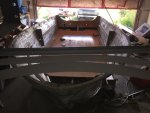
I don’t plan on putting heavy things back there, but some space for the necessities like drinks, food, bait and tackle would be a major advantage. I hate the OE battery placement and the 16 gauge aluminum tray it sat in.
Yet Im thinking I’ll fab up the whole splashwell and stern section in the shop, and when it’s done it’ll be a quick swap type. That, or it will be in the winter where I can use the boat without the Splashwell and make a wood mock up even.
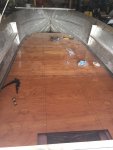
I might fab up some consoles someday. Until then I’m trying to decide how to go with the under-dash space. I’m also trying to decide if my trolling motor batteries should go under the dash, where Ive always had them, or just in front of the consoles. Likely won’t make much of a difference yet I have had trouble making plane with a heavier person at the bow + trolling motor. So I’m leaning towards under dash.
I just got AutoDesk Inventor software, which anyone can get if you register a student account for free. It’s Auto CAD more geared towards mechanical design and manufacturing. So I’m hoping to get to where I can mock up stuff virtually rather than physically. Not sure if my mind can envision things as well on a screen as compared to infront of me, but I’m learning.
Thanks for the advice and support, much appreciated. It’s interesting how much another person cheering you on can motivate you

That’s a nice set up. I’ve seen guys do this in the past and seen it on new boats at the sportsman show.
If I ever do another SS resto/build, it will be an 18’ OB with this trick set up
 

PlayD0h

Petty Officer 1st Class
Joined
Apr 23, 2009
Messages
326
That’s a nice set up. I’ve seen guys do this in the past and seen it on new boats at the sportsman show.
If I ever do another SS resto/build, it will be an 18’ OB with this trick set up

With an I/O your likely limited in terms of keeping the original size of the motor enclosure, and factoring in ventilation. I’m sure I’ve seen it done also, yet I’d think that it would be a little more complicated.
 

ShoestringMariner

Lieutenant Commander
Joined
Apr 18, 2015
Messages
1,605
With an I/O your likely limited in terms of keeping the original size of the motor enclosure, and factoring in ventilation. I’m sure I’ve seen it done also, yet I’d think that it would be a little more complicated.

Yes, but I’d want an OB not I/O
 

PlayD0h

Petty Officer 1st Class
Joined
Apr 23, 2009
Messages
326
Yes, but I’d want an OB not I/O

Oh man, my mind is lost completely now lol. I have no idea where I got I/O from there. id love an 18’er too. I’m literally 2’ under the total tow limit with my truck, 5th wheel and boat. And more often than not it’s me alone or with 1 buddy.
I’d pay top dollar for a Bimini while out on a scorcher
 

PlayD0h

Petty Officer 1st Class
Joined
Apr 23, 2009
Messages
326
Deck is down! Riveted all three sections. The lil piece can wait. I wanted to put epoxy down over rivet heads but I ran out of gas. I have the entire hull primed, bottom painted. Consoles primed and ready to go, splashwell is tomorrow, and final (2nd) coat of primer on starboard 3/4’s and transom.
Word to your mom, never shoot your workpiece with the first out of the gun. Apparently I had some acetone left in the gun and the entire 200ml went on like water, the worst right away. I wiped the thin run edges with acetone and it dried enough to sand it 18 hrs later. Well kinda, as it was gumming up the paper a bit, so I left it to dry more.
I might have to strip that section, which would suck, but I’m prepared. In hindsight I should have just dumped the primer and started over, yet most of it went on and I’d guess will be fine. Considering the consequences I should eat the loss and strip which I may very well do.

A few of my rivet heads are a tab above totally level. I wondered if it would be ok to sand the head down a bit? I’m thinking they won’t be noticeable after epoxied and vinyl goes over. Yet I had leaving things to chance.
 

Watermann

Starmada Splash of the Year 2014
Joined
Jan 12, 2013
Messages
13,822
Yep what he said, always test fire the paint gun on some cardboard before I shoot the boat.

Most guys have popped on a drill guide to be able to drill 90 degrees and at the same depth every time. I would imagine removing some LF rivet head to flush with a sander would be alright.
 

PlayD0h

Petty Officer 1st Class
Joined
Apr 23, 2009
Messages
326
Yep what he said, always test fire the paint gun on some cardboard before I shoot the boat.

Most guys have popped on a drill guide to be able to drill 90 degrees and at the same depth every time. I would imagine removing some LF rivet head to flush with a sander would be alright.

I found that when counter sink drilling the right depth was at the same spot a laminate layer ended, and the layer below was much darker. I went slow and got them all at the same depth give or take a millimeter. I should have used a forstner bit one size larger (3/4”), or at least tried it. That and I should have drilled with the forstner bit first, then drilled through with a regular bit. That way centering the counter sunk area would have been perfect. A couple were off a bit, yet thankfully the majority are good.

Going to MT epoxy the rivet head / holes soon. I got the second coat of primer on so the whole hull is ready for paint. Also primed the consoles and front 2 gunnel top sheets.

I used 5200 in the holes then screwed the deck to doubler supports as well. I’m going to have to clean out the Robertson holes on the screws to get the 5200 out, so I won’t have to wait a week to epoxy over those. Q-tips should do the trick. I’ll take some pics here soon. I never take enough.
 

PlayD0h

Petty Officer 1st Class
Joined
Apr 23, 2009
Messages
326
Am I blind or are there no installation instructions for boat seat pedestals / bases? Fear of liability?

I have Springfield 2 3/8” bases and I’d imagine it’s hole-saw the below deck portion and SS screws with a ‘boat-load’ of 5200. Of all the restos I’ve read I don’t recall seeing anyone detail base installing. Maybe I’m just forgetting.

Are there official or otherwise instructions? Anyone have 16SS post locations written down? I know I’ll have to mock them and fine tune myself, but I know that’ll take me forever to finally commit to sawing the holes. I’d like to have the base on top of the vinyl yet would imagine the norm
 

PlayD0h

Petty Officer 1st Class
Joined
Apr 23, 2009
Messages
326
Not much to see but still boat porn
 

Attachments

  • photo315137.jpg
    photo315137.jpg
    61.6 KB · Views: 4
  • photo315140.jpg
    photo315140.jpg
    107.4 KB · Views: 4
  • photo315141.jpg
    photo315141.jpg
    88.4 KB · Views: 4
  • photo315142.jpg
    photo315142.jpg
    169.6 KB · Views: 4
  • photo315143.jpg
    photo315143.jpg
    74.6 KB · Views: 4

bchaney

Petty Officer 1st Class
Joined
Jul 3, 2018
Messages
246
That is weird that they don't come with instructions, but maybe because it's pretty self explanatory. Your plan sounds like a good one, but you could call Springfield to confirm.
 

PlayD0h

Petty Officer 1st Class
Joined
Apr 23, 2009
Messages
326
That is weird that they don't come with instructions, but maybe because it's pretty self explanatory. Your plan sounds like a good one, but you could call Springfield to confirm.

The more I think about it, the weirder it gets. I was assuming there’s no instructions because they claim they should technically only be installed by professionals. Yet they sell them in retail stores so there goes that theory.
While it is fairly straight forward, the consequences of improper installation could be life and death. I was once nearly killed, along with 3 friends by a fairly large boat. After dodging him running us over we seen him trying to put his steering wheel and dash back in place.
Having your seat fail would / could be a worse scenario than that.
I would guess the average Joe who has a boat doesn’t know screws should be SS. Even if 1 in a hundred people don’t thats a large number of potential disasters. I can’t remember the last time I’ve installed a use-specific item that didn’t have any form of instructions, advisories or documentation.
 

PlayD0h

Petty Officer 1st Class
Joined
Apr 23, 2009
Messages
326
Base coat of black. I used up what I mixed and mostly filled in the mid hull where it will be white. You can see some white primer peeking through on the port side if you look close.
 

Attachments

  • photo315204.jpg
    photo315204.jpg
    117.2 KB · Views: 8
  • photo315205.jpg
    photo315205.jpg
    148 KB · Views: 1
  • photo315206.jpg
    photo315206.jpg
    139.4 KB · Views: 1
  • photo315207.jpg
    photo315207.jpg
    210.6 KB · Views: 1

Watermann

Starmada Splash of the Year 2014
Joined
Jan 12, 2013
Messages
13,822
The pedestal bases I have are flush mount. There's been many thread discussions about using 3/4"ply on the underside of the deck sections as a pedestal backer using SS T-nuts on the underside and SS machine screws to secure the pedestals.
 

PlayD0h

Petty Officer 1st Class
Joined
Apr 23, 2009
Messages
326
The pedestal bases I have are flush mount. There's been many thread discussions about using 3/4"ply on the underside of the deck sections as a pedestal backer using SS T-nuts on the underside and SS machine screws to secure the pedestals.

I have seen that mentioned, and it sounds like the most ideal method. Yet that sounds like it might be tricky to have all the holes lined up and the nuts set perfectly. Although as long as the holes are straight it probably isn’t as complicated as I’m imagining it could be.

I have 5/8” fir doubled, epoxy sealed, poly glued and screwed. I would imagine straight screwing into the deck would be enough, but I’ll take bolts (machine screws) over wood screws anyday.

Today Im hoping to lay down the vinyl floor and get a second coat of paint on. It’s been raining for a few days off and on, and still at it, so I have a heater on in the garage to keep it at 70° and the humidity down.

I might be forced to roll and brush on primer on the interior pieces, because of overspray.
 

Watermann

Starmada Splash of the Year 2014
Joined
Jan 12, 2013
Messages
13,822
No you just need to have a hole a bit larger than the bolt you're using as the T nut takes a larger hole too. I used left over titebond glue on the T nuts and tightened them down with the bolts to hold the nuts straight in line with the holes in the deck..
 

ShoestringMariner

Lieutenant Commander
Joined
Apr 18, 2015
Messages
1,605
Base coat of black. I used up what I mixed and mostly filled in the mid hull where it will be white. You can see some white primer peeking through on the port side if you look close.

Black boats look really cool. My other project, an old double cockpit wooden boat will be black with a green bottom, separated by a thin white stripe. Can’t wait to see a Starcraft in black
 
Top