Project "1600 Capri Hard Top" has begun!

oops!

Supreme Mariner
Joined
Oct 18, 2007
Messages
12,932
Re: Project "1600 Capri Hard Top" has begun!

atta boy mark......keep atter.

the cool thing about a proj like this is you still goet to use the boat during construction....in sept when its done...youll be all nice and toasty warm during thoes late night cruses !
 

Mark42

Fleet Admiral
Joined
Oct 8, 2003
Messages
9,334
Re: Project "1600 Capri Hard Top" has begun!

What is amazing is how few tools this project takes. The foam is all cut with box cutter style razor knives, some sand paper, glue, and a Makita portable table saw to make the window frames. The fanciest tool I'll use is a router to make the recess for the windshield glass. Other than that, those are tools most do-it-yourself home owners have.
 

redfury

Commander
Joined
Jul 16, 2006
Messages
2,657
Re: Project "1600 Capri Hard Top" has begun!

Most powerful tools we have in our arsenal are "ingenuity" and "ambition"( in 3/4 in drive of course) ;)
 

Mark42

Fleet Admiral
Joined
Oct 8, 2003
Messages
9,334
Re: Project "1600 Capri Hard Top" has begun!

I think I have a change in plans for the windshield. After making two window frames and fitting them to the top, I'm not too happy with a few aspects of the opening windshield:

1) Not too happy with the overall looks.

2) The frames are very heavy, even after beveling the edges. Add another 12 lbs per glass, and the weight adds up.

3) I really wanted to be able to get to the bow without having to go through the cuddy hatch, but making the window open and seal and LATCH is getting to be a real problem. Latching with an interior drip edge is a problem because I just can't find any latches that work with that design.

4) I am still not convinced that 1/4" laminated safety glass will not crack in the frame when open on a strut (window regulator) as the boat rocks or someone pushes on it by mistake.

5) Hinge support. I need to cut out the foam and replace with some wood so the hinge will have some solid core for screws. The problem is the wood support has to be on the corner of the top, so It can't be supported from the back side.

So, rather than spend valuable time trying to work out this opening window problem, I think I will just recess the window flat with the surface of the top. It will look nice, I won't have to deal with sealing and latching problems, and I guess I wil just have to get used to climbing through the cuddy hatch to get to the bow. The down side is it won't open.

I'm going to talk to the guy at the glass shop and see what he thinks about using laminated safety glass fixed in the top. If he advises against it, I'll go with plexi.

I can always work out the opening window issue next summer.

BTW, I noticed that not all hard top boats have opening windshields. But lots do.

And the side window will still slide open.

An alternate plan I have been kicking around for a while to get to the bow without climbing through the cuddy, is to add a 6" wide foot ledge to the side of the boat at or above the rub rail line. With a simple grab bar on the hard top roof, it would be easy to walk from the rear of the boat along the outside to the bow. It would probably be the fastest and easiest way to get to the bow. I may just drop the opening windshield all together in favor of this alternate method of getting to the bow.
 

jonesg

Admiral
Joined
Feb 22, 2008
Messages
7,198
Re: Project "1600 Capri Hard Top" has begun!

looks good, I've done tons of laminated foam work, I first sheet it with 1/16th balsa or 64th ply sheet (aviation supply) , cut to shape then glass cloth, I use 4 oz and slow epoxy, you can walk on it when laminated over pink foam.
Thin epoxy with denatured alkyhol and it will not affect foam.
First coat goes on like water, when it gets tacky slap the second layer of cloth on with less alcohol.
For butt gluing foam sheets I just use white carpenters glue , easier to sand than the gorilla stuff.

4 gals of epoxy resin just to fill the weave on the top ?
Its what..$100+ for a 5 qt kit and at 8 lbs per gal...nah.

A sheet of white formica, fixed w/ water based contact cement.

For the radius curves, I cut the balsa sheeted foam and 5 minute epoxy on pre- radiused wood to form the curve, no need to try and get the cloth to follow sharp curves. Resin over the wood as you apply cloth , sand, apply filler and sand the whole thing together, you can't tell once its sanded and primed.

just some ideas.
 

reelfishin

Captain
Joined
Mar 19, 2007
Messages
3,050
Re: Project "1600 Capri Hard Top" has begun!

I think I have a change in plans for the windshield. After making two window frames and fitting them to the top, I'm not too happy with a few aspects of the opening windshield:

1) Not too happy with the overall looks.

2) The frames are very heavy, even after beveling the edges. Add another 12 lbs per glass, and the weight adds up.

3) I really wanted to be able to get to the bow without having to go through the cuddy hatch, but making the window open and seal and LATCH is getting to be a real problem. Latching with an interior drip edge is a problem because I just can't find any latches that work with that design.

4) I am still not convinced that 1/4" laminated safety glass will not crack in the frame when open on a strut (window regulator) as the boat rocks or someone pushes on it by mistake.

5) Hinge support. I need to cut out the foam and replace with some wood so the hinge will have some solid core for screws. The problem is the wood support has to be on the corner of the top, so It can't be supported from the back side.

So, rather than spend valuable time trying to work out this opening window problem, I think I will just recess the window flat with the surface of the top. It will look nice, I won't have to deal with sealing and latching problems, and I guess I wil just have to get used to climbing through the cuddy hatch to get to the bow. The down side is it won't open.

I'm going to talk to the guy at the glass shop and see what he thinks about using laminated safety glass fixed in the top. If he advises against it, I'll go with plexi.

I can always work out the opening window issue next summer.

BTW, I noticed that not all hard top boats have opening windshields. But lots do.

And the side window will still slide open.

An alternate plan I have been kicking around for a while to get to the bow without climbing through the cuddy, is to add a 6" wide foot ledge to the side of the boat at or above the rub rail line. With a simple grab bar on the hard top roof, it would be easy to walk from the rear of the boat along the outside to the bow. It would probably be the fastest and easiest way to get to the bow. I may just drop the opening windshield all together in favor of this alternate method of getting to the bow.
1, & 2 ) I think the idea of using wood for your frames is adding too much bulk and weight, I'd look into making some aluminum frames.

3) Is it possible to make a larger bow hatch? I know that on my 18' boat, it's impossible for me to get my large self anywhere close to getting through the hatch, in fact, I can't even contort myself to get to the hatch at all other than to reach up and unlatch it. I plan to oversize the hatch on mine, maybe thats an option as well. If not, a windlass may be in order? It will be sooner or later on at least two of my boats.

4) Laminated safety glass has very little torsional resistance to cracking, it's no stronger than standard plate glass beyond the fact that it's sandwiched with plastic. Proper use of this type of glass would entail making a rigid frame or rubber mounting in a gasket. It needs to be rigidly supported on all sides.
I would consider the idea of making the top accept a rubber gasket much like that used on truck windshields, or find a way to frame the glass in aluminum channel. Maybe recutting a few used rigid boat windshield frames?

5) Framing the glass in aluminum and making an aluminum glass frame in the top would allow the use of a simple piano hinge and latch. I just stripped an old Larson Trihull with a full cuddy cabin and opening windshields. While it used a bimini top style soft top, the upper windshields were two section and opened by simply loosening a slotted slide with a knob and pushing outward and re-tightening the same knob. They opened only about 45 degrees forward, but the windshield panels also had corner releases which allowed them to fold down for either trailering clearance or forward access.
The drivers side also incorporated a wiper motor mount. I saved them in hopes of reusing them one day on another project. They hinged on a simple interlocking channel but could just as easily use a stainless piano hinge, thus allowing full movement. If I reuse them, I'll probably convert them to use a hinge and gas struts and maybe a camper cap style latch and handle. That would allow them to open and stay open and self limit their travel. On that boat, the upper windshield was on the flybridge, so anchor access wasn't the reason for the opening glass, just ventilation and maybe stowing items on the forward roof area? (Someone had cooler tie downs up there).
 

Mark42

Fleet Admiral
Joined
Oct 8, 2003
Messages
9,334
Re: Project "1600 Capri Hard Top" has begun!

looks good, I've done tons of laminated foam work, I first sheet it with 1/16th balsa or 64th ply sheet (aviation supply) , cut to shape then glass cloth, I use 4 oz and slow epoxy, you can walk on it when laminated over pink foam.
Thin epoxy with denatured alkyhol and it will not affect foam.
First coat goes on like water, when it gets tacky slap the second layer of cloth on with less alcohol.
For butt gluing foam sheets I just use white carpenters glue , easier to sand than the gorilla stuff.

4 gals of epoxy resin just to fill the weave on the top ?
Its what..$100+ for a 5 qt kit and at 8 lbs per gal...nah.

A sheet of white formica, fixed w/ water based contact cement.

For the radius curves, I cut the balsa sheeted foam and 5 minute epoxy on pre- radiused wood to form the curve, no need to try and get the cloth to follow sharp curves. Resin over the wood as you apply cloth , sand, apply filler and sand the whole thing together, you can't tell once its sanded and primed.

just some ideas.

Jonesg, thanks for the ideas. What sort of things do you make from pink foam? How much is the balsa and thin ply?


1, & 2 ) I think the idea of using wood for your frames is adding too much bulk and weight, I'd look into making some aluminum frames.
.
.
.
3) Is it possible to make a larger bow hatch? I know that on my 18' boat, it's impossible for me to get my large self anywhere close to getting through the hatch, in fact, I can't even contort myself to get to the hatch at all other than to reach up and unlatch it. I plan to oversize the hatch on mine, maybe thats an option as well. If not, a windlass may be in order? It will be sooner or later on at least two of my boats.

4) Laminated safety glass has very little torsional resistance to cracking, it's no stronger than standard plate glass beyond the fact that it's sandwiched with plastic. Proper use of this type of glass would entail making a rigid frame or rubber mounting in a gasket. It needs to be rigidly supported on all sides.
I would consider the idea of making the top accept a rubber gasket much like that used on truck windshields, or find a way to frame the glass in aluminum channel. Maybe recutting a few used rigid boat windshield frames?
.


Actually, your large hatch idea may be the best idea yet! I've been thinking about your idea all morning. It solves a few problems all at once. First, I don't need an opening windshield if its easy to get to the bow (I never thought crawling through a window was such a good idea in the first place. I know that sooner or later the boat will lurch, someone will grab hold of the open window and then it will break or rip the hinge from the top.) So... If a larger hatch is installed right in front of the windshield, to the port side (where the cuddy door is) it would be soooo much easier to climb up and out onto the bow deck. That area is all reinforced with plywood and non-slip gel coat. So it would be a good place to put a large hatch. Your idea also eliminates trying to make the windshield water tight. I want to anchor or moor the boat for a few days without worrying about rain or spray leaking into the boat through the windshield. (the back of the boat will be enclosed with a camper back).

Regarding using laminated glass and breakage, I realize that almost all auto windshields are laminated safety glass, and are actually glued directly to the unibody of the auto with industrial silicone adhesive (then a decrorative gasket/trim is added on top). Car bodies flex quite a bit and the glass is not cushioned by a thick gasket. All I need to make the front of the top very rigid and there should be no stress issues. Soooo.... I think that by bedding down glass in a thick soft silicone bead directly in a recess in the fiberglass, it should be OK. I am willing to take the risk of trying glass this way over framing it.


Thanks for all the input guys!
 

erikgreen

Captain
Joined
Jan 8, 2007
Messages
3,105
Re: Project "1600 Capri Hard Top" has begun!

I don't think most cars use silicone for windshield glue. The last time I replaced a windshield I used a coil of tarry windshield adhesive... much stickier than silicone, also much nastier.

For a boat I'd recommend sikaflex.

Erik
 

Mark42

Fleet Admiral
Joined
Oct 8, 2003
Messages
9,334
Re: Project "1600 Capri Hard Top" has begun!

Quick update.... Was on vacation last week, so not too much progress. Have done some sanding and shaping, and ordered the glass, epoxy and side window channels. There was a dip on the roof panel and I made some braces from pine that shore up the dip and with a few shims, it should be nice and straight. Getting better at sanding foam. Hopefully it will not have too many waves in the suface! Maybe I should use a flat finish paint! HA!
 

reelfishin

Captain
Joined
Mar 19, 2007
Messages
3,050
Re: Project "1600 Capri Hard Top" has begun!

I don't think most cars use silicone for windshield glue. The last time I replaced a windshield I used a coil of tarry windshield adhesive... much stickier than silicone, also much nastier.

For a boat I'd recommend sikaflex.

Erik


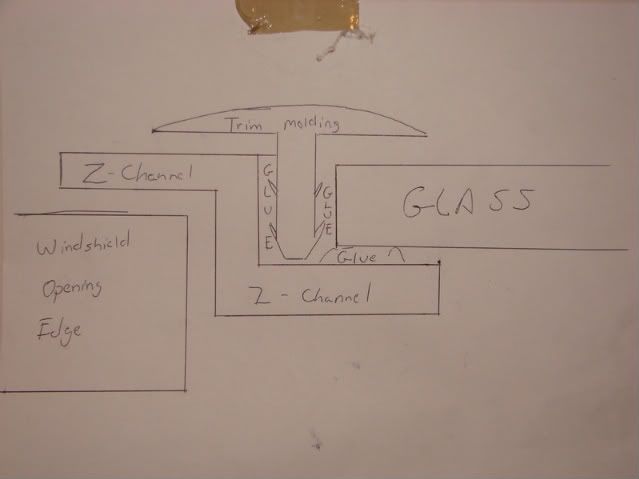
Automotive windshields are held in place with two type of adhesives, first the glass is set on a strip of butyl rubber, then with a urethane adhesive which bonds the glass permanently. The butyl rubber bead provides the correct depth and spacing while the urethane glues the glass in. An automotive windshield is supposed to be able to retain the occupants in the event of a crash. Windshield urethane is black in color and just about non removable from unwanted surfaces.

The problem with flat laminated glass is just that, being flat there is no structural rigidity. In a truck or bus, which is it's most common use, it's either framed in metal or secured on all sides with a rubber gasket. I think the easiest way to go about it would be to make an aluminum frame, maybe from a few old existing boat windshield frames and finding a way to secure that into a recessed fiberglass edge. Try going to a local glass shop, one that does motor homes, buses and trucks, they may have something that you could use. I'd say just form a lip and use a rubber gasket, but I think the process of seating the glass may be a bit tough on the fiberglass edge.
Take a look at how a window mounts in a camper cap, especially an older one, they use a flanged channel with a rubber insert to seal the glass to the channel. I usually just use sealing putty. The glass is framed on all sides, then screwed in place via a sandwich between an inner strip and the frame.
This would leave the glass well protected, fairly easy to repair if the need arises and it would leave a well finished edge. Many styles of frames can mount on a single flat edge as well.

Using an aluminum frame would eliminate the need for any glassed in window frame, the aluminum frame would form it's own supporting perimeter.
Any shop that sells camper caps or trailers should have spare parts and bulk aluminum edging. There's on near me that's been great for parts of all sorts.
I would probably make the frame and opening, then take the precut or partially assembled frame to the glass guy to cut a piece of glass to fit, unless you happen to be able to find an already correct fit camper window.
Try some of these sites for ideas: http://www.glen-l.com/campers/suppliers.html#windows
 

Mark42

Fleet Admiral
Joined
Oct 8, 2003
Messages
9,334
Re: Project "1600 Capri Hard Top" has begun!

Reelfishin,

Thanks for the info and suggestions. I have been looking at windshield gaskets from Jeep and VW Bug, as I am familiar with those. I have done a few old bug windshields and I really don't think the gasket provides much cushion against body flex. I have watched the windshields be replaced in a few of my late model cars, and they used a single caulk/adhesive to bed down the glass. The glass came with a finish rubber edge to hide the gap. Again, I don't see the black caulk giving much cushion.

I am going to try to emulate the late model car install. That is setting the glass on a bed of caulk/adhesive in the fiberglass windshield frame. The top should be so rigid in the windshield area that flexing will not be a problem. Then 1x1/16" aluminum will be set on top as trim.

I'll see how it goes.
 

redfury

Commander
Joined
Jul 16, 2006
Messages
2,657
Re: Project "1600 Capri Hard Top" has begun!

I'm curious....what's the traveling height going to be on this rig once you are done ( I'm thinking bridges here :eek: )....got the notion from the post about the lay down windows.
 

drewpster

Commander
Joined
Oct 17, 2006
Messages
2,059
Re: Project "1600 Capri Hard Top" has begun!

Mark, Just to add a little confusion,
I use the urethane adhesive mentioned at work on a daily basis replacing cracked windshields in the Freightliner trucks in our fleet. The urethane is used as a bed and a seal for the glass. It is specifically used in these trucks as structural support. So if you decide to use that type adhesive I am sure it will add plenty of structure to your hardtop. Generally speaking the problems we have with broken windshields is not flex. It is most often caused by road hazards and bad installation. The trick is to use enough urethane glue under the glass before it is pressed in place. We caulk a bead of it at least as big as a thumb on to the flange in the window opening then press the glass in to place. Provided the glass is clean and the proper primer is used on the sealing surface the urethane will permanently bond to glass. (well enough it cannot be removed) As long as a thick enough bead is laid down and no boats ahead of you kick up any rocks it should fine.

Glue
http://www.levineautoparts.com/3mwinsupfasu.html

Primer
http://www.levineautoparts.com/3m08681.html

The windshield frames we install windshields in to are aluminum and if they are bare (no paint) they must be primed with the stuff above to encapsulate the metal. The glue is a very high solid and can galvanically react with metal.
I would suggest building in some aluminum z-channel around the opening to give a flange for the glass to set into. Glue the glass in place and use T-molding set into the glue gap around the opening to trim it.

Z-channel
http://www.brunnerent.com/Tools/Portfolio/frontend/item.asp?type=9&size=0&lngDisplay=0&jPageNumber=30&strMetaTag=

Trim t-molding to fill and cover the glue gap between the glass and edge
http://www.t-molding.com/store/home.php?cat=1
 

Mark42

Fleet Admiral
Joined
Oct 8, 2003
Messages
9,334
Re: Project "1600 Capri Hard Top" has begun!

I'm curious....what's the traveling height going to be on this rig once you are done ( I'm thinking bridges here :eek: )....got the notion from the post about the lay down windows.

On the trailer is will be just under 8 ft high. Thats about 1.5 ft higher than factory. I bet its gonna suck some gas to tow it with the extra wind resistance!!!!
Hopefully the slant to the windsheild will streamline it a bit and ease the drag. But that big open back will creat a huge low pressure area, and that makes it harder to tow. Will just have to see.
 

drewpster

Commander
Joined
Oct 17, 2006
Messages
2,059
Re: Project "1600 Capri Hard Top" has begun!

I am not a cumperter guy so no fancy stuff here, just a picture of what I had in mind. Of course nothing is to scale

DSC04395.jpg
 

Ezrider_92356

Chief Petty Officer
Joined
Jul 14, 2007
Messages
426
Re: Project "1600 Capri Hard Top" has begun!

i don't think you will have to worrie about hight too much here is a boat that i hauled as part of my part time hotshot company i run (well the company is just me but still) this boat was right around 13ft on the trailer. just watch the markers on the bridge they will give you fair warning and just follow truck routes if your really worried about it.

SUNP0190.jpg

SUNP0189.jpg


btw i got an average of right around 14 mpg on that trip of 1300 loaded miles.
 

Mark42

Fleet Admiral
Joined
Oct 8, 2003
Messages
9,334
Re: Project "1600 Capri Hard Top" has begun!

Drewpster, thanks for those links. The T molding is just what I was looking for. I'm going to return the 1x1/16" aluminum I bought and order the T molding. As far as the Z stock, I was going to make a Z shape in the frame itsself using L bracket or maybe just a 3/4" square wood strip attached to the inside of the window opening. Then lay the window glass right on it with the urathane adhesive. This setup should give a nice flat, flush window with a nice trim.

One thing that totally blew me away is the fiberglass biax. It came today, I have 10 yards of the stuff, and it is so heavy. Like 30lbs or so. I can't believe it! Have to pick up a respirator and gloves and suit tomorrow on the way home. Then fully open and roll out some of this biax. Damn that roll is heavy. I wonder if they sent the wrong amount. The roll is about 9 inches in diameter x 54 inches long. The invoce said it is 10 yards, but it sure looks like more. With the weight of a few gallons of epoxy, this is going to put on weight fast. The top is replacing a lot of very heavy factory glass, so I hope the net gain is not much.
 

drewpster

Commander
Joined
Oct 17, 2006
Messages
2,059
Re: Project "1600 Capri Hard Top" has begun!

Just a couple of tips about that urethane glue.
The stuff is thick gooey and sticks to everything so be very deliberate about where it goes. Use rubber gloves because it is next to impossible to get off skin.
it is better to overfill just a bit and get a little ooze out of the joint but not too much. If you get too much squeezed out use a plastic spreader and cut as much of the excess off is you can before it starts to set. Get a can of this,
pACE2-1186917reg.jpg

It is the only thing I have found that will cut the glue. You might try lacquer thinner if you have some around. I have wiped small amounts of the glue off with a rag wetted with PB Blaster.
If you get a glob out somewhere the glue can be cut with a sharp utility knife after it cures.
Put a bead down and let it set for a couple of minutes. After you press the glass in place use the heel of you hand and gently bump the glass around its edges to seat it into the glue. All this only applies to the glue I recommended. I have never used any of 3M's other urethane. It should be very firm and sticky as hell out of the caulking gun.
 

Mark42

Fleet Admiral
Joined
Oct 8, 2003
Messages
9,334
Re: Project "1600 Capri Hard Top" has begun!

I figured out why the roll of fiberglass is so heavy, it's because the 1708 biax is 25 oz sq/yd. (duh, 17 oz biax + 8 oz mat = 25 oz) So its 1.5 lbs sq/yd. Wow! No wonder this stuff sucks up the resin. No wonder the glass guy said one layer will be more than enough for my application!

I gotta start paying more attention to the details of the materials I order! LOL!

This weekend I will start playing/testing the epoxy and glass. I also have to order some filler for the epoxy to make some fillets and fairing compound.

Hey EZrider, thanks for posting that towing experience! Makes me feel better.
 

Mark42

Fleet Admiral
Joined
Oct 8, 2003
Messages
9,334
Re: Project "1600 Capri Hard Top" has begun!

Have been working on the top this morning. Been sanding all the edges round, cutting out excess Gorilla Glue that oozed out on inside corners (in prep for fillets) and did a light sanding overall.

Next was tests with the epoxy and glass. Man, that 1708 biax is heavy thick stuff. I can see it will be difficult to get it to bend around corners. I cut two pieces, one from 1708 biax, and one from plain 6oz. Then I made punctures in a test piece of foam board about 1/2 to 3/4 in deep and layed on the two pieces of glass, wrapping them around sanded/rounded edge. One side of the test foam I applied plastic wrap to see how smooth the finished epoxy will be, the other side is must smoothed over with a squeegee.

I found the epoxy a little more runny than I expected, and it took longer to mix than I expected too. That means that covering the top and sides with epoxy will be messy, and rolling out the glass will be even messier.

Took some photos, maybe I can post them later.
 
Top