Rebuild/repurpose 1986 Alumacraft 1610 Supreme

Lewis

Petty Officer 2nd Class
Joined
Jun 17, 2002
Messages
164
Hi all,
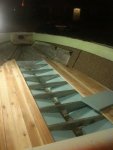
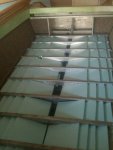
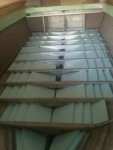
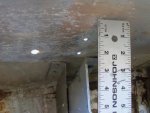
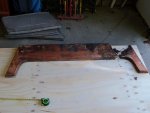
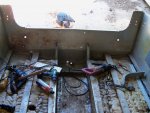
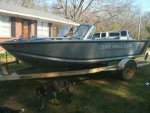
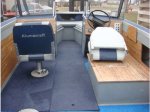
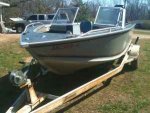
I've been contemplating a bigger fishing boat for a while, and last week took the plunge. I bought a 1986 Alumacraft 1610. Although the seller assured me the floor was solid, it was more rotten than not. I'm not too upset, one because I'm not really surprised, and two because I want to rebuild the boat as a dedicated fishing rig. Here are some photos, four from the seller and one of the same year and model boat.
 

Attachments

  • 2.jpg
    2.jpg
    7.8 KB · Views: 2
  • 98339734_3thumb_550x410.jpg
    98339734_3thumb_550x410.jpg
    29.7 KB · Views: 2
  • 3.jpg
    3.jpg
    9.1 KB · Views: 2
  • 4.jpg
    4.jpg
    9.3 KB · Views: 2
  • 1.jpg
    1.jpg
    8.8 KB · Views: 2

Lewis

Petty Officer 2nd Class
Joined
Jun 17, 2002
Messages
164
Re: Rebuild/repurpose 1986 Alumacraft 1610 Supreme

Here a two pictures of the boat as of this afternoon. Consoles are gone, floor is out, and things are generally cleaned up. The foam is in pretty good shape, so I'm planning to leave it in. 4-24-2011 353.jpg4-24-2011 351.jpg
 

Lewis

Petty Officer 2nd Class
Joined
Jun 17, 2002
Messages
164
Re: Rebuild/repurpose 1986 Alumacraft 1610 Supreme

In the above picture looking at the bow, you can see that there are new channels in the foam in the three sections closest to the bow. When the foam was poured, it went gunnel to gunnel, completely filling the drain holes along the keel line. I cut it down to the bare aluminum to make a channel. The foam was dry except the bottom half-inch, so I'm planning to forego the joy of ripping out all the foam. The picture looking at the stern shows the 7-foot under-floor rod storage compartment; there's no foam underneath (I determined that by the scientific method of pouring a cup of water under the bow end and watching it flow right out at the stern end). The pictures below show a couple of pieces of the allegedly "good and solid" floor.4-24-2011 356.jpg4-24-2011 355.jpg
 

Lewis

Petty Officer 2nd Class
Joined
Jun 17, 2002
Messages
164
Re: Rebuild/repurpose 1986 Alumacraft 1610 Supreme

These two pictures show how much spare room I have in the garage. The trailer tongue is against the front wall, and there's just two inches to the garage door.

4-24-2011 352.jpg4-24-2011 354.jpg
 

Lewis

Petty Officer 2nd Class
Joined
Jun 17, 2002
Messages
164

ezmobee

Supreme Mariner
Joined
Mar 26, 2007
Messages
23,767
Re: Rebuild/repurpose 1986 Alumacraft 1610 Supreme

Very nice boat you have there. I haven't seen a similar Alumacraft of that size done on here yet. Lots of similar Starcraft and Sea Nymph threads though. I like your build plans. That's pretty much what I did with mine also (looked at new boats and did my best to replicate the features I like). I'm most happy with my stern fishing platform http://i176.photobucket.com/albums/w200/ezmobee/New Boat/IMG_0487.jpg I am a little concerned about your plan to leave the foam because we have seen some instances where corrosion was found underneath poured in foam which was removed from an aluminum hull. I don't think it it was necessarily the foam itself causing the corrosion but the water that it trapped against the metal. If it was mine I'd dig it out and replace it with noodles or sheet foam although I wouldn't fault you if you took the attitude of "it's been fine for 25 years why mess with it". My boat also JUST fits in my garage with millimeters to spare :p I didn't know if it would fit when I bought it and was thrilled it did. Just remember, no pressure treated wood in an aluminum boat. Good luck with your project.
 

Piece715

Senior Chief Petty Officer
Joined
Jan 26, 2009
Messages
757
Re: Rebuild/repurpose 1986 Alumacraft 1610 Supreme

I agree with EZ about the foam. Once its wet its wet... and the weight can definitely add up. I have a 1986 Sea Nymph 15.5' that I'm restoring and I went the blue construction foam route despite my foam being bone dry. I am really happy with how it came out. Might as well rip it all out while you're there... would hate for ya to rip up a brand new floor due to a corrosion hole or a couple hundred pounds of soaked foam
 

Attachments

  • photo(3).jpg
    photo(3).jpg
    125.9 KB · Views: 0
  • photo(4).jpg
    photo(4).jpg
    119.7 KB · Views: 0
  • photo(5).jpg
    photo(5).jpg
    117.3 KB · Views: 0

Lewis

Petty Officer 2nd Class
Joined
Jun 17, 2002
Messages
164
Re: Rebuild/repurpose 1986 Alumacraft 1610 Supreme

Thanks, EZ, I've been through your Starcraft restoration thread -- tons of good info there that will make my project easier! One thing I've noticed after browsing some of the Starcraft projects (there are a lot of you guys here!) is that the Alumacraft has more bulkheads than the Starcrafts. Don't know why that is.
About the foam, I pulled all the foam out of my last project (a 1970 Searay V190), and that was not fun. Full of ants and water. I'm planning on leaving it in the Alumacraft because the foam is such good shape, and there doesn't seem to be any corrosion. I took the foam out near the bow down to bare aluminum and there is absolutely no sign of corrosion, so I think I'll be all right.
Here are some pics of the motor: a 1994 Mercury 60HP, soon to be a tiller. The tiller looks to be pretty easy to rig up, but that's going to have to wait a bit -- no room in the garage to hang the motor on the transom!
Lewis
 

Attachments

  • 004.jpg
    004.jpg
    142.6 KB · Views: 1
  • 001.jpg
    001.jpg
    149.2 KB · Views: 1
  • 003.jpg
    003.jpg
    142.2 KB · Views: 1
  • 002.jpg
    002.jpg
    144.6 KB · Views: 1

Lewis

Petty Officer 2nd Class
Joined
Jun 17, 2002
Messages
164
got rivets?

got rivets?

On the front porch when I came home from work:
100 of Closed End Blind Rivet - PR66AAPH
200 of Large Flange Head - PR612AAL
from rivetsinstock.com
The closed end ones are for sealing some of the many holes in the hull (who mounts three transducers on the transom -- with rusty plain steel screws?), riveting in new additional supports for the gunnel, etc.
The wide flange ones are for riveting the floor to the stringers and bulkheads, and attaching storage structures to aluminum brackets.
More stuff arriving all week. I'm getting pretty tight with the UPS guy!
 

Attachments

  • 2nd 004.jpg
    2nd 004.jpg
    157.8 KB · Views: 0
  • 2nd 003.jpg
    2nd 003.jpg
    146 KB · Views: 0
  • 2nd 002.jpg
    2nd 002.jpg
    145.5 KB · Views: 0

Lewis

Petty Officer 2nd Class
Joined
Jun 17, 2002
Messages
164
and the transom, too

and the transom, too

I tried to check out the transom before I bought the boat. It seemed solid everywhere I poked at it. The motor was off, so I even got to poke a knife blade into the mounting holes, and they were solid. After I got it home, as I was pulling the floor, I found a soft spot that was about 2" long at the bottom edge and under one of the splashwell drains. Didn't have a chance to check it out further until tonight. Even though it is solid along the edge except for that 2", the rot extends inside at least the length of a screwdriver.
Deja vu! When I bought an old Searay years ago, I knew I'd be replacing the transom, and it turned out I had to replace the floor, too. I knew I was going to have to replace the floor on this Alumacraft, and now I get to do the transom, too. May 14 fishing trip is looking doubtful now :(
Oh, well. As long as I'm mixing epoxy, tracing curves and cutting plywood, what's one more piece?
 

ezmobee

Supreme Mariner
Joined
Mar 26, 2007
Messages
23,767
Re: and the transom, too

Re: and the transom, too

Oh, well. As long as I'm mixing epoxy, tracing curves and cutting plywood, what's one more piece?

That is the nice thing about tinnies.
 

Lewis

Petty Officer 2nd Class
Joined
Jun 17, 2002
Messages
164
Re: and the transom, too

Re: and the transom, too

So I'm sure you guys all know this, but I learned some things about aluminum boat construction tonight:
1. The transom wood can't be removed until the splashwell is removed.
2. The splashwell can't be removed until the cap is removed.
3. You can't even start on the cap until you remove the rubrail.
4. You can't remove the rubrail until you pull out the vinyl rubrail insert.
5. The vinyl rubrail insert runs from the splashwell to the bow -- about eighteen feet on a seventeen foot boat.
6. The vinyl insert on a 25 year old boat is stiff and set.
7. Ants, for no reason that is apparent to me, like to live behind the vinyl insert.
8. The aluminum rubrail itself is refreshingly easy to remove.
9. The cap on this Alumacraft is in pieces, and the stern-to-midship piece is nine feet.
10. There are exactly 44 rivets attaching that nine foot section in place.
11. One side is enough for a night.
Lewis
 

ezmobee

Supreme Mariner
Joined
Mar 26, 2007
Messages
23,767
Re: and the transom, too

Re: and the transom, too

Bummer. You don't have to do any of that with a Starcraft (although some do). Just pop the end caps and trim off, remove the screws holding the splash well to the plywood, remove any through bolts and slide it out.
 

Lewis

Petty Officer 2nd Class
Joined
Jun 17, 2002
Messages
164
Re: and the transom, too

Re: and the transom, too

Here's a view of the splashwell, and then a close-up of the problem area. The splashwell drain tube is loose, and there's a significant gap between the transom skin and the splashwell bottom. Both, and especially the drain tube, allowed water into the transom wood. I'll get it apart tonight and post some more photos. I am seriously considering not draining the splashwell out thru the transom, but instead a single hole straight down into the bilge. Be a problem if I did a lot of backtrolling, but otherwise maybe not a big deal.
 

Attachments

  • 001.jpg
    001.jpg
    144.1 KB · Views: 1
  • 004.jpg
    004.jpg
    142.2 KB · Views: 1

Lewis

Petty Officer 2nd Class
Joined
Jun 17, 2002
Messages
164
Re: and the transom, too

Re: and the transom, too

More progress tonight. Nothing exciting, but no nasty surprise either. Aft cap is now off on both sides, and the splashwell is out. The boat feels very flimsy with the cap removed; I'm glad the trailer allows me to get in and out without putting any stress on the hull. Transom wood is 2", so I'll be laminating three layers tomorrow. One of the pics shows the splashwell with a tape measure. It is 25" from the inside edge of the transom to the forward edge of the splashwell. A big part of this project is converting from remote to tiller steering, so I think the splashwell will have to be modified -- 25" seems like a big reach to hold a tiller.

You can see a pile of loose wood chips pulled out of the starboard corner of the transom -- the brown pile in one of the pics.

Tomorrow I'll finish taking apart the transom and pull the wood out. It should be solid enough to be a template. Once that's done, I'm going to be at that oh-so-satisfying moment when you realize that you've just moved from tearing apart a wreck to rebuilding a boat!
Lewis
 

Attachments

  • 040.jpg
    040.jpg
    146.8 KB · Views: 2
  • 034.jpg
    034.jpg
    149 KB · Views: 2
  • 033 (980x735).jpg
    033 (980x735).jpg
    99 KB · Views: 2

Lewis

Petty Officer 2nd Class
Joined
Jun 17, 2002
Messages
164
Re: and the transom, too

Re: and the transom, too

EZ, thanks for the link. I'm still a few steps from there, but getting closer.
Turns out there are a few more steps to getting the transom wood out on this Alumacraft. Because the outer transom skin wraps over the transom wood, (see the first pic) the transom wood (once all the fasteners are out) needs to be pushed down a little and towards the bow two inches. To be able to move the transom wood forward, the knees have to be un-riveted. You can see that before I drilled out the rivets, there's no room to tilt the wood forward to clear the aluminum that's wrapped over from the outside -- it's 2" which is the thickness of the wood. After I drilled the knees loose, I could tilt them forward enough to tilt the wood forward and clear the lip.
 

Attachments

  • 008.jpg
    008.jpg
    128.6 KB · Views: 2
  • 014.jpg
    014.jpg
    142.8 KB · Views: 2
  • 013 - Copy (980x735).jpg
    013 - Copy (980x735).jpg
    82.7 KB · Views: 2

Lewis

Petty Officer 2nd Class
Joined
Jun 17, 2002
Messages
164
Re: and the transom, too

Re: and the transom, too

So, once I got the knees out of the way, the wood came out. Rotted all the way through about a foot wide, but the port 3/4s is solid. Here are both sides laid out on the new plywood. Because the two pieces didn't fit together, I used the inner aluminum skin to line up the holes for the stern U-bolts to make sure that the lay-out was accurate even with a bunch rotted and the wood in two pieces.
 

Attachments

  • 009.jpg
    009.jpg
    135.4 KB · Views: 1

Lewis

Petty Officer 2nd Class
Joined
Jun 17, 2002
Messages
164
Re: and the transom, too

Re: and the transom, too

Here's the bare transom. The boat is getting flimsier and flimsier; I'm looking forward to putting things back together. On the bright side, look at all the tools I got to use!
 

Attachments

  • transom.jpg
    transom.jpg
    116.2 KB · Views: 3

KellyC

Senior Chief Petty Officer
Joined
Aug 24, 2010
Messages
733
Re: and the transom, too

Re: and the transom, too

Here's the bare transom. The boat is getting flimsier and flimsier; I'm looking forward to putting things back together. On the bright side, look at all the tools I got to use!

That looks a lot like mine did when I was tearing it down. The only difference was that I had a few more tools inside my boats. Which also included crowbars of several different sizes.

Way to keep at it though, you will have it done way before you know it.
 
Top