Replacing decking and floatation foam in a 1994 Bayliner 1952 Cuddy

jaybeava

Seaman Apprentice
Joined
Sep 20, 2011
Messages
32
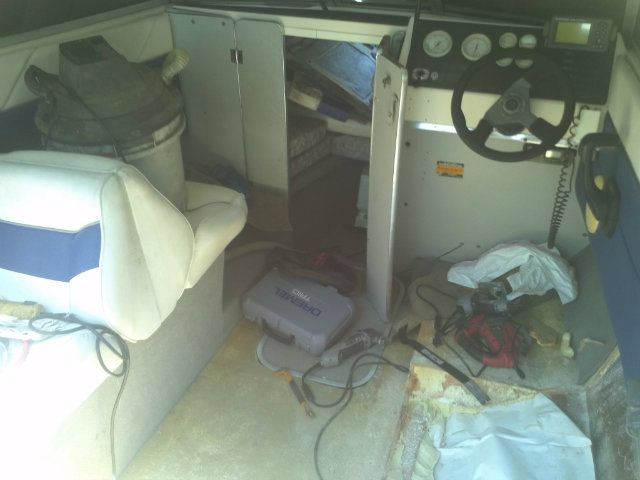
So here's the unexpected project... A 1994 Bayliner 1952 Cuddy. I bought the boat with minor engine repairs needed (water pump, hoses, tune-up) and outdrive work. At the time there was also one little soft spot in the aft port side of the floor that I thought I should look at and after pulling the carpet...well...here I am.
Picture898-2-1.jpg

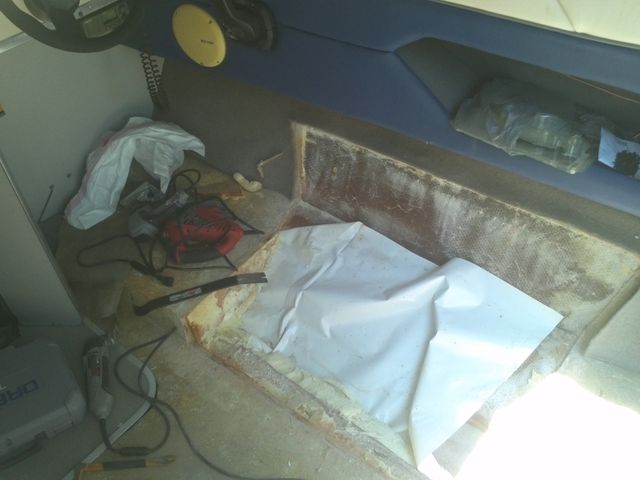
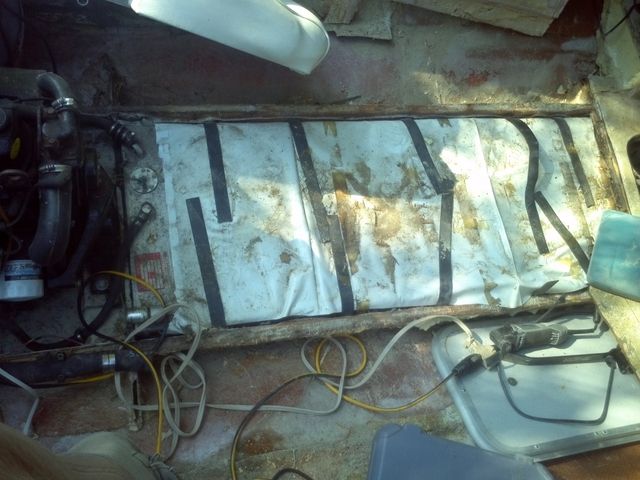
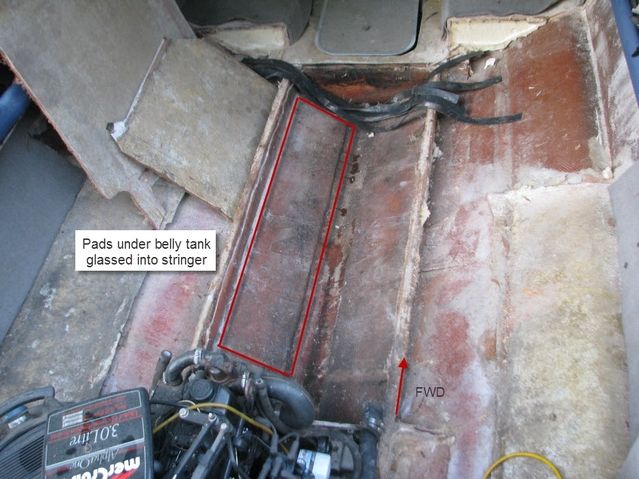
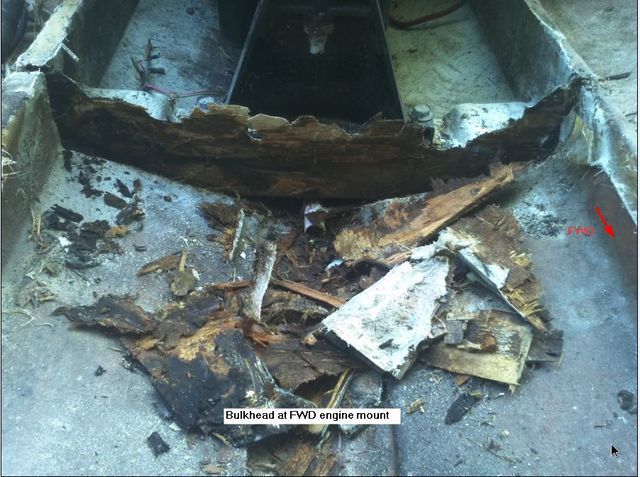
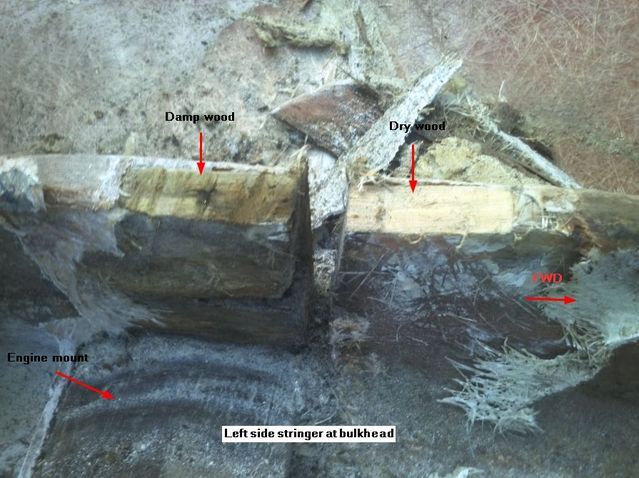
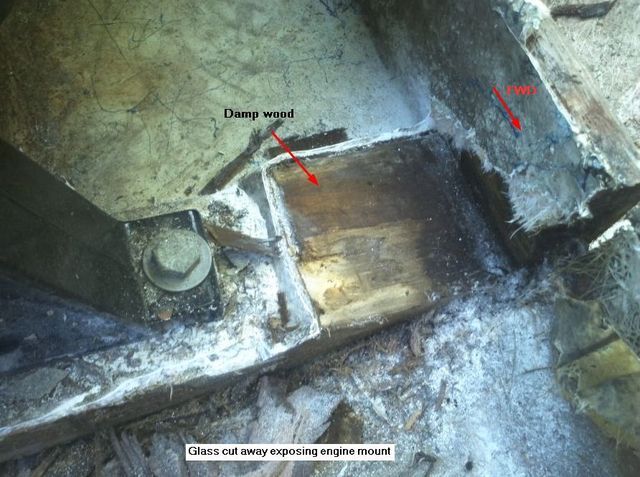
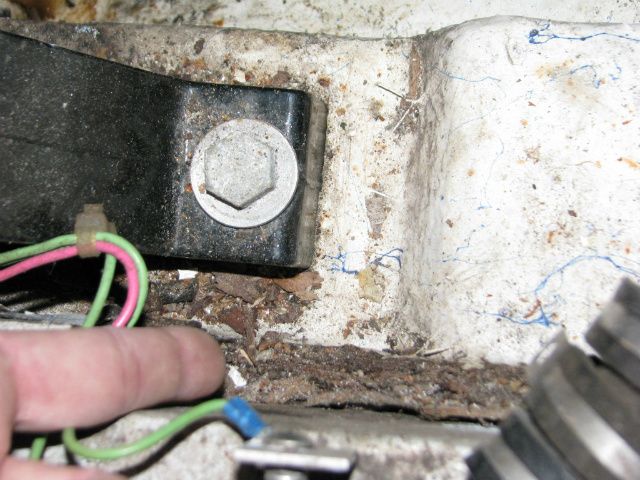
In the first pic I cut off the dog house at the floor using an oscillating cutting tool. I wanted to get closest to the floor as possible so that measuring a new one to build would be easier. First time using one and its pretty nice! It goes through cutters quicker than I thought but it did exactly what I needed. The next tool to cut the floor was a Dremel Trio. That thing is great! It's like a router that is used like a jigsaw. I set the height a little shorter than the floor thickness then ran with it. I'm not trying to advertise but I haven't seen anyone list what they used to do this job and it took me a little while to shop around for something. After taking out a section of the floor the aft section turned out to be really soaked. I used a couple different sized crowbars (medium and mini) to hook and pull the foam out trying not to apply direct pressure onto the hull. One thing I noticed was the rotted bulkhead going from left to right at the fwd engine mount.
Picture952-1-1.jpg

Picture962-1.jpg

Picture924-1.jpg

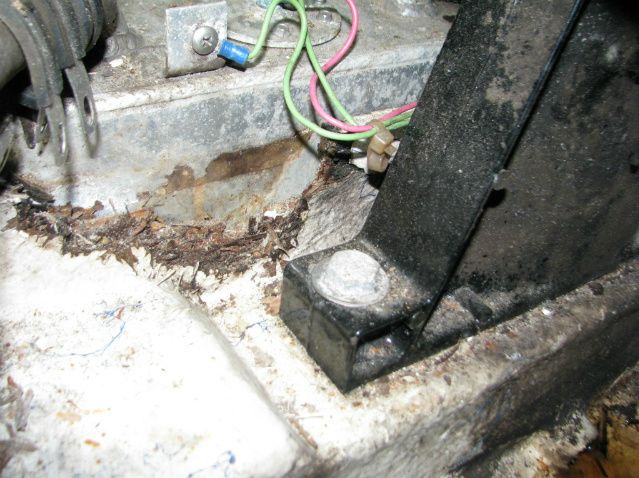
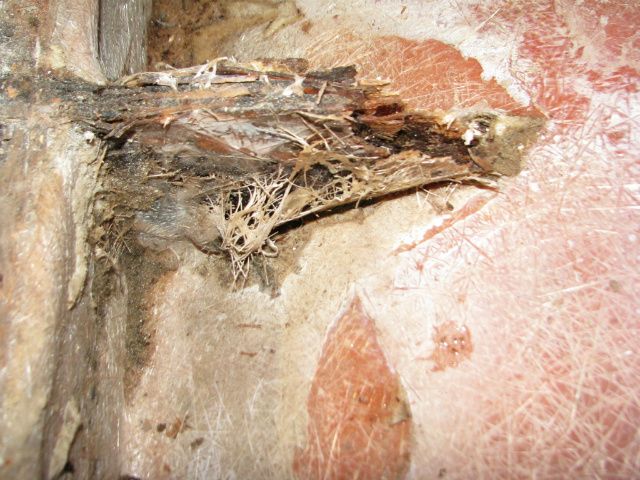
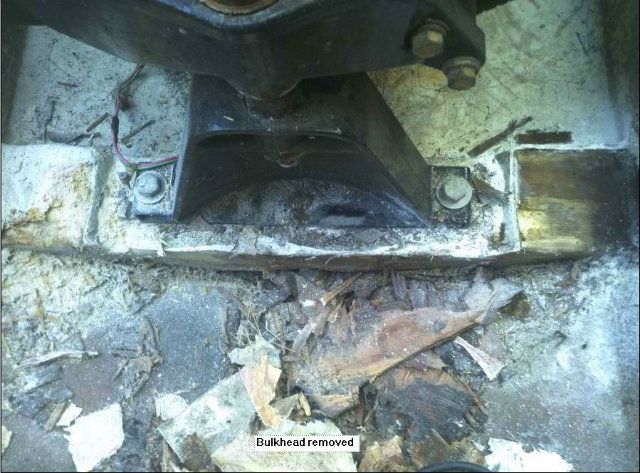
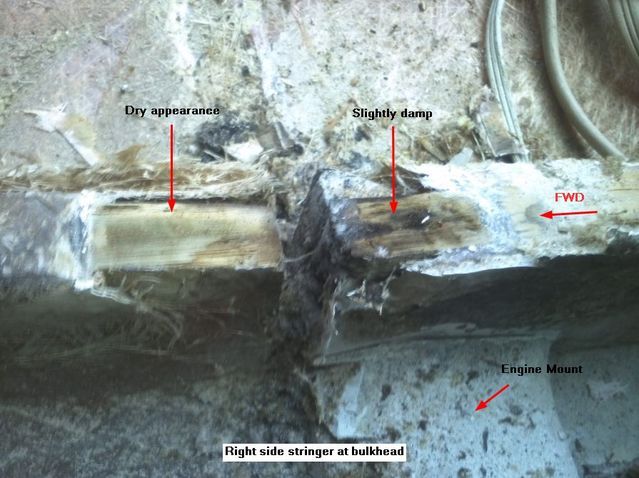
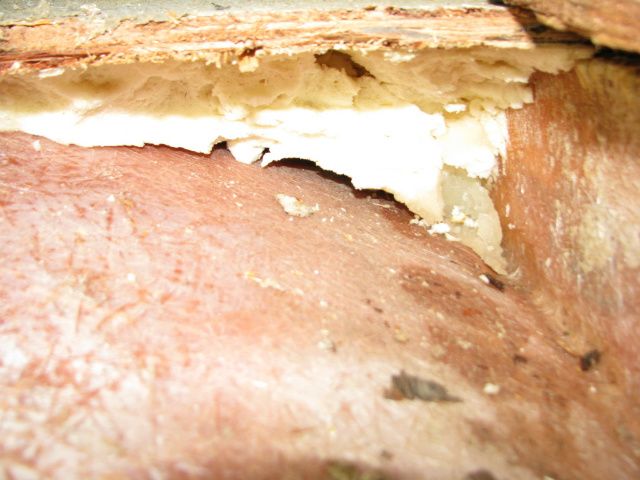
The rotten bulkhead is making me worried that the engine mount is also rotted since the bulkhead sits against it and both are gel coated in together. As I'm going fwd towards the seats I'm still finding slightly damp floatation foam.
Picture949-1.jpg

Picture969-1.jpg

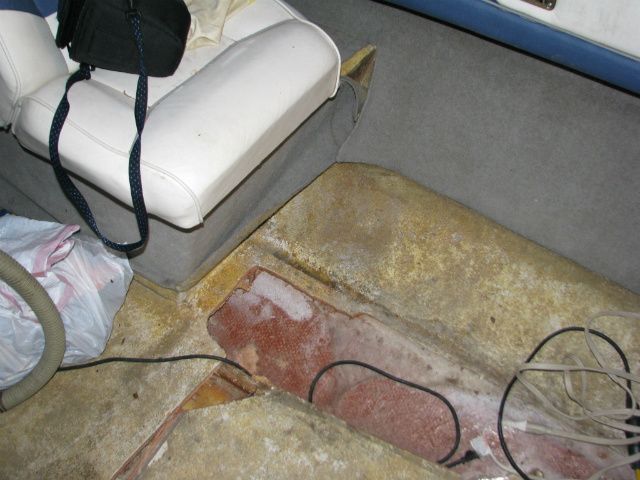
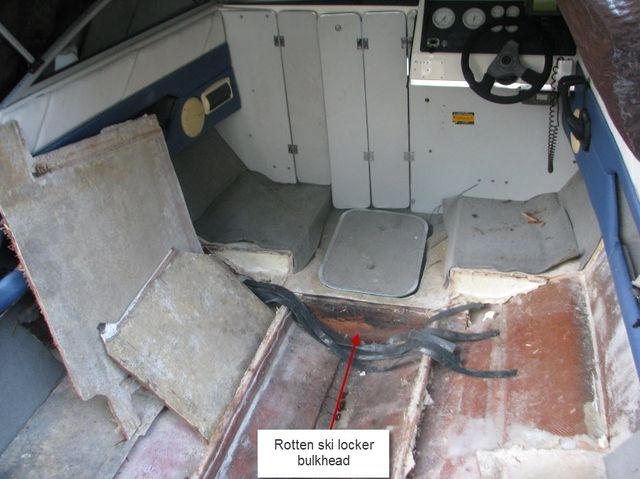
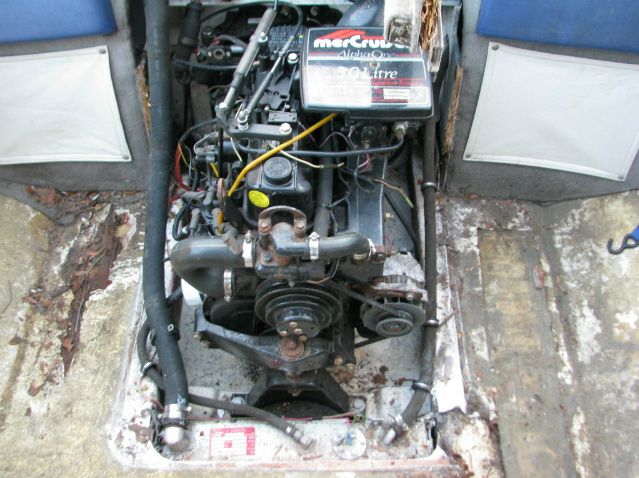
From what I hear, cutting those seat boxes from the floor is really going to be a bear. So I guess I'm looking for a path forward. I think I'll have to pull the tank and replace the bulkhead and core sample the engine mount? I was told to not worry about the stringers due to the fact that Bayliner engineered the strength of the stringer in the actual glass layup itself and not in the foam core. Opening up the stringer to dig out foam and repairing what was opened up might actually degrade the structural integrity. I have a feeling this is going to be quite the job doing it in an apartment complex parking lot.
 

oops!

Supreme Mariner
Joined
Oct 18, 2007
Messages
12,932
Re: Replacing decking and floatation foam in a 1994 Bayliner 1952 Cuddy

lol.....i have picked worse places to do a restoration.

sorry it took me so long to get back to you bud...and starting a thread is the best way to get lots of help here.

the tools we use are a long blade sawzall....(the long blade will bend easy enough that those seat boxes are not too bad.)

and for the deck its a circular saw set to depth.....this allows straight cuts and sections can be replaced easily if you are not going to do a full gut.

ok.....correct on the stringers, by 94 all plants had switched to this method.
as for the forward motor mount.....you will need to remove the bulkhead to do a core sample of the mount.
if the mount is bad.....then the motor need to come out....
(we will get to pulling the motor later, but dont worry, its easy)

ok.....your deck has two sections forward of the dog house.....first the deck, and then under it, is another 5/8ths ply over the belly tank.
to get to the bulkhead.....the deck comes up.....and the ply cover over the tank comes out.

you will notice that your stringers are actually notched to allow the different depth of ply for the rank cover.
DO NOT CUT FROM THE CENTER OF THE PLY.
cut the cover from the edges where the stringer is......then above the bulkhead......and above the forward bulkhead that forms the ski locker.
cut this rectangle shape....and just lift the wood......there is your tank.....
there will be a flange on each end of the tank with three screws...pull the 6 screws.....you might have to pry and swear....the tank is held there by foam.....after you get the tank out......you will have access to the fore and aft tank bulkheads....
after the reat tank bulkhead is removed.....you can core sample your forward motor mount.

this sounds like a lot of work......but in actual fact, it is about 2 hours worth.....it goes quite fast.

also.....this is a bayliner......take core samples of the foam on the outboard sides of the main stringers, especially moving aft.
anyhing wet, must come out !
 

FastFission

Petty Officer 2nd Class
Joined
Sep 3, 2011
Messages
134
Re: Replacing decking and floatation foam in a 1994 Bayliner 1952 Cuddy

I just bought the 1993 version of this boat last fall, so I'm really interested to see how your repairs progress. By the way, a few months back I found someone's thread on a pretty much complete gut on a 1994 Bayliner 1950. It's a bow rider, but I think the basic structure is pretty similar. It is a bit frightening, since this was a Florida boat and pretty much all the wood was rotten.

If you're interested, the thread is:
http://forums.iboats.com/showthread.php?t=415891

Good luck! You'll have a lot of fun with her once she's put back together.

Carl
 

jaybeava

Seaman Apprentice
Joined
Sep 20, 2011
Messages
32
Re: Replacing decking and floatation foam in a 1994 Bayliner 1952 Cuddy

Sorry for the delay. Haven't gotten much done with family in town and work, etc, etc. Today I was able to get the seats cut out and belly tank removed. Seats were a bit of a pain. I didn't realize they were foam filled. After siphoning out the fuel, the tank was a breeze. What are the pads that the tank sits on? They are completely soaked. It seems like they are there to keep the tank from sitting directly on the hull and rubbing through. Is this something to typically replace? (Photos to come shortly) -Jason
 

jaybeava

Seaman Apprentice
Joined
Sep 20, 2011
Messages
32
Re: Replacing decking and floatation foam in a 1994 Bayliner 1952 Cuddy

After digging into this floor I must say that I'm not too impressed with the design. It seems as though when one area gets wet it will spread to everything. Almost like a termite in search of wood. Fastfission, I hope you don't run into any floor issues. This has gotten to be quite the task. And all I thought it needed was a water pump and out drive seal! Lol
 

jaybeava

Seaman Apprentice
Joined
Sep 20, 2011
Messages
32
Re: Replacing decking and floatation foam in a 1994 Bayliner 1952 Cuddy

Here is a photo of the driver side seat box removed.
Dvrsideseatremoved.jpg
Dvrsideseatremovedlookingright.jpg

After removing both seats I pulled up the floor to access the fuel tank.
Fueltankbeforeremoval.jpg

After pulling the tank I was disappointed to find more rot at the ski-locker bulkhead
Skilockerbulkhead.jpg

I also noticed that the pads the fuel tank sits on were water logged. Are these tough to replace? They are glassed in with the stringer. I assume their only purpose is keep keep the fuel tank from chaffing against the hull?
Wetfueltankpad.jpg
Wetfueltankpad1.jpg

What is the best way to start removing the bulkheads without removing the stringers? I was thinking a 45 degree cut (or shallower) on the stringer where they intersect with bulkhead? Can the fuel tank pads be cut from the stringer without jeopardizing the integrity of the stringer?
 

FastFission

Petty Officer 2nd Class
Joined
Sep 3, 2011
Messages
134
Re: Replacing decking and floatation foam in a 1994 Bayliner 1952 Cuddy

After digging into this floor I must say that I'm not too impressed with the design. It seems as though when one area gets wet it will spread to everything. Almost like a termite in search of wood. Fastfission, I hope you don't run into any floor issues. This has gotten to be quite the task. And all I thought it needed was a water pump and out drive seal! Lol

Actually, from reading the resto threads, I think most glass boats are about the same. At least they kept a good bit of the foam above the floor level. I've been sweating this kind of thing myself, but so far I've gone through the boat with a hammer looking for soft spots. The only problem I've found is a little surface rot at the battery compartment limber hole.

I think our climate here (high desert, VERY dry) has been a lifesaver. Actually, I looked at about a dozen boats of similar vintage before I bought mine, and I really didn't see any with soft spots or obvious rot. Peering around, I did notice that Bayliner did leave a fair amount of uncovered wood. The little floor locker, for instance, looked like they'd probably stuck a nozzle in and gelcoated up underneath, but they missed a lot of spots.

I am a bit encouraged that it looks like you'll be able to replace the deck without pulling the top cap.

I think you are going to end up with a nice little boat once you're done.
 

jaybeava

Seaman Apprentice
Joined
Sep 20, 2011
Messages
32
Re: Replacing decking and floatation foam in a 1994 Bayliner 1952 Cuddy

Thanks. I think she might be alright once I get this deck squared away. I don't have to pull the cap at this point but I haven't sampled the transom yet. If it turns out I need transom work, I don't know what I'll do. Your probably right about the gelcoat job. Better attention to quality at the factory could probably have changed the fate of many boats. Guess ya get what ya pay for. Next boat will have to come from your area! Have you taken your Capri out yet?
 

FastFission

Petty Officer 2nd Class
Joined
Sep 3, 2011
Messages
134
Re: Replacing decking and floatation foam in a 1994 Bayliner 1952 Cuddy

Thanks. I think she might be alright once I get this deck squared away. I don't have to pull the cap at this point but I haven't sampled the transom yet. If it turns out I need transom work, I don't know what I'll do. Your probably right about the gelcoat job. Better attention to quality at the factory could probably have changed the fate of many boats. Guess ya get what ya pay for. Next boat will have to come from your area! Have you taken your Capri out yet?

Not yet. We're just now getting past frost season. I was hoping, but I saw some leaky bearing seals on the trailer a couple weeks ago, and after what I found there, I'll be ordering a new axle, hubs, etc this weekend. I was kind of thinking about adding brakes anyway, so it looks like it's time for that as well. After that, I just need to replace a broken bunk (another long story) and I think we're ready to go (crossing my fingers). I've been redoing some of the PO's electrical installations anyway, so I've got weekend projects for May.
 

jaybeava

Seaman Apprentice
Joined
Sep 20, 2011
Messages
32
Re: Replacing decking and floatation foam in a 1994 Bayliner 1952 Cuddy

Not yet. We're just now getting past frost season. I was hoping, but I saw some leaky bearing seals on the trailer a couple weeks ago, and after what I found there, I'll be ordering a new axle, hubs, etc this weekend. I was kind of thinking about adding brakes anyway, so it looks like it's time for that as well. After that, I just need to replace a broken bunk (another long story) and I think we're ready to go (crossing my fingers). I've been redoing some of the PO's electrical installations anyway, so I've got weekend projects for May.
Sounds good. I had to replace the axle on this one to get her home. Other than that the trailer was in real good shape. The salt really takes a toll on the axles and non-galvanized parts.
 

jaybeava

Seaman Apprentice
Joined
Sep 20, 2011
Messages
32
Re: Replacing decking and floatation foam in a 1994 Bayliner 1952 Cuddy

.
if the mount is bad.....then the motor need to come out....
(we will get to pulling the motor later, but dont worry, its easy)


anything wet, must come out !

Ok...What I feared has come true... The engine mount is damp.
enginemountbulkhead1.jpg

enginemountbulkheadremoved.jpg

I also found that the stringers are in deed wood. I cut a small section of glass off the top of the stringer and engine mount to peek inside.
rightsidestringerwithbulkheadremoved.jpg

leftsidestringerwithbulkheadremoved.jpg

enginemountbulkheadwglassremoved.jpg

Not exactly prepared for an engine pull :facepalm:
 

Funkiegh_g

Cadet
Joined
Feb 8, 2012
Messages
28
Re: Replacing decking and floatation foam in a 1994 Bayliner 1952 Cuddy

Hi Jaybeava. Your thread pics look very familiar! I have exactly the same boat but mine is 6 years older and I'm at about the same stage as you in a tear down. My stringers are wood cored but very well glassed and stiff so I'm not about to take them up. I had the same problem at the engine mount bulkhead and sure, there was some deterioration of the engine mount at the interface but I've let it dry out and the block of wood is so thick that I'm happy about the structural integrity and plan to leave it in place - maybe use some wood hardener resin on it.

The main shock for me was my transom. I thought it was pretty sound, with no signs of rot through the drain hole or outdrive areas. However, when I probed around the side after lifting the floor I found quite a bit of mush - check out my thread below to see where I put the screwdriver in! Do some core samples as low as you can on yours to check. From what I've seen these transom replacements aren't too bad - check out Frisco Boaters thread. I think I'll have a go at mine when I've got somewhere with the floor and honed my glassing skills. One thing's for sure - I'll not be on the water this year!!. Good luck with the project and do persevere - it'll be fun in the long run :D

http://forums.iboats.com/showthread.php?t=542393&p=3719537
 
Last edited:

maddog238

Seaman
Joined
Oct 31, 2011
Messages
54
Re: Replacing decking and floatation foam in a 1994 Bayliner 1952 Cuddy

Your layout is exactly like mine:
http://forums.iboats.com/showthread.php?t=541713&highlight=1952

To be honest, it feels a little overwhelming...expecially watching friends and neighbors head out to Chesapeake Bay while you are at home ripping out boat pieces.

My original intent was to fix a soft spot. Next thing i knew the whole deck and seat bases came out. I cut the seat bases as close to the bottom as I could get so that I could use them as a template. I drilled a few holes into the 2 primary stringers. THe starboard side was solid while the port side was shot. Yesterday, I cut out the port side, bought a 1x4, and prepping it to put it in.

There are 2 stringers about 30 inches long that are on both sides of the motor. When I took the port side out I noticed that where it touched the bottom of the transom, the wood was wet. I cried...not literally but mentally.
 

jaybeava

Seaman Apprentice
Joined
Sep 20, 2011
Messages
32
Re: Replacing decking and floatation foam in a 1994 Bayliner 1952 Cuddy

Your layout is exactly like mine:
http://forums.iboats.com/showthread.php?t=541713&highlight=1952

To be honest, it feels a little overwhelming...expecially watching friends and neighbors head out to Chesapeake Bay while you are at home ripping out boat pieces.

My original intent was to fix a soft spot. Next thing i knew the whole deck and seat bases came out. I cut the seat bases as close to the bottom as I could get so that I could use them as a template. I drilled a few holes into the 2 primary stringers. THe starboard side was solid while the port side was shot. Yesterday, I cut out the port side, bought a 1x4, and prepping it to put it in.

There are 2 stringers about 30 inches long that are on both sides of the motor. When I took the port side out I noticed that where it touched the bottom of the transom, the wood was wet. I cried...not literally but mentally.

Maddog,

Odd as this sounds, I'm emotionally going through the same thing. I'm biting my nails as I read your updates and look over my shoulder at my project. I haven’t come to grips that the engine needs to be pulled. Also can't imagine anything would ever be wrong with the transom as you found (yikes). Are these boats sister boats? Maybe both of these boats came off the assembly line on a Friday? I also have a few minor cuts in the hull to repair (I changed tools after that). All of this work, solo, one or two days a week, in an apartment complex parking lot. I’m one block from the Charleston harbor so I also get to hear and see everyone heading out like you do near the Chesapeake Bay. I think I should rename this post to “What you thought you had to fix…” or “While you were dreaming” lol.
 

jaybeava

Seaman Apprentice
Joined
Sep 20, 2011
Messages
32
Re: Replacing decking and floatation foam in a 1994 Bayliner 1952 Cuddy

My stringers are wood cored but very well glassed and stiff so I'm not about to take them up. I had the same problem at the engine mount bulkhead and sure, there was some deterioration of the engine mount at the interface but I've let it dry out and the block of wood is so thick that I'm happy about the structural integrity and plan to leave it in place - maybe use some wood hardener resin on it.

http://forums.iboats.com/showthread.php?t=542393&p=3719537
Funkiegh, Thanks for the encouragement! Its greatly appreciated. After exposing the stringer at the bulkhead I wondered the same thing. Can I leave the wood core? The glass around the stringer seems super tough. I think Oops may agree. He said why tear up a good glassed stringer shell just to replace minimal foam inside of it, so Im thinking why tear it up if even its wood filled? In a boat where the stringer core is the main structure I can see leaving it. Since Bayliner builds their strength into the glass why bother? (I hope this is the right thinking at least). I don’t think I can get around pulling the engine. The engine mount isn’t real soft but it’s so wet that you can squeeze some water out just pushing your finger into the wood. I guess I’ll have to build some type of engine lift. What do you all think about something like this? http://forums.iboats.com/showthread.php?t=496010
 

maddog238

Seaman
Joined
Oct 31, 2011
Messages
54
Re: Replacing decking and floatation foam in a 1994 Bayliner 1952 Cuddy

Funkiegh, Thanks for the encouragement! Its greatly appreciated. After exposing the stringer at the bulkhead I wondered the same thing. Can I leave the wood core? The glass around the stringer seems super tough. I think Oops may agree. He said why tear up a good glassed stringer shell just to replace minimal foam inside of it, so Im thinking why tear it up if even its wood filled? In a boat where the stringer core is the main structure I can see leaving it. Since Bayliner builds their strength into the glass why bother? (I hope this is the right thinking at least). I don?t think I can get around pulling the engine. The engine mount isn?t real soft but it?s so wet that you can squeeze some water out just pushing your finger into the wood. I guess I?ll have to build some type of engine lift. What do you all think about something like this? http://forums.iboats.com/showthread.php?t=496010

Jaybeava, by no means am I an expert or can give any sound advice by any stretch... But based off of what I have read on other restores and discussions concerning dry rot, if you have dry rot in your stringers, the rot will continue. That just leads me to believe in due time your floor will begin to sag in these weeks spots....eventually....though eventually can be years or sooner if water somehow leaks into these hull areas from an improperly sealed screw hole ;)

I read a post from Yacht D. when he was asked about dry-rotted stringers

"There's no easy way to "fix" it, there may be some Band-Aids that will let you use it a little longer, but they aren't really a fix. Soaking rotten wood with epoxy will make stronger, but it won't stop the rot, the area just past the epoxy will start to rot long before a new piece of wood will. Stringers are for "energy transfer " throughout the hull.. they can be made of foam or wood with outside fiberglass. The glass is your stringer m8.. if you have rot inside a glassed stringer system that never meant for the wood or foam to be the stringer itself.. you still have your stringer.. As long as the "fiberglass" is made to be your super-structure."

So basically what will bring you piece of mind.

This is what I did. On my port stringer, I kept cutting it at a 45 degree angle from back to front try to find where the rot stopped. By the time I was done cutting, all but 18 inches remained of the stringer remained before I found solid wood (no dry rot). So, I am leaving that one piece as a temporary guide for the new stringer. On the starboard side, the rot was isolated to the ski locker bulkhead. So I cut 2 45's out of the wood and I am going to sister in a new piece, wrap it and call it a day.

My engine mounts and transom are wet but 'seemingly' solid. I drilled a few holes in the top of them, put in acetone to dry them out, and plan on filling them with 3m, fiberglassing them and calling it a day. Of course I am going to keep close watch on the transom but I plan to make pulling the engine and replacing the motor mount a next winter job.
 

jaybeava

Seaman Apprentice
Joined
Sep 20, 2011
Messages
32
Re: Replacing decking and floatation foam in a 1994 Bayliner 1952 Cuddy

Jaybeava, by no means am I an expert or can give any sound advice by any stretch... But based off of what I have read on other restores and discussions concerning dry rot, if you have dry rot in your stringers, the rot will continue. That just leads me to believe in due time your floor will begin to sag in these weeks spots....eventually....though eventually can be years or sooner if water somehow leaks into these hull areas from an improperly sealed screw hole ;)

I read a post from Yacht D. when he was asked about dry-rotted stringers

"There's no easy way to "fix" it, there may be some Band-Aids that will let you use it a little longer, but they aren't really a fix. Soaking rotten wood with epoxy will make stronger, but it won't stop the rot, the area just past the epoxy will start to rot long before a new piece of wood will. Stringers are for "energy transfer " throughout the hull.. they can be made of foam or wood with outside fiberglass. The glass is your stringer m8.. if you have rot inside a glassed stringer system that never meant for the wood or foam to be the stringer itself.. you still have your stringer.. As long as the "fiberglass" is made to be your super-structure."

My engine mounts and transom are wet but 'seemingly' solid. I drilled a few holes in the top of them, put in acetone to dry them out, and plan on filling them with 3m, fiberglassing them and calling it a day. Of course I am going to keep close watch on the transom but I plan to make pulling the engine and replacing the motor mount a next winter job.
Hmm…I wonder if I can get away with doing the same to my mount? Thing I’ll poke at it a little today. How wet was the wood when drilling?
From what I understand, I should never have a sag problem if the fiberglass shell (in good shape) is built to be the structural stringer and part of the super-structure. The only way I can see a problem existing is if the stringer was dis-bonded from the hall or delaminated somewhere along the length of it. Excessive flexing or water intrusion within the bond matrix would cause a failure.
So I guess this raises a question...If the wood core is there to help limit the amount of flexing in the stringer, then why would the stringer be a 3 piece design on each side? The stringer run is separated by a bulkhead at both the fwd side and aft side of the belly fuel tank. The first point of failure (failure by water intrusion or stress) is at the bulkhead. This seems like one of the main issues creating the need for a stringer repair. If I laid up core and glass at the bulkhead locations to form a one piece stringer (now similar to a keel beam), then tabbed in a bulkhead around the stringer, the likelihood of doing another stringer repair down the road drops and the structure is greatly improved. This is of course if I’m not totally over looking something. Does anyone see a problem doing it that way?
 

maddog238

Seaman
Joined
Oct 31, 2011
Messages
54
Re: Replacing decking and floatation foam in a 1994 Bayliner 1952 Cuddy

Hmm…I wonder if I can get away with doing the same to my mount? Thing I’ll poke at it a little today. How wet was the wood when drilling?
From what I understand, I should never have a sag problem if the fiberglass shell (in good shape) is built to be the structural stringer and part of the super-structure. The only way I can see a problem existing is if the stringer was dis-bonded from the hall or delaminated somewhere along the length of it. Excessive flexing or water intrusion within the bond matrix would cause a failure.
So I guess this raises a question...If the wood core is there to help limit the amount of flexing in the stringer, then why would the stringer be a 3 piece design on each side? The stringer run is separated by a bulkhead at both the fwd side and aft side of the belly fuel tank. The first point of failure (failure by water intrusion or stress) is at the bulkhead. This seems like one of the main issues creating the need for a stringer repair. If I laid up core and glass at the bulkhead locations to form a one piece stringer (now similar to a keel beam), then tabbed in a bulkhead around the stringer, the likelihood of doing another stringer repair down the road drops and the structure is greatly improved. This is of course if I’m not totally over looking something. Does anyone see a problem doing it that way?

The mount was wet but i did not see any water dripping like others have seen. The last 3 days here in Virginia have been really hot and sunny. The transom and mount area i exposed and drilled is pretty dry. Now take in mind, I have no idea the condition of the rest of the wood that is still wrapped in fiberglass. But I do know that there are not stress cracks in the transom area and the motor didnt shake all over the place. Again, this is a chance I am willing to take. I dont go offshore fishing, and when I do go into the bay, I am always near land. Just in case :)

When I do lay my new deck down, I am going to make sure it is as solid and water tight as I can get it. Though I have learned nothing is water tight, all I can do is my best.

This winter, I will take my boat down to NC, pull the motor, and do it right. Because as long as I know there is problem, I will never totally rest easy.

Im moving in July so the wife has a huge honey-do list that doesnt include the boat.... "I'm just sayin"
 

jaybeava

Seaman Apprentice
Joined
Sep 20, 2011
Messages
32
Re: Replacing decking and floatation foam in a 1994 Bayliner 1952 Cuddy

The mount was wet but i did not see any water dripping like others have seen. The last 3 days here in Virginia have been really hot and sunny. The transom and mount area i exposed and drilled is pretty dry. Now take in mind, I have no idea the condition of the rest of the wood that is still wrapped in fiberglass. But I do know that there are not stress cracks in the transom area and the motor didnt shake all over the place. Again, this is a chance I am willing to take. I dont go offshore fishing, and when I do go into the bay, I am always near land. Just in case :)

When I do lay my new deck down, I am going to make sure it is as solid and water tight as I can get it. Though I have learned nothing is water tight, all I can do is my best.

This winter, I will take my boat down to NC, pull the motor, and do it right. Because as long as I know there is problem, I will never totally rest easy.

Im moving in July so the wife has a huge honey-do list that doesnt include the boat.... "I'm just sayin"

Sounds like ya have a plan. I'm going to pull the rest of the glass off the engine mount and see what I have to work with. Do you have any pictures you can post of your progress?
 

oops!

Supreme Mariner
Joined
Oct 18, 2007
Messages
12,932
Re: Replacing decking and floatation foam in a 1994 Bayliner 1952 Cuddy

hi bud......sorry it has taken so long to get back to you....

if the mount is wet....you will have to pull the motor and change the mount.

for some strange reason, that is still a wood stringer boat, so the glass is not structural, it is just there to encapsulate the wood.

if you were able to dry the wood out completely, then you could inject anti freeze into the wood then re dry it and re glass it.

but drying the mount will take weeks.....then the injection and drying will take more time.

you are far better off to pull the motor...do the mount and anything else there that is wet then re glassing.

pulling the motor is very very easy.
undo the 2 pins at the back of the transom plate....the front mount.....the fuel line...the exhaust the main power cable and a few grounds...and out it comes.

just make note of the current mount height and duplicate that.

cheers
oops
 
Top