Seafarer transom and deck replacement

zymox

Petty Officer 2nd Class
Joined
Dec 1, 2011
Messages
104
Re: Seafarer transom and deck replacement

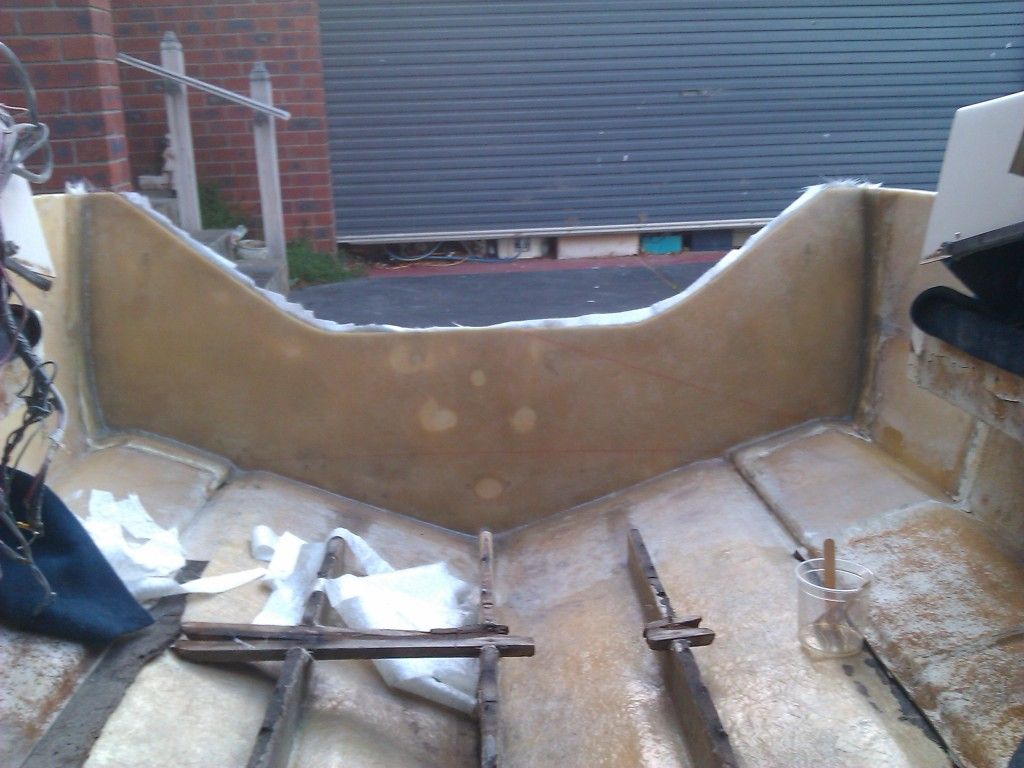
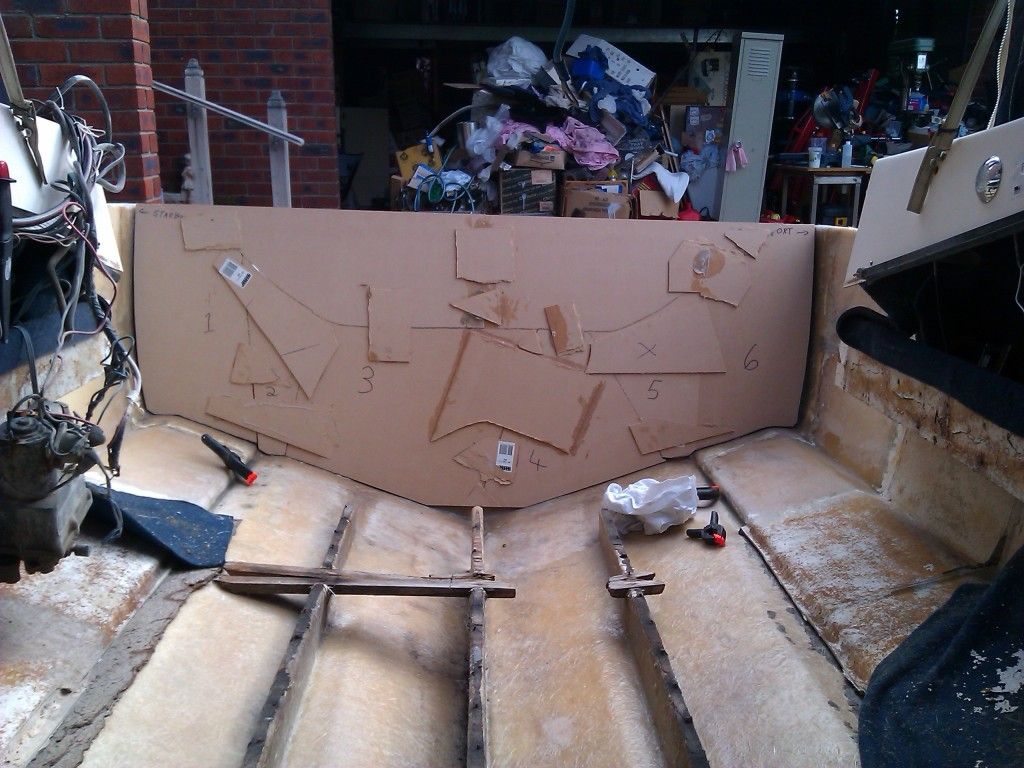
Your prepared area looks great. Make sure you have at least 6 inches. I cleaned it really really good with acetone before all work was initiated. Then I took a lot of PB (approx. 6-7 kg's) and spread it even on both the transom-core and the outer skin, then I clamped it just enough for the excessive to come out all around. I then used a table spoon dipped in mineral spirit to form a nice rounded edge all the way around for the coming laminate to lay on so I didn't get any sharp edges.

I don't use the same type of mat as you but it's very similar except that mine is not stitched together.
Check out the link below and you will see how to cut yours and how to do it. I did all my cuts in a way that the cuts always ended up overlapping in the corners to gain max strength at those points.

http://forums.iboats.com/showthread.php?t=525821&page=2&highlight=zymox
 

oops!

Supreme Mariner
Joined
Oct 18, 2007
Messages
12,932
Re: Seafarer transom and deck replacement

hi bud.....

a few things here....

first.....i noticed that you have had a couple of posts that you were asking questions and didnt get an answer right away.

pm me with the link....i dont mind at all. !

im al llttle concerned about some of the stuff i see.

but let me explain.......first of all you are working on an outboard type boat......so what you have done is ok.
is it was in inboard / out board or an i/o it would not be good.

for an out board, all you have to build is a strong area for the motor to hang off......
this means that the transom should be well glassed to the bottom and sides of the hull......this is done by filling the gaps that the new transom leaves with a thickened resin....(search oops sooper dooper peanut butter in the thread)
then....tab that in with your csm ....then 1808.

thickness ot the outboard transom is not as critical as an inboard out board......but for the proper thickness.....check the space between the "hangers" of the motor.....make it 3/8th s thinner....about a centemeter i think.

ok....next....

the cut out of the transom shape...

when you ground out the transom.....you cut out the shape of the hull skin.
this is important because you have no reference for the top edging or the splash well.

i would now build your transom larger (higher) than the cut out area. and glass it.

when you get every thing installed (as far as glass work is involved) then you can match the splash well to the transom and cut it to the correct size and shape of the splash well cap portion.
as well, you can match your motors height as relative to the anti cav plate on the drive.

other than that....it looks like you are doing a bang up job !

again......due to my mod duties.....i cannot follow every thread in the dry dock.....so just direct my attention to your thread when ever you are stuck....really, i dont mind !

cheers my friend
oops
 

Three08

Petty Officer 2nd Class
Joined
Oct 24, 2009
Messages
111
Re: Seafarer transom and deck replacement

Thanks for the reply oops, if this was an inboard would the issue be that I've changed the transom thickness?
I'm going to be putting a bracket and swim platform on that's why I was worried about the thickness, I've read somewhere on here that I should make the transom total minimum thickness of 2" to support the bracket.

Someone has done a bad repair on this before I think because the outside skin was really thin only about 1/8" including the gel coat, the original transom was only 1 1/8" total.

I built it up to a 1/4" I got 1 1/2" of marine ply for the core, I'm just not sure if I should add another 1/2" to the core, I don't want to make it to heavy but I want to be sure it can support the bracket when it's on the trailer.

I'd been planning to fill the cut out from the inside before I install the transom, with a mold on the outside sort of like what you did on the hull extension but I've seen lots of people do this type of remodel and they all installed the transom then added the glass to the cutout, is that the better way to do it?

I have no idea what I'm going to do about the stringers since the boat is sitting on a roller trailer, I might have to look on ebay for a cheap bunk trailer...
 

GT1000000

Rear Admiral
Joined
Jul 13, 2011
Messages
4,916
Re: Seafarer transom and deck replacement - Updated

Re: Seafarer transom and deck replacement - Updated

You have a couple of options as far as supporting the hull...

You can raise the hull slightly and slide in some boards on top of the rollers...or...

You build up a cradle out of some dimensional lumber and slide the hull on to it...

Some of the guys here have built really nice and solid ones, I just threw together some scrap lumber and came up with this...


DSCF1399.jpg
...

it ain't pretty, but it has worked OK so far...:redface:

If you want you can add some wheels to be able to roll it around...
 

Three08

Petty Officer 2nd Class
Joined
Oct 24, 2009
Messages
111
Re: Seafarer transom and deck replacement - Updated

Re: Seafarer transom and deck replacement - Updated

Thanks GT, I think I'll have to use boards, I'm working in my driveway and it's far from flat so I think I would have trouble getting a cradle to sit right.

Haven't got anymore work done yet but I spent a few hours moving junk out of the shed so I could bring the motor out and start it up. I was really starting to worry that I'd let it sit to long but she fired right up.

The more research I do the more I think I should fit the new core and then layup the new outside skin directly to to the core, this seens to be the way everyone else is doing it
 

oops!

Supreme Mariner
Joined
Oct 18, 2007
Messages
12,932
Re: Seafarer transom and deck replacement - Updated

Re: Seafarer transom and deck replacement - Updated

for cradles......some people cut the top off a shopping cart.

if you are worried about the ground under the wheels....but a small piece of plywood under the wheels.

or, you could just slip 2x6's over the rollers on your trailer....you just want to avoid a point load here...
 

oops!

Supreme Mariner
Joined
Oct 18, 2007
Messages
12,932
Re: Seafarer transom and deck replacement

j_k_bisson, I was wondering how long it would take for someone to notice the feet, I always wear boots when I'm grinding but most other times I'm in bare feet, I stuck my sock to my foot with resin the other day.....


lol.....just to let you know....
one of out guys here did the same......walking around in bare feet.

he got fiberglass in his feet, the actual glass strands......he had quite a bit of trouble with it if i remember correctly...

lots of doctors appointments....

it may not be the best idea.
 

j_k_bisson

Lieutenant Junior Grade
Joined
Oct 6, 2010
Messages
1,082
Re: Seafarer transom and deck replacement

lol.....just to let you know....
one of out guys here did the same......walking around in bare feet.

he got fiberglass in his feet, the actual glass strands......he had quite a bit of trouble with it if i remember correctly...

lots of doctors appointments....

it may not be the best idea.

Waiting for someone to chime in with this. I thought it was just something my mother used to say, just to be heard!!!!
 

oops!

Supreme Mariner
Joined
Oct 18, 2007
Messages
12,932
Re: Seafarer transom and deck replacement

Thanks for the reply oops, if this was an inboard would the issue be that I've changed the transom thickness?
I'm going to be putting a bracket and swim platform on that's why I was worried about the thickness, I've read somewhere on here that I should make the transom total minimum thickness of 2" to support the bracket.

Someone has done a bad repair on this before I think because the outside skin was really thin only about 1/8" including the gel coat, the original transom was only 1 1/8" total.

I built it up to a 1/4" I got 1 1/2" of marine ply for the core, I'm just not sure if I should add another 1/2" to the core, I don't want to make it to heavy but I want to be sure it can support the bracket when it's on the trailer.

I'd been planning to fill the cut out from the inside before I install the transom, with a mold on the outside sort of like what you did on the hull extension but I've seen lots of people do this type of remodel and they all installed the transom then added the glass to the cutout, is that the better way to do it?

I have no idea what I'm going to do about the stringers since the boat is sitting on a roller trailer, I might have to look on ebay for a cheap bunk trailer...

yes.....the transom skin would be the issue if it was an i/o.

ok...install your new transom.....then re glass the cut out oare on the out side....youwill need to fair and re gell it...but it will be correct.
if you do it the other way.....you will have a void between the transom and the skin.....as the new glass will want to pool toward the outer mold....this will create a void at the transom bond.

the wood you are using is fine...so are the thicknesses.....just use 2 layers of the 1808 on the inside.....this will bring you very close to the 2 inches.
 

oops!

Supreme Mariner
Joined
Oct 18, 2007
Messages
12,932
Re: Seafarer transom and deck replacement

oh....the dry ness is good as well.....

marine ply is a lot dryer that store bought ply.....
 

Three08

Petty Officer 2nd Class
Joined
Oct 24, 2009
Messages
111
Re: Seafarer transom and deck replacement

Thanks heaps oops! that should get me back on track. I knew there had to be something I was missing with that cut out, lucky I didn't fill it. Hopefully the weather will be nice to me this weekend so I can get the core in or at the very least get it cut and ready to fit for the next nice day.
I've learn't my lesson about bear feet and fiberglass, I must of spent a week picking splinters out my feet. I still keep forgetting to put my boots on when I take photos at the end of the day:facepalm:

I spent half of today searching for my drill press so I could drill the clamps, a little tip for everyone, don't try drilling them without a guide of some sort or you'll never get the holes to line up. Also measure your transom height before you make them, I had to made the center clamp 10" longer or the bottom bolt would of been in the way. ( I never did find the drill press, drilling them tomorrow now)

I've got a few ideas on how I'm going to finish off the cap, I have to work out how it's going to tie into the transom before I cutout the new core. It's kind of had to explain what I'm thinking of doing, I'll post some pictures up later to give you all a better idea.
 

Three08

Petty Officer 2nd Class
Joined
Oct 24, 2009
Messages
111
Re: Seafarer transom and deck replacement - Updated

Re: Seafarer transom and deck replacement - Updated

Well it's been a while since my last update but I'm still hard at work.
My clamps are ready, all my prep work for the transom tabbing and skin is done

I Added a final layer of CSM to the inside of the skin, it had been a few weeks since I put the last layer of 1808 on so I ruffed it up with a 40 grit on the RO sander. Washed it a few times with warm soapy water, let it dry and then cleaned it with acetone before the CSM went on. I need to trim the excess and then feather the outside edge to allow for the cutout being filled and then make a few final adjustments to the template, the she's ready to cut and fit the core :D

IMG_20120421_170137.jpg


IMG_20120421_170038.jpg
 

Three08

Petty Officer 2nd Class
Joined
Oct 24, 2009
Messages
111
Re: Seafarer transom and deck replacement - Updated

Re: Seafarer transom and deck replacement - Updated

Just a picture with the template sitting in place to give you all an idea of what it's going to look like. This was before the final layer went in so I'll have to shave a tinny bit off the top to allow for the CSM I added. I'm still not to sure if I should grab a sheet of 12mm to add to the core, at the moment it's @ 36mm (just under 1 1/2") oops! said I should be right with that much but I'm just thinking because I going to use fiberglass for the bracket and not aluminum it will be a little heaver than a lot of the bought brackets.

IMG_20120417_185250.jpg


And here's my helper, I've kicked her out so many times now I've given up trying. I just make sure she's out before I start working now.

IMG_20120408_181244.jpg


IMG_20120407_125408.jpg
 

Three08

Petty Officer 2nd Class
Joined
Oct 24, 2009
Messages
111
Re: Seafarer transom and deck replacement - Updated

Re: Seafarer transom and deck replacement - Updated

Hey everyone, I finally have an update. So I got everything ready, I just have to cut and install the core, the weathers been really bad down here lately so I haven't been able to bring the marine ply outside.

I got a few questions before I install the core.

I'm using 1808, do I still need to use 1.5oz CSM under the tabbing?

Do I need to keep the bottom of the core off the hull like you do with stringers?

Anyone got any advice on using the transom clamps, I'm a little worried about squeezing too much or not enough PB out?

I don't seem to be able to get oops sooper dooper structural peanut butter to work, every time I fellow the instruction the milled fibers soak up all the resin and it ends up very dry and weak so I've been using my own mixture.

This is how I've been making it, and it seems to be quite strong, I get 100ml of resin mixed with mekp and add around 40-50ml of chopped strands and mix well, then I add enough aerosil to stop it sagging and mix it again, then thicken it with as much milled fiber as I need to get the consistency I'm after.
Will this mixture be ok for gluing the cores together and bonding the core to the transom skin?

Here's a shot of the template from the inside, I felt I'd taken too much from the plug section so I changed it to a rounded cut-out. See 3rd picture.
IMG_20120428_130621.jpg


This how I originally did the plug, see the changes I made in the next picture.

IMG_20120428_130544.jpg


And the changes I made, I'm much happier with it that way. I forgot to take a picture while it was in the boat but this is what it looks like now.

IMG_20120507_200116-Copy.jpg
 

Three08

Petty Officer 2nd Class
Joined
Oct 24, 2009
Messages
111
Re: Seafarer transom and deck replacement - Updated

Re: Seafarer transom and deck replacement - Updated

Can anyone confirm for me that the PB mixture I've been using will be ok for laminating the cores together? Or is it better to use a layer of 1.5oz CSM?

I've done some more research and now know that it's best to still use CSM under the 1808 tabbing.

I'm still concerned about the clamps, how do you make sure you get them even at both ends?

Looks like I might get 1 day of good weather this week, so hopefully I can get the core cut and warped in CSM.

Hey everyone, I finally have an update. So I got everything ready, I just have to cut and install the core, the weathers been really bad down here lately so I haven't been able to bring the marine ply outside.

I got a few questions before I install the core.

I'm using 1808, do I still need to use 1.5oz CSM under the tabbing?

Do I need to keep the bottom of the core off the hull like you do with stringers?

Anyone got any advice on using the transom clamps, I'm a little worried about squeezing too much or not enough PB out?

I don't seem to be able to get oops sooper dooper structural peanut butter to work, every time I fellow the instruction the milled fibers soak up all the resin and it ends up very dry and weak so I've been using my own mixture.

This is how I've been making it, and it seems to be quite strong, I get 100ml of resin mixed with mekp and add around 40-50ml of chopped strands and mix well, then I add enough aerosil to stop it sagging and mix it again, then thicken it with as much milled fiber as I need to get the consistency I'm after.
Will this mixture be ok for gluing the cores together and bonding the core to the transom skin?
 

GT1000000

Rear Admiral
Joined
Jul 13, 2011
Messages
4,916
Re: Seafarer transom and deck replacement - Updated

Re: Seafarer transom and deck replacement - Updated

Howdy 308,

Best opinion I can give from my limited knowledge and experience in all this is, PB is fine for laminating, CSM wetted out is also good...

PB...use a 1/4 inch notched trowel to spread the PB on one surface, then in a 90? direction on the other surface...this insures thourough conact...you could also drill some pressure relief holes in the panels...this does two things...helps prevent possible air pockets and acts like driving a nail into the panel, except it is a PB "nail"

With the CSM I don't have any experience with laminating, but have read here on the forum that 2-3 wet layers are used between the pieces being laminated...

The third option is to use a waterproof glue, such as Titebond III...I have used this and it is ready to go in 24 hours...

As far as the clamps...that is still a bit of a black art...Practice putting them on a couple of times before the actual laminating...to get the feel for how long it takes and how tight to get them...You don't want to squeeze out all of the adhesive, just tight enough is just right...

Be ready with all of the tools and supplies handy, well beforehand...to do the filleting, etc...it can be quite frustrating to need something in the middle of a procedure...don't ask me how I know...:rolleyes::facepalm:

Also, a tip I got from "woodonglass"...use a couple of tiny brad nails driven into one surface, then cut the head off, leaving a sharp point to help maintain the panel alignment when the 'glue' gets applied [don't forget to take into acount the thickness of whatever adhesion method you end up using]...this keeps them from floating away from each other while you get the clamps on...

Hope this helps, Best of luck with the lamination and the weather...:)

Regards,
Gus
 

Three08

Petty Officer 2nd Class
Joined
Oct 24, 2009
Messages
111
Re: Seafarer transom and deck replacement - Updated

Re: Seafarer transom and deck replacement - Updated

Thanks GT, I keep picturing the csm setting up before I get the second sheet of ply in place so I think I'll go with the PB. I've been keeping the wood inside the house and don't want to bring it back in once it's glued so I need to get the core laminated and warped in csm in the same day. I don't think i could do that with the wood glues. As you guys have seen in the pictures there's no room in the shed to work, but I can squeeze the core in there once it's warped in csm. I just need 2 nice dry days and the core should be in.

With the small nails I'm not sure I understand correctly how they're used, are they just used as a spacer to keep the gap between the 2 sheets even?

I forgot to ask before, when I cut the core do I need to match the angle of the hull on the bottom or can I just use PB in the gap?
 

GT1000000

Rear Admiral
Joined
Jul 13, 2011
Messages
4,916
Re: Seafarer transom and deck replacement - Updated

Re: Seafarer transom and deck replacement - Updated

Here's a quick sketch of what the nails are for...see the attachment...

As far as cutting the angle, you can if you want, but a gap all the way around is OK, too...since it will all be filled with PB and then tabbed in...

Also, I forgot to mention to pre-soak the bare wood with plain resin, when it becomes tacky, then add the layer of CSM/PB to waterproof the piece before installation and to provide a good bond to the succesive layers of tabbing...
 

Attachments

  • nails for alignment.jpg
    nails for alignment.jpg
    12 KB · Views: 0

Three08

Petty Officer 2nd Class
Joined
Oct 24, 2009
Messages
111
Re: Seafarer transom and deck replacement - Updated

Re: Seafarer transom and deck replacement - Updated

Thanks mate, I understand now.

I'm planning to build the core tomorrow if all goes well.
After it's laminated I was planning to cover the edges with csm tape and then csm the 2 faces of the core, is this method ok or is is better to round the edges and wrap the csm right around?

Will 1 layer be enough for waterproofing or should I go 2 layers?

Is it ok to wipe the raw ply with acetone?
 

GT1000000

Rear Admiral
Joined
Jul 13, 2011
Messages
4,916
Re: Seafarer transom and deck replacement - Updated

Re: Seafarer transom and deck replacement - Updated

Thanks mate, I understand now.

I'm planning to build the core tomorrow if all goes well.
After it's laminated I was planning to cover the edges with csm tape and then csm the 2 faces of the core, is this method ok or is is better to round the edges and wrap the csm right around?

Will 1 layer be enough for waterproofing or should I go 2 layers?

Is it ok to wipe the raw ply with acetone?

Raw Plywood + Acetone = A-OK!...and any time the work sits for more than a day, a quick wipe down with acetone is ALWAYS a good thing...helps to clean off the surface and will give a fresh tacky surface for the next layer...

1 Layer is Plenty...

If you round over the edges and cut out the CSM about an inch or so bigger, then kind of tug and loosen, even tear a little, the edges all the way around, with a good wet-out of resin, it should fold over nicely...try for a frayed edge that is big enough to wrap over and cover the edges...

Then, if you wait for it to get just past the gelled stage, but before it gets hard...[another of those "Black Magic" things]...you can take a fresh sharp razor knife and cut off the excess...otherwise, you'll have to wait for it to get hard [2-3 hours]... then grind off the excess...

Holler back if something isn't clear...:)...I'll check back in 'round lunch time, my time...and then again later in the afternoon...

BTW, it is like getting to be Fall in Oz, Right?...:confused:
 
Top