Seafarer transom and deck replacement

Three08

Petty Officer 2nd Class
Joined
Oct 24, 2009
Messages
111
Re: Seafarer transom and deck replacement - Updated

Re: Seafarer transom and deck replacement - Updated

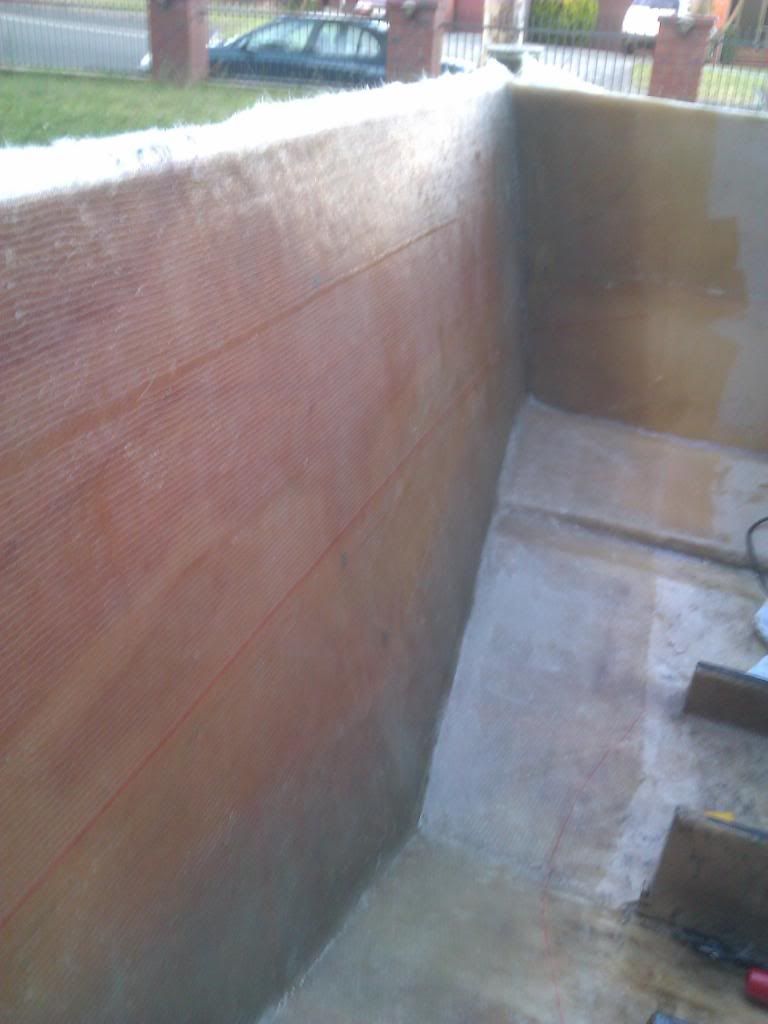
You wouldn't want 18" but according to the diagrams from woodonglass I should of made the first layer 6" overlap, I don't think it will be a problem since I have 1 more layer of 1808 then he recommended and my skins will finish with around 12-13" overlap.

There's 6 layers of glass on all the tabbing, 3 CSM and 3 1808 then I'll be putting a total of 5 layers of glass across the whole transom 3 of CSM and 2 of 1808 so in the end there will be 11 layers of glass on the corners and 5 in the center.

That soulds like a lot doesn't it. Am I over killing the the skin? Maybe I should leave out the layer of CSM I was planning to put between the 2 layers of 1808...hmmm
 

Three08

Petty Officer 2nd Class
Joined
Oct 24, 2009
Messages
111
Re: Seafarer transom and deck replacement - Updated

Re: Seafarer transom and deck replacement - Updated

I added a layer of 1808 today but it didn't go so well, I ended up with some air in one of the corners. I know I need to grind the the air bubbles out and fill them, but should I use CSM or 1808 or is just hairy pb enough?
 

Three08

Petty Officer 2nd Class
Joined
Oct 24, 2009
Messages
111
Re: Seafarer transom and deck replacement

Here's a picture of todays work, see the 2 lines going through the middle, that was a bit of the stitching on the 1808 got stuck to the roller and pulled out, is that going to be a problem? Should I put a little CSM over that part?

IMG_20121210_201405.jpg
 

Woodonglass

Supreme Mariner
Joined
Dec 29, 2009
Messages
25,929
Re: Seafarer transom and deck replacement

Hairy PB should do the trick. Tabbing of 4" to 6" is sufficient and then the succeeding full layers should extend out 8", 10" to 12" You could go to 18" but really not needed. The Missing stitching will Not be an issue, other than cosmetic.
 

Three08

Petty Officer 2nd Class
Joined
Oct 24, 2009
Messages
111
Re: Seafarer transom and deck replacement

Thanks mate, I did 4", 6", 8" on the tabbing and 10" for the skin, the next layer of 1808 I was going to do 11" and then finish it off with one layer of CSM @ 12" Does that sound alright? I guess it's already 3 times as strong as it was (It had 1 thin layer of csm for the inside skin and no tabbing at all!)

Do you guy's think it would be safe to keep using these stringers for another year or so, I had a boat builder out here a little while ago and he recommended not to touch the stringers as they look really solid, he said just put bulkheads in where they should be. (there are none atm, see the pics on the first page). If I did do that I would probably still end up tearing the floor out again in a year or so and adding tanks and kill boxes and all that neat stuff that I really cant afford right now. Best fishing in Victoria in 25 years and my boats in dry dock :grumpy:
 

Woodonglass

Supreme Mariner
Joined
Dec 29, 2009
Messages
25,929
Re: Seafarer transom and deck replacement

If the wood in the stringers is NOT rotten then coat em with resin and re glass em. If some sections have rot cut that section out and replace it and sister it in. I would recommend Doing as much as you can NOW so you don't have to come back later. Your plan for the transom is good. I would suggest always having a minimum 2" overlap so in your case 12" on the 1808 and 14" on the Final CSM. It will be a TANK when you're done!!!
images
 

Three08

Petty Officer 2nd Class
Joined
Oct 24, 2009
Messages
111
Re: Seafarer transom and deck replacement

Cool thanks mate, I'll have a closer look at the stringers before I make up my mind what to do there.
 

Three08

Petty Officer 2nd Class
Joined
Oct 24, 2009
Messages
111
Re: Seafarer transom and deck replacement

Well it's been awhile since my last update but I'm still getting on with it, the last layer of CSM is on the transom, the new stringers/knees are glassed in and the bulkhead is bedded in ready to lay up. I have to finish filling and gel-coating the old splash well cut-out, then I'll be installing the pod, then I'll gel-coat the bilge, make, install and gel-coat the floor, rejoin the cap where I cut it and build the new section and then it's mostly all fit out!

The lay up for the inside skin was CSM-1808-CSM-1808-CSM.
I had a good look at the the stringers, there nice and solid.


Three08

Petty Officer 2nd Class
Joined
Oct 24, 2009
Messages
111
Re: Seafarer transom and deck replacement

Hey everybody, I'm still alive! The weather's finally looking up around here so I've been working hard on the boat for last few weeks, I've filled and sanded the cut out from what use to be the splash well (20+ hours of work!) painted the transom and today I've started playing around with the top cap, it's just working out how to join the new section of cap into the existing cap that's slowing me down right now. After that's done all that's left to do is mounting the bracket and install the deck!


Woodonglass

Supreme Mariner
Joined
Dec 29, 2009
Messages
25,929
Re: Seafarer transom and deck replacement

WOW...Just WOW!!!! Your transom really turned out NICE!!! Excellent Craftsmanship!!!! That should hold up really well.
 

GT1000000

Rear Admiral
Joined
Jul 13, 2011
Messages
4,916
Re: Seafarer transom and deck replacement

Beautiful transom job!
Looking forward to more progress...:D
 

Three08

Petty Officer 2nd Class
Joined
Oct 24, 2009
Messages
111
Re: Seafarer transom and deck replacement

Hey guy's, things are moving along fast now, I can almost feel the water spraying on my face :cool:

So if you look at the last few pictures I posted you'll see the gunwale is a little short, that's what I'm working on at the moment. I made a mold out of MDF and extended the port side and I'm working on the mold for the starboard side now, this time I'm using the MDF that has a white coating on one side.
I've made them a little long as I still haven't worked out exactly how I'm going to finish it across the back yet, I'll cut it down once I've worked out all my angles.

I'll try to get some more detailed pictures as I do this next one, in the meantime these should give you an idea of how it was done.


Woodonglass

Supreme Mariner
Joined
Dec 29, 2009
Messages
25,929
Re: Seafarer transom and deck replacement

Nice fabrication job on the gunwales. You could make a section of the gunwale and then cut 1" sections and then use masking tape to form then into a curve to make a curved end cap and then use small torn up pieces of csm to cover the taped curve mold. I can see it in my mind but have no way of illustrating it. Hopefully you get the gist of what I'm saying. The other method would be to just make a Mitered cut and glass it in. That would prolly be a lot easier.
 

Three08

Petty Officer 2nd Class
Joined
Oct 24, 2009
Messages
111
Re: Seafarer transom and deck replacement

Here's some more pictures of the next mold, I used modeling clay for the corners this time. I'm not shore what happened with the PVA bubbling up, but I think the problem was with my spray gun. Took 2 days to get the mold to this piont so I'm just going to run with it see how it goes, I can always cut it off if it's no good.


Mud Puppy

Petty Officer 1st Class
Joined
Sep 8, 2013
Messages
276
Re: Seafarer transom and deck replacement

Nice looking job so far Three08! Wish mine was as far along as yours. Mind if I tag along?

I cut my hull cap at the stern as well. Everyone here said I was crazy for doing so, but I think it was best for me. I can step back the glass on both sections and glass everything back in easier than I could have by taking the whole hull cap off. It was tabbed in everywhere around the bow and helm and I didn't want to stand on my head cutting it and then do it again tabbing it back in.

You'll be back in the water soon! ;)
 

Three08

Petty Officer 2nd Class
Joined
Oct 24, 2009
Messages
111
Re: Seafarer transom and deck replacement

Well, after waiting a week for my order of mixing cups to arrive I bought some locally and finished off the starboard side extension today. Here's some pictures of the process....


Top