SOLVED :) Tilt/Trim: Take off unit, seals on tilt, and refill, reversed polarity

stewfish1818

Seaman Apprentice
Joined
Jul 14, 2010
Messages
42
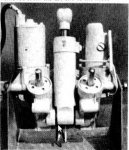
Ok I tried and tried to find a post with general info to replace a piston fluid ring on the tilt (middle piston) of the trim/tilt system. I have fluid leaking out of it. Part # 54 in link below.

Parts Diagram:
http://www.boats.net/parts/search/B...POWER TRIM-TILT HYDRAULIC ASSEMBLY/parts.html

1990 J150TXESB ( 150 hp ) but should be fairly universal in the John/Ev world at least from 1979 to 1991

I have the horrible manual

6 Dewalt grinder wrench does actually fit the tilt cylinder cover's pattern for removal.

I just need to get the system off the motor.

Thoughts?


SOLVED: Update and personal recommendations:

1.) Find how to make the tool in this thread it's 90% easier that a dewalt tool which will bend at the pegs

2.) Mapp or propane torch will take hours to get the $59 oxy-mapp torch at lowes or home depot (red and yellow bottles together) and use it on the cutting setting, or borrow and oxy-acetlyne torch kit

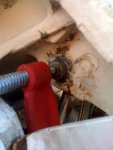
3.) Under the hammer and lowes and home depot you can get a punch that is giant and has a rubber piece that fits on the top of you hand as you grip it so you can really hammer as hard as possible and grip the punch with ll your strength to keep it exactly where you want it and sludge it over and over again on the tilt pin. If you miss it just hits the rubber piece and you will have it out in 5 minutes with a 4lb mallot. A hammer and punch etc may take hours and I gave up after 5 hours and went to the store and bought one $19 at lowes and $9 at home depot but I liked the one better at lowes. They are about 9" long.

PB blaster's pentrating fluid was the last fluid I used and may have made the difference, but see the tried and true fluids I found for releasing nuts and corroded objects as seen with exhaust pipes and in our case the tilt pin.

The pin moved on the 2nd hit with the 4lb mallot, giant punch, a full arms swing, oxy-mapp torch, and PB Blaster.

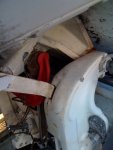
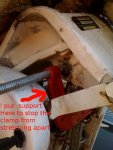
I left the tilt on the system and stood on the unit and my wife used the tool I made to twist off the tilt cap. It saved me a lot of time with the fluid lines and lower pin as well. The lower pin held the tilt cylinder in place as she twisted it off so no worries about damaging anything. Just don't pull the tilt away from the unit as the fluid lines could bend.

The electrical motor is steel so use your drill and circular wire brush to get off any rust and repaint. My favorite paint for water besides boat paint is the $7 rut-oleum universal all- surface paint that has the new head that can spray upside down (not the new nozzle types , but a new head with no cap). ON a side note I have used this paint on my Jeep top to get another year out of it and the paint has never came off. It truly is the best paint out there in a can. It also is working great on a dozen other projects I have.

Lastly don't take the electric motor cap off the brushes and springs will fall out and it's a pain compared to a starter as the cap makes it hard to get them back on. You cannot disconnect wires at that end. Go insid ethe motor to get the wires off.

Assemble Notes:
1.) scrape out the 1/32" worth of corrosion on the block side of the motor where the pin is supoosed to go in it should slide through the block's holes by hand then tap through the plastic shims of the tilt piston's eyelet.

2.) Save yourself 30 minutes and Prefill the reservoir while the unit is on your table facing up so the whole thing gets filled, then prefill the cylinder with the piston down but up just enough for the cap to be open to get the fluid bottle nozzle in to fill it up. Connect, lift up tilt and install pin.
 
Last edited:

stewfish1818

Seaman Apprentice
Joined
Jul 14, 2010
Messages
42
Re: Tilt cylinder removal. will make how-to for secret file sticky

Re: Tilt cylinder removal. will make how-to for secret file sticky

Also in my experience the engine would drop if fluid was low or leaking. Just to get through the shallows on a friend's boat we had to continually hit the button to get the engine up as it would fall immediately. What's the deal? In this case I needed to add fluid to drop the tilt down lowering the prop into the water
 

jonesg

Admiral
Joined
Feb 22, 2008
Messages
7,198
Re: Tilt cylinder removal. will make how-to for secret file sticky

Re: Tilt cylinder removal. will make how-to for secret file sticky

We all just buy the factory service manuals.:D

www.outboardbooks.com
 

boobie

Supreme Mariner
Joined
Nov 5, 2009
Messages
20,826
Re: Tilt cylinder removal. will make how-to for secret file sticky

Re: Tilt cylinder removal. will make how-to for secret file sticky

Agreed on that one 100%. Saves a lot of finger work. LOL.
 

boobie

Supreme Mariner
Joined
Nov 5, 2009
Messages
20,826
Re: Tilt cylinder removal. will make how-to for secret file sticky

Re: Tilt cylinder removal. will make how-to for secret file sticky

edit
 

stewfish1818

Seaman Apprentice
Joined
Jul 14, 2010
Messages
42
Re: Tilt cylinder removal. will make how-to for secret file sticky

Re: Tilt cylinder removal. will make how-to for secret file sticky

A manual sounds great, but do I get an o-ring kit, manifold PART #1 or O-ring kit PART #54 or ??? Do other seals go bad on those that I should do now?
 

stewfish1818

Seaman Apprentice
Joined
Jul 14, 2010
Messages
42
Re: Tilt cylinder removal

Re: Tilt cylinder removal

Well, the dealer said to just get the o-ring kit. So I'm back from spending 2 hours messing with it. I have the pressure out of the tilt cylinder. It's resting on the safety brackets for transport. I cannot get the tilt cylinder pin to budge (figure 21 of OEM repair manual on page 9-18. Any ideas I have a propane torch and let it the body and pin heat up and down to try and break the seal and then heated just the body to see if the colder pin (thus smaller) would come out of the larger heated body; no go. Now I just have a pin with a punch ding in the center. At a stand still at this point.

I was thinking grind the back side that sticks out to be flat on two sided so I can get a wrench and turn it as I hit it. If it will turn. Might just rip the end off for the heat of the grinder making it more brittle and I have seen more stainless bolt head rip off than most.

What is the angle adjusting rod? It says to mark it?

The manual sucks!

Ideas?
 

Attachments

  • cylinder3.jpg
    cylinder3.jpg
    24.5 KB · Views: 0
  • cylinder pin.jpg
    cylinder pin.jpg
    32.6 KB · Views: 0

levi_tsk

Ensign
Joined
Dec 26, 2010
Messages
907
Re: Tilt cylinder removal

Re: Tilt cylinder removal

Well, the dealer said to just get the o-ring kit. So I'm back from spending 2 hours messing with it. I have the pressure out of the tilt cylinder. It's resting on the safety brackets for transport. I cannot get the tilt cylinder pin to budge (figure 21 of OEM repair manual on page 9-18. Any ideas I have a propane torch and let it the body and pin heat up and down to try and break the any seal and then heated just the body to see if the colder pin (thus smaller) would come out of the larger heated body; no go. Now I just have a pin with a punch ding in the center. At a stand still at this point.

I was thinking grind the back side that sticks out to be flat on two sided so I can get a wrench and turn it as I hit it. If it will turn. Might just rip the end off for the heat of the grinder making it more brittle and I have seen more stainless bolt head rip off than most.

The manual sucks!

Ideas?

start by getting the motor on the safety latch and trim cylinders all the way down ( if you hold the trim switch down with the safety latch on it will retract them fully and i store my motor like this and it keeps dirt and grime off the trim cylinder shafts which is what causes the o-rings to fail -dirt)


i just did one of these back in july the key is having a good tool i built my own and it worked AWESOME
you said you have a grinder ? go to home depot and get a piece of flat bar 2"x1/4"thick and 12-18" long (depending on how hard you want to pull) and a 1/4" diameter piece of round cold rolled steel cut one end of the flat bar on a 45 degree angle and round the point off take a punch and center punch back from the rounded point 3/8" so that you have at least a 3/8" inch of metal all the way around the center punch mark drill a 1/4" hole using your center punch mark now take your piece of cold rold and cut about 2" off one end stick it in the hole you just drilled and then in the hole on the cap for the trim cylinders now with a pencil make a mark on the plate on BOTH sides of the trim shaft take it off and grind a notch between your 2 marks about 3/8" deep and rounded in the back now you have a spanner wrench :D
take your new tool put the round bar in the hole again and then back into the cap on the trim cylinder (you can trim the round bar off shorter if its in the way just make sure it BOTTOMS OUT in the hole) now take one hand and hold the tool flat on the cylinder and pull on the tool with the other hand it will take a fair amount of force but it will crack loose if it doesnt take a hammer and the left over piece of round bar and tap in EACH hole and give it another go take both caps off at the same time and replace the o-rings on each one seperately so you have something to look at lube up the o rings and the trim shaft with a little grease and screw the caps back in by hand and them tighten them up with the tool and your done

taking out the fill screw sometimes requires that you hit the screw driver that your trying to turn the screw with a couple times with a hammer and make sure you have the right size screw driver as it require a really large one to be done correctly if it doesnt fit in the slot tightly your wasting your time (i had to go buy one)
sorry this was so long hope it helps you
 

stewfish1818

Seaman Apprentice
Joined
Jul 14, 2010
Messages
42
Re: Tilt cylinder removal: Updated

Re: Tilt cylinder removal: Updated

Yeah manual says keep it in the down position when storing. Dealer said this keep the pistons down and less metal to the elements.

I have the wrap around tool to take out the piston caps. Good idea though.

I just have to get that stupid thing off the motor!
 

Chris1956

Supreme Mariner
Joined
Mar 25, 2004
Messages
28,097
Re: Tilt cylinder removal: Updated

Re: Tilt cylinder removal: Updated

Are there any snap rings holding the tilt pins? Did you try heating the housing and then spraying with penetrating oil? Sometimes as the part cools it will suck some of the oil into the joint.

When the motor trims up/down, what part of the PTT unit swivels on the pin? At least you know that part is not frozen.
 

stewfish1818

Seaman Apprentice
Joined
Jul 14, 2010
Messages
42
Re: Tilt cylinder removal: Updated

Re: Tilt cylinder removal: Updated

Ah good thinking on the heat penetrating oil, I'll try it.

Yeah the piston moves freely it just the pin going through the housing.

holding pins are off.

I think I'll try vice grips to see if it rotates I can always put the pin in the same way and have one side scraped up. This way cutting off flat edges won't make the metal more brittle.

Wish my torch was hotter this time of year. A cold front came through tampa bay and it's in the 50s for the last two days. COLD, brrrrrr

FYI, A couple things I found to try after heating for penetrating fluids, from exhaust mechanics. Wax seems to be the way our grandpa's did it.

1.) 50-50 mix atf,and acetone
2.) hot enough to melt wax and then use it, not too hot to burn/char the wax
3.) WD-40 etc sprays

also pick away rust near the outside of the nut; rather salt/corrosion in our world.
 

Chris1956

Supreme Mariner
Joined
Mar 25, 2004
Messages
28,097
Re: Tilt cylinder removal: Updated

Re: Tilt cylinder removal: Updated

I would also try heating the pin, to crush any corrosion around it. Then spray the penetrating oil (PB Blaster is pretty good) and let it cool. Then heat the housing and let cool, spraying the oil.
 

stewfish1818

Seaman Apprentice
Joined
Jul 14, 2010
Messages
42
Re: Tilt cylinder removal: Updated

Re: Tilt cylinder removal: Updated

Ok I spent 3 hours heating up the pin and body. See pics

I got a three prong clamp with a screw in the middle and a c clamp to see if that would work, thinking I could screw the pin through

1st drilled a small countersink for the punch and later for my the clamp idea

Then went to town on the pin and then boddy. The pin once hot started to boil something inside probably old grease used to push it through or something.

Sprayed wd40
moved to wax
moved to acetone and ATF 50/50 mix back and for back and forth on both sided.
I could only spray WD-40 on the inside of the body.

Between each one I used the punch a couple times. Just being methodical, to no avail!

I then did it a little more with the wax to see when the metal cooled and put on the C-Clamp see pics :). Screw side on port side of pin on stern side I put a large crescent wrench to flank and raise the c-clamp about 1/4" above the pin so I could be screwed in that much. I supported the port side between the body and the outside of the clamp later from the clamp stretching.

Conclusion I need a better torch vs my 1980's propane torch we all have that screws on to a bottle. 2nd a stronger clamp because the little handle is bending under the stress now. I used a wrench to turn the clamp so it must have 100lbs of pressure on it, a bolt would have broken apart with the force on it so far.

I was unable to rotate it also

Thoughts?
 

Attachments

  • clamp2.jpg
    clamp2.jpg
    108.6 KB · Views: 0
  • clamp3.jpg
    clamp3.jpg
    126.2 KB · Views: 0
  • clamp4.jpg
    clamp4.jpg
    67 KB · Views: 0

stewfish1818

Seaman Apprentice
Joined
Jul 14, 2010
Messages
42
Re: Tilt cylinder removal: Updated

Re: Tilt cylinder removal: Updated

Oh and pressure is out of the cylinder. I was able to get the manual opened the other day and it sat down on it's brace as seen in pics.
 

kdrennon7

Recruit
Joined
Jun 1, 2010
Messages
1
Re: Tilt cylinder removal: Updated

Re: Tilt cylinder removal: Updated

Just went through this with an 83 evenrude 50hp. ended up having to kill a 7/16 deep well 3/8 drive socket found the size to be almost the same as the pin. beat one way 10 times then the other 10 times till movement was increased using Liquid Wrench Lots of it. It sucks and took about 6hrs of methodical banging with a hammer on the socket and my fingers but finally got it.
 

nymack66

Petty Officer 1st Class
Joined
Aug 5, 2009
Messages
356
Re: Tilt cylinder removal: Updated

Re: Tilt cylinder removal: Updated

You need to remove the STARBOARD side bracket this gives you the access you need, be sure to support the engine.
You have to use a solid rod and heavy hammer and drive the pin out. If I remember correctly I used a 6" socket extension and lock it with a vise grip. The pin is corroded and locked in there you have to apply real force to remove it.
When re-installing dress it down on a bench grinder you never have and issue removing it the next time.
I have removed a couple in my time its never easy. Use heat carefully, be sure never to have PB blaster come in contact with any of the end caps area it will fubar all your seals good and bad. I paid a mechanic eighty five bucks an hour to destroy my T&T this way three years ago.
Good luck take your time you get it off. Rebuilding and removing the end caps is where the real work is..
I have a complete T&T ready to be bolted up if you need it PM me.
 

stewfish1818

Seaman Apprentice
Joined
Jul 14, 2010
Messages
42
Re: Tilt cylinder removal: Updated

Re: Tilt cylinder removal: Updated

I left the brackets up, sounds dangerous, just got a long punch.

What about drilling it out on both sides. A new one is $30 and an American made SS bolt and nut at West Marine should work well, especially If I can get one of those that just has threads on the end, or grind the threads down in the center and put a black plastic sleeve/spacer in the eyelit for a tighter fit after the grind.

When I drilled a counter sink for the punch and c-clamp it was like butter; It would take 20 minutes. Thoughts?
 

Chris1956

Supreme Mariner
Joined
Mar 25, 2004
Messages
28,097
Re: Tilt cylinder removal: Updated

Re: Tilt cylinder removal: Updated

Drilling SS can be real hard, like the metal. One would think a few cycles of heat and oil ought to do it. I once broke both brake caliper bracket bolts on my car's rear brake system. They were large diameter bolts of grade 8 or so(metric), and they broke from corrosion when I tried to loosen them. I have never had that large of a bolt break before. I had to use a cheater pipe to break them.

I was able to get the residual pieces of them out of the bracket with the MAPP torch, PB Blaster and vice grip.
 

stewfish1818

Seaman Apprentice
Joined
Jul 14, 2010
Messages
42
Re: Tilt cylinder removal: Updated

Re: Tilt cylinder removal: Updated

Does anyone say "Don't drill it out" ??????

SS is not hard that's why the bolts break with twisting/ torque forces so easily. The sheer force is better though (pretty hard to do). Steel is way harder and aluminium less. One hit with the hammer puts a pin hole from a punch into it, and it was easy to drill with a dull bit. A chrome finish over it will certainly make it way harder to dent or steel covered in chrome so not sure what you meant.

Still waiting to hear thoughts on replacing the pin if I drill it out.

This is not a bolt but a pin driven through and I don't want to spend 6 hours pounding on the thing.
 

levi_tsk

Ensign
Joined
Dec 26, 2010
Messages
907
Re: Tilt cylinder removal: Updated

Re: Tilt cylinder removal: Updated

it will drill but you have to go PAINFULLY SLOW and the moment it gets too hot you just wasted a bunch of time im a pipefitter and we drill stainless pipe and plate all the time and without alot of cooling oil it work harden in an instant so yeah i wouldnt try drilling stainless that far once it heats up it will harden in a matter of seconds and forget drilling it then youll just wipe out perfectly good drill bits after that (if it blues,gets red hot, or smokes your done) its got chrome and nickel in the metal and when you heat it too much the carbon granuals burn out and the chrome bonds with the iron molecules and forms chromolly steel and has a tensile strength of 110kpsi whereas 316 stainless' tensile strength is 3kpsi

go get a can of mapp gas for your torch it burns ALOT hotter and it wont be so hot that itll mess up the aluminum
also have you tried pressing it while it was hot with c-clamp?
my advise just keep beating do one side afew times and then the other back and forth over and over eventually itll free up i had a wheel bearing on my jeep that took about 3 hours to beat out id hit one side and then hit the other over and over again until it finally freed up
 
Top