(Somewhat) New to boating, New to the forum.

das_army_life_yah

Petty Officer 2nd Class
Joined
Apr 3, 2020
Messages
122
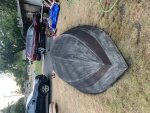
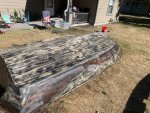
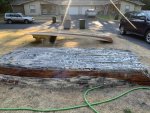
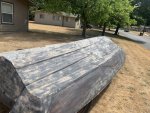
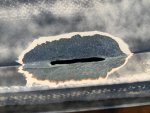
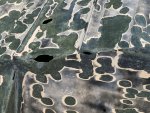
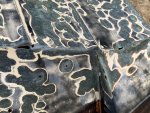
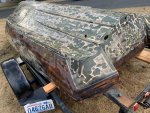
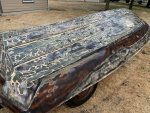
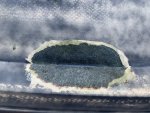
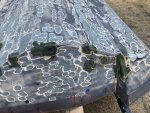
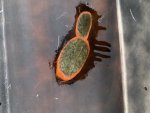
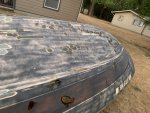
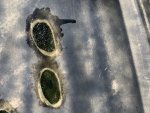
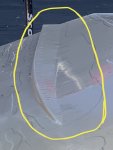
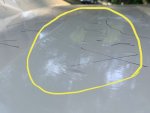
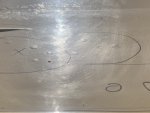
kcassells I had some decent sunlight to work this morning, so I was able to get a few good pics of the blisters. I circled the areas that had high concentrations of smaller blisters (about 1/4” and smaller). The two close-ups that I didn’t circle are the clearest shots I managed to get of some of the larger blisters. When I pressed on a few of the bigger ones, it was fairly easy to make a circular crack where the outer edge of the blister is.

When I first realized it had blisters, I ground out a couple of them. I noticed that the centers were a bit discolored. I also noticed a bit of what I thought looked like delamination. The centers weren’t grinding smooth like the outer edges did. Instead, the glass in the center seemed to be fraying off until I ground a little deeper. Then it started to finally smooth out.

I’m trying to decide the best way to tackle these blisters (or whatever they are). My plan for today is to start grinding out all of the bigger ones that aren’t in the areas I circled in Sharpie. These areas are where there is too many small blisters to try to grind them out one-by-one. I’m thinking about laying down a guide coat in these area, stretching the guide coat a bit beyond the Sharpie outline. I then plan on sanding the whole area to see where the blisters start/stop so I can try to minimize the size of these areas the best that I can. If it works, and I have a better idea of where they start/stop, I’m going to sand off all of the gelcoat and then build it back up with glass and fair it out.

I’d really like your guys’ input on this before I start ripping all the gelcoat off in those spots. I’m sure you more experienced folk can come up with a better alternative for me to go about this. LOL. Keep in mind, I am not super concerned with the finish on the underside of the hull. Since it will either be on a trailer or in the water, “good from 10/15 feet away” is more than good enough for me.

***SIDE-NOTE***
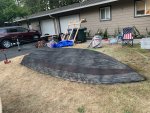
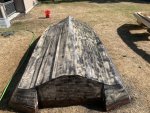
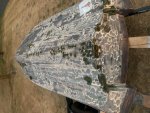
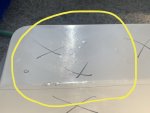
After I got the hull flipped over, I noticed lengthy cracks in the gelcoat that run down the sides of the two inner chines (from stern to a foot or so behind the middle of the hull). I’m almost wondering if this is why there’s so many little blisters in the rear of the hull given the most heavily concentrated areas are near the chines. :confused:
 

Attachments

  • photo335640.jpg
    photo335640.jpg
    191.5 KB · Views: 0
  • photo335641.jpg
    photo335641.jpg
    208.6 KB · Views: 0
  • photo335642.jpg
    photo335642.jpg
    174.5 KB · Views: 0
  • photo335643.jpg
    photo335643.jpg
    225.2 KB · Views: 0
  • photo335644.jpg
    photo335644.jpg
    182.4 KB · Views: 0
  • photo335645.jpg
    photo335645.jpg
    244.5 KB · Views: 0
  • photo335646.jpg
    photo335646.jpg
    301.4 KB · Views: 0
Last edited:

sphelps

Supreme Mariner
Joined
Nov 16, 2011
Messages
11,475
Wow ! I’ve never had to deal with so many blisters like that before .. I think your thinking is headed in the right direction though .. I don’t know what to do other than jump in there and start grinding down the enemy. Fill and fair then paint and hope for the best .. I don’t think there is any guarantee that they won’t come back but by the time they do you’ll have moved on to the next boat probably ...
 

das_army_life_yah

Petty Officer 2nd Class
Joined
Apr 3, 2020
Messages
122
​​​​​I wasn’t kidding when I said it was littered with blisters...definitely a major oversight on my part. :facepalm: Something I’ll be sure to check before diving into a future project. It wouldn’t be so bad if they were all fairly large, but I have yet to find a picture of a boat with blisters this bad. It’s got a terrible case of boat herpes. If they made Valtrex for boats.....this girl would be the perfect candidate for it. :lol:

sphelps Only time will tell if they come back or not. In theory, polyurethane is slightly more porous than polyester. However, the primer is epoxy-based and I plan to use vinylester to build everything back up to try to help reduce the risk of them returning. This paint is used by many, many yacht builders. They swear by it. It seems pretty durable from what I’ve read. I just hope that I don’t screw up somewhere in the prep work so I can get the same results. LOL.

kcassells I’m actually subscribed to his channel already. I swear I’ve seen nearly all of his videos. LOL. The guy has definitely been a huge help. I’m definitely following his advice on how far out and what angles to taper everything. I’ve also watched a lot of JamestownTV and SeaHawks videos. Hopefully all this edumacation will make me a YouTube-certified marine technician. LOL.
 

das_army_life_yah

Petty Officer 2nd Class
Joined
Apr 3, 2020
Messages
122
I just want to say that blue jeans, a grey shirt, a scotchbrite pad, and elbow grease DO NOT mix with sunny, 85+ degree weather. LOL. I look like I dumped the soap bucket over my head and I’ve only scrubbed half of the hull. The paint prep instructions say to scrub it until the water sheets off before I can even consider touching it with a sander. I’m slowly starting to learn that working on boats takes more patience than raising kids. LOL.
 

Attachments

  • photo335684.jpg
    photo335684.jpg
    497.5 KB · Views: 0

das_army_life_yah

Petty Officer 2nd Class
Joined
Apr 3, 2020
Messages
122
Finished scrubbing the hull down after many breaks in the shade. Once I gave her a good scrub down, I realized that much of what I was seeing could have been due to contaminants, bc it didn’t seem nearly as bad when I got done. I also gave her a quick guide coat so I can locate all the blisters and minimize the amount of gelcoat removal that I need to do. I have some nerve damage in my right hand from a screwdriver accident and I suck at spraying, so I think I may have laid it on a bit thicker than necessary. I held it a good 14-16” away and it was pretty warm today, so I’m thinking most of it should dust off before I even start sanding. Gonna let it set up overnight and then in the sun tomorrow. Plan to block her out after I get off work. Hopefully this guide coat works out for me.
 

Attachments

  • photo335716.jpg
    photo335716.jpg
    427.9 KB · Views: 0
  • photo335717.jpg
    photo335717.jpg
    482.9 KB · Views: 0
  • photo335718.jpg
    photo335718.jpg
    480.6 KB · Views: 0

das_army_life_yah

Petty Officer 2nd Class
Joined
Apr 3, 2020
Messages
122
First step in blister repair is complete. It seems like there aren’t quite as many blisters as when I first flipped it. I’m thinking the lighting and the grunge that was on the hull made the print-through of the weave look like blistering. Either way, there’s still a ton of work to be done, but the night is young! Lol. I’ll get more pics up once I get this grinding out of the way.
 

Attachments

  • photo335806.jpg
    photo335806.jpg
    484.5 KB · Views: 0
  • photo335807.jpg
    photo335807.jpg
    506.2 KB · Views: 0
  • photo335808.jpg
    photo335808.jpg
    537.4 KB · Views: 0
  • photo335809.jpg
    photo335809.jpg
    609.2 KB · Views: 0

Original Thor

Seaman
Joined
Jun 11, 2020
Messages
61
Wow man looks like alot of work and really good too. What's it like to guide coat a boat. I did it to a 68 Chevy truck once and it was alot if work. I wanted to flip my boat and fix up my gelcoat issues on mine but I think I can get away from doing that now and leave it as a winter project. I'm running out of boating season here.
 

das_army_life_yah

Petty Officer 2nd Class
Joined
Apr 3, 2020
Messages
122
So, I managed to get one side done before my knees gave out and my back started screaming at me. Took me a good two hours of grind a bit, dust a bit, grind a bit, dust a bit more before I got done. LOL. As you can tell from the pic, the stern end of the beast was an absolute nightmare. I pretty much focused on the centers of the blisters and tapered out until there was no more delamination. Once that was done, I tapered it just a touch further just in case. I’m going to try to hammer out the other side and the back tomorrow, and then start laying the glass in on Wednesday. I’m hoping to start fairing her out next Tuesday/Wednesday when I’m able to bust her out again.
Original Thor Honestly, shooting the primer for the guide coat is just like shooting it for a car. Sanding on the other hand, is not quite as easy. With all the corners around the chines and whatnot, I had to get pretty creative with a sponge and sandpaper. The flatter parts I was able to hit with my block. Towards the bow, it was a royal pain bc my block was too stiff. I did the entire bow section using a sponge with very light pressure. I pushed down just enough to get it to conform to the shape. Needless to say, it took many passes before I felt confident that everything was showing up that I needed to address with the grinder.
 

Attachments

  • photo335825.jpg
    photo335825.jpg
    458.3 KB · Views: 0

das_army_life_yah

Petty Officer 2nd Class
Joined
Apr 3, 2020
Messages
122
Finally got some time to jump back on the project. Got about halfway through what’s left before I needed a break from the sun. I should have the rest of the grinding done in an hour or so. Once that’s done, plan to give her a bath, let her dry out for an hour or two in the sun, then pull her in the shade and start laying some glass (fingers crossed!!!)
 

Attachments

  • photo336820.jpg
    photo336820.jpg
    462.4 KB · Views: 0

das_army_life_yah

Petty Officer 2nd Class
Joined
Apr 3, 2020
Messages
122
And FINALLY all the grinding is done...at least I hope!!! LOL. Took a bit longer than I expected due to the heat and sun. I made a few more holes in her :grumpy: along the way, but it was for the best. There were a few spots that were delaminated clean through.

Sadly, I don’t think I’ll be able to lay up any glass today. I’m running out of daylight and have a terrible heat headache. I’m gonna let this old girl dry off for a couple hours while some ibuprofen kicks in, then clean both sides of all the holes with acetone and start laying down a tape backing for the new glass. Hopefully tomorrow I can actually start rebuilding the ridiculous amounts of destruction I have made. :laugh:
 

Attachments

  • photo336846.jpg
    photo336846.jpg
    313.7 KB · Views: 0
  • photo336847.jpg
    photo336847.jpg
    301.5 KB · Views: 0
  • photo336848.jpg
    photo336848.jpg
    375.4 KB · Views: 0
  • photo336849.jpg
    photo336849.jpg
    397 KB · Views: 0
  • photo336850.jpg
    photo336850.jpg
    393.8 KB · Views: 0
  • photo336851.jpg
    photo336851.jpg
    492.1 KB · Views: 0
  • photo336852.jpg
    photo336852.jpg
    427.6 KB · Views: 0
  • photo336853.jpg
    photo336853.jpg
    508.1 KB · Views: 0

archbuilder

Vice Admiral
Joined
Sep 12, 2009
Messages
5,697
Hmm looks like measles to me lol! You have to tear it up to fix it sometimes, looks like you are making progress!
 

das_army_life_yah

Petty Officer 2nd Class
Joined
Apr 3, 2020
Messages
122
And the real fun begins. LOL. Finally got to a point in the project that I can start laying some glass. Got a couple layers of CSM down on the holes. I’m thinking that I’m only gonna do CSM on the outside of the hull for them, except in the spots where they are a little too big. I figure it will be easier to fair out and do up some strength from the inside with 1708. Did up about 10 blisters so far. They seem to be building up pretty nicely with 2-3 layers of CSM. Gonna try to hammer out all the blisters on one side at least before I call it a day. Let’s hope for the best, because I realized I’m a bit rusty since I haven’t done glasswork in about 6-7 years. Lol
 

Attachments

  • photo336948.jpg
    photo336948.jpg
    336.3 KB · Views: 0
  • photo336949.jpg
    photo336949.jpg
    468.8 KB · Views: 0
  • photo336950.jpg
    photo336950.jpg
    489.3 KB · Views: 0

archbuilder

Vice Admiral
Joined
Sep 12, 2009
Messages
5,697
Sounds like a good plan, looking good so far! That is going to be a lot of fairing and blocking....my finger feel sore just thinking about it!
 

das_army_life_yah

Petty Officer 2nd Class
Joined
Apr 3, 2020
Messages
122
I didn’t get as far as I would have liked. However, I did manage to get a decent start on it. I was working at an unruly pace to get everything down before the resin started kicking too much, so I got some resin drips and runs. I’m not super worried about it though, because it’s all getting sanded anyways. I got a ton more glass work to go before I can hit her with PVA and tuck her away for a few days. I’m hoping I can have everything patched up by Wednesday night so I can pull her back out on Sunday and start sanding everything to prep it for fairing. I’m shooting to have the majority of the compound laid down by the end of next Monday, so I can start block sanding next Wednesday. It’s my ultimate goal to have her smooth and ready for primer by the end of the 16th. My hope is to have the paint done by the 23rd, so I can flip her back over on the 30th and start working on getting the transom in. Only time will tell. Lol.

archbuilder The sanding is definitely not something I’m looking forward to. Especially since I’ll have to hit all these spots I’m patching with 60-grit before it will even be able to see any compound. LOL. I’m pretty experience with drywall and bondo, so it shouldn’t be too bad. Still gonna be an awful big PITA though.
 

Attachments

  • photo336966.jpg
    photo336966.jpg
    354.6 KB · Views: 0
  • photo336967.jpg
    photo336967.jpg
    300.8 KB · Views: 0
  • photo336968.jpg
    photo336968.jpg
    327 KB · Views: 0

das_army_life_yah

Petty Officer 2nd Class
Joined
Apr 3, 2020
Messages
122
sphelps archbuilder kcassells So, I may have just made a terrible mistake last night. All of my previous experience with glass/resin was in a shop. I’ve never worked with it outdoors like I have to here. Needless to say, I’m not used to fighting the elements when it comes to glasswork. I woke up this morning and found my layups to look like this....they’re all cloudy and the surface is a bit goopier than normal. I’m assuming this is from condensation/dew. Am I totally screwed? Do I need to sand off everything? Do you think the sun will make it work itself out? Most of it feels pretty solid underneath with the exception of one patch that’s still soft. I was mixing at 1.5% and mixed for a good 1-2 minutes. It’s Vinylester resin btw. Any help would be greatly appreciated. I’ve never had to deal with anything like this before.
 

Attachments

  • photo336985.jpg
    photo336985.jpg
    495.2 KB · Views: 0
  • photo336986.jpg
    photo336986.jpg
    507.7 KB · Views: 0

archbuilder

Vice Admiral
Joined
Sep 12, 2009
Messages
5,697
Never used vinylester, but I think it is pretty touchy. I am wondering if you just put a heat lamp on it and see if it fires off. I have had to do that when the layup was too cold.
 

tpenfield

Moderator
Staff member
Joined
Jul 18, 2011
Messages
18,140
I eat vinylester for lunch . . . :)

2% MEKP . . . it stays 'open' for about 45-60 minutes, whereas poly resin will kick in 10-15 minutes.

If you applied the resin late in the day and temperatures cooled down overnight, it will probably still be gooey in the morning.

Go with some heat (mild . . . hair dryer level of heat) and see if you can force it to cure.
 

das_army_life_yah

Petty Officer 2nd Class
Joined
Apr 3, 2020
Messages
122
tpenfield Ya I was between 1.5-2%. I went a little hotter on the first layer I laid up over the holes so I could get more layers on a little quicker. I’m about to check on it now while I’m on lunch break. It’s been sitting since in the sun since this morning so I’m hoping it tacked up and isnt as gooey any more. I’m just worried about the moisture bc it was covered in condensation this morning and was looking mighty cloudy.

archbuilder I’m not very experienced with vinylester either. I do know that it works out pretty similar to Polyester. I’m hoping tpenfield is right. I really don’t want to undo some of what I already did lol.
 

das_army_life_yah

Petty Officer 2nd Class
Joined
Apr 3, 2020
Messages
122
tpenfield I gotta hand it to you, you know your stuff. LOL. I just checked up on it and this is what I saw. No more milky look, and it seems to be tacking up just fine. The stuff in the shade is a little tackier than I would like, but I’ll just rotate it into the sun. LOL.
 

Attachments

  • photo337005.jpg
    photo337005.jpg
    581.3 KB · Views: 0
Top