(Somewhat) New to boating, New to the forum.

das_army_life_yah

Petty Officer 2nd Class
Joined
Apr 3, 2020
Messages
122
Popped the cap and realized I still have a bit of grinding left. :facepalm: I forgot that there were a couple spots by the transom that I couldn’t hit with the angle grinder. It’s mainly just some old PB. I thought of just leaving it, but realized that they’re cracked so it will let water get trapped in there. Figured I’ll just hit it with a belt sander real quick. I also forgot to scuff up where the starboard side float box will mount to the side of the hull and where the battery “tables” tab into the sides of the hull. I also forgot that I needed to grind the inside of the hull where the bow eye mounts up. Forgot the outside was a bit tore up and I needed to reinforce it a bit. Maybe 30 minutes left of grinding in total. You guys weren’t kidding when you said you aren’t done, even when you think you are lmao.
 

Attachments

  • photo332876.jpg
    photo332876.jpg
    570.2 KB · Views: 0
  • photo332877.jpg
    photo332877.jpg
    470.7 KB · Views: 0
  • photo332878.jpg
    photo332878.jpg
    535.5 KB · Views: 0
  • photo332879.jpg
    photo332879.jpg
    562.6 KB · Views: 0

das_army_life_yah

Petty Officer 2nd Class
Joined
Apr 3, 2020
Messages
122
After I got the rest of the grinding done (fingers crossed lol), I went ahead and stripped the cap of anything that would get in my way while doing the paint. I still got a couple things like the button rivets for the cover, the two logos on either side of the stern, and a couple seized screws I got to cut off. Other than that, all went pretty well today. Took some dawn and a scrub brush and washed anything I could humanly get to. Did my best to get every speck of fiberglass dust off the thing, because I am very tired of being itchy when I put her away for the night lol. After I gave her a good scrub, I jacked up the bow with my engine hoist to get the most of the water out that I can. I looked around once all this was done, and realized that my yard looks like a place where boats go to die (or to get resurrected lol). I plan to go through tomorrow and take out the little bits of foam that are left and pressure wash the inside real well.

So I got a couple questions. There’s a strip of glass on the starboard side that was used as a “ledge” of sorts to run the steering cable, outboard controls, and assorted wiring from fore to aft (I circled it in one of the pics). It’s only on the starboard side, so I’m assuming it has no other purpose than to keep the wiring and whatnot neat and hidden. Since I plan on covering the vast majority of the sides with a trim panel, I’m wondering if you guys think I should bother grinding it off. My other question is how long would you guys suggest that I let her dry out before I start laying up new glass and patching the hull. Any input/recommendations you guys have is greatly appreciated. You guys are awesome.
 

Attachments

  • photo332929.jpg
    photo332929.jpg
    380.3 KB · Views: 0
  • photo332930.jpg
    photo332930.jpg
    404.7 KB · Views: 0
  • photo332931.jpg
    photo332931.jpg
    406.7 KB · Views: 0
  • photo332932.jpg
    photo332932.jpg
    475.6 KB · Views: 0
  • photo332933.jpg
    photo332933.jpg
    490.5 KB · Views: 0
  • photo332934.jpg
    photo332934.jpg
    501 KB · Views: 0
  • photo332935.jpg
    photo332935.jpg
    547.5 KB · Views: 0

sphelps

Supreme Mariner
Joined
Nov 16, 2011
Messages
11,475
As long as your not glassing anything back in that area its up to you if you want to grind or not really ..
The old glass usually dries pretty quick .. Just needs to be dry ... A good wipe down with acetone before glass is all you need ..
 

das_army_life_yah

Petty Officer 2nd Class
Joined
Apr 3, 2020
Messages
122
sphelps thanks for that. I just wanted to be certain before I start putting anything back in her. I don’t want to have the glass I put in start acting weird/delaminating as soon as it’s put in.

Also, I got another question/need for advice. I decided not to go with gelcoat given how hard it is to get it to look nice. Instead, I’ve decided to go with Alexseal. It’s says it can be applied over gelcoat or bare glass. My concern is that if I strip all the old gelcoat off that I’ll have to do a ton of work to fair the hull before I can paint. I was wondering what your guy’s thoughts/opinions are about just fixing any/all blisters and damage, fairing the damaged/repaired spots, and then just sanding the whole thing down. I don’t have a ton of spider-cracks anywhere, mainly just around the screw holes and such. I planned on chipping/sanding any gelcoat off around these areas and then patching them over with glass. The only reason I ask is that Alexseal says that the gelcoat should be sanded with “100-150 grit until a 1 mil profile is achieved.” I’m wondering if it’s recommending to take the gelcoat down to 1 mil thickness or sand until approximately 1 mil has been removed. Either way, I don’t have any means to determine how much I’d be taking off or to determine if I’m leaving 1 mil of gelcoat. Any insight that y’all may have in regards to this will be a huge help. Lemme know what y’all think, because I’d rather not have to remove all the gelcoat if at all possible. Lol
 

das_army_life_yah

Petty Officer 2nd Class
Joined
Apr 3, 2020
Messages
122
I forgot to include this pic in my last post. It’s the instructions for painting over gelcoat in Alexseal’s technical guide.
 

Attachments

  • photo332938.jpg
    photo332938.jpg
    556.7 KB · Views: 0

76SeaRay

Lieutenant Junior Grade
Joined
Aug 24, 2017
Messages
1,071
Are you still located in Washington State..??? I am doing a full restoration on a 22ft 1976 SeaRay and have it pretty much down to working the floor now.. Happy to have you look over what I am doing so you can kind of see what's ahead. I have an engine hoist and gantry crane but the crane isn't portable. If you need something hoisted into a pickup or onto a trailer let me know... Guessing if you are still here with the Army you are near Joint Base Lewis McChord. I am south of Olympia about 45 minutes... There is a guy in the Olympia area that does fiberglass boat work if you need a little extra help.. I used him to help me with my transom...

Edit: Ok, I missed a bunch of thread.. You are screaming right along and, my bad, you are ahead of me.. Anyway, offer still stands if you need something hoisted.. I don't know much about outboards but I do about wiring.. If you get hung up in that area.. Great job from what I saw after the rest of thread became apparent...
 
Last edited:

Original Thor

Seaman
Joined
Jun 11, 2020
Messages
61
Nice job. I am just about at the same stage as you on my 79 glastron. I would way rather grind metal then fiberglass anyday.
 

das_army_life_yah

Petty Officer 2nd Class
Joined
Apr 3, 2020
Messages
122
So I managed to get a fair amount done today. I pressure washed the hull really well and went through and ground out all the old screw holes to a taper and any bits I need to/want to patch on the cap. Gave her a good bath when I was done and had my buddy help me get the cap back on. I’m still trying to decide what to do with all the blisters on the bottom. They’re definitely going to need to be fixed before I ever think of doing any paint. I want to get them addressed before I go putting the transom and core back in her so I don’t have the added weight in the hull making it an even bigger chore to get her flipped over. I came up with a couple options/ideas to see what route you guys think/recommend I should take.

For option #1, I was thinking of lifting the hull off the trailer, setting a Fluorescent light bar at one end, and going through and circling all the blisters with a sharpie. Once I found them all, Id pop the cap again and flip the hull so I can grind them out and patch them all up. I liked this idea bc I wouldn’t have to do a ton of fairing. The major downside I found was that if I missed any blisters, I’d have to go back through and fix them once I got the new paint on.

This downside led me to option #2. Instead of going through the trouble of locating/circling all the blisters, just strip the gelcoat off the whole bottom. I would use a DA sander and remove as little glass as possible. Preferably just the gel to make minimal fairing for myself. Afterwards, go through and reinforce any major damage/delamination from the blisters and then maybe lay up a layer or two of glass and fair it out. Then paint as normal. I’m not too concerned with the bottom looking super pretty given it won’t be seen except when it’s on the trailer.

Just curious to know what you guys suggest/recommend. Any help would be awesome. The boat is almost ready to get the core/transom put back in, but I want to get any work to the bottom done before I start putting weight back on her.

76SeaRay I would be more than happy to help/be helped. Lol. And ya I’ve been working my fingers to the bone on this project. Just did a ton more grinding/prep work today. Trying to get every last thing ready for glass that can possibly need it before I start hammering anything back out. And I appreciate the hoist offer. I actually picked one up from harbor freight a couple months ago. Hit me up in a private message. We’ll have to link up one of these days.
Original Thor Thanks. I can certainly agree with you about the grinding bit. I’m happy I got the vast majority of it out of the way.
 

Attachments

  • photo333015.jpg
    photo333015.jpg
    251 KB · Views: 0
  • photo333016.jpg
    photo333016.jpg
    224.6 KB · Views: 0

sphelps

Supreme Mariner
Joined
Nov 16, 2011
Messages
11,475
I think if it were me I would just grind out the blisters patch then sand everything down with 100 grit and let the hair go with the hide ... Paint it .. Is the paint you got Easy to touch up if anymore blisters show up down the road ?
 

das_army_life_yah

Petty Officer 2nd Class
Joined
Apr 3, 2020
Messages
122
sphelps It’s Alexseal and it is able to be buffed/touched up. My concern is with the sheer number of blisters on the bottom of the hull. I’m worried that I’m going to put in all that work/effort of finding, grinding, and patching up the blisters and then end up missing a ton of them. I’d hate to go through all of that, give her a fresh paint job, just to wind up going back and having to do it all over again bc the ones I missed start coming through. That’s why I was thinking of just taking a DA to the whole bottom below the waterline. I figure if I take the gelcoat off with a sander, as time-consuming as it may be, that it will minimize how much fairing I’ll have to do and also ensure that I get all the blisters the first time around. Once I get the hull flipped, I’ll try to get a good pic of all the blisters so you can understand why I’m leaning more towards going that route. When I say it’s littered with them, I mean it. It’s horrible. One of those things that I wish I would have given a more thorough look when I bought it. My excitement of the deal got the best of me. Lol
 

das_army_life_yah

Petty Officer 2nd Class
Joined
Apr 3, 2020
Messages
122
76SeaRay I forgot to mention it earlier, but as far as wiring goes I’d certainly be down to chat/plan it out with you. I have a good bit of experience wiring up audio systems in cars, but I’m not so familiar with how to set up the wiring in a boat. I have a general idea of how to do it, but it’s just that, a basic knowledge. I’ve done tons of research into the topic, but I’m not sure how I’m going to go about it when the time comes. If you’re familiar with re-pinning a plug for a harness I could certainly use your help. I’d really like to redo my engine harness, as well as the wiring for the trim control box and remote control for the outboard. I attached a pic of the plus as well as the diagrams I’ve “learned” about marine wiring from.
 

Attachments

  • photo333020.jpg
    photo333020.jpg
    97.7 KB · Views: 0
  • photo333021.jpg
    photo333021.jpg
    91.6 KB · Views: 0
  • photo333022.jpg
    photo333022.jpg
    102.9 KB · Views: 0
  • photo333023.jpg
    photo333023.jpg
    197 KB · Views: 0
  • photo333024.jpg
    photo333024.jpg
    203.5 KB · Views: 0
  • photo333025.jpg
    photo333025.jpg
    196.9 KB · Views: 0
  • photo333026.jpg
    photo333026.jpg
    196.2 KB · Views: 0

archbuilder

Vice Admiral
Joined
Sep 12, 2009
Messages
5,697
You might also look around, it wouldn't surprise me if you could just pic up a NOS wiring harness fairly cheap.
 

sphelps

Supreme Mariner
Joined
Nov 16, 2011
Messages
11,475
sphelps Also, I’m not familiar with the “let the hair go with the hide” expression.

Lol! It’s just an old Irish saying my dad always said meaning Don’t stress over it , it is what it is , don’t worry about it ..
I guess if the blisters are literally covering the bottom sanding all the way down would be the way to go .. It’s just a crapload of work ...
 

das_army_life_yah

Petty Officer 2nd Class
Joined
Apr 3, 2020
Messages
122
kcassells I planned on it. I gotta wait til I get a chance to flip her over. Once I do I’ll tag you so you can get a good look. It looks kinda like an orange peel with a some of the bumps being a bit bigger than the rest.
sphelps im not gonna stress it but I like the phrase. Lol. I’m thinking I may just go ahead and sand her all off anyway. That way I can hit it with a layer or two of CSM and some vinylester resin to help make it a bit more water resistant than polyester resin.
 

76SeaRay

Lieutenant Junior Grade
Joined
Aug 24, 2017
Messages
1,071
As ArchBuilder said, it may be easiest to pick up a used harness or NOS harness. Most of the original plugs are all molded so if you mean re-pinning it, you wouldn't be able to put new pins in a molded plug. Make sure if you buy wiring, that you buy marine grade wire to avoid corrosion since it is plated copper wire.
 

das_army_life_yah

Petty Officer 2nd Class
Joined
Apr 3, 2020
Messages
122
Sorry about the extended absence. Ive tried to keep up a strong pace on this project since I picked it up in April, but I recently had my wife surprise me with a last-minute “hey by the way, I forgot to tell you that we have two weddings to go to in September. Oh ya, I also forgot to mention that they’re on opposite ends of the country and about 10 days apart.” LOL. Needless to say, I’ve been working a side-hustle the last few weeks to get some extra cash put back for these weddings, so “project” time was a no-go.

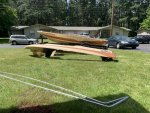
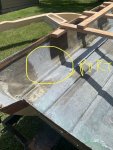
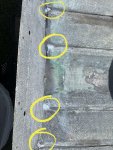
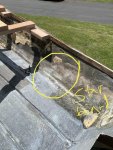
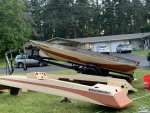
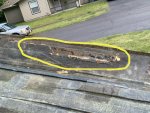
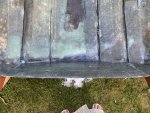
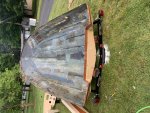
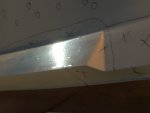
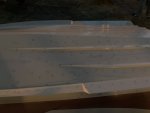
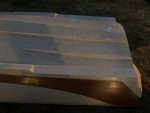
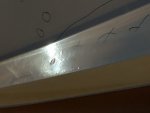
As you can tell by the pics, I did finally manage to get back to work on it and flipped the hull. I finally managed to get a good look at the blister situation. Because of the lighting when I got done, it was hard to get a decent picture of the blisters. However, I did manage to get a couple pictures where you can get a reasonable look at the heavy concentrations of 1/4” and smaller diameter blisters. The larger groups were mostly around the strakes, the outer edges of the bottom, and towards towards the rear-third of the hull. The vast majority of the 1/2”-3/4” and larger blisters were found primarily towards the bow. I circled all the larger ones (And some smaller onesies and twosies) as I worked my way bow to stern. I wound up just circling entire areas where the smaller ones were concentrated.

So here’s my current plan of attack now that I’ve had a good look at it. I plan to go through and grind the larger blisters individually. For these, I’m gonna use some vinylester and glass to build it back up and then fair them out individually to the surrounding gelcoat. For the larger areas towards the stern that you see circled with x’s, I’ve decided to just sand off all of the gelcoat. Once I get that done, I plan to lay up enough glass to build these areas back up a bit, and then fair them out to blend in with the rest of the bottom. I’m not too concerned with having a “showroom” finish on the bottom of the hull, as it will either be on the trailer or in the water. If it looks good from 10-15 feet away, That’s all that matters to me. LOL I’m more concerned with making the sides look good.

If you guys have any suggestions, critiques, or advice on this it will be greatly appreciated. I plan to start the grinding/sanding tomorrow. I’ll try to get a few better pictures in the morning light before I get started. That way y’all don’t think I’m just seeing things. LOL
 

Attachments

  • photo335545.jpg
    photo335545.jpg
    176.6 KB · Views: 0
  • photo335546.jpg
    photo335546.jpg
    151.7 KB · Views: 0
  • photo335547.jpg
    photo335547.jpg
    167.8 KB · Views: 0
  • photo335548.jpg
    photo335548.jpg
    183 KB · Views: 0
Top