(Somewhat) New to boating, New to the forum.

das_army_life_yah

Petty Officer 2nd Class
Joined
Apr 3, 2020
Messages
122
This is what they have listed under the "CSM" section.
 

Attachments

  • photo327539.png
    photo327539.png
    14.7 KB · Views: 0
  • photo327540.png
    photo327540.png
    10.4 KB · Views: 0

sphelps

Supreme Mariner
Joined
Nov 16, 2011
Messages
11,475
If I understand their system I think what you want is the C74-4237 but not sure if it has the 3/4 oz mat sewn to it .
Or the C74-4545 . It states to have mat sewn in but it is 19.3 oz where as the other is 17 oz .. Just a bit thicker ..
‘As far as the csm just get the 1.5 oz ..
‘Your using poly resin right ? If so you want it with mat sewn in .
‘If your using epoxy then no need for any csm mat ...
Hopefully some others will check it and confirm what I think ..
Its been a while since I’ve done any major glassing ..LOL !
 

das_army_life_yah

Petty Officer 2nd Class
Joined
Apr 3, 2020
Messages
122
Crazy ideas for installing new transom, would love your guy's input.

So looking at my old transom, I realized that the water damage and rot was mainly around the drain fittings and the mounting bolts for the motor. I started thinking of ways to seal these holes like Fort Knox while increasing their strength and minimizing any movement of the mounting bolts within the holes. Call it “reinventing the wheel” if you will. The ideas I came up with are MAJOR overkill. I also had an idea of a way to ensure that the new stringers are installed to the exact same height and location of the factory stringers.

My first idea for the transom was to just seal the insides of the holes really well with the thinnest glass you can possibly buy. Once cured, I’d go on to add a good filling of sealant. I realized that the resin would wind up shrinking the diameter of the holes, making it a bear to get the bolts/drain fittings in, potentially causing the resin I put in there to be scraped off. I then thought that maybe I could increase the diameter of the holes by a 16th of an inch to accommodate for this, but given I want the holes as close to the diameter of the bolts as possible, I scrapped this idea.

My second idea is very similar to the first. Instead of a using thin glass in the holes, I thought of using just a single layer of unwaxed resin. Once it tacked up, I thought of filling the holes with a waxed PB mix that has a vey high concentration of chop strand. While it’s still wet, installing the hardware and wiping any excess that pushed out. This idea seemed a little more plausible.

My third idea is where it gets really nuts. Before installing the transom, I thought of finding 1/8” thick stainless steel pipe with an inner diameter that matched that of the mounting bolts and drains. Then, I’d drill the holes in the new transom to match the outer diameter of the pipes, maybe going a bit bigger. To prep the pipe for install, I thought of sanding the outside with 40 grit to give it a good bonding surface and then cutting it to sit flush with the wood and removing any burrs from the edges. I’d then pretreat the wood with a few layers of resin to include the holes. After the final coat of resin tacked up, I thought of lining the hole and coating the sanded pipe with the same PB mix as I mentioned before, and then wiping away the excess after I installed the pipe. I’d wait for the PB to cure, then I’d install the transom like normal. Once the transom was in place, I would tab it in and cover it with glass like normal, making sure to leave the holes exposed. After everything cured, I would install the hardware like normal, being sure to add sealant around the outer edges of the holes as well as in the pipes to seal it even further. I really want to hear what you guys think of this idea in particular.

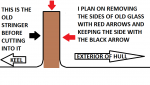
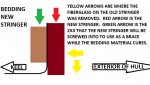
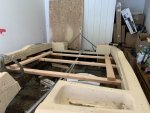
The idea I had for installing the stringers is pretty simple. I plan to cut the top and outer side of the glass off of the old stringer with a dremel, leaving the inner side of glass intact and flush with the top of the old stringer. After this, I’ll remove the old wood stringer (hopefully in one piece so I can use it as a template on the new one). I’ll then sand down the old fillet and glass on the side that was removed, as well as where the old stringer was bedded so that it is prepped for a fresh stringer. After everything is wiped down with acetone, I plan on bedding the new stringer. I’m going to make sure that the new stringer is flush against the glass that is remaining, and hold it in place by screwing it to a 2x4x10 placed on the opposite side of the old glass. Once it cures, I’m going to remove the screws and 2x4 and cut out the remaining portion of glass and prep it for tabbing in the new stringer. I'm planning on doing the stringers one at a time like this(there's only 2 stringers on my boat from the factory). I figured the bit of glass left intact, in combination with doing the stringers one at a time, will help to prevent the full from deforming at all while I replace the stringers. I also planned on bracing the hull from the exterior. It may seem confusing, so I’ll attach a couple pictures to help illustrate what I’m saying.
 

Attachments

  • photo327603.png
    photo327603.png
    11.7 KB · Views: 0
  • photo327604.png
    photo327604.png
    12.3 KB · Views: 0

kcassells

Fleet Admiral
Joined
Oct 16, 2012
Messages
8,738
You should keep your topics in your original thread instead of starting multiple threads.
-You are losing sleep at night aren't ya?:D
The holes you referred to.....-
-Overdrill the hole
-seal with resin.
-fill hole front to back with hairy pb.
-Let set up, redrill new holes to the size you need and then there is no water to wood exposure.
 

kcassells

Fleet Admiral
Joined
Oct 16, 2012
Messages
8,738
Go back to UScomp.....com and read their descriptions of glass and apply to the guy you want to buy from.
Too much for me.
 

JASinIL2006

Vice Admiral
Joined
Feb 10, 2012
Messages
5,714
I think you're overcomplicating this. I agree with kcassells' that overdrilling, filling the hole with resin, then drilling a smaller hole (that is the size you actually need) would work just as well. It is much, much easier to drill the holes in an installed transom than it would be to match a bunch of holes in the hull with new holes in the transom while you're dealing with clamps, resin that is kicking off, etc.

I also think your idea for the stringers would not only make that task harder, but you also face the problem of getting a good bond between the new wood and the old fiberglass. To me, that sounds like a real pain. If you want to protect the hull from deforming, just build a good cradle.

I also agree it would help if you keep all your restoration-related questions in one thread.
 

chevymaher

Commander
Joined
Mar 29, 2017
Messages
2,932
Here is my drain hole. Wood cut far from the drain. I made a cone of cardboard and covered it with plastic as a mold. Put csm over that and resin. Once it was done trimmed to fit. Filled the voids with hairy pb. More just cut up csm and resin. stuffed it in the hole filed after it hardened. As KC said drilled it for the screws. Installed the drainplug with 4200 as usual.

In the end this is what it was.
 

Attachments

  • photo327642.jpg
    photo327642.jpg
    383.7 KB · Views: 1

sphelps

Supreme Mariner
Joined
Nov 16, 2011
Messages
11,475
What’s the old saying analysis paralysis ..
over drill , fill , re-drill .. Like Was stated and your good to go ...
 

das_army_life_yah

Petty Officer 2nd Class
Joined
Apr 3, 2020
Messages
122
Thank you everybody for the information and critiques. I got a bit of a late start today because I was trying to find my respirator. I was hoping I could start working on getting the old flooring and transom out today, but wasn’t going to touch anything without a respirator. I never found the darn thing, and frantically started calling everybody in a 1.5 hour radius that carries them, hoping they had one in stock. Needless to say, I called about 40 different stores and finally got lucky. It was about an hour and 40 minute drive to the middle of nowhere. Just a little mom/pop shop and they literally had been wiped clean of everything but that one mask. I think I got the last respirator available in the SeaTac area. ROFL

I did manage to get some things done. I got the motor off and mounted on the stand. I also removed all the screws around the cabin that may have been holding the cap to the bottom in some form/fashion. I took off the rub rails and was happy to find that it was all screws. Every one of them came out with ease, except for one on the starboard side that was stripped. I tried to drill it out, but it burned up my drill bit instead. :mad-new: I took a dremel to it and finally managed to get the rub rail off. There was a white strip seal between the cap and bottom, so I was able to just push up softly on the edge of the cap with a section of 2x4 to break it loose. I managed to get to the back corners, but the cap is fixed to the transom REALLY flippin good. When I hit this snag, I decided I would just remove the tank so I had more room to get up under the back of the cap to break it loose.

Idk who worked on this boat before, but I discovered some real jacked up stuff when I tried to pull the tank. First, the filler neck was fixed to the tank with zip ties. There is no bulkhead separating the tank cavity from the bilge. Instead, it’s just all open and letting the leaking fuel from the tank run out of the the drain. The tank was fully spray painted....over everything; the sending unit is completely encapsulated. The tank has no brackets or anything installed to suspend it in the cavity. Instead.....it’s either glued or glassed to the hull, idk yet. I’m going to have to cut a good foot away from it and tear everything out by hand around the tank because it leaks every time I move around in the boat and I don’t want to start a fire by sawing/grinding into a screw or something.

Kcassells, you’re right, I have been losing sleep.:sleeping: Really I was just bored and wishing I could rent an engine hoist on Sunday so I could dig in. Sorry about that. I’ll remember to keep everything in one place from now on.

JASinIL2006, I see what you’re saying about creating bonds where I don’t need them. I’m going to rip the old ones out and do my best to mark them. Also, I’ve been looking all over for some write-up about how to cradle the boat for support, but for the life of me I can’t find one anywhere. If y’all know where to find a write-up for that it’d really help.

Sphelps, I have indeed read through woodonglass’s post about all that, but I got kinda confused. Also, I really appreciate the help with the glass. I’ll have to call them to see if the CSM on the 17 oz is sewn on. And I’m using nothing but poly.

Chevymaher, your pic isn’t loading for some reason. Idk why. It just shows up with “null” where a pic should be when I click on it. I do however somewhat understand what you are saying.

Once I get the cap fully separated, I’m going to go get the lumber I need to build a cradle. I just gotta figure out how to build one first lol
 

sphelps

Supreme Mariner
Joined
Nov 16, 2011
Messages
11,475
The cradle doesn’t have to be real elaborate or anything .. You can leave it on the trailer and just add a few extra bunk boards under the hull .. Rig them up snug somehow to the cross supports on the trailer .. Take some measurements across from side to side on the hull in a few places before you take the cap off .. the sides are gunna want to spread out when it comes off .. Some folks just put a couple ratchet straps around the hull to keep it pulled in or a board fastened in place in a few areas screwed through the old rub rail holes on the top .. Leave those on until you get the new deck glassed in ..Or you can take them off then put them back on before you glass the deck in .. That’s why you need to take the measurements across the hull and record them .. Hopefully when the time comes the cap will fit right back on without much trouble ...
 

das_army_life_yah

Petty Officer 2nd Class
Joined
Apr 3, 2020
Messages
122
a board fastened in place in a few areas screwed through the old rub rail holes on the top

this is actually what I initially thought of doing, but then I read somewhere that the bottom should be supported as well. I figured that was the job of the bunks on the trailer. Idk if they’ll support the bottom that well bc my bunks are only about 4-5’ Long and start about a foot from the transom. Also, the starboard side bunk also needs replaced and shimmed to meet the hull towards the front of the bunk. The boat is still supported from the bottom, just not that great on the starboard side. Do you think the boards going from the old rub rail holes will suffice still?

also, I found a fiberglass supplier even closer than the first one I found. Their prices on certain things seem a lot more reasonable and it’s less of a drive. Only trouble I’m having now is deciding which resin to get. The title of the one states “ORCA 200 (P-16) ORTHO LAM RESIN 5GL (17-23 MIN GEL)” and is described as “Orca 200 is an Ortho GP, thixotropic, polyester resin designed for fabrication of small to large FRP parts at an ambient temperature. Orca 200 is pre-promoted for curing at room temperature with the addition of methyl ethyl ketone peroxide (MEKP) initiator. Orca 200 is designed to be used with both the spray-up and hand lay application technique.”It’s about $171 after tax. The other states “ORCA 000 ECONOMY RESIN 5 GAL 23 MIN” and is described as “Fiberlay 000 is a general purpose resin. It is designed to be used in basic composite applications. Fiberlay 000 has great wet-out properties and good strength. Use with Fiberlay mat, cloth, knitted or roving for best results. Not recommended for use without composite materials.” The price on this one is about $147 after tax. The penny pincher in me says to go with the cheaper option, but i don’t know a thing about the differences in poly resin so I could wind up purchasing something that will make my boat fall apart in a year.
 

das_army_life_yah

Petty Officer 2nd Class
Joined
Apr 3, 2020
Messages
122
Got a bit of a question/concern. As far as the stringers go, they’re currently 1” by 6”. I don’t mean a “1x6” where it’s actually 3/4”x5.5”, they are 1”x6” in actual size. I know a lot of people have recommended to use the same size as what came from the factory, but if I did I would lose 1/4” in thickness bc i have no idea where to go to get a true “1x6”. On top of that, I’m going to be using putty and placing screws every 1’ - 1.5’ when I go to mount the deck and I don’t like the idea of screwing into 1” of material. Should I just replace them with 2x6’s or should I try to go with the 1x6 and Make it a bit thicker with glass?
 

das_army_life_yah

Petty Officer 2nd Class
Joined
Apr 3, 2020
Messages
122
Kcassells, If I go the ply route, is it safe to go two-piece on the stringers? Like run an 8’ section from the rear And then tie into that?
 

sphelps

Supreme Mariner
Joined
Nov 16, 2011
Messages
11,475
Are the runs longer than 8 ft ? If so then do the 2 layers of 1/2 “ and stagger your joint to make it long enough ...
If the original stringers measure 1 inch now with glass then they were probably 3/4 “ to start with .. The glass adds thickness ...
 

das_army_life_yah

Petty Officer 2nd Class
Joined
Apr 3, 2020
Messages
122
sphelps, the stringers are definitely longer than 8’. And stagger them how? And the wood itself is 1”. With the glass it’s like 1 3/16”
 

kcassells

Fleet Admiral
Joined
Oct 16, 2012
Messages
8,738
Add a bulkhead to shorten the run and yes, you can do a butt joint. This is re searchable.:joyous:
 

das_army_life_yah

Petty Officer 2nd Class
Joined
Apr 3, 2020
Messages
122
Sphelps, So this is what I came up with. I ripped a 2x4 into a one inch strip and cut it into 3” sections. I then placed these on the outside of the hull and put 18” sections of 2x4 along the along the inside where the rub rail screwed into. I then screwed then together through the rub rail holes and sandwiched the fiberglass between the two. After that I cut 2x4’s to the width of the hull and used these to connect the two sides. I then ran another 2 boards perpendicular to that to prevent any twisting that might have occurred from me moving around. The bunks on the trailer aren’t mounted very high, so the keel sits below the trailer frame. I tried to think of a way to build a cradle around it, but nothing I mocked up came out very solid and would have provided minimum support. I was thinking of a way to build something around the wheel well, but it would make it a pain to get out of the garage bc my door is tiny. Given I live on a military base, I’m not allowed to store my boat outside. So I have to pull it in/out of the garage to work on it. That being said, I couldn’t build a stationary frame either. It’s not the optimal way of doing it, but it will work. I’ll just have to work around it, giving myself a few minor concussions and inventing a few new curse words along the way. :lol:
 

Attachments

  • photo327691.jpg
    photo327691.jpg
    286.7 KB · Views: 0
Top