(Somewhat) New to boating, New to the forum.

sphelps

Supreme Mariner
Joined
Nov 16, 2011
Messages
11,475
Well its certainly braced off well ! :lol:
How are the neighbors gunna react once the grinding starts ?
 

sphelps

Supreme Mariner
Joined
Nov 16, 2011
Messages
11,475
sphelps, the stringers are definitely longer than 8’. And stagger them how? And the wood itself is 1”. With the glass it’s like 1 3/16”

Stagger the joint from one side which would be in the front to the other side which would be in the back .. That way the joint wont be in the same place ..If that makes sense ...
 

das_army_life_yah

Petty Officer 2nd Class
Joined
Apr 3, 2020
Messages
122
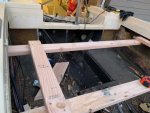
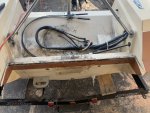
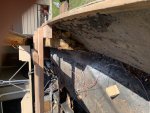
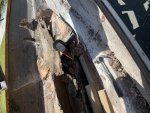
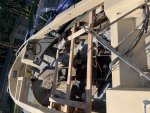
Sphelps, I actually found a picture of what you guys were talking about in regards to staggering the stringers. Also, I realized that I didn't actually measure the core of the stringer. What I thought was the wood core was actually the bottom of the ply from the rotten decking.:facepalm: Can't believe I did that. lol. I took a dremel and cut a bit of the glass away from the side and the top, getting to the actual core. Turns out it IS 3/4" ply. That being said, I'm going to get a good look at how they did it from the factory when I remove the decking. Gonna see if I can improve upon it at all with what you guys have mentioned.

As far as the neighbors go, we're pretty close. They thought I was nuts when they saw the condition of the boat. They don't think I'll be able to get it back to its former glory. At the same time, they want to see just how far I get before I give up (I won't :cool:). That being said, they don't mind at all as long as I'm not grinding too late.

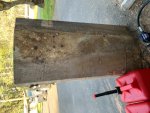
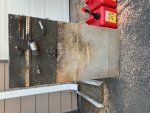
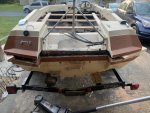
I also have a bit of an update. I managed to get the old fuel tank out without making too much of a mess. The tank was made to fill every bit of the compartment. It was literally top-to-bottom and wall-to-wall in there. I also managed to find the company that bought out the original manufacturer of the fuel tank. I gave them the year/make/model and they said that they may be able to dig through their archives to find the specs and build me a new one. I'm going to give them the dimensions as well, in case they can't find the specs of the original.

So a few questions in regards to the fuel tank before I pull the trigger and order it. Is it normal to mount an aluminum tank to be wall-to-wall like that? Would it be safe to order the original and install it as it was from the factory, or should I ask them to make it a little longer and narrower so I can "float it in the space"? There's also a rear "bulkhead" of sorts that goes on the stern-side of the tank. It doesn't close off the fuel compartment from the bilge, as it has a 2" gap or so below it. Should I keep it that way? Does the coast guard have anything to say in regards to these matters?

Anyways, I called my local glass supplier and they said they had both CSM and 1708 in stock. Pretty fair pricing on them as well. I'm stopping by tomorrow to pick up a couple buckets of resin, hardener, fillers, and the glass. Tomorrow also marks the start of the interior demo. I'm so stoked! I'm hoping to start (and possibly finish) grinding tomorrow so that I can get the transom cut and put in place so it has time to cure. I am REALLY hoping I can get the decking installed by next weekend so I can start on the interior work/paint.
 

kcassells

Fleet Admiral
Joined
Oct 16, 2012
Messages
8,738
Fuel tanks are a interesting topic here and yup their are CG regs. Today though you can purchase aluminum or plastic tanks.
If aluminum you want the fabricator to have holding tabs specific to your needs to mount the tank.
Plastic usually has a kit available for mounting.
I would move forward w/demo with the tank dimensions/info in your notes. On occasion I have seen where the old size just didn't want to go back in or had modification made.
pics,pics,pics
 

das_army_life_yah

Petty Officer 2nd Class
Joined
Apr 3, 2020
Messages
122
Kcassells, here’s some pics of the tank and where it sat. It was literally in there wall-to-wall and bulkhead-to-bulkhead. I was thinking of going a little narrower on the tank and not quite as deep, that way I could run a small drain pip under it and “float” it in the space. I had planned to have it stretched as well to bring it back to a 18 gal capacity, but I’m not sure if that will affect how the boat rides or not. I have to talk to some fabricators to see what my options are here.
 

Attachments

  • photo327736.jpg
    photo327736.jpg
    112.2 KB · Views: 0
  • photo327737.jpg
    photo327737.jpg
    141.1 KB · Views: 0
  • photo327738.jpg
    photo327738.jpg
    145.8 KB · Views: 0
  • photo327739.jpg
    photo327739.jpg
    142.3 KB · Views: 0

kcassells

Fleet Admiral
Joined
Oct 16, 2012
Messages
8,738
Oh yea,................Looks like the FUN has begun! Keep crackin, looking good.
 

das_army_life_yah

Petty Officer 2nd Class
Joined
Apr 3, 2020
Messages
122
I didn’t want to have to do this....but I think ’m gonna have to cut the back lip off the splash well where it mates to the transom. I’ve tried a sawzall, oscillating saw, angle grinder, etc. but the stuff they got in between the cap and transom looks like concrete....only WAY stronger.
 

Attachments

  • photo327761.jpg
    photo327761.jpg
    393.6 KB · Views: 0

sphelps

Supreme Mariner
Joined
Nov 16, 2011
Messages
11,475
Yeah , that type cap can be a pain to get loose from others I’ve seen here from time to time ..
 

das_army_life_yah

Petty Officer 2nd Class
Joined
Apr 3, 2020
Messages
122
So before I popped the cap. I made sure to measure in a few different spots along where the floor met the sides of the hull. Remeasured a few times to make certain I got it measured well enough. I wound up cutting just the little strip of cap off that covered the top of the transom. I really didn’t want to cut anything on the cap, but it made it possible to remove the thing. I made sure to take a lot of pictures of the thing before cutting so I can replicate the shape of it when when I get around to fixing it.

After getting that strip removed, I then took a 1” flat bar and hammer to separate the cap from the inside of the transom just enough to get a few wooden wedges I made from 2x4’s in there. A couple curse words and a smashed finger or two later, and I got the cap free. I may have to spend a little more time and money to fix that strip I cut, but it was definitely worth it to get the cap off. I tried everything, but the limited space near the bilge made it impossible. I’m so excited to see that I’ve made this much progress on the “Divorce-Maker” in the five days I’ve owned it.

For tomorrow, I plan to strip out all the wiring and get the transom/stringers/bulkheads removed (preferably in one piece). Hoping to grind everything on Friday, and have the transom in place by Sunday.

I’m calling it a day for now. I’m beat and about as frustrated as my wife was when I brought this thing home. Lol
 

Attachments

  • photo327761.jpg
    photo327761.jpg
    393.6 KB · Views: 0
  • photo327776.jpg
    photo327776.jpg
    408.3 KB · Views: 0
  • photo327777.jpg
    photo327777.jpg
    395.1 KB · Views: 0
Last edited:

das_army_life_yah

Petty Officer 2nd Class
Joined
Apr 3, 2020
Messages
122
So I got to cutting the floor out. Started out on the starboard side using an angle grinder. What I thought was the line between the deck and hull....well needless to say it was definitely not the line I was looking for. Lol luckily it’s glass so it’s not too hard to patch up. As soon I realized I went through, I switched to a oscillating cutter. May take more time, but it’s a bit safer imo. The port side was much easier to see. Cut the tabbing and getting ready to rip it out after a short break from the sun. These tyvek suits are boiling me lol. Once that’s done, I’m moving back to the starboard side. I’ll post more pics once the deck is removed.
 

Attachments

  • photo327826.jpg
    photo327826.jpg
    239.5 KB · Views: 0
  • photo327827.jpg
    photo327827.jpg
    382.3 KB · Views: 0
  • photo327828.jpg
    photo327828.jpg
    443 KB · Views: 0

kcassells

Fleet Admiral
Joined
Oct 16, 2012
Messages
8,738
Looking Great! I did the same thing. Part of initiation I guess. :watermelon:
 

das_army_life_yah

Petty Officer 2nd Class
Joined
Apr 3, 2020
Messages
122
BOOM!!! Got the deck out. I’m about to go get some hvac filters and make a dust collection box for the shopvac. Once it’s all cleaned out, gonna get some measurements for the stringers and put it up for the day. Gotta get some schoolwork done. :grumpy:
 

Attachments

  • photo327832.jpg
    photo327832.jpg
    405.5 KB · Views: 0

das_army_life_yah

Petty Officer 2nd Class
Joined
Apr 3, 2020
Messages
122
Archbuilder, there was some 2x4 strips of dense green foam that was glued down to the bottom of the hull. The only 2-part foam is in the floatation boxes in the stern and between the hull and trim panels on the sides. Gonna be working on all that tomorrow.

I plan to get an early start in the morning to get everything measured out before I fully gut it. I’m hoping to have everything ground down tomorrow (I know.....wishful thinking). I’m trying the best I can to get the transom in and clamped by tomorrow evening/Saturday morning. Once that is done, I’m going to go through the exterior of the hull with a fine-tooth comb to fix any major problems. I gotta patch that grinder mishap of mine in and take care of a few deeper scratches and some blisters.

So as far as the blisters, I talked to an older gentleman at my fiberglass supplier and it just so happens that he likes to build/restore boats. I asked him about the blisters that I saw and showed him some pics, and he said that given their size (1”-1.25”) and how few of them I have, they may just be spots where the gel coat might have separated from the glass. Maybe from a bad bond in the areas from something getting in between the glass and Gelcoat. It seems to be reasonable thinking given they’re all within a foot of each other and nowhere else on the hull. Idk. I’m gonna “pop” them tomorrow to see if there are any signs of moisture or damage to the laminate. I had planned on fixing them anyways. Lol
 

das_army_life_yah

Petty Officer 2nd Class
Joined
Apr 3, 2020
Messages
122
Archbuilder, I have not posted on of the blisters yet. I’ll try to see if I can get a good pic of them before I start grinding them out to be fixed. Plan to let them dry for a good month/month and a half.
 
Top