(Somewhat) New to boating, New to the forum.

das_army_life_yah

Petty Officer 2nd Class
Joined
Apr 3, 2020
Messages
122
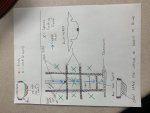
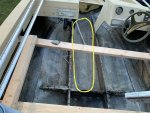
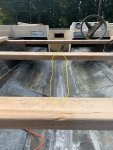
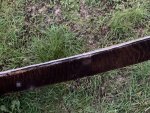
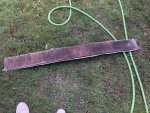
sphelps my bad. I thought I added in the pics when I mentioned the drain. Here they are. I circled it in the pic before and after I cut it out.

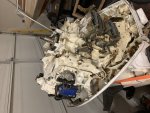
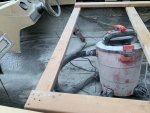
This grinding dust is no joke. I’ve had the shopvac running behind the grinder the whole time, and it barely takes the edge off. Even in this tyvek suit I’m itching lol
 

Attachments

  • photo328467.jpg
    photo328467.jpg
    302.3 KB · Views: 0
  • photo328468.jpg
    photo328468.jpg
    338 KB · Views: 0
  • photo328469.jpg
    photo328469.jpg
    404 KB · Views: 0
  • photo328470.jpg
    photo328470.jpg
    416.5 KB · Views: 0
  • photo328471.jpg
    photo328471.jpg
    472.5 KB · Views: 0
  • photo328472.jpg
    photo328472.jpg
    596.3 KB · Views: 0

sphelps

Supreme Mariner
Joined
Nov 16, 2011
Messages
11,475
So that was the drain for the bow recessed area for the deck ? Was there a ski locker with a hatch in that area ? I guess the water collected in the bow cockpit drained through that then the bilge pump pumped it out of the boat ..
I don’t see a reason why a pvc pipe wouldn’t do the same thing .. With no center stringer the drain may have given it some structure and clear un obstructed path for water .. especially if there was a ski locker .. Or was it just foamed ?
 

das_army_life_yah

Petty Officer 2nd Class
Joined
Apr 3, 2020
Messages
122
sphelps There was a ski locker there. It wasn’t foamed at all. It was completely open underneath that “plate” and I’m thinking it was exactly as youre thinking, just a drain from the bow to the bilge bc the boat also had/has a soda (beer:cool:) cooler at the front of the bow. I’m thinking that it wasn’t intended for any support. Did you see the crappy glass work they did towards the front of the board? A lot of the glass on the stringers, transom, and battery ledges were the exact same way.
 

sphelps

Supreme Mariner
Joined
Nov 16, 2011
Messages
11,475
Yeah , they didn’t build them to last forever back then .. Especially if you got a Friday made boat .. :lol:
I think I would put it back in place at least where the ski locker is .. But put a layer of csm on the bottom of the board before you glass it to the hull . I’m really surprised it didn’t have foam .. might not be a bad idea to add some wherever you can get it ..
 

archbuilder

Vice Admiral
Joined
Sep 12, 2009
Messages
5,697
I would add the foam like Sam mentioned. It will make it run quieter and it will make the deck a lot stiffer.
 

das_army_life_yah

Petty Officer 2nd Class
Joined
Apr 3, 2020
Messages
122
sphelps ”Friday” boat lmao. I think that’s what I’ll name her now bc it’s starting to look like that’s the case. Big air pockets in the laminate everywhere like they just sprayed the hull with resin, dropped the glass on top, then sprayed it again. I may put the “drain” board back in, but I’m thinking it was more of a drain than anything. I attached a pic of how I was thinking of redoing it. Im thinking if I did it this way, it should provide as much if not more support than before and better drainage as well.
archbuilder I have every intention of adding a good amount of foam to her. It came with only 6 or 8 three-foot sections of green “pool noodles” glued to the hull. I planned to foam in everything that isn’t going to be used for a ski locker, storage, or fuel tank. Im assuming that the piece Sphelps and I are referring to was to drain any water from the bow to the bilge, especially since there were drainage “ports” cut out of the bottom of the bulkheads. If you haven’t seen it yet, you can see the board we’re referring to in the pics a few posts back. It’s the section circled in yellow. I couldn’t imagine foaming in a drainage channel. That sounds like you’d just be asking for trouble down the road lol

Im about to knock out some more of this grinding. I’ll post a progress report when I’m done for the day.
 

Attachments

  • photo328517.jpg
    photo328517.jpg
    253.2 KB · Views: 0

das_army_life_yah

Petty Officer 2nd Class
Joined
Apr 3, 2020
Messages
122
Work had me tied down for the better part of the day, but I managed to get a couple hours in. Just got done working around the consoles with a grinder. I’m thinking that since that was the tightest workspace on the whole boat, the rest should go by pretty fast and smooth. Made it to about mid-ship before I ran out of daylight. Tomorrow should be a very short day at work, so I’m hoping to hammer out the rest of the grinding tomorrow and get to her with a broom and vacuum. If I have time, gonna scrub her down with some mild dawn-water and a brush and get all the dust out. Plan to give her one more wash on Wednesday, then it’s on to patching the hull.
 

Attachments

  • photo328523.jpg
    photo328523.jpg
    358.1 KB · Views: 0

das_army_life_yah

Petty Officer 2nd Class
Joined
Apr 3, 2020
Messages
122
sphelps im happy you think so. I’m working as hard and fast as I can to get this thing to a point where it actually starts looking like a boat again. That, and so I can get the floor in so I’m not having to crawl around the support frame I built lol
 

sphelps

Supreme Mariner
Joined
Nov 16, 2011
Messages
11,475
Only thing is ,it’s probably gunna take quite a good bit of resin for all the fillets .
 

JASinIL2006

Vice Admiral
Joined
Feb 10, 2012
Messages
5,714
I think your plan looks really good, and the PVC channel should work fine. I wouldn't go crazy with the fillets, though. You just need enough of a radius to allow you to lay the 1708 over it before you foam it all in, right? If that's the case, a 3/4" or 1" radius would be plenty to allow the glass to lay flat. Fillets will eat up resin, as sphelps mentioned, so don't feel like you need to go crazy with them.

One nifty fillet trick I learned on iboats: when laying fillets, many folks use a large spoon as a rounded trowel to form the fillets; that works pretty well. If you're going to glass over the fillets, you need them really smooth, so your fiberglass doesn't get caught on any jaggies which can cause air bubbles in fiberglass, etc. To prevent that, right after you trowel the fillet, before it kicks off, lightly 'paint' the fillet with a chip brush dipped in catalyzed resin. It will get any fibers in the thickened fillet resin to lay down, allowing a smoother surface for glassing. (It will save you a ton of time and help you avoid having to pull out the grinder again!)
 

sphelps

Supreme Mariner
Joined
Nov 16, 2011
Messages
11,475
Jas I think he wants more of a flat surface for the bottom of the ski locker . That’s why he drew in such large fillets ..
Just thinking ,you could always layup a flat fiberglass skin out of the boat with 2 or 3 layers of 1708 to span across the pipe .
It could sit right on top of the pipe and bridge from one side to the other .... fillet down the edges then lay a few more layers of 1708 over that tabbed into the hull .. No wood to rot ,strong , and create a flat surface for the ski locker ...
‘Just thinking out loud ...
 

das_army_life_yah

Petty Officer 2nd Class
Joined
Apr 3, 2020
Messages
122
archbuilder Im sure it gets more fun. If it wasn’t for the fact that it makes such a mess and you get so itchy, grinding isn’t half bad aside from having a sore back. Lol
sphelps you hit the nail on the head. I want the ski locker to have a more finished look. Trying to get it smooth and then imma gelcoat the whole thing.
JASinIL2006 The thicker fillets are strictly for the ski locker. The rest of the pipe that’s going between the ski locker and fuel compartment is gonna be foamed over, so I’m not too concerned with having large fillets there.

As far as resin is concerned, I went the lazy route and just bought pre-mixed bonding/fillet resin for all the filleting. It wound up being about the same price as buying everything separate and I figured I wouldn’t have to worry about a ton of excess chop strand and cabosil laying around. On top of that, I figured it’s a lot easier to just have to drop in the MEKP and go. Lol. I have plenty of poly laminating resin for glassing in the transom and stringers. I also got some vinylester resin so I could do a couple skim coats on the exterior to act as a water barrier before I gelcoat it. I did buy some cabosil too just in case I have to make any vinylester PB to patch the hull before I skim it.

Im getting a fairly early start today, so hopefully I can hammer out the rest of the grinding and get this thing ready for cleaning. Wish me luck. I’ll post some pics if I manage to get her cleaned out today.
 

JASinIL2006

Vice Admiral
Joined
Feb 10, 2012
Messages
5,714
All of your plan sounds pretty sensible. Are you planning to have the ski locker drain into the PVC pipe that runs below it?

Good luck getting the grinding done. I wish I could remember how many times I thought, "Finally! Done with the grinding!" only to find out later I had to pull the grinder out for something I missed/forgot/etc. It is definitely good to get that part behind you!
 

das_army_life_yah

Petty Officer 2nd Class
Joined
Apr 3, 2020
Messages
122
JASinIL2006 Yeah I’m going to have the ski locker drain into the PVC pipe. Plan to use a fitting like what’s on the transom. I also planned on making a slight taper towards the aft end of the ski locker to direct any water towards the drain. I plan to use the same type of drain fitting to allow the storage compartments under the seats in the bow to drain into the ski locker. My goal is to provide the ability for any “open” compartment to drain towards the bilge.

UPDATE: So it’s supposed to be rainy for the next week or so. Decided that since I can’t grind, I may as well continue working on the project somehow. Since I have all the new parts for the motor on hand, I decided I’d go ahead and start the rebuild/refresh process on it. Although glass work/boat restoration may be foreign to me, I’ve been wrenching on cars for over 20 years. This is my strong suit, and by far the one thing that I was REALLY looking forward to doing in the project. The pic is about 45 minutes in.
 

Attachments

  • photo328633.jpg
    photo328633.jpg
    337.3 KB · Views: 0

das_army_life_yah

Petty Officer 2nd Class
Joined
Apr 3, 2020
Messages
122
I’m happy I got a seal/gasket set for the whole powerhead. The main seal under the flywheel is shot and leaking bad. Carbs were leaking just as bad. Plug seals were shot, blowing oil/fuel all over the inside of the cowl. I can only imagine that the main seal on the bottom is dumping oil/fuel out everywhere as well. Can’t wait to get this bad boy cleaned up, re-sealed, and shot with a fresh coat of high-temp paint. Got the whitest paint I could. This thing leaks again, I’m gonna know. Lol
 
Top