Re: Starcraft Holiday: 1976 + 1982 = 1 'new' boat
Re: Starcraft Holiday: 1976 + 1982 = 1 'new' boat
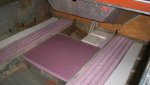
The build continues. I pulled up the floor that was temporaraly down for fitting purposes and started filling the hull with as much foam as I could. I used 2inch thick pink foam from a big box store. I put 3 sheets in. That comes to cu sq ft of pink foam. I had some white styro and put that in too. in total I have 10.8 cubic feet of foam in the floor. I sliced the pink foam and put it in vertically... I was able to get more volume in like that and it keeps an air space under it because the ribs keep it up off the bottom of the hull.
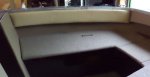
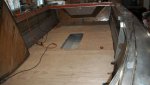
Next came putting the floor back in and riviting it to the ribs and stringers. I used 48 3/8 inch x 3/4 inch aluminum pop rivits. The rivits were set 2 inches in from the edge of the ply, and about every 12 inches in the two stringers.
Rivets = $7.79
3 sheets of pink 2 ft by 8 ft by 2 inches foam board = 17.91 a sheet ($53.73)
4 spools of wire for the wiring that is coming soon... 100ft roles, 11.21 a role ($44.84)
Time 17 hrs .
Total time 49 hrs.
Total expense= $1279. I sold my second hull to a duck hunter. He wanted an open hull boat so I sold it for $247.... beat sending it to the scrap pile (at 50 cents a pound i would have gotten about the same).
Total adjusted expense = $1,032.
For some reason I can't load any pics today...... will put them in soon.
Re: Starcraft Holiday: 1976 + 1982 = 1 'new' boat
The build continues. I pulled up the floor that was temporaraly down for fitting purposes and started filling the hull with as much foam as I could. I used 2inch thick pink foam from a big box store. I put 3 sheets in. That comes to cu sq ft of pink foam. I had some white styro and put that in too. in total I have 10.8 cubic feet of foam in the floor. I sliced the pink foam and put it in vertically... I was able to get more volume in like that and it keeps an air space under it because the ribs keep it up off the bottom of the hull.
Next came putting the floor back in and riviting it to the ribs and stringers. I used 48 3/8 inch x 3/4 inch aluminum pop rivits. The rivits were set 2 inches in from the edge of the ply, and about every 12 inches in the two stringers.
Rivets = $7.79
3 sheets of pink 2 ft by 8 ft by 2 inches foam board = 17.91 a sheet ($53.73)
4 spools of wire for the wiring that is coming soon... 100ft roles, 11.21 a role ($44.84)
Time 17 hrs .
Total time 49 hrs.
Total expense= $1279. I sold my second hull to a duck hunter. He wanted an open hull boat so I sold it for $247.... beat sending it to the scrap pile (at 50 cents a pound i would have gotten about the same).
Total adjusted expense = $1,032.
For some reason I can't load any pics today...... will put them in soon.
Attachments
Last edited: