starcraft supersport 1971 restoration

GT2010

Seaman
Joined
Nov 21, 2010
Messages
60
Re: starcraft supersport 1971 restoration

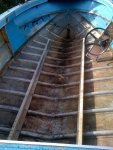
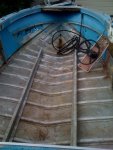
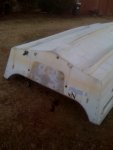
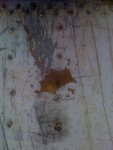
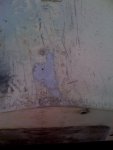
Slowed down this week with weather, illness, and busted water pipe in house. Did get the flotation foam out, vaccumed out, and pressure washed. Will get a more thorough cleaning before applying gluvit.

Thanks again for all of the help with this. I have been telling several of my friends that own boats about this website.

Epoxy should arrive Monday, seats and pedestals should arrive by the end of the week.
 

Attachments

  • photo12.jpg
    photo12.jpg
    75.1 KB · Views: 0
  • photo13.jpg
    photo13.jpg
    68.1 KB · Views: 0

GT2010

Seaman
Joined
Nov 21, 2010
Messages
60
Re: starcraft supersport 1971 restoration

Made a mistake! I received my boat seat pedestals and I now know what a class B pedestal is for a rating. Didn't know this when ordering! As I said before, I am new to boat ownership!

These will not work for my driver and passenger seats. Is it safe to order an adjustable/ locking 360 pedestal for my seats or do I need to be looking fopr a fixed height? Do seats have these same ratings or is it the pedestal that must be correct?

I should have posed this question before purchasing.

Thanks for any input.
 

STARCRAFT16SS

Petty Officer 1st Class
Joined
Mar 25, 2008
Messages
344
Re: starcraft supersport 1971 restoration

I also am on my first boat...I have the springfield taper lock bases and the
pedestals for that base has a B rating...you have me checking out the Springfield web site at Springfieldgrp.com
also check out Springfieldgrp.com/Standards.htm
the second site explains the AD / AP / B ratings

Looks like my stern seats are only rated for up to 5mph while sitting on them...
Thats fine for fishing ...but if I have a lot of passengers/skiing??
Looks like one of the concerns with my setup is the seats can rotate
while on the move...looking at the above web site it looks like I could replace the bases I have now with the Springfield Removable Series with the
class AD Removable Power Rise Pedestals....I'll have to look into this and
see if these bases have the same bolt pattern and spacing as what I'm currently using:(
The seats/pedestals/bases I have now...seem plenty strong enough but
I can see concern with the seats freely rotating with small kids on them
who do not have long enough legs to reach the deck to keep themselves
facing forward....For my kids...they have been sitting on the bench in
the open bow area where I can keep an eye on them when underway...
I tried finding a phone # for Springfield on the above website but the
only contact info they had listed was Sales@springfieldgrp.com
 

ezmobee

Supreme Mariner
Joined
Mar 26, 2007
Messages
23,767
Re: starcraft supersport 1971 restoration

Those are most likely going to be too high for your boat. I believe I actually went with 8" for my 18' SS. Definitely no more than 10". I got mine at www.greatlakesskipper.com for a great deal.
 

GT2010

Seaman
Joined
Nov 21, 2010
Messages
60
Re: starcraft supersport 1971 restoration

EZ, should I just get regular seat posts that do not rotate 360? I see I can get those as cheap as $25.00 or maybe I should just go with lounge seats and use these as fishing seats.

Thanks
 

ezmobee

Supreme Mariner
Joined
Mar 26, 2007
Messages
23,767
Re: starcraft supersport 1971 restoration

The bucket seats I went with are fairly substantial and reclined. Therefore, in order for them to be able to swivel all the way around, I'd have had to mount the pedestals much further in from the sides than I'd have liked (and it would have looked silly). I can still swivel them around backwards if I mess with the slider and turn them in one specific direction. I'm going to have a fishing seat mounted on the bow deck and another on a box I've yet to build in the stern. I already have the matching seats. I'd got with swivel pedestals if I was you. It can be handy to be able to turn them around backwards.

http://i176.photobucket.com/albums/w200/ezmobee/New Boat/DSCF2728-2.jpg
 

GT2010

Seaman
Joined
Nov 21, 2010
Messages
60
Re: starcraft supersport 1971 restoration

Thanks for the tips.

We built our motor stand yesterday and when the wind stops blowing,we can pull the motor and transom. I know a lot of you guys are up north, but down here in Ga it is very unusual for it to be below 30 degrees this time of year.

Question, I need to detach the cables to remove the motor. The cables are running thru a hole in the splash cover. Should I detach them from the motor or should I detach them from the control box? Is there anything we should pay close attention to when removing the motor other than not dropping it?

The manual for the motor says it weighs about 208 lbs so I think my son and I can handle it.

We have purchased the plywood for the deck and by the end of the week should have it cut with the first coat of epoxy! I am hoping to do the transom as well!
 

ezmobee

Supreme Mariner
Joined
Mar 26, 2007
Messages
23,767
Re: starcraft supersport 1971 restoration

At least on my OMCs, they are MUCH easier to detach from the motor than from the control box. 208 is a lot when it's as top heavy as it is. A cheapie come-along from Harbor Freight attached to something overhead will make the job a lot easier.
 

GT2010

Seaman
Joined
Nov 21, 2010
Messages
60
Re: starcraft supersport 1971 restoration

Motor is off and all the bolts and screws are out of the transom.

Good thing I follow you guys that know what your talking about. Even though the transom looked like it was solid to a person that doesn't know much, once you start you digging you find out the truth. It is mush on the sides from top to bottom. Only the center part where the motor bolted is solid.

Two questions;

1) My transom is in three pieces and I don't mean from rot. The top two corner pieces were cut and installed separetly. I will post pictures tomorrow. Is this normal? All the photos I see of you guys when you have created a new transom, it is one solid piece.

2) Any tricks to getting this thing out? It is in there tight and I can't get much leverage. Thought about drilling down some ibolts, then using an engine lift to yank it out?

Thanks again for the help. Christmas and weather have slowed down much of our progress, but we are creeping along!
 

v8mgbal

Petty Officer 1st Class
Joined
Jul 14, 2010
Messages
309
Re: starcraft supersport 1971 restoration

hey GT, it sounds like a PO repair with the three piece transom and I think you have the right idea with drilling down and screwing some eyelets into the transom to remove it. try to get a big friend or a couple to sit in the boat so it dosen't lift when you pull on the transom;)
 

ezmobee

Supreme Mariner
Joined
Mar 26, 2007
Messages
23,767
Re: starcraft supersport 1971 restoration

I was able to "pop" my transom out with a 2x4 prying up on it from the inside. There should be a couple inches on either side at the bottom of it in which to do this.

Replace it with a single piece.
 

GLG fishing

Chief Petty Officer
Joined
Dec 25, 2009
Messages
456
Re: starcraft supersport 1971 restoration

My transom is in three pieces and I don't mean from rot. The top two corner pieces were cut and installed separately. I will post pictures tomorrow. Is this normal? All the photos I see of you guys when you have created a new transom, it is one solid piece.

They came from the factory in three pieces. Most put them back as one piece. Your choice to do it in one or three. If you look at it the two small pieces don?t really do any thing for support. If it was my boat and I planned to add a kicker I would go with one piece, which would beef up the transom where the kicker is mounted.

GLG
 

fshngho

Lieutenant
Joined
Apr 1, 2009
Messages
1,332
Re: starcraft supersport 1971 restoration

Gt my offshore transom was the same way, 3 pcs, but as you have read it would be preferable to put back one piece. After I had removed all the screws I "sawed" in between the wood and transom skin. Then I attached a rope through the wood holes (not the skin) and lifted up. It was tight so I layed a 2 x 4 across the top corners of the stern and wrapped the rope around it. Then I could use leverage to lift out the wood. Make sure your gunwale caps aren't in the way.
 

ezmobee

Supreme Mariner
Joined
Mar 26, 2007
Messages
23,767
Re: starcraft supersport 1971 restoration

After I had removed all the screws I "sawed" in between the wood and transom skin. Then I attached a rope through the wood holes (not the skin) and lifted up. It was tight so I layed a 2 x 4 across the top corners of the stern and wrapped the rope around it.

I tried pulling mine out like fshngho did but I didn't use his 2x4 method so it failed miserably. I was lifting up the whole darn boat and that transom wouldn't budge! Here's evidence: http://i176.photobucket.com/albums/w200/ezmobee/New Boat/DSCF2363.jpg Those suckers can swell in there pretty tight and you may have to try a few things to get it out.
 

GT2010

Seaman
Joined
Nov 21, 2010
Messages
60
Re: starcraft supersport 1971 restoration

Got the transom out before Christmas and then work stalled for the holidays.

Got her off the trailer and flipped over for sanding. I will add some pictures, as I have a few questions.

Thanks
 

GT2010

Seaman
Joined
Nov 21, 2010
Messages
60
Re: starcraft supersport 1971 restoration

The boat is off the trailer and flipped. I plan on sanding it down, but not fully to the metal. My plan is rustoleum paint, as I am on a budget and trying to stick to it.

The last photo shows a possible hole that has been patched. Won't know for sure until I sand it down.

As you can see from the photos, the bottom is scuffed pretty good and shows a lot of base metal. Any suggestions on sand paper grit? Do I leave the molding on or take it off? For unwanted holes in the transom skin, is JB weld what most suggest?
 

Attachments

  • boat1.jpg
    boat1.jpg
    107.3 KB · Views: 0
  • boat2.jpg
    boat2.jpg
    114.1 KB · Views: 0
  • boat3.jpg
    boat3.jpg
    117.2 KB · Views: 0
  • boat4.jpg
    boat4.jpg
    126.2 KB · Views: 0

fshngho

Lieutenant
Joined
Apr 1, 2009
Messages
1,332
Re: starcraft supersport 1971 restoration

GT, I would suggest you try a stripper from Wally World first before you sand.
Some guys remove the rubrails and trim, it's up to you. JB works great on smaller holes as long as you prep correctly.
Remember you can make a cheap paint job look like a million bucks, it's all in the prep and details.
A little extra work in this area can go a long way in the way she ends up looking.;)
 

ezmobee

Supreme Mariner
Joined
Mar 26, 2007
Messages
23,767
Re: starcraft supersport 1971 restoration

On my extra transom holes I wanted to fill with JB, I cut some little sqaures of aluminum flashing to use a "backers". Seems to have worked well and kept the plugs from popping out.
 

GT2010

Seaman
Joined
Nov 21, 2010
Messages
60
Re: starcraft supersport 1971 restoration

Spent most of the day sanding down the hull. Even got to a few interior parts as well.

Sanded down what I thought was a patch on the bottom and was correct. Maybe shouldn't have messed with it, but wanted to know what I had.

Would JB Weld be a good fix for this? It is below the knee brace.

Been spending my free time in the evenings rereading and reviewing all of your threads and rebuilds. Trying to process all the info. If the weather keeps doing well, I can continue to make progress.

Thanks again for the posts and responses.
 

Attachments

  • photo15.jpg
    photo15.jpg
    81.3 KB · Views: 0
  • photo14.jpg
    photo14.jpg
    120.8 KB · Views: 0
Top