starcraft supersport 1971 restoration

GT2010

Seaman
Joined
Nov 21, 2010
Messages
60
Re: starcraft supersport 1971 restoration

Spent over 12 hours the last two days getting further and, unfortunately, seem to be stepping backwards.

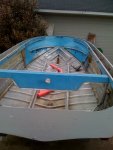
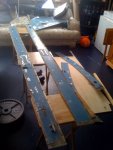
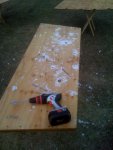
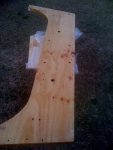
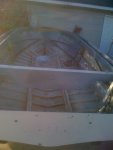
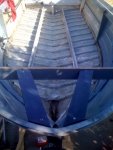
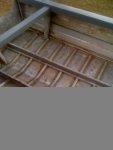
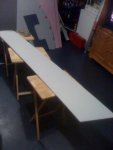
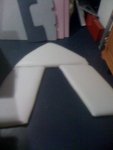
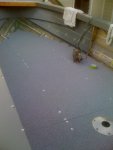
The progress, got the deck in and made the necessary cuts to make sure it fit. Epoxyed two coats onto the bottom of each deck piece. Got the transon laminated together and sitting under 45 lb weights as I am typing. Each mix of epoxy left me a little, so I used that to epoxy my sliding doors and the large side panels. Plan is to cover those in marine vinyl eventually.

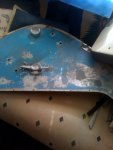
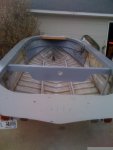
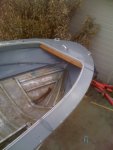
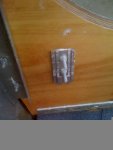
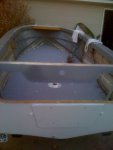
Where I took a step back. The wood support under the bow was mostly rotted, but when I got up under there to fix it, I was unable to pull out the wood because of how it was bolted in there, I guess, when built.

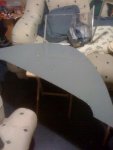
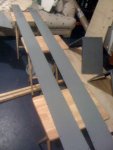
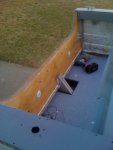
So I removed the inside and outside molding and up came the gunwale aluminum. Now I can easliy replace the wood, but now I have created a lot of work for myself riviting the aluminum back in place.

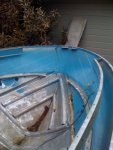
Two positives; 1) When I removed the moldings, the rivets holding the gunwales just snapped up like pretzels. They were no good. So replacing these should add more strength. 2) Now I can easliy patch and sand the gunwale aluminum to prep for painting.

I hope I didn't jump to far in over my head, but it seems like I did the right thing????
 

ezmobee

Supreme Mariner
Joined
Mar 26, 2007
Messages
23,767
Re: starcraft supersport 1971 restoration

That piece is a b&%*h ain't it? Pretty sure I took like 900 fasteners out of it. I think that was like the very first piece and they built the entire boat around it. What I did was cut mine out, then when I replaced it, I made the new one only go as far in as the first set of bolts. I didn't try to take it all the way in and under the gunwales. It is a little less sturdy up there though so your hard work will hopefully pay off with a sturdier bow than I have. I made mine out of one of those PVC trim boards from Lowes.

http://i176.photobucket.com/albums/w200/ezmobee/New Boat/DSCF2531.jpg
http://i176.photobucket.com/albums/w200/ezmobee/New Boat/DSCF2530.jpg
http://i176.photobucket.com/albums/w200/ezmobee/New Boat/DSCF2534.jpg
 

GT2010

Seaman
Joined
Nov 21, 2010
Messages
60
Re: starcraft supersport 1971 restoration

Glad to hear I didn't do something crazy. Now that you have posted, I do remember that in your resto thread about how difficult it was to fix.

My daily schedule right now; work, use spare time to work on the boat, get on iboats when everyone goes to bed and reread threads or try to find new ones to make sure I am doing this right or learn new tricks.

For my gunwall tops, do you think jb welb for the unnecessary holes will be fine. I don't think I want to invest in new gunwall tops like djpeters did, but they sure do look nice. Will jb weld sand down and allow paint?
 

ezmobee

Supreme Mariner
Joined
Mar 26, 2007
Messages
23,767
Re: starcraft supersport 1971 restoration

Yes. I'd JB it. I did a bunch of that on my transom and they all came out nicely. I used little squares of aluminum flashing as "backers" for my patches. Seemed to give the adhesive more to grab onto.
 

Huron Angler

Admiral
Joined
Apr 7, 2009
Messages
6,025
Re: starcraft supersport 1971 restoration

GT I have yet to tackle removing my "keystone" bow piece myself. It's got a couple fasteners holding it in to put it mildly.:facepalm::eek:

Looks like you are making good progress.:)
 

GT2010

Seaman
Joined
Nov 21, 2010
Messages
60
Re: starcraft supersport 1971 restoration

Been busy on the boat, but facing frustrations as it seems to be moving slower than I want it to right now.

My updates are;
1) Decided to cut my bow front wood support out of red oak like my console dashboards. Thought it would look neat if they matched. Just need to epoxy those three pieces so I can get them reinstalled.
2) Patched over 70 holes in the gunwalls and bowcap (don't know the actual name). I have started to sand these down. I think they will come out real nice once painted. Thanks EZ for the tip on using aluminum flashing as a backing
3) I had laminated my transom together, so I went to fit it in so I could start working on drilling out the holes. The transom wouldn't slide down and I noticed that I didn't have enough pressure on the left side and it left about an 1/8 inch gap between the sheets for about 8 inches down the side. I could have made it work, but I am putting too much time in this to put something in I know was not correct. So I bought another sheet and cut them yesterday. This time I did what Huron did and that was to leave the cut at the top for last so I have something to grab onto to pull it out.
4) Decided to change my console paint job. The spray metallic flake even with a clear coat just scratches too easy. So I need to resand and paint those as well.

I know I am making progress, but without a garage, I am limited to daylight and good weather, so it is a bit slow right now. I am not complaining, cause my former garage is an enclosed man cave that I really enjoy.

Here are pics of the boat without gunwalls, bowcap, gunwalls getting ready for jb weld, the bowcap with a little sanding to show it works really well, and my new transom cut.
 

Attachments

  • photo9.jpg
    photo9.jpg
    139.3 KB · Views: 0
  • photo6.jpg
    photo6.jpg
    119.9 KB · Views: 0
  • photo5.jpg
    photo5.jpg
    126.2 KB · Views: 0
  • photo8.jpg
    photo8.jpg
    146.3 KB · Views: 0
  • photo7.jpg
    photo7.jpg
    124 KB · Views: 0

GT2010

Seaman
Joined
Nov 21, 2010
Messages
60
Re: starcraft supersport 1971 restoration

My son reminded me that I have gotten behind on my posts. So here are the updates. Had two days off this week and have made a lot of progress.

1) Sanded and painted the gunwalls and bow plate(?). Installed the new wwood for the bow support and then installed the bow plate(?) and gunwalls.

2) Painted the inside of the boat that will be seen.

3) Finished cleaning the hull and applied gluvit. That stuff really becomes rock hard!

4) Drilled out the transom holes larger then epoxied then drilled them out. Last coat of epoxy is curing right now.

5) Decided to cover each of the deck pieces individually with nautolex. It is drying. Still need to wrap it around and staple to the bottom.

6) Purchased the pink foam from HomeDepot.

7) My marine vinyl arrived.

8) This week I can work in doors if necessary and re-upohlster the bow seats and all my trim pieces.

9) By the end of the week I hope to have the transom in, deck in, gunwalls finished and start adding the interior pieces.

10) One more picture is of the new lounge seats. Decided to go back with these.

11) Rereading several threads daily to keep refreshing on how you guys restored your boats.
 

Attachments

  • photo20.jpg
    photo20.jpg
    144.8 KB · Views: 1
  • photo19.jpg
    photo19.jpg
    116.4 KB · Views: 0
  • photo17.jpg
    photo17.jpg
    144.1 KB · Views: 0
  • photo22.jpg
    photo22.jpg
    100.1 KB · Views: 1
  • photo23.jpg
    photo23.jpg
    116.4 KB · Views: 1

GT2010

Seaman
Joined
Nov 21, 2010
Messages
60
Re: starcraft supersport 1971 restoration

Only let me load 5 photos, so here are more.
 

Attachments

  • photo26.jpg
    photo26.jpg
    117.4 KB · Views: 0
  • photo24.jpg
    photo24.jpg
    125.1 KB · Views: 0
  • photo21.jpg
    photo21.jpg
    139.9 KB · Views: 0
  • photo18.jpg
    photo18.jpg
    81.4 KB · Views: 0
  • photo25.jpg
    photo25.jpg
    132.2 KB · Views: 0

fshngho

Lieutenant
Joined
Apr 1, 2009
Messages
1,332
Re: starcraft supersport 1971 restoration

Dang GT you are moving along my friend! Very nice work. Don't sweat the time it takes to work on these things. That is part of the fun and when you do finish you will still find more to do. Great your son is keeping you on your toes. I would imagine he ready for you to finish his,,,er, I mean your boat.:rolleyes:
All in time...all in time....;)
 

VooDuuChild

Recruit
Joined
Feb 19, 2011
Messages
4
Re: starcraft supersport 1971 restoration

Wow, impressive for no garage, workin outside and your first resto! You are really makin headway on that bad boy....wish I could do stuff outside, it's either raining or freezing right now here just north of Seattle.
 

GT2010

Seaman
Joined
Nov 21, 2010
Messages
60
Re: starcraft supersport 1971 restoration

We have been blessed with 70-75 degree weather right now. Last year at this time we had a couple of inches of snow! Right now it is 9:30 and 68 degrees outside.

When I got home from work I finished adding the nautolex to the deck. Yesterday I applied the glue and let that set overnight. Today I wrapped it, applied adhesive and stapled with marine staples. Came out looking pretty good.

Hope to get my bow seats reupholstered tomorrow evening.
 

Attachments

  • photo27.jpg
    photo27.jpg
    118.8 KB · Views: 0

GT2010

Seaman
Joined
Nov 21, 2010
Messages
60
Re: starcraft supersport 1971 restoration

Got my bow seats reupholstered today and one of the long panels. It is a light gray marine vinyl. I need to take the pictures outside as the camera phone not the best indoors. My trim that goes around the trim panels is in bad shape so I am going to paint those the same color as the gunwalls. Hope to get those painted tomorrow.
 

Attachments

  • photo28.jpg
    photo28.jpg
    115.9 KB · Views: 0
  • photo29.jpg
    photo29.jpg
    109.3 KB · Views: 0

boatguy94

Chief Petty Officer
Joined
Jul 29, 2009
Messages
520
Re: starcraft supersport 1971 restoration

Lookin good on everything GT! You're really flying through this too. :D
 

jasoutside

Supreme Mariner
Joined
Dec 20, 2009
Messages
13,269
Re: starcraft supersport 1971 restoration

OK, add one more to the list of guys I am chasing:facepalm:

Nice job GT!:)
 

GT2010

Seaman
Joined
Nov 21, 2010
Messages
60
Re: starcraft supersport 1971 restoration

Put in a lot of time this weekend. Got the transom installed. All bolt holes had been filled with epoxy then redrilled and I added 5200 everytime I installed a bolt or screw. Should be water tight?

We used some aluminum to strengthen up where the transom eye bolts are. The bolts pulled through the transom on the previous owner and if I am going to pull a tube someday I wanted to make sure it is strong.
 

Attachments

  • photo12.jpg
    photo12.jpg
    93 KB · Views: 0
  • photo11.jpg
    photo11.jpg
    135.7 KB · Views: 0

GT2010

Seaman
Joined
Nov 21, 2010
Messages
60
Re: starcraft supersport 1971 restoration

Also installed the deck. My rivets were long enough for the stringers, but not the ribs, so I have to finish screwing them down with deck screws or stainless screws. Shortest deck screws I can find are 1 1/4 inch and that has me a little nervous since I installed 1/2 ply for the deck.

Any ideas I will gladly accept?
 

Attachments

  • photo13.jpg
    photo13.jpg
    132.6 KB · Views: 0
  • photo14.jpg
    photo14.jpg
    124.6 KB · Views: 0
  • photo15.jpg
    photo15.jpg
    115.2 KB · Views: 0

GT2010

Seaman
Joined
Nov 21, 2010
Messages
60
Re: starcraft supersport 1971 restoration

Dad and I got the motor back on the boat yesterday. My right arm is now longer than my left arm. Just the opposite for my father. If I ever pull off or put on another outboard that weighs this much, I will take EZ's advice and purchase a come along!

Being a first time boat owner and working on a boat, it amazes me at how much an outboard motor weighs and adds to the stern of the boat and transom.

We did a test hole yesterday for attaching the deck to a rib and my 1 1/4 inch deck screws from Lowes leaves me 1/4 between the point of the screw and the hull. Is this too close for comfort? We measured by drilling a pilot hole then inserting a tiny drill bit until we touched the hull. Should I be looking to see if anyone carries 1 inch deck screws?
 

Teamster

Lieutenant Commander
Joined
Nov 8, 2010
Messages
1,923
Re: starcraft supersport 1971 restoration

I can't believe you cant find one inch stainless deck screws,.....When I did my boat I bought them at Menards,...

If you can't find them locally have you looked online??
 

GT2010

Seaman
Joined
Nov 21, 2010
Messages
60
Re: starcraft supersport 1971 restoration

Thanks Teamster.

Made a bad decision and took the worker at Lowe's word for it that 1 1/4 were the shortest self tapping deck screws! (Tan colored) I was focused too much on the actual " tan deck self tapping screws" and not even thinking to just buy stainless screws!

Did you predrill holes or just drive them right into the deck and ribs?
 
Top