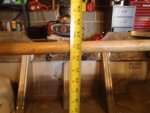
Starting my 59' Starcraft flooring project!

IndyFish

Seaman
Joined
Feb 20, 2013
Messages
56
Re: Starting my 59' Starcraft flooring project!

When working on a boat you throw your level away, you'll run yourself crazy and will be building and then tearing things out trying to use a level.

Boats are put together by measuring.

Mark where you want the top of the deck in one spot, then measure down from the top of the gunwale to that spot... then take that dimension and measure down from the gunwale all the way around the boat in about one foot spaces and that will be the top of your deck/floor.

If you try to take it to the lake with a level the hull is going to sit differently in the water everytime you move... it would make a great video to watch of somebody trying to do that though.:laugh::lol::laugh:

As for your deck framing plan, there's no way I can draw up a framing plan only using 50' of material... you'll probably need to stick to your own design for that.

I just want to make sure i'm understanding.... measeure down fron the top of the boat (gunwale from what i understand) to where i want my floor, mark that same measurement all the way around? Wouldn't that be saying that the gunwale is parallel with the water?

Also, i'm not using ONLY 50' of material. It's just what i've got the money for at this particular time and it will get me started. atleast do the frame around the edges and such and give me something to play around with untill next month. (bills hit pretty hard this month)
Thanks!
 

IndyFish

Seaman
Joined
Feb 20, 2013
Messages
56
Re: Starting my 59' Starcraft flooring project!

2 16' runs down the sides, and "cross members" every other rib will already put me well over 50', and i know it's going to take more than that! I see lots of pictures (mainly of boats that came factory with floors) that have some sort of beam running down the center to support these "cross members" maybe called stringers? I would imagine i will need some sort of channel for this, but thought i'd ask anyways!:D
 

jigngrub

Fleet Admiral
Joined
Mar 19, 2011
Messages
8,155
Re: Starting my 59' Starcraft flooring project!

I just want to make sure i'm understanding.... measeure down fron the top of the boat (gunwale from what i understand) to where i want my floor, mark that same measurement all the way around? Wouldn't that be saying that the gunwale is parallel with the water?

Also, i'm not using ONLY 50' of material. It's just what i've got the money for at this particular time and it will get me started. atleast do the frame around the edges and such and give me something to play around with untill next month. (bills hit pretty hard this month)
Thanks!

Then gunwale and deck are only parallel with the water when the boat is under power and on plane. Look at some of the Starcraft restorations that have the fore to aft stringer design, the stringer is the same height from end to end.

If you try to put the deck in level when the boat is at rest on the water it will look very funny, you won't have very much deck space at all, and it'll be weird and hard to walk on when the boat is under power and on plane. Trust me on this... or try it for yourself and you'll see what I'm talking about.


Check with the scrap yards and recycle centers for your angle, they sell it by the pound there and not by measurement.
 

IndyFish

Seaman
Joined
Feb 20, 2013
Messages
56
Re: Starting my 59' Starcraft flooring project!

I guess i'm not adressing my concern correctly! And once again, I'm a newby so its probably a stupid question. But if the front of the boat is deeper (from gunwale to floor ribs) and the stringer is the same height from front to back, wouldn't that mean that your front measeurment (from gunwale to deck height) will differ from the rear? Thanks for being patient!
 

jigngrub

Fleet Admiral
Joined
Mar 19, 2011
Messages
8,155
Re: Starting my 59' Starcraft flooring project!

Tomorrow get yourself a nice long straight edge, one long and strong enough to sit on top of both of your gunwales and not sag. Then measure down in the center of your boat from the bottom of the straight edge to the hull at the keel, depending on how straight up and down you hold the tape (plumb) you should come up with the same number until you get close to the bow and then the measurements will start getting shorter.

The bow or front of the boat looking deeper is an optical illusion.
 

IndyFish

Seaman
Joined
Feb 20, 2013
Messages
56
Re: Starting my 59' Starcraft flooring project!

Tomorrow get yourself a nice long straight edge, one long and strong enough to sit on top of both of your gunwales and not sag. Then measure down in the center of your boat from the bottom of the straight edge to the hull at the keel, depending on how straight up and down you hold the tape (plumb) you should come up with the same number until you get close to the bow and then the measurements will start getting shorter.

The bow or front of the boat looking deeper is an optical illusion.

This is what I'm not undertsanding! (I'm not trying to argue with a boat wiz, because I'll lose every time) But I do have carpenter in my blood! One is taken in the back, and other near the front. If I set the floor from the gunwales down it won't even be close to touching my stringer in the front?! Did the bow ectomy effectthis? Looking at everyones pictures it seems that my floor is going to run where ever the stringer lets me do it (6" up from the center and bottom of the ribs). ??

heading to the scrap yard! wish me luck

P1011299-75.jpg
P1011300-75.jpg
 

Woodonglass

Supreme Mariner
Joined
Dec 29, 2009
Messages
25,929
Re: Starting my 59' Starcraft flooring project!

Boat Wiz????? There are a few PRO's here on the forum but most of us are just like you, Learning everyday as we go!!!! The deck is supposed to rest on the stringers. The engineers that designed your boat had lots of reasons for doing it the way they did. IMHO you should build it back EXACTLY the way she was designed. I REALLY think you are OverThinking this aspect. Follow the "Map" that was there before.
 

jigngrub

Fleet Admiral
Joined
Mar 19, 2011
Messages
8,155
Re: Starting my 59' Starcraft flooring project!

I think that's because of your modified V hull. Take a measurement at every rib space and see if the dimension gradually increases, or it it just start increasing when the hull starts to V at the keel.

Here's the framing plan I drew up:
59starcraftpaint1_zps4ec524a5.jpg

I suggest using 1/16" thick angle for the pieces in red and orange, they'll need to bend a little and will conform to your hull easier. The pieces in green and black can either be 1/8" or 1/16".
59starcraftpaint2_zpsfc95e141.png

I suggest using 3/16" diameter closed end blind rivets for fasteners, the closed end rivets are much stronger than the open end rivets.
 

IndyFish

Seaman
Joined
Feb 20, 2013
Messages
56
Re: Starting my 59' Starcraft flooring project!

Thanks for the help! Found some sticks of 1 1/2 x 1/8th angle at the scrap yard. not enough, but it will be a good start! They actualy kicked me out because they were closing... anyhow I just got in from mocking it up a little and agree that 1/8 doesn't NOT BEND.... i will need to bend the angle to either more or less than 90 degrees.....because the ribs are not perpendicular to the imaginary deck. mine is like this \___/ not this |____|... the aluminum angle will end up pointing upwards because of this running down the sides.... any suggestions other than getting the recommended 1/8'' and bending the angle so it will accept the deck? (plus flexing around the bow will be much easier)

correction! 1/8 does NOT bend. two don'ts make a do? when you've had enough beer it does?nt..? anyways, it's impossible to re shape the 1/8 angle with vise, pliers, large crescent wrench, teeth, etc. The wife was entertained. I'm sure theres an embarrasing video thats about to hit facebook.
 

jigngrub

Fleet Admiral
Joined
Mar 19, 2011
Messages
8,155
Re: Starting my 59' Starcraft flooring project!

As mentioned above, I'd use the 1/8" for the decking "nailers" and supports and get some 1/16" for the decking perimeter and the lay downs.

... but if you can't do that, how long are the sticks of 1/8" that you got? If they're long enough, they will bend for the decking perimeter (but you might have to cuss them a little). As for using the 1/8" for the lay downs, it'll be fine. Your support/braces wont be plumb and will be cocked over at an angle, but that'll be ok too. They'll look something like this:
59starcraftpaint3_zps2b595422.png
 

IndyFish

Seaman
Joined
Feb 20, 2013
Messages
56
Re: Starting my 59' Starcraft flooring project!

sorry ment the "side runners" running down either side of the boat where the edge of the deck will connect to the haul. Those are the ones that need to be seriously altered to get my 90 degree angle for the deck (and the "cross braces") I'll take a pic of what i'm talking about.

I will defintely get the 1/16 angle, might have to buy some new, which will suck on the wallet. I just saw the 1/8" so i grabbed it before they kicked me out. They are all about 8' sticks (6of em i believe). I know its not really the optimal length, but i figured i will need all the short ones for the stringer, and ods and ends pieces anyways.
 

jigngrub

Fleet Admiral
Joined
Mar 19, 2011
Messages
8,155
Re: Starting my 59' Starcraft flooring project!

correction! 1/8 does NOT bend. two don'ts make a do? when you've had enough beer it does?nt..? anyways, it's impossible to re shape the 1/8 angle with vise, pliers, large crescent wrench, teeth, etc. The wife was entertained. I'm sure theres an embarrasing video thats about to hit facebook.

The 1/8" will be... IF it's long enough, but like I said... it's a PITA to worm it around a radius and I weave a large tapestry of profanities whenever I have to do it.

1/16" will be a lot easier to use for the perimeter angle.
 

jigngrub

Fleet Admiral
Joined
Mar 19, 2011
Messages
8,155
Re: Starting my 59' Starcraft flooring project!

Since your sticks are only 8', you can notch the top horizontal leg at each rib and this will enable you to bend it. It won't have to be a big notch, probably just 1/4" at the wide part. You'll probably just have to do this around the bow area.

59starcraftpaint4_zps82a534a8.png
 

IndyFish

Seaman
Joined
Feb 20, 2013
Messages
56
Re: Starting my 59' Starcraft flooring project!

ok here we go. the top finger is pointing to the old bench seat mount, that gives you the idea of the plane the deck is going to be at. the lower finger is showing you the aluminum angle (at an exagerated angle for picture taking) but i think this will show my delema. basically that 90 degrees (aluminum angle) is going to need to be lowered to 75 degrees etc in order for it to work with the deck! these are the angles running the LENGTH of the boat where the deck is going to rest on at the edges, etc.

P1011303-75.jpg
 

IndyFish

Seaman
Joined
Feb 20, 2013
Messages
56
Re: Starting my 59' Starcraft flooring project!

dont worry, i'm also getting more metal! :D
 

IndyFish

Seaman
Joined
Feb 20, 2013
Messages
56
Re: Starting my 59' Starcraft flooring project!

I WILL be able to bend the length of it to match the shape of the boat. I'm a fattie, i'll just bounce on em till they take shape! my main problem is the top edge of the 90 degree aluminum angle is not going to be "flat" (with the deck thats not there yet) so i can't connect anything to it. This is because of the shape of the ribs. lets try it different. shelf brackets. you mount them on a wall, they hold your shelf at 90 degrees. Now, if your wall was slanted at 30 degrees, put your 90 degree bracket on it, you now have a shelf that is useless because it is protruding from the wall at an angle other than 90 degrees. the wall is the shape of my boat, the brackets are the aluminum angle, and the shelf is the deck. hope this helps explain what i'm perceiving as a problem. **says the half drunk man** haha
 

IndyFish

Seaman
Joined
Feb 20, 2013
Messages
56
Re: Starting my 59' Starcraft flooring project!

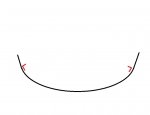
my computer drafting skills are clearly outmatched but, maybe this will help!

example.jpg

Cross section of the boat at the transom. the red are the aluminum angles running down the sides of the boat. as you can see, they are pointed upwards quite a bit! i'm not able to move them up (towards gunwale) if i want the floor to be stable.

I've been scouring the internet for pictures of how these boats came from factory and i don't see them using one of these to begin with. just either a stringer in the center (or in this case two) and tying everything directly to the ribs at the edges (no angle running down the sides where the deck meets boat.)
 

Attachments

  • P1011303-75.jpg
    P1011303-75.jpg
    135.7 KB · Views: 0

jigngrub

Fleet Admiral
Joined
Mar 19, 2011
Messages
8,155
Re: Starting my 59' Starcraft flooring project!

ok here we go. the top finger is pointing to the old bench seat mount, that gives you the idea of the plane the deck is going to be at. the lower finger is showing you the aluminum angle (at an exagerated angle for picture taking) but i think this will show my delema. basically that 90 degrees (aluminum angle) is going to need to be lowered to 75 degrees etc in order for it to work with the deck! these are the angles running the LENGTH of the boat where the deck is going to rest on at the edges, etc.

View attachment 182875

I don't want to sound like a recording, but this is another reason to go with the 1/16" around the deck perimeter... it's much easier to work with and can be bent fairly easily. Just fasten it to the ribs and then step on it to bend it down fattie!:lol:... sorry, I just had to throw that in there.:D
 

Decker83

Commander
Joined
Apr 5, 2011
Messages
2,593
Re: Starting my 59' Starcraft flooring project!

You could use the 1/8 angle as is.. Find the deck hieght that u want and place the angle were it needs to lign up..
Clamp them in place or temporarily pop rivet them in place.. Use a marking pen and mark on the angle the outside of each rib.
Do this for all the ribs.. Take your angles lose and cut the vertical leg all the way up to the horizontal leg. Make sure that the vertical
leg will clear the rib when you bend down the horizontal leg.. I would not try and bend the angle until you have it all in place and
pop revitted in..When you go to bend the angle down your only bending about a 2 inch bend instead of trying to bend the whole angle.

Bending the bow part will work this way and just as Jig has shown with the notch..
Don't throw away any scrape angle.. You never know what may come up..

Jig has a great layup for the deck..
 
Top