The inevitable 1979 16? DeckCraft restoration!

dOb

Petty Officer 1st Class
Joined
Jun 14, 2010
Messages
244
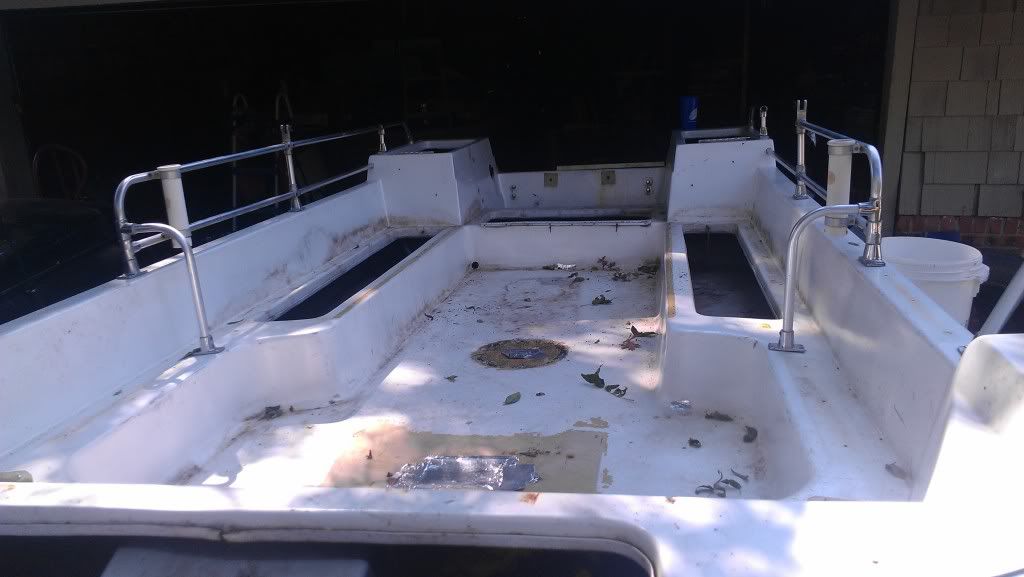
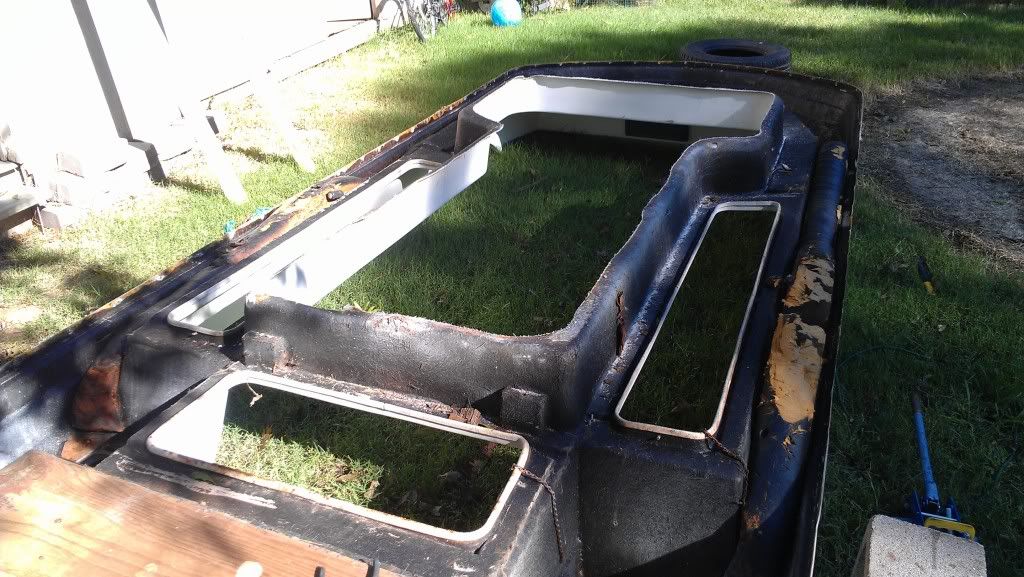
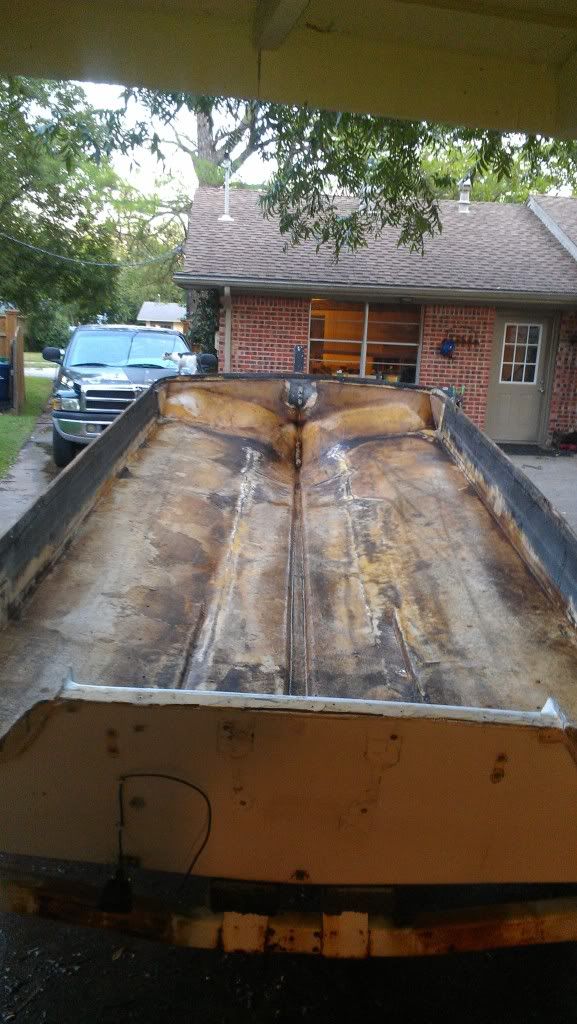
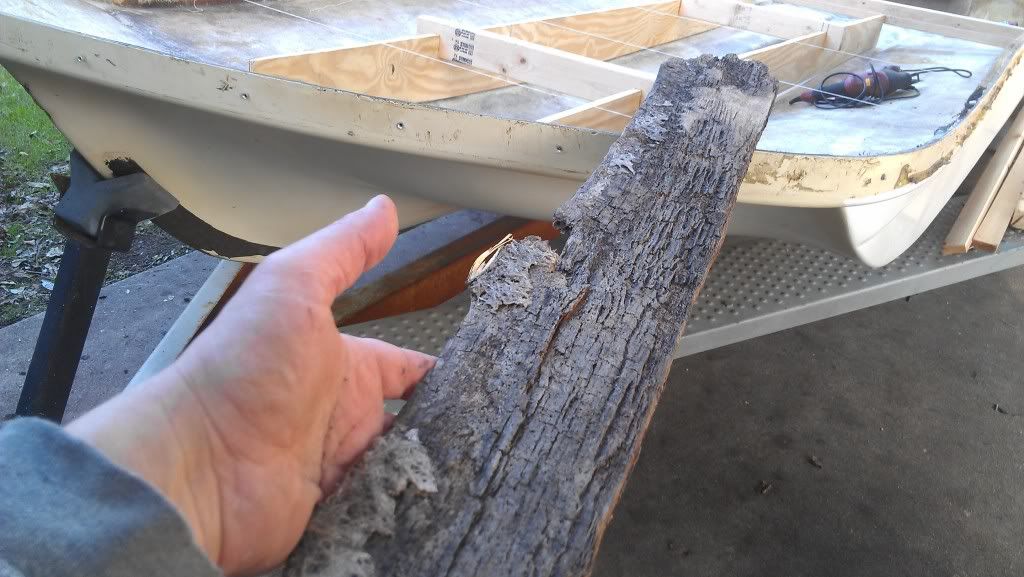
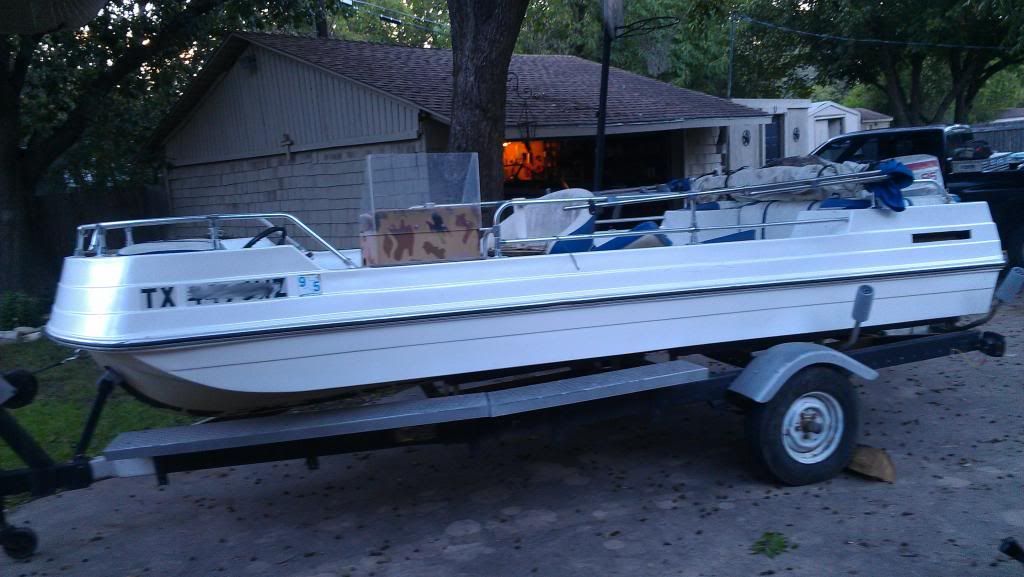
I’m back! I never thought I’d be doing another restoration. But here I am. This past Sunday I brought home a 1979 16’ Deckcraft deck boat. She’s a little rough, but the hull is in good shape, so I’m already one step ahead of my last project.

I just sold my completely restored Tri-hull. I don’t have room for two boats and the funds from the sale will help me get started on this project.

side_zps23be7cf6.jpg


IMAG0104_zpsef932dad.jpg


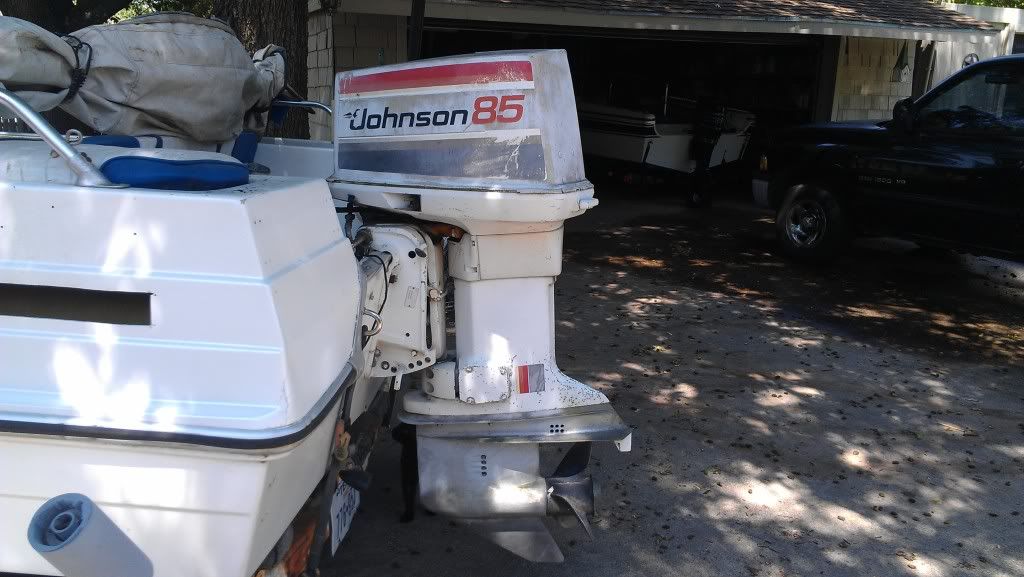
I haven’t had much time to inspect. I did notice that the motor doesn't have clamps. So I don’t think I can hang it on my motor stand like I did the mercury on my last project.

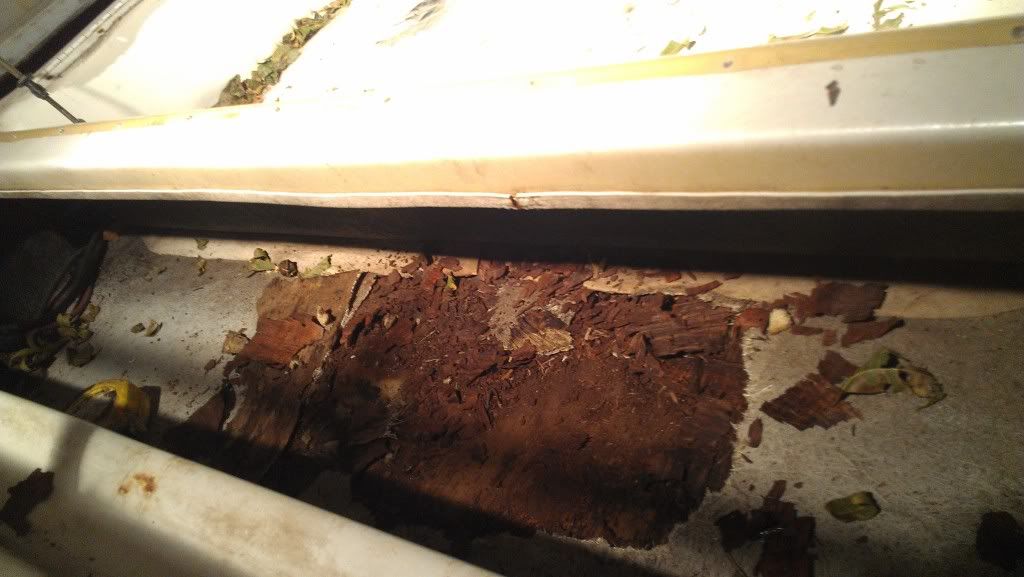
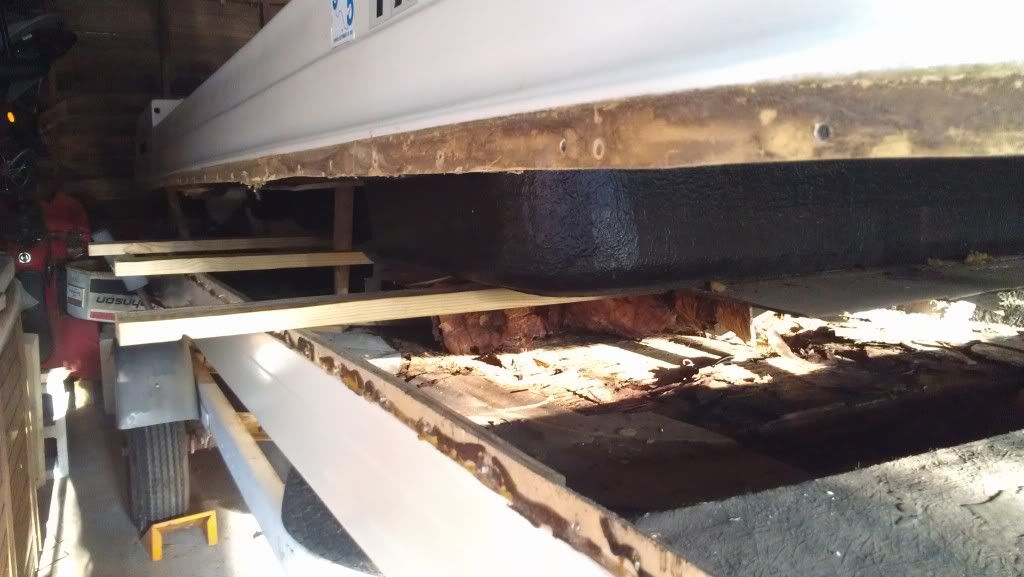
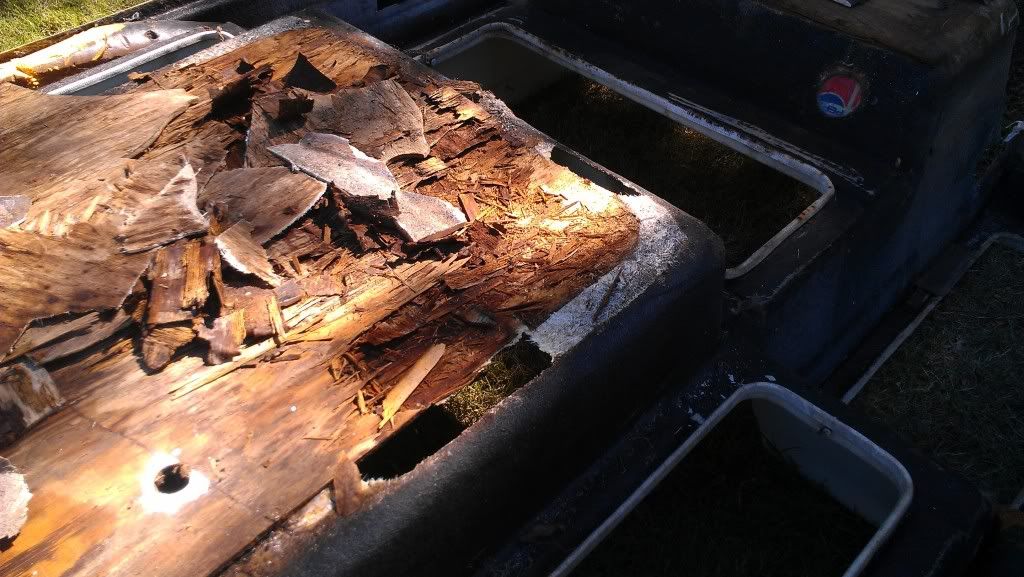
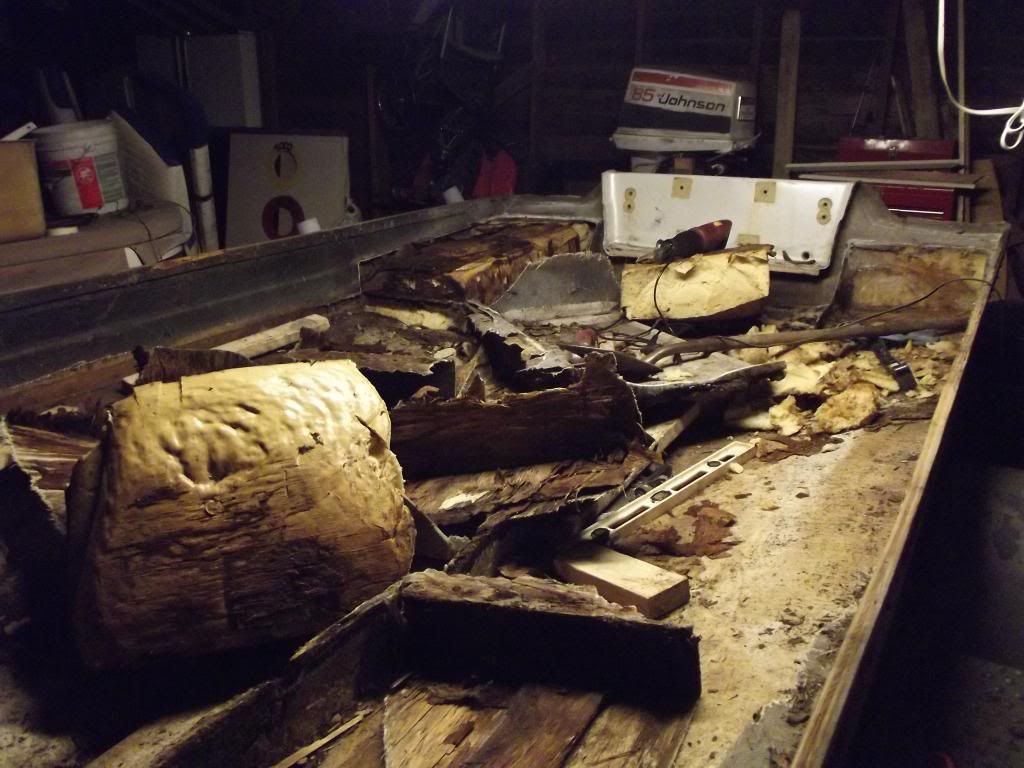
I plan on popping the cap right away to see what’s under there.

With the center console and the Jonson motor, and a few other things, this boat is so different from my last boat that I feel like I’m starting from square one again. Here we go. I’ll keep you posted.
 
Last edited:

Woodonglass

Supreme Mariner
Joined
Dec 29, 2009
Messages
25,929
Re: The inevitable 1979 16? DeckCraft restoration!

Sure you can hang that motor on your stand. Might need a bit of modification but clamps aren't required. Some Wedges will make it work just fine.

Good Luck on the new Project!!:D
 

dOb

Petty Officer 1st Class
Joined
Jun 14, 2010
Messages
244
Re: The inevitable 1979 16? DeckCraft restoration!

I did manage to hang the motor on the stand that I built for my last motor. This Johnson has small claws that grab the top of the stand. I strapped it down with a heavy duty ratchet strap for safety.
I drilled a couple of prospecting holes in the deck and discovered that the stringers are indeed trashed. I removed the rub rail and started to separate the cap. But there are a couple of things that I will need to take care of first.
The cap and the deck are one piece. Like a molded bath tub. The deck area has been glued down to the “sub” deck.

IMAG0133_zpsdba3c201.jpg


The sub deck is actually just a layer of veneer on top of foam that has been sprayed with fiberglass. It’s very brittle.

IMAG0150_zps310bd704.jpg


I don’t want to cut through the molded fiberglass if I don’t have to. I can access the sub deck through the seat boxes. The plan at this point is to cut the veneer all the way around the deck area, and hope that I can rip it up from the foam.

The other thing is the transom. The back wall of the splash well is glued or glassed to the transom. To get the cap off, I will need to cut the splash well off. The good news is that the stringers stop a couple of feet from the transom, and so far the transom seems solid. I’ve removed the tow hooks, drain tube, and motor mounts and so far all of the wood looks clean and dry. I may have dodged a bullet there. We’ll see. When I get the cap off I can get a better look and drill a couple of samples.
 
Last edited:

dOb

Petty Officer 1st Class
Joined
Jun 14, 2010
Messages
244
Re: The inevitable 1979 16? DeckCraft restoration!

Over the last week or so I managed to remove the cap. First I removed the rubber from the rub rail, and then drilled out the rivets. After I removed the aluminum rail, I started to pry the cap open. It had been glued down, and glassed together in a couple of places. The glass was thin enough to cut through with a multipurpose tool. With the use of a car jack and some 2 x 4's I was able to separate the cap from the bottom. Then I used ropes and pulleys to lift the cap while I rolled the boat away.

IMAG0156_zpsb9c6302c.jpg


I moved the cap into the yard upside down so I can work on the damaged wood.

IMAG0166_zpsb690c140.jpg


While I was tearing the old wood and glue, I was also tearing the old glass.

IMAG0169_zps64861c30.jpg


I had planned on writing in to see if anyone had an opinion about I should do. But it was getting late so I just decided to cut out the deck. I can just build up the sub deck and glass it over to make a new deck. It wasn't in great shape anyway.

IMAG0191_zpsb0760d67.jpg


Then I removed all of the old veneer and glass from the sub deck. And you?ll never guess what I found?.?..WET FOAM! I couldn't believe it. Actually I could. I kind of expected it. So last night I took some pictures, did some measuring and removed most of the foam. Next chance I get I?ll clean out the hull and start grinding out the old glass.

Today it?s a trip to the dump.
 

jigngrub

Fleet Admiral
Joined
Mar 19, 2011
Messages
8,155
Re: The inevitable 1979 16? DeckCraft restoration!

Sounds like you've got a good handle on what needs to be done, this will be interesting to watch.


How much was someone willing to pay for a 40 yr. old restored tri-hull if you don't mind me asking?
 

dOb

Petty Officer 1st Class
Joined
Jun 14, 2010
Messages
244
Re: The inevitable 1979 16? DeckCraft restoration!

Thanks. I don't mind you asking. But to be fair to the buyer I probably shouldn't give out any numbers. You can probably figure what an average restoration costs. I made back about 2/3 of my investment give or take. I was happy with that. They have a solid boat and I have a budget for my next project. I'm hoping that what I learned on the last project will help me keep the costs down on this one. We'll see.
 

dOb

Petty Officer 1st Class
Joined
Jun 14, 2010
Messages
244
Re: The inevitable 1979 16? DeckCraft restoration!

I gutted the boat last week and ground down the old fiberglass. Not much to report yet. Here are a couple of pictures of old foam and a cleaned out hull.

IMAG0183_zps5a4d61df.jpg


DSCF0046_zpsee5d5643-1.jpg


IMAG0212_zpsceabf0ee.jpg


I still need to wash some dirt out of the hull. There were a couple of holes in the sub-deck that allowed a lot of junk to get in. I even found a couple of critter nests tucked away.
Good news! It turns out that someone redid the transom at some point. And the glass is pretty thick. I’ve removed the motor mounts and splashwell drain and its all clean dry wood.

I have noticed that with this being my second time around that I’m moving a little faster. Here’s something that I learned from the last time that I can pass on – cut and pry out as much old glass out as you can before you start to grind. I used a sawzall, hand saw and pry bar. I cut as close to the hull as I could. You will still end up with a ton of dust when you grind, but it will save you some time. And when you’re on your knees or bent over in a cloud of dust, that will make a big difference.

Here's my PSA on grinding:
Be sure that you cover yourself from head to toe. And use a good heavy duty respirator. Every now and then, put your palms over the cartridges on your respirator to test the seal. It should totally cut your air flow. If not, then get away from the dust and fix it. Don’t mess around with fiberglass dust.
 
Last edited:

dOb

Petty Officer 1st Class
Joined
Jun 14, 2010
Messages
244
Re: The inevitable 1979 16? DeckCraft restoration!

This boat was designed with a center console. The original design had the conduit run up the outside of the starboard stringer. Then it passes through the stringer as it angles to the console. I had planned on using 3" or 4" PVC. I will only need to seal around the PVC where it passes through the stringer and at each end where the cables exit. I will probably use PL for this. But I was wondering, will fiberglass stick to PVC?
 

jigngrub

Fleet Admiral
Joined
Mar 19, 2011
Messages
8,155
Re: The inevitable 1979 16? DeckCraft restoration!

Looks like you get 'er goin' there dob.

I hate cut stringers and bulkheads and if you're going to penetrate them I strongly suggest using a hole saw instead of a square cut... much stronger.

I'm not sure about polyester resin sticking to PVC, poly doesn't like to stick to a lot of things. I personally would cut the holes and then glass them in or seal them with epoxy resin.
 

jbcurt00

Moderator
Staff member
Joined
Oct 25, 2011
Messages
25,111
Re: The inevitable 1979 16? DeckCraft restoration!

Poly will stick, kind of, to roughened PVC, but probably not stand up to much stress on the bonded joint...

Since it's below deck, epoxy may work slightly better (you won't be concerned w/ gelcoat or poly resin sticking to the epoxy (it won't)) and stand up to some stress better then the poly joint would....
 

dOb

Petty Officer 1st Class
Joined
Jun 14, 2010
Messages
244
Re: The inevitable 1979 16? DeckCraft restoration!

Thanks guys. That's kind of what I thought about the PVC. I'm starting to rethink the design all together. It looks like I can run the tube straight back without having to cut through the stringer. I'll just have find another place for my battery. I can hold the tube in place with some PL until I pour the foam. Once the foam is in, the tube should be solid.
 

jigngrub

Fleet Admiral
Joined
Mar 19, 2011
Messages
8,155
Re: The inevitable 1979 16? DeckCraft restoration!

That conduit will be solid as a rock once the foam gets around it.
 

dOb

Petty Officer 1st Class
Joined
Jun 14, 2010
Messages
244
Re: The inevitable 1979 16? DeckCraft restoration!

Not a lot of progress. Between car repairs and installing a new dishwasher, I haven?t had much boat time. But I?ll keep posting so I don?t get lazy.
I spliced together 10 ft. stingers out of 8 ft. ? inch plywood. I spent a long time getting the rough shape. On my last project, I had enough of the two stringers to get the general contour. On this one, I only had a few feet of rotted wood. There was enough to let me know that the stringers were ? inch.

More good news! I hate to brag, but when I removed the old dishwasher, I found something that I can use ?

IMAG0240_zpsad87be23.jpg


A drain tube for the bilge pump! That?ll save me about $8. I?m practically making money on this build.
 

dOb

Petty Officer 1st Class
Joined
Jun 14, 2010
Messages
244
Re: The inevitable 1979 16? DeckCraft restoration!

You can see from one of the pictures above that the keel is an empty channel that runs the length of the boat and tappers off towards the bilge. I am considering filling the channel with wood and glassing it in before I start on anything else. I've seen it done here many times. But I am wondering if there is a reason (other than time and money) that the manufacturer didn't fill it in. Flexibility? It seems like beefing up the keel would be a good idea.
 

jigngrub

Fleet Admiral
Joined
Mar 19, 2011
Messages
8,155
Re: The inevitable 1979 16? DeckCraft restoration!

A drainage channel is all I can see the empty keel would be good for.

... but if you drain the boat after each use and store it bow up on the trailer, I don't see the need for a drainage channel.

Some boats have a bare keel and others have a stringer in the keel, I don't see where filling the keel would hurt anything.
 

dOb

Petty Officer 1st Class
Joined
Jun 14, 2010
Messages
244
Re: The inevitable 1979 16? DeckCraft restoration!

The original was filled with foam so it wouldn't have helped with drainage. One good thing about filling it with wood is that if I scrape the bottom of the boat on a rock enough to compromise the fiberglass, the wood will be exposed and not the foam. And that would probably be an easier fix. I tend to beach the boat a lot when we're at the lake, so I may seriously consider adding wood to the keel.
 

jigngrub

Fleet Admiral
Joined
Mar 19, 2011
Messages
8,155
Re: The inevitable 1979 16? DeckCraft restoration!

If you beach the boat a lot I'd invest in a keel guard too.
 

Woodonglass

Supreme Mariner
Joined
Dec 29, 2009
Messages
25,929
Re: The inevitable 1979 16? DeckCraft restoration!

If you beach it, then not only would I fill it with would, I'd also but a thick layer of Hairy PB in there as well, and I'd but a layer or maybe two of 1708 on the outside of the keel to kinda make my own Keel Guard so to speak.
 

dOb

Petty Officer 1st Class
Joined
Jun 14, 2010
Messages
244
Re: The inevitable 1979 16? DeckCraft restoration!

I figured I'd bed the wood with resin and fibers, but I hadn't considered adding any fiberglass to the outside of the keel. That's an interesting idea.
 

dOb

Petty Officer 1st Class
Joined
Jun 14, 2010
Messages
244
Re: The inevitable 1979 16? DeckCraft restoration!

I finally managed to get the stringers in shape. On the last go around, I had at least enough of the two stringers to get a rough shape to start with. On this boat, there was nothing that even resembled a stringer so I had to start from scratch.. I ran string at deck level and measured down from there every couple of feet or so to get the basic shape. Then it was a long process of cutting and sanding to get the final shape. In the end the stringer were sitting 1/4 inch below deck level. That 1/4 inch will allow for bedding the stringers.

IMAG0257_zpsaf632bd4.jpg


Here's one of the original stringers

IMAG0258_zps22ad32f3.jpg


I was also able to get a couple of cross members and rails cut. At the end of the day I wet out the cut pieces. It was probably right around 60 degrees and dropping when I started. I mixed the resin a little hot but a couple hours later it still hadn't set up. The sun was on it this morning, and when I went out and checked, the resin in the bucket I used was hard so I guess it finally kicked.
I did the last boat in the summer, and never had any problem with temps. This time I think I'll need to set up a plastic tent with a heater before I use any fiberglass.
 
Top