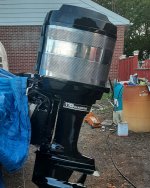
So I went at this old girl that was already in surprisingly good shape for the year and decided I wanted it perfect. I went with Mercury's phantom black enamel paint and that side of it came out perfect. Can't say enough good about this paint being its from a rattle can, it laid out so smooth and mirror finish that it would pass as factory. But then came the cowl wrap. I was just going to give it fresh paint and clean it up. But I got thinking about the fact its aluminum (and I had a spare if it went sideways on me) well I thought why not polish it like some of the early motors. It's not finished in the photo, still have to do some more sanding and polishing but it came out pretty damn nice. Now the big question is how to keep it that way? Being she's an old merc the cover has to come on and off about 20 times a season and it obviously has quite a bit of flex. So I'm thinking most clear coats would just chip off of it. When I've polished aluminum parts on cars in the past they oxidize up pretty damn quick. Now this is on a boat that is always covered and is only trailered out for day trips in fresh water. I'm wondering how quick it will tarnish in those conditions, I'm fine with polishing it out once a season if that's all it takes. So I'm basically looking for input from anyone who has dealt with polished aluminum on a boat and how to keep it nice. And of course don't forget it has to be able to handle all the flex of taking it on and off. And while we're at it if anyone has any suggestions to some cool old mercury decals that would fit nicely in the space on the cover that would be great. I'm more looking at older logos since the black and shades of brown label this motor came with when new is just ugly to me.
And for anyone wondering about the process I used.
1. Aircraft stripper and let it set up for about 15 minutes. This part does basically nothing except make the paint about 10% softer for the next steps, you could easily skip it. I tried about 5 different strippers and nothing touched it.
2. I went at it with a high rpm die grinder and Steele wheel. This will leave you with a very rough pitted looking surface. But it's surprisingly even on the surface finish and this helps out with the next step.
3. I take sandpaper all the way up to 6 or 800 grit and smooth out all the Topps of the ribbed areas and all the smooth ones. This leaves that rough surface in the valleys of the ribbed areas and really makes it pop when you polish it.
4. Finaly I polished it with cutting compound meant for aluminum and a polishing disk on a andle grinder. Just remember how thin and easy to warp the metal is. The polishing puts a lot of heat in it quickly so you have to jump from spot to spot if you don't want to ruin it.
Thanks for any input. And I'm curious if anyone else has had a go at doing this on these old mercs. Seems like such a waste to paint all that shinny aluminum.


