Transom repair

Joined
Jan 16, 2014
Messages
17
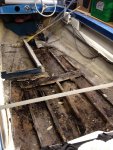
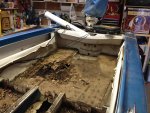
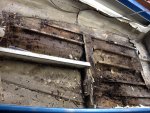
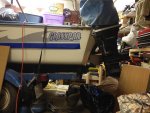
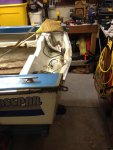
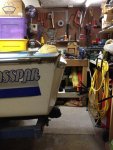
Started the tearout on the 1965 14' glasspar Marathon w/ original 50 hp Mercury over the weekend. Some pics below for reference. New transom and floor here we come. I think I have my plan in order for repair and thought I'd share it to see if I'm missing anything or maybe if there is other ways to achieve the quality finished product easier.

I will be using this poly resin throughout.

http://www.fiberglasssite.com/servlet/the-190/Premium-Polyester-Resin-5g/Detail

It is sold as a un-waxed poly with the hardener at no extra cost. But, you can ask for the wax also and they also send this free of charge to. So I can laminate my transom pieces and such with the un-waxed resin an then finish the fiberglassing by adding the wax to it without having to buy different resin and a ton of extra work and cleaning I am thinking. Does this sound like a good idea? Moving on to the plan.

I'm starting with the transom first. The fiberglass is cracked on the inside but still ok on the outside. Plan is to cut the inside fiberglass panel 3 " in from the edges all the way around and remove the old wood. Leave the outside fiberglass and gelcoat as iis. I will then sand the heck out of it to provide a good clean surface to bond to, clean it well after sanding. It has a slightly curved transom so at this point I may need some input into the best way to approach this. I am thinking I will make my pattern and cut my edges on the bottom and sides to final size and leave a little extra on top to cut away later. Laminate the first piece to the existing fiberglass using un-waxed resin, coating the plywood with a coat of resin and coating the fiberglass with a coat of resin with a wood flour additive or chopped fiberglass.(Any suggestions here as to if this is the proper way to thicken the resin for a more better bond welcome!!! I was thinking the chopped fiberglass for this step) I will try and make some long wood clamps to hold this while it cures but if that doesn't work I was just thinking of running a bunch of screws thru the back and refilling them when finished. I'd prefer the clamps but I'll see what i think will give me my best results. I will be using (2) 1/2" exterior grade pieces of plywood(trying to locate the austral brand, which is what I think people have recommended if not using marine grade) laminated together to make up my most of my thickness up. After the first one is cured enought, I was thinking the same laminating process as before and claming or screwing the second layer of 1/2" plywood. I need 1 1/4" but with the motor I have I don't think it is crucial to be exact. I think as long as I'm within an 1/8" of that I should be ok. with the original layer of fiberglass and gelcoat being an 1/8" and then adding 6 oz cloth on the inside I think I should be close to that 1 1/4" thickness. Before I run the cloth inside I will cut the transom top to the correct dimensions. I was planning on running the cloth up and over the top of the plywood to totally encase it in resin with the wax added to the resin for a finish coating. Is there any things I may be missing or left out or doing wrong?

Also. I am going to use a closed-dell foam for my stringer replacement. Glue them to the clean and prepped hull with PL or 3m 5200 adhesive. To make my fillets I was thinking I'd us poly resin with the wood flour. then run the biax tape on the sides with the unwaxed resin. then run 6oz cloth over the top and down over the top of the biax for extra support with the waxed resin and make sure to completely cover the unwaxed resin to cure to a hard finish. I have heard the chopped is normally used on top but if 1.5 is ok 6oz is better and stronger. Or am I putting in too much stiffness and going to create a hard spot somehow?

Hope this was not too confusing, there is a lot of crap floating in my head right now as I am a rookie at this fiberglass stuff.
Thanks for all the great info everyone gives.Transom Back.jpgFloor looking toward bow.jpgTransom Back.jpgTransom and floor.jpgFloor from side.jpg
 

gm280

Supreme Mariner
Joined
Jun 26, 2011
Messages
14,605
Re: Transom repair

It never seems to surprise me anymore. Everybody that post pictures with wood rot looks like everybody's else pictures. And I thought my rotted wood was unique until I started reading these threads here on iboats. Follow WON's suggestions, he seems to know the steps it takes and give really good advice. One other thing I did see, your arched transom isn't suppose to be arched. That IS part of your problem with the transom wood rot. When you finish rebuilding that area, it should be perfectly straight across not arched... JMHO!
 

jbcurt00

Moderator
Staff member
Joined
Oct 25, 2011
Messages
25,164
Re: Transom repair

You can't get that Merc off that transom soon enough. It looks like it's about to pull free & take the exterior transom skin w/ it.

WOG's graphic & info in that fabrication link are great! Note the large transom clamps he suggests. They will be a great help when you start to put the transom back together.
 

jigngrub

Fleet Admiral
Joined
Mar 19, 2011
Messages
8,155
Re: Transom repair


Not a minute too soon on that transom repair.^^^^

... and gm280 is correct in saying your should fabricate your transom to be straight, that radius was caused by the weak transom and the force or the motor pushing the boat.


For a 1-1/4" transom thickness I strongly suggest 1 piece of 3/4" plywood and one piece of 1/2" bonded together before installation. Then bond the 1-1/4" thick piece to your transom fiberglass peanut butter and fillet it with the PB that squeezes out, then tab and glass the transom in.

The wood flour for thickening the resin isn't really that good of a build, it'll work... but you can make a much stronger peanut butter (home made resin adhesive) with resin, cabosil, and /or milled fiber or 1/4" chopped strand:
Fillers

The milled fiber or chopped strand will break down in the resin giving it a hardness and strength that the wood flour won't.

Closed cell foam for stringers will be expensive because you'll have to use twice the amount of fiberglass and resins that would with ordinary wooden stringers, instead of using 2 layups of 1708 for wooden stringers you'll need to use 4 layups for the foam stringers to acquire the needed strength.

It sounds like you have a fairly good grasp of what needs to happen to restore your boat, you just need a little guidance.
 
Joined
Jan 16, 2014
Messages
17
Re: Transom repair

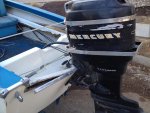
gm 280 I hear you on the rotten stringers and floor. I could actually grab the soaked plywood, and squeeze it like a sponge and just rung water out by the gallons. I realized the motor is pulling it back aways at the top of the transom. As the picture shows it is pulling it a lot, like 4-5". I don't have a very good picture from the side to show you but I can post one when I get home this evening to show it better. If you put a straight edge from corner to corner on the bottom of the hull it curves back about 2" farther in the middle. this is not from the motor. It is from the mold at the factory. I have done a little research on these and i have found this to be correct. Thank you though for the input. Always better to ask and find out problems before they become a real ones.

Woodonglass... Thank you, I have seen these before and could not relocate them. it definately helps with the clamps he posted. I have been back and forth on laminating the wood together before putting it in the boat. Being that it is curved I am affraid it won't be flexible enough to bend with the curve it needs to if I have them laminated together before I put them in and install them in the boat. Is this a potential problem Or am I overthinking this?

Also, I'm curious. Everyone talks about using the Peanut butter for laminating and mounting the stringers. Correct me if I am wrong here. PB is a mixture of epoxy resin and Cab O Sil correct? I am using poly resin for my build so I cannot use this together with the poly going over the epoxy correct? That is the primary reason I am not using the PB in my build. Can I make PB with poly resin by adding the wood flour or shredded fiberglass or is this not the same?

jbcurt00... your right, it's about ready to go. I'm pulling it off this weekend after i get my engine stand built. transoms pretty bad. yep, those transom clamps are gonna kick butt. gonna build about 8 of them I think. can always use them for my carpentry projects after the boat is done and out of my workshop.
 

kcassells

Fleet Admiral
Joined
Oct 16, 2012
Messages
8,738
Re: Transom repair

Lots of fun coming your way! But the results will be all yours. These guys are great! So take head and think it out.
WOG is like opening a book in a library area that no-one visits. All dusty, paper smelling. Then you open that book and the information is infinite, simple to digest and makes you want to keep plucking at it. The best part is electronically or suggestively he keeps sending you int eh right direction.
Alot of guys here are that way too. Don't get discouraged by other flappers, you'll do fine.
"JMHO"....lol, some guy sent me that/uses it regularly after calling me a bottom feeder.
 
Joined
Jan 16, 2014
Messages
17
Re: Transom repair

Jigngrub - i see your point on the foam stringers. I was trying to prevent the dreaded hard spots by using foam I guess. My supply store only carries 1/2' ply so that was why I was going to try and make that work. I will look around harder for a thicker ply that is usable. Sorry I don't have a better view of the transom, but I'm fairly confident in my saying its a curved transom. I will get more pics to post later. I've also done some research on the boat, which there isn't much of, but what I have found is saying its got a slight curve and when you get down next to it at the bottom where the motor isn't pulling out you can see the curve from how it was molded. I found a thread on here of a boat that was similar to mine that had a curved transom. I believe it was a glaspar Citation. It doesn't suprise me either. In my projects I take on, if there is a chance that the typical 99% of repairing it is easy and the other 1% is a terrible pain in the keister. Mine will always be the 1%.
 

jigngrub

Fleet Admiral
Joined
Mar 19, 2011
Messages
8,155
Re: Transom repair

Jigngrub - i see your point on the foam stringers. I was trying to prevent the dreaded hard spots by using foam I guess. My supply store only carries 1/2' ply so that was why I was going to try and make that work. I will look around harder for a thicker ply that is usable. Sorry I don't have a better view of the transom, but I'm fairly confident in my saying its a curved transom. I will get more pics to post later. I've also done some research on the boat, which there isn't much of, but what I have found is saying its got a slight curve and when you get down next to it at the bottom where the motor isn't pulling out you can see the curve from how it was molded. I found a thread on here of a boat that was similar to mine that had a curved transom. I believe it was a glaspar Citation. It doesn't suprise me either. In my projects I take on, if there is a chance that the typical 99% of repairing it is easy and the other 1% is a terrible pain in the keister. Mine will always be the 1%.

A "hard spot" is nothing more than an area large or small on the stringer that sets down hard on the hull with no room between the bottom of the stringer and the hull for adhesive. That spot will sit hard against the hull. Careful trimming and shaping of the stringer before bedding will eliminate any "hard spots".

If your transom does indeed have a radius, it's not a big problem, it'll just take a little more work and planning. You'll need to kerf the back of your transom wood to make it flexible enough to bend to the radius and you'll also need to make a template to hold the shape when it's clamped until the resin mix cures. I can go into this in further detail later if you need me to.
 
Joined
Jan 16, 2014
Messages
17
Re: Transom repair

I had thought about kerfing the plywood at one point already. I think I can handle the template and the kerfing just fine. Am I understanding your initial reply on the poly resin? If I add shredded fiberglass "filler" to my Poly resin that will act similar to the "epoxy" Peanut Butter for mounting the wood to the existing transom?
 

Woodonglass

Supreme Mariner
Joined
Dec 29, 2009
Messages
25,929
Re: Transom repair

If in fact your boat does have a curved transom AND it's only 1 1/4" then the best way to fabricate it is laminating 3 sheets of 3/8" ext grade plywood. You can build some interior bracing to use to make bracing for the multiple laminates so they will conform to the the curve. By the time you use PB to Glue it in and then apply some layers of resin and glass you'll end up with the final 1 1/4" thickness. Fairly easy to do. One of our members, andgott, did one on his boat in a similar but slightly different manner. I'd highly recommend that you use Polyester resin for your entire build. No need for epoxy at all. Your boat is made from poly and poly will be plenty strong to do everything you need to do. I would NOT use wood flour. Better to use Cabosil. Enhances water resistance and very inexpensive. This will help you understand some of the materials you'll be needing...

(Click the pic to download and view the PDF file.)

View attachment MaterialsList.pdf
 
Last edited:

Woodonglass

Supreme Mariner
Joined
Dec 29, 2009
Messages
25,929
Re: Transom repair

Well, actually it doesn't say it's ONLY for Epoxy it says "CAB O SIL Adhesive Filler is a thickening additive, mixed with epoxy resins to create a strong general purpose adhesive with a smooth texture."

Trust me you can use it with Poly Too!!! Heck it's even used in Ketchup and Mustard!!

Is there a reason you're getting your supplies from them. Have you checked out these guys...Fiberglass , Epoxy , Composites, Carbon Fiber - U.S. Composites, Inc. Lots of the guys here on the forum get their supplies. Located in Florida.
 

jbcurt00

Moderator
Staff member
Joined
Oct 25, 2011
Messages
25,164
Re: Transom repair

attachment.php


how wide are these ^^^ stringers?

If the 1/2" ply you can get locally is ACX, Auraco or MDO, laminate 2 strips into a 1" thick stringer...
 

oldboat1

Fleet Admiral
Joined
Apr 3, 2002
Messages
9,612
Re: Transom repair

Whoa. think I would get that motor off even in the snow! The stainless (or aluminum) top trim should indicate if the transom is curved or not (plus what you know about that hull, of course). Once the motor is off and the rest of the trim unscrewed, you should be left with an envelope full of rotted transom wood. The wood remnants need to be dug out by whatever "tools" you have available to fit in there. And once the trim is removed, you should be able to determine the thickness of the plywood needed for the new transom. I'm guessing it's going to be 1 1/2 inches, the thickness of two 3/4 inch wide pieces, sandwiched together. Some use 5200. I like West System epoxy, and drywall screws. When you coat the inside and outside of the new wood transom, the screws will be enclosed in the coating. But the combination of epoxy and mechanical fasteners gives you a transom that will likely outlast the rest of the boat. As to installation in that nice clean fiberglass envelope, after the new transom is cut to fit perfectly, you are left with how to attach the wood to the inside and outside of the glass skin of the hull. Again, I like epoxy and screws. Because the outer skin is misshaped (my assumption), I think you are going to want mechanical fasteners (drywall screws again, in my view). You will need to epoxy and paint the skin on the inside and outside of the transom.

I'm not sure how you came up with the 1 1/4" thickness, but could have good reasons (actual measurement, maybe, or an allowance for adhesive.) The envelope method, if that's what it is, requires careful dry fitting and exact measurements. Another way is to cut out either the back or inside of the transom (continued assumption that your hull has an inner and outer skin back there). I've done it that way too, but have followed the same procedure as with the envelope (i.e., epoxy and screws). I've also pieced the transom into place, using cut pieces of 3/4 inch ply, pre-coated with epoxy and cut to overlap each other. Doing it this way, the pieces are prefit -- but easier to do than with the 1 1/2 thickness. The end product is the same, as everything is epoxied and screwed together.

I'm a hobbyist, but did these fixes with the advice (and periodic followup advice) of a local boatshop. The finished product is a good one -- and will hold that Merc again.
 
Last edited:
Joined
Jan 16, 2014
Messages
17
Re: Transom repair

Update, after making a motor stand and some time cutting more fiberglass out, the motor is off and most of the floor is gutted and ready to get all my stringer measurements before removing them. There was still about 5" of water in the bow under the dash. This boat saw water the last time about 2 years ago so its had plenty of time to rot. I just have a little more floor in front of the transom to cut out. I want to do some measuring of the width of the hull and any other measurements I think I may need before building my cradle to set the boat on before I take all the structure out of it. It looks like I can basically make a pattern from the existing stringers for a starting point. The transom will be my first job to tackle though.

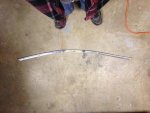
here are some of the pics I took over the weekend to show a better view of my curved transom. After taking the motor off it regained most of the original shape back. It may only be about an inch off now instead of 5". I will of course have to stabilize(support) it before reinstalling the new one. oldboat1 mentioned the transom trim indicating if it was curved or flat. I have included a picture of the trim piece taken from an above view looking straight down. I feel pretty confident in the transom being curved. This is my first boat build though.

Transom 1.jpgTransom 2.jpgTransom 4.jpgTransom trim piece.jpge begins but it is pretty close now
 

Woodonglass

Supreme Mariner
Joined
Dec 29, 2009
Messages
25,929
Re: Transom repair

Yup, I can clearly see the bottom of your stern and it clearly shows the curvature. A lot of Glaspar's have curved Transoms. I'd get an accurate measurement of the thickness at the drain tube, down low and then use the laminating process previously described to re-fabricate the new transom into the boat. You'll have her back to as good or better than new in a few hours of work.
 

oldboat1

Fleet Admiral
Joined
Apr 3, 2002
Messages
9,612
Re: Transom repair

looks like a curve to me too -- no experience on this end with a curved transom repair, unfortunately. Maybe there is enough intact material in there to give you a template. Even a partial template would help in duplicating the shape. going to be a nice looking hull.
 

oldboat1

Fleet Admiral
Joined
Apr 3, 2002
Messages
9,612
Re: Transom repair

well, maybe another point or two -- Like Woononglas says, get the interior thickness at the drain tube, assuming that is intact and hasn't been dislodged. That is going to be important because of the complex curves you may be working with in addition to the distortion. You will need to replace the tube after you get the new filler for the transom installed (drill through existing holes). You will be drilling through existing holes for mounting the motor as well if you are using the same motor. You can use the holes to clamp the new transom in place during assembly too (maybe devise clamps with interior and exterior wood strips cut to match transom shape). Is there wood in there, or did Glaspar use some other material? (I assumed it was wood ply, but maybe not?) But ASSUMING it's wood, an extensive amount of the rot will have come from the top -- the screws holding that strip in place, and if it's unsealed plywood, the top edge is the most likely to become waterlogged, with the moisture leaking and wicking down. So when all is said and done, the top really needs to be well sealed.
 
Joined
Jan 16, 2014
Messages
17
Re: Transom repair

the drain tube is still intact and the wood toward the bottom seems fairly stable still, the top obviously has the worst rot. I think I can get a good template off of it for sure though. After more thought I'm thinking the cradle on the ground is going to be the best choice to put the boat on for the rebuilding project. Woodonglass, I have seen a picture I believe you posted of one of your boats on a cradle, Pic below, It was similar to what i was invisioning. would you have any more pics and information on how you built it? maybe some ideas to keep in mind when building it for proper support. I have a pretty good idea of it I think but asking seems logical at this point. I'm going to try and start building it over the weekend and hope to have it on the cradle by end of the weekend. Maybe have a start on removing the top of the boat. I am planning on building a plastic covered room inside my garage around the boat with a shop vac or some sort of exhaust fan sucking out dust and debris as I am cutting and grinding in hopes of reducing the amount of dust inside the house. Any better idea's out there?

One question when I get to fiberglassing. is there a way to heat my garage safely while using a poly resin or do I just need to wait to spring and the weather warms up?
 
Top