1966 Starcraft Holiday Engine Repower

Watermann

Starmada Splash of the Year 2014
Joined
Jan 12, 2013
Messages
13,822
Other than mother nature spitting on you it sounds like things are going your way :thumb:

There should be no problem with putting a few small drain holes in that Z for water to drain out but once everything is set in place to include the transom cover there's no way for water to reach it unless you have a leak in the transom.
 

66Holiday924

Chief Petty Officer
Joined
Aug 21, 2017
Messages
586
I was thinking the same thing. It should be dry, but if water does start making it's way in somewhere, it'll be good to have a way for it to drain. It's more likely water will find it's way there while cleaning the inside of the boat or something... I don't think it' hurts anything to drill a hole for it to drain either, might as well.
 

66Holiday924

Chief Petty Officer
Joined
Aug 21, 2017
Messages
586
Day 14:

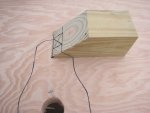
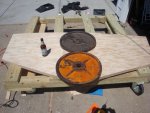
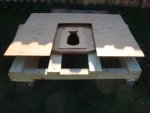
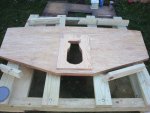
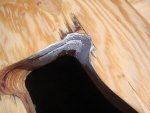
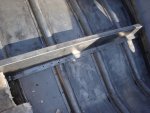
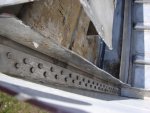
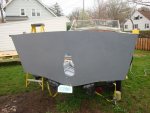
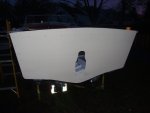
Today I cut out the keyhole in my transom and made my horse collar. Originally I was going to laminate the horse collar and then cut it all together, but I couldn't find a hole saw with a deep enough well to do the 45 degree steering cutout, and I absolutely was set on using a hole saw. I used a 4x4 to get the hole saw started on the right angle. It went pretty good. My steering cutout ended up a little higher up on the bowling pin than it was on the original. :censored:. I'm thinking some material might have to be filed away later when they run the steering through it, but it shouldn't be a big deal. The keyhole cutouts didn't match up perfect, but I screwed them together, sanded it, and they seem like they were cut as one now.

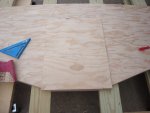
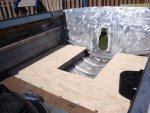
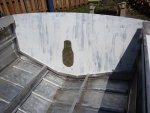
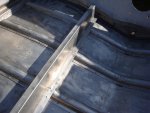
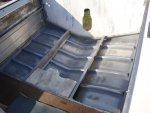
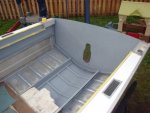
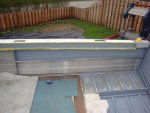
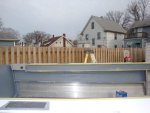
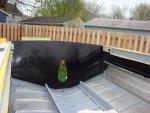
I dry fit the transom and I'm really pleased with that. In the picture I don't have the transom 100% seated but I can tell it is going to be perfect when it is. Being happy with the dry fit I went ahead and laminated the horse collar to the transom and stole one of the Admiral's beers to do my victory dance. :very_drunk:

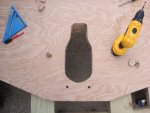
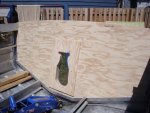
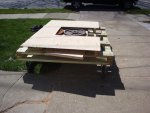
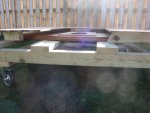
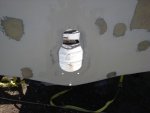
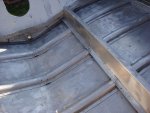
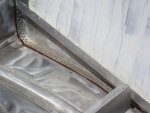
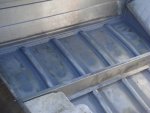
I dry fit my flooring, that fit perfect and I drilled that hole in my Z-Bar. I was watching the water pour through it when I was cleaning up the boat and I was thinking that was a good move.

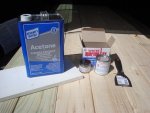
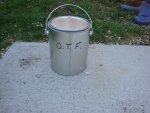
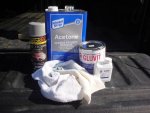
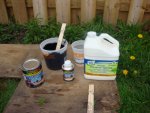
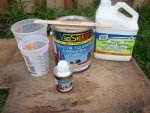
Starting tomorrow I will be treating my transom and flooring wood with the O.T.F. It's a little tricky for me. I have a one car garage, that half of it I work out of and the other half is filled with my daughter's toys. So I converted my furniture cart to a portable drying rack. We'll see how this goes... I treat the wood on the rack, wheel it out when the garage is being used or leave it in the garage when it's not being used.
 

Attachments

  • photo289367.jpg
    photo289367.jpg
    80.1 KB · Views: 5
  • photo289368.jpg
    photo289368.jpg
    86.9 KB · Views: 4
  • photo289369.jpg
    photo289369.jpg
    88.4 KB · Views: 4
  • photo289370.jpg
    photo289370.jpg
    119.5 KB · Views: 17
  • photo289371.jpg
    photo289371.jpg
    130 KB · Views: 3
  • photo289372.jpg
    photo289372.jpg
    113 KB · Views: 4
  • photo289373.jpg
    photo289373.jpg
    135.9 KB · Views: 4
  • photo289374.jpg
    photo289374.jpg
    115 KB · Views: 4

66Holiday924

Chief Petty Officer
Joined
Aug 21, 2017
Messages
586
Day 15:

Pretty nice afternoon for working on the boat. I'm glad I waited for warmer weather to do this work. It's nice weather to work in and I think the chemicals I'm using are setting up nice.

Today I mixed up some Old Timer's Formula and treated my transom and floor wood, once in the morning and once at night. My furniture cart is working fine so far. I pull it out, toss the floor wood to the side, treat the transom wood, lay the flooring across the 2x4's on the rack and treat it. The wood seems to be sucking this OTF right up. At the end of the day, after I treat the wood, I push the cart back into my tiny garage...

I washed the transom aluminum thoroughly with acetone and then treated it with Marine Tex. I addressed the inboard side and some areas around the keyhole on the outboard side. The Marine Tex should fill and repair the damaged aluminum but it also feels like it creates a really good preventative barrier.

The only thing that I wasn't happy about with yesterday's work was when I was playing with my hole saw trying to smooth out my 45 cuts in the main transom wood, and the drill walked on me, gouging my transom around the keyhole. It resulted in avoid when I laminated the horse collar on. So, today when I had the Marine Tex out I stuffed some of that in the void. It should work good. It's cosmetic more than anything and according to the instructions Marine Tex can be used on wood too.
 

Attachments

  • DSC04468.JPG
    DSC04468.JPG
    64.2 KB · Views: 2
  • DSC04465.JPG
    DSC04465.JPG
    155.7 KB · Views: 3
  • DSC04466.JPG
    DSC04466.JPG
    152.4 KB · Views: 2
  • DSC04470.JPG
    DSC04470.JPG
    99.6 KB · Views: 1
  • DSC04467.JPG
    DSC04467.JPG
    118 KB · Views: 2
  • DSC04469.JPG
    DSC04469.JPG
    114 KB · Views: 2
  • DSC04474.JPG
    DSC04474.JPG
    159.1 KB · Views: 2
  • DSC04473.JPG
    DSC04473.JPG
    105 KB · Views: 2
  • DSC04472.JPG
    DSC04472.JPG
    64.2 KB · Views: 2
  • DSC04471.JPG
    DSC04471.JPG
    110.2 KB · Views: 2

66Holiday924

Chief Petty Officer
Joined
Aug 21, 2017
Messages
586
Lay some CSM in the transom there. Be better than new. The turning radius spot.

Thanks, I already filled it in with the Marine Tex though. Marine tex is very strong stuff. It is structural. They advertise it, strong as steel. It repairs integrity. It's a cosmetic fix anyway. It has no affect on the piece. It just bothered me.
 

Attachments

  • photo289433.jpg
    photo289433.jpg
    105 KB · Views: 0

Watermann

Starmada Splash of the Year 2014
Joined
Jan 12, 2013
Messages
13,822
Did you cut the top of the transom at the 15 degree angle? Just making sure since I can't tell from the pics.

fetch
 

chevymaher

Commander
Joined
Mar 29, 2017
Messages
2,934
Thanks, I already filled it in with the Marine Tex though. Marine tex is very strong stuff. It is structural. They advertise it, strong as steel. It repairs integrity. It's a cosmetic fix anyway. It has no affect on the piece. It just bothered me.

LOL I know that feeling. Stuff nobody will ever see buried under the deck will eat at me. And it isnt even a safety structural issue. It is just the fact it wasnt perfect.
 

66Holiday924

Chief Petty Officer
Joined
Aug 21, 2017
Messages
586
Did you cut the top of the transom at the 15 degree angle? Just making sure since I can't tell from the pics.

[IMG2=JSON]{"data-align":"none","data-size":"full","src":"https:\/\/forums.iboats.com\/filedata\/fetch?photoid=10564822"**[/IMG2]

Yes I did. I got that it was 20 degrees though. It seems like it's going to be perfect when It's all the way seated.
 

Watermann

Starmada Splash of the Year 2014
Joined
Jan 12, 2013
Messages
13,822
Yeah it's 15 but better more than less as you'd have to cut it again to get the transom cover to sit down flush.
 

66Holiday924

Chief Petty Officer
Joined
Aug 21, 2017
Messages
586
Day 16:

Today I did two more treatments on my transom & floor wood, 4 coats now. Then I addressed the rivets. I'm realy liking my rivet guns. The head on the DeWalt swivels, so it's easy to get into tight spots.

I replaced the rivets holding my stringers to the ribs. Every one of those rivets was loose. I replace them with 3/16" aluminum rivet & mandrel. Then I treated all of the exposed rivets with Gluvit. I have to say I am thoroughly impressed with that product. You can just tell it's going to do what it is advertised. It was a damn shame to waste half of it but It treated the hell out of what was exposed. It was starting to pool in places. I've been happy with all of these products that are new to me, the Gluvit is no different.

After the Gluvit set-up I painted the rivets & seams that I treated with the Van Sickle SE Primer. I did that because this isn't a total rebuild but I'm sure a more extensive floor project is coming within a few years, when I do that I will be able to see clear as day exactly which rivets were already addressed. I ended up painting the Gluvit with the paint that I was nervous about using on it. :laugh:. Just the difference between reading about it and doing. You can tell that paint isn't going to do anything to that Gluvit after you've handled it.
 

Attachments

  • photo289488.jpg
    photo289488.jpg
    111.1 KB · Views: 3
  • photo289489.jpg
    photo289489.jpg
    101.7 KB · Views: 4
  • photo289490.jpg
    photo289490.jpg
    143.4 KB · Views: 3
  • photo289491.jpg
    photo289491.jpg
    101 KB · Views: 3
  • photo289492.jpg
    photo289492.jpg
    113.7 KB · Views: 3
  • photo289493.jpg
    photo289493.jpg
    94.2 KB · Views: 3
  • photo289494.jpg
    photo289494.jpg
    98.3 KB · Views: 5
  • photo289495.jpg
    photo289495.jpg
    92.7 KB · Views: 4
  • photo289496.jpg
    photo289496.jpg
    92 KB · Views: 3
  • photo289497.jpg
    photo289497.jpg
    96.3 KB · Views: 5
  • photo289498.jpg
    photo289498.jpg
    86.8 KB · Views: 3

66Holiday924

Chief Petty Officer
Joined
Aug 21, 2017
Messages
586
Day 17:

Not much of a day, I spent a couple hours sanding down the Marine Tex putty and I put two more coats of the OTF on my floor and transom wood, that's 6 coats. I'm going to do one more coat and then varnish. Then I have to do the other sides.

I have to say that Marine Tex is great stuff. It is very solid. There's a few places where it "gunked" up on the edges of the aluminum skin, where there isn't much area to adhere too and it is so solid that it is like an extension of the aluminum. I accidentally plugged a few of the little trim holes with it and it filled them right in. When I re-drilled them it was like drilling into a fiberglass shell or something. I'm very happy with the Marine Tex.

It's raining this morning and it's supposed to rain on and off all day. So other than treating my wood, I hope to get some more sanding done on the aluminum skin.
 

66Holiday924

Chief Petty Officer
Joined
Aug 21, 2017
Messages
586
Day 18:

Today was the day I've been waiting for to paint my boat. I cleaned everything with acetone. I painted both sides of the transom skin, the bilge, two side compartments, and the trim piece running parallel to the side compartments (they were baby blue). I used all Van Sickle products. First I primed with the self-etching primer. Then I mixed up some gloss black with hardener & reducer and brushed it on the inside of the transom skin and the side compartment. I figure it will serve as a good protective barrier/buffer between the transom wood and aluminum skin. Then I mixed up the white with the hardener & reducer, and painted the trim, bilge and the outboard side of the transom. It came out good for rolling and tipping but this is not the final product. I will paint the top coat of the white when I get my boat back with the new engine installed.

I have to say this Van Sickle Paint is great. it's nice, thick, and sticky. It does not seem like it is going to peel. I added the catalyst and reducer into the paint as per instructions on the can.
 

Attachments

  • photo289822.jpg
    photo289822.jpg
    109.9 KB · Views: 4
  • photo289823.jpg
    photo289823.jpg
    112.7 KB · Views: 3
  • photo289824.jpg
    photo289824.jpg
    95.1 KB · Views: 3
  • photo289825.jpg
    photo289825.jpg
    125.5 KB · Views: 3
  • photo289826.jpg
    photo289826.jpg
    127.1 KB · Views: 3
  • photo289827.jpg
    photo289827.jpg
    119.2 KB · Views: 3
  • photo289828.jpg
    photo289828.jpg
    140.5 KB · Views: 3
  • photo289829.jpg
    photo289829.jpg
    65.4 KB · Views: 3

Watermann

Starmada Splash of the Year 2014
Joined
Jan 12, 2013
Messages
13,822
I love the smell of that VanSickle paint, no other paint smells like it. Looking good, and yeah with proper prep work it's tough as nails and won't come off easily once cured.
 

66Holiday924

Chief Petty Officer
Joined
Aug 21, 2017
Messages
586
Day 19:

Yesterday I finished treating my transom wood with the Old Timer's Formula. I did 7 coats, each side, on the floor and the transom. I used one gallon exactly. This morning I started in on Polyurethane. I'll do two coats of the poly on each side and then move on to painting. Additionally I put the boat back into storage. It'll probably be a couple weeks before I do my next round of intensive work on it and that will be installation. I'm pretty pleased with what I did to it during this round. The paint job isn't the best, but as I said before I am going to put the finish coat on later, after the engine is installed.

It seems like half of the people on here end up getting a new tow vehicle. I don't know why I thought I should be any different, so, it was unplanned but new tow vehicle for me too!
 

Attachments

  • photo290032.jpg
    photo290032.jpg
    142.3 KB · Views: 2
  • photo290033.jpg
    photo290033.jpg
    167.3 KB · Views: 2
  • photo290034.jpg
    photo290034.jpg
    119.8 KB · Views: 2

66Holiday924

Chief Petty Officer
Joined
Aug 21, 2017
Messages
586
I'm originally from Toledo (little Detroit). We are built on the American auto industry here. My dad retired from Jeep, started at the plant where they built the original Wrangler's for WWII, manually hanging tires one every two minutes or something. My mom is retired from Chevy. The American auto industry supports more than half my friends and family. I'll never drive a foreign vehicle, regardless of quality, some things are more important. And yes I'm brainwashed and I know it! :lol:!

My transom had the handles on it where the stern eyes are on yours Watermann . It's about the only difference I can see between our transoms. I'm going to mount the sterneyes, and I'm going to add a swim platform later. I like using the tow eyes with a bridle vs a ski hook in the center, but I have to make sure my stern eyes are high enough to clear the swim platform later when I'm pulling skiers
.
 

Watermann

Starmada Splash of the Year 2014
Joined
Jan 12, 2013
Messages
13,822
God bless the US auto industry! My driveway and garage looks like a GM used car lot. :lol:

Chevy Avalanche
Chevy Silverado
Buick Lucerne
Work vehicle Chevy Tahoe
 
Top