Thanks a lot for all the good info and support guys!!
A lot to reply to so I'll try to do it all in one post lol.
So I got a 90* carpenters square and I measured the block in every single way possible. Sideways, vertically, left, right, across, etc. 0.06mm was the lowest that would not go under the carpenters square. I think I'm in spec? I also tried to "force" it in between the block and the carpetner square and it would still not go through(Unfortunately I wasn't able to take pictures I needed 2 hands)
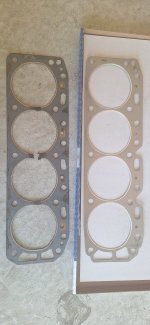
For the gasket sealant, I honestly ordered a bottle of Permatex 80019 JUST in case IF I need to use it. I'm not sure if it's any good but will check if MANHLE requires any sealant on their gaskets.(I'm sure I won't need it)
Permatex 80019 Aviation Form-A-Gasket No. 3 Sealant, 4 oz. : Amazon.ca: Automotive
www.amazon.ca
Also, as for the head. I took it to a machine shop today. They'll clean it up, pressure test it, check the valves, check for cracks, recurface it all in one. To me the valves looked pretty good, but you never know.
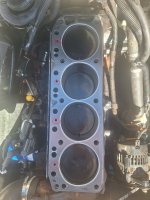
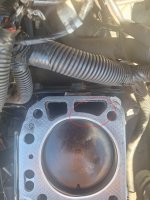
And lastly, I was checking over my blown headgasket, and I remember someone saying in this thread that blowing a headgasket could be from timing issue. So I was inspecting it and I saw that in between cylinder 1 and 2 it was getting ready to punch another hole through the gasket. So maybe I was wrong about the engine being over heated? Maybe it was due to incorrect timing?
Oh and also, lets say my block is warped just a little. Than how would I sand it down?
Does anyone know if the head bolts are torque to yeild? Or are they reusable(DON'T STRETCH), because I read a lot online and different people have different opinions. Just want to do things right the first time.
View attachment 411681View attachment 411682


") That sucker is really blown.
That sucker is really blown.