1957 35hp Evinrude Lark Help

Squirrel42

Petty Officer 2nd Class
Joined
Mar 23, 2016
Messages
109
No Title

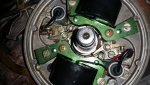
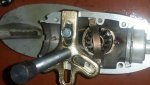
So i finally pulled the flywheel after discovering i was getting no spark at all.. looks like I do need to clean up and replace some ignition stuff. Dreaded!

Anyone know the correct Kit number for replacing the points, mounts and condensers? I cant seem to find one for my year

1957 25532 35hp Evinrude lark

I could not adjust one of the points, it just would not space. This leads me to believe it needs to be replaced correct?
Coils look great, should I replace them anyway?
 

Attachments

  • photo240745.jpg
    photo240745.jpg
    269.8 KB · Views: 0

racerone

Supreme Mariner
Joined
Dec 28, 2013
Messages
38,471
????----The coils appear to be good replacements...........My guess here is that there is no need to spend any money on this magneto.-----Someone has done that for you.---------Please take the time to learn more about this simple magneto and how to maintain it.----If you are adjusting the points using the cam screw there is absolutely no reason for you to not be able to get a 0.020" gap.------Stop , research this magneto.
 

Squirrel42

Petty Officer 2nd Class
Joined
Mar 23, 2016
Messages
109
Ok ok.. I think i figured out how to gap it. Only one screw needs to be tightended correct? if I tightien the adjuster screw it pushed the points back together. do i leave it a little lose and tighten other screw to hold gap?

Whats the best way of cleaning points, they had a little black on them. I sanded them to clean the tarnish off. Is that safe?
Scared leaving theat adjuster bolt loose, but it appears thats how it works.
 

racerone

Supreme Mariner
Joined
Dec 28, 2013
Messages
38,471
No------You tighten the screw that holds the points.-------Then use the cam screw to set the gap.-------Yes it will adjust with that screw tight.-----------But make sure the cam screw is not screwed all the way in tight !!----------The cam screw is used to open or close the gap.----------These magnetose were installed from 1950 to the late 1980's so they are very good and very simple if you learn to understand them.
 

Squirrel42

Petty Officer 2nd Class
Joined
Mar 23, 2016
Messages
109
I got it now, well i think, thank you for the advice. Sometimes you just need someone to tell you that you can do it and stop being a lil b****.
I wont have the feeler gauge until tomorrow, so i cant set gap, but i wanted to learn how before hand.

1. First I turn it to "WOT"
2. Turn cam until the word "top" is in front of the breaker arm rubbing block
3. Set gap to .020 and re tighten anchor screw

Anything else before I test spark?

Should i use a spark tester or just a spark plug grounded to engine?
 
Last edited:

racerone

Supreme Mariner
Joined
Dec 28, 2013
Messages
38,471
Throttle setting does not matter !-----Use a spark tester and not the plugs on the block.----You tighten the anchor screw before you adjust the gap !
 

oldboat1

Fleet Admiral
Joined
Apr 3, 2002
Messages
9,612
While still in the testing phase -- know you could use the pressure tank from the '56 5 1/2, right? Can test run the Lark when up to that point, then decide what you want to do about a fuel pump conversion. Get it running well first (same with the '56, for that matter). JMO.
 

HighTrim

Supreme Mariner
Joined
Jun 21, 2007
Messages
10,486
To dress the points, you can put a piece of emory wrapped around a hack saw blade, and run that through to polish. Or a points file. They blow with compressed air. Then dip paper stock, or a business card, in acetone, and run that through to clean off. Then blow again with compressed air. Sometimes if pitted, I pull them, and polish them on my wire wheel on the bench grinder, to get a real good shine, the install and clean with the acetone. As stated, keep the lock down screw tight, don't need to loosen it to adjust them. TOP simply means the way the cam goes. Not necessarily the widest point of the cam. Align the rubbing block with the widest point. That may be at TOP, but verify that. Usually at the flywheel keyway.
 

lindy46

Captain
Joined
Nov 27, 2008
Messages
3,886
I got it now, well i think, thank you for the advice. Sometimes you just need someone to tell you that you can do it and stop being a lil b****.
I wont have the feeler gauge until tomorrow, so i cant set gap, but i wanted to learn how before hand.

1. First I turn it to "WOT"
2. Turn cam until the word "top" is in front of the breaker arm rubbing block
3. Set gap to .020 and re tighten anchor screw

Anything else before I test spark?

Should i use a spark tester or just a spark plug grounded to engine?

1. Throttle position makes no difference
2. Adjust points when the rubbing block is at the high point on the cam - usually coincides with the flywheel key.
Turn the mag plate back and forth a little until the points are open to the max. Then set to .020"
3. Anchor screw should be fairly tight when adjusting the eccentric bolt. Once set to .020", snug it up again so it's good and tight.

Also, clean those points with an acetone-soaked strip of business card to remove any oily residue. And, yes, use a spark tester. Spark should jump 1/4" in open air with a snappy blue-white spark.
 

jimmbo

Supreme Mariner
Joined
May 24, 2004
Messages
13,656
No Title

From the 1957 35 hp owners manual
 

Attachments

  • photo240759.jpg
    photo240759.jpg
    182 KB · Views: 1

Squirrel42

Petty Officer 2nd Class
Joined
Mar 23, 2016
Messages
109
No Title

So racerone says my 2 clips on the point return are installed incorrect, possible explaining why this engine was sitting for so long. Does this effect performance having them installed from the top and not the side.
The carb appeared to be rebuilt and they forgot the pin on the float valve for the fuel needle. All kinds of screwy stuff!

This all is proving difficult to know if I am reinstalling anything correctly that i have dissembled.

Throttle position doesn't matter, Check!
Rely more on Fly wheel key than "top" for widest spot, Check!
Use spark tester, Check

I'm balls deep in this project and there is no turning around, even if i had to rebuild the head or rings, or whatever else is possible wrong.

Carb is rebuilt
Replaced both Bypass gaskets
Replaced lower throttle gear
Installed fuel pump on top bypass for single line. Drilled and tapped!
I get everything for Lower gear case rebuild Saturday. I destroyed my oil seal ring trying to remove the seal.
FML!
I ordered a new ring that does not have a seal so I don't make that mistake again.
I need to pull the shift rod seal tomorrow. I guess with a 5/16 tap and long threaded bolt to remove it.
Why the hell did they put that damn brass piece and rubber seal so deep on the lark? I've been dreading removing it.

Than maybe, possibly a test run in a trash can Sunday. If i can figure out the ignition, I'm no good with all the timing mojo!
If all else fails, ill take it to the marine mechanic up the street and dish out the coin to fix ignition.

Points appear to be a little tiny bit discolored, I'll clean them the best I can...

Wish me luck!
 

Attachments

  • photo240745.jpg
    photo240745.jpg
    269.8 KB · Views: 0
Last edited:

racerone

Supreme Mariner
Joined
Dec 28, 2013
Messages
38,471
Actually you can use an ohmeter to set the points perfectly , you use the timing marks to do it that way.------And you can , with some patience replace the shift rod o-ring without removing the bushing.-------Now most folks will deny that it can be done , but I have !
 

Squirrel42

Petty Officer 2nd Class
Joined
Mar 23, 2016
Messages
109
Thanks, crosby man.. I was watched that video a couple of times.. He makes me mad that he doesnt say what size tap he used but this is the way i'm going to do it if i can find a bolt that long.
 

racerone

Supreme Mariner
Joined
Dec 28, 2013
Messages
38,471
????---Essentially a 1/4" hole is the tap drill size for 5/16"-NC thread.
 

Squirrel42

Petty Officer 2nd Class
Joined
Mar 23, 2016
Messages
109
Thats what i got, headed out to the shop to murder this brass bushing.. Thanks for the replys! Love this fourm!
Wish i could buy all that helped a beer!
 

Squirrel42

Petty Officer 2nd Class
Joined
Mar 23, 2016
Messages
109
No Title

So I built a little extractor to pull the brass bushing, It's not budging it seems . I first started with a piece of wood and a washer but it started to crack the wood.
I'm now using an arm of a Harmonic puller with a 5/16 bolt. I'm scared I'm going to crack the lower unit housing while tightening the bolt into the brass bushing.

Any recommendations on making this easier, I got some PB blaster soaking on it. Should I resort to HEAT? Maybe heat the brass bushing up and try and pull it again?

That damn video made it look so easy, what I'm i doing wrong?
 

Attachments

  • photo240796.jpg
    photo240796.jpg
    177.6 KB · Views: 1

racerone

Supreme Mariner
Joined
Dec 28, 2013
Messages
38,471
It pulls out with minimal effort , never had one that would not budge !---------How far did you tap and how many threads are engaged !------Are you 100 percent sure you are not threaded into the gearcase itself ?
 

Squirrel42

Petty Officer 2nd Class
Joined
Mar 23, 2016
Messages
109
I only tapped about half the brass bushing, maybe a little more. The 6in bolt I'm using to thread barely makes into the thread before i can tighten. I doubt its making it into the gear case, but I will double check. I might try the method from this page i just found.
 
Top