1967 Starcraft resto, code name "On Holiday"

dpotter

Petty Officer 2nd Class
Joined
Oct 4, 2015
Messages
191
Saved some money there, the Chieftan is trash. Hit a big rock and basically destroyed the keel. Pealing away from the hull. Wasted travel day, but at least I can stay focused on this one.
 

jbcurt00

Moderator
Staff member
Joined
Oct 25, 2011
Messages
25,111
Jeez sorry it was a wasted trip. You'd think it was worth mentioning. What, hope you show up and take it smashed, peeling keel and all? Some people....
 

oldhaven

Chief Petty Officer
Joined
Aug 30, 2015
Messages
578
Good job walking away. I have trouble with that sometimes... to my later regret.
 

dpotter

Petty Officer 2nd Class
Joined
Oct 4, 2015
Messages
191
Merry Christmas to you all. Well, I found a parts boat, went to look at it and not sure there is much to use. I wasn't willing to pay what they wanted so i just made an offer and will wait to see what happens. I need a better trailer, under floor tank and anything else that's useful. this boat has a 350 that wasn't winterized in 1991 and is still sitting where it was put in 91. out in the weather so most of the boat is trash. still it has a one side swim platform ladder...
 

dpotter

Petty Officer 2nd Class
Joined
Oct 4, 2015
Messages
191
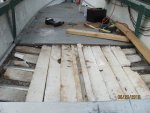
It's been very cold and snowy here in Western Montana. Not to bad today so I went out to tear the floor out of the Holiday. Got 2 layers of carpet out and found the floors had been replaced at some point. 3/4 ply in not to bad a shape. The bow area had the original 1/2 and it's good enough to make a pattern out of. Nice to have some good news on one of these old tinny's. In the mean time I've been browsing the rebuilds again. I'll do that at least one more time. I started taking screen shots to help me remember some of the information. These old brain cells aren't what they used to be.
 

dpotter

Petty Officer 2nd Class
Joined
Oct 4, 2015
Messages
191
Hmmm, surprise, the PO didn't replace part of the floor. He overlayed it with 3/8's ply of some sort. attached it to the old floor with dry wall screws. Not exactly a good solution. The screws will not screw out, they just spin even drilling them may be a pain. thinking of using a hole saw to drill around them. Gonna be a pain. floor overlay.jpg
 

dpotter

Petty Officer 2nd Class
Joined
Oct 4, 2015
Messages
191
There were 2 layers of carpet over these 2 layers of ply. Everything is severely water logged. I knew it felt heavy coming home. I can only assume the foam is the same. the front piece of ply was not attached and pulled right out. The foam is not poured it, just blocks. Whew.
 
Last edited:

oldhaven

Chief Petty Officer
Joined
Aug 30, 2015
Messages
578
Don't you just love the bodges people used on these poor SC's. I had exactly the same thing in my Chief, drywall screws holding down a second waterlogged layer of plywood under soaked carpet. I should have weighed the wood I took out. I found that if some care is taken to make sure you don't bend the underlying aluminum, you may be able to tear the over decking right out using a prybar around what ever screws you can not get out, pulling the screws through the wood or out of the under decking. This also worked for me for portions of the original 1/2 " deck and the original rivets were left in the ribs to be taken care of later, though they can be drilled out easily. Yours may not be that far gone, or if things have dried out this would not be as easy as if it was soaked like mine was. This destroys some deck as a pattern, but it should not be too hard to remeasure and layout the replacements.

Ron
 

dpotter

Petty Officer 2nd Class
Joined
Oct 4, 2015
Messages
191
Thanks Ron, I was thinking something similar. I may get a few of the more forward screws out and give it a try.
 

BWR1953

Admiral
Joined
Jan 23, 2009
Messages
6,278
...attached it to the old floor with dry wall screws. Not exactly a good solution. The screws will not screw out, they just spin even drilling them may be a pain. thinking of using a hole saw to drill around them. Gonna be a pain.
Oh man, my heart goes out to ya on that one. I had the exact same thing on my Kingfisher. I don't recommend using a cutoff wheel to get them out. My deck was still usable before I started but I ended up with grooves around the screw holes when I was done. Not only unsightly, but that method did NOT let the screws "pop" up. That's because they're screws, not rivets. The drywall screws had rusted themselves into the wood and the ribs underneath.

The hole saw idea may work.
I ended up using a piece of 2x4, a BFH and a 72 y.o. neighbor to get everything up! :eek: :laugh: We got a pry bar under one joint then forced the 2x4 underneath. Started whacking the board till the deck finally came free. It wasn't easy. And still had to go back and remove the screws from everything afterwards.

IMG_9001a.JPG
 

dpotter

Petty Officer 2nd Class
Joined
Oct 4, 2015
Messages
191
It's supposed to be about the same temp(mid 30's) today so I plan to get out and work on getting them up. I figure a combination of the hole saw and prying that Ron recommended should do the trick. Anxious to find out. At least I can get the floors out. and more cleanup done. I'm on bag 5 of pine cones, leaves and aluminum cans. Lots of places for debris to hide on these tinnys.
 

Watermann

Starmada Splash of the Year 2014
Joined
Jan 12, 2013
Messages
13,822
I would just use a cut off wheel on an angle grinder and zip the screw heads off and then pry the boards up.
 

dpotter

Petty Officer 2nd Class
Joined
Oct 4, 2015
Messages
191
Ok, using a grinder with cutoff wheel made short work of the screws. The screws were mostly retained in the old floor so I'll leave the 3/8 in place until I get the rivets drilled out from the original floor. Those cut off screws are sharp. Got called to work so not sure when I can get back to it today.
 

dpotter

Petty Officer 2nd Class
Joined
Oct 4, 2015
Messages
191
The PO threw in the rats for free. The good news is the original floor underneath was in pretty good shape. At least enough for a pattern to trace for the new one. extremely saturated with water. Surprising the foam I pulled out didn't have much water weight.
 
Last edited:

dpotter

Petty Officer 2nd Class
Joined
Oct 4, 2015
Messages
191
Ok, now that i have the next section of lloor out i have a question. The stringers are supposed to have 2 pop rivets into the ribs. The first 6-7 have all popped out. Is there something stronger to use or should i just drill larger holes and use larger rivets to repair?
 

oldhaven

Chief Petty Officer
Joined
Aug 30, 2015
Messages
578
Ok, now that i have the next section of lloor out i have a question. The stringers are supposed to have 2 pop rivets into the ribs. The first 6-7 have all popped out. Is there something stronger to use or should i just drill larger holes and use larger rivets to repair?

You mention that you may want a belly tank in my thread, so you may want to wait until you have decided about that before you put the new rivets/stringers back. Even if they go back in the same spot, you might need to do some holes for fuel lines or add brackets for the tank or athwartships tank bulkheads to them and that might be easier if they are removed..
 

Watermann

Starmada Splash of the Year 2014
Joined
Jan 12, 2013
Messages
13,822
The holes should be fine, those ribs are way tougher with a harder alloy than the blind rivets and the rivets shouldn't be able to deform the holes. Once the blinds get loose a little bit of working back and forth will dislodge them.
 

dpotter

Petty Officer 2nd Class
Joined
Oct 4, 2015
Messages
191
Thanks Ron and Wattermann I'll wait on reinstalling the stringers until I decide on the fuel tank. I'd like to get the weight low and forward. I guess just replacing the rivets will do good for me. This boat had seen some hard licks. I intend to take much better care of her.
 

dpotter

Petty Officer 2nd Class
Joined
Oct 4, 2015
Messages
191
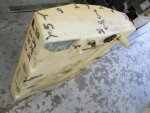
tank.jpg

Found the perfect fit for a tank. The store is closed until Monday so I'll wait until then to verify.
 
Last edited:
Top