1968 8-teen project

cedarjunki

Chief Petty Officer
Joined
Aug 23, 2007
Messages
472
Re: 1968 8-teen project

sorry to hear about your woes.
so what happened? maybe others (me) can learn from the blues your getting.. hope your nightmare becomes a pleasant dream..

its really not as bad i made it out to be.....
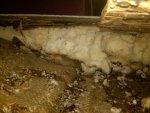
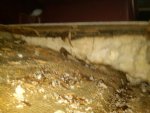
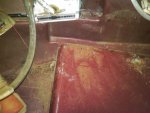
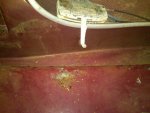
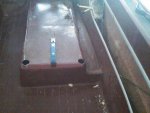
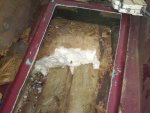
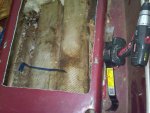
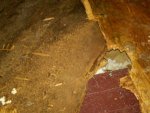
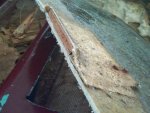
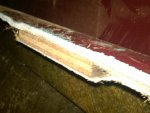
finished the glassing and painted the bilge ready for the newer engine.
cleaned it up with the pressure washer and blew thru the 2 (steel) :mad: welsh plugs. replaced with brass! noticed it need a new water shudder had to wait 4 days to get it. so i painted the motor, now its a cute redhead :) even though it looks orange. i did odds and ends, anxious to put the motor in and hear it run....
finally got the shudder, installed it, slapped in the motor. aligned it, it was way off after refoaming, and a new mount glassed in! put oudrive on, slid in easy as pie for the first time i can remember.
started to raise it up and the pump acted funny again :( got tired of messing with it and robbed the ss of hers. worked perfectly... picked up tools, put in fresh gas. about 20 minutes later told my kid to raise it up as i got the blazer and heard a loud pop....the reverse lock valve stuck and built enough pressure to blow oe of the cylinders apart :( robbed the ss again lock valve and trim cylinders....
now it works better than it ever has! brand new lines last year so its good to go....hooked up blazer, pulled out of garage.... hooked up muffs and it fired right up! after sitting for a few years i expected to hear noisy valves or something but nothing.... ran perfect! that new shudder is very noisy though!
let it run about 20 minutes, the old man was tickled pink after all these years of having to yell over the knocking of the old motor. working between raindrops put it back in the garage started looking it over....dad asked if anything was leaking....ummmm well the rear main seal is dripping :(
i still need to paint the deck and finish my trailer before either can hit the water.............if it werent for bad luck i wouldnt have any right now!
 

ziggy

Admiral
Joined
Jun 30, 2004
Messages
7,473
Re: 1968 8-teen project

i dunno, them seem to be pretty substantial blues to me. glad your working them out though. does sound like a boat though. fixing one thing always leads to fixing another dozen things before it's happy.
ya sure got that engine lookin pretty. way to go... my paint has pretty much lost it's luster..
 

Ricks Project

Seaman Apprentice
Joined
Jul 9, 2009
Messages
40
Re: 1968 8-teen project

CJ,
Good looking engine! Sorry to hear about all the issues you've been having but it sounds like you've got them figured out. The cool thing is that no matter what happened you found the solution.

It's going to take me a while to get all the foam out of my boat. It seems that it is all wet and I'm not sure how I'm going to get all of it the way the floor is molded. I'm going to work on it more tomorrow to see how far I can get.
 

cedarjunki

Chief Petty Officer
Joined
Aug 23, 2007
Messages
472
Re: 1968 8-teen project

CJ,
Good looking engine! Sorry to hear about all the issues you've been having but it sounds like you've got them figured out. The cool thing is that no matter what happened you found the solution.

It's going to take me a while to get all the foam out of my boat. It seems that it is all wet and I'm not sure how I'm going to get all of it the way the floor is molded. I'm going to work on it more tomorrow to see how far I can get.

thanks but shes no longer a redhead..had some water in the oil issues too :( ended up being the riser of all things!
thinking about dunking it today to see how it runs before i finish painting.

what areas are you having trouble with?? i used this to reach everywhere and worked very good! kinda swung the claw in and pryed out bigger chunks than anything else i tried.
 

Ricks Project

Seaman Apprentice
Joined
Jul 9, 2009
Messages
40
Re: 1968 8-teen project

Hey CJ,
How'd the dunking go? Hopefully with no issues.

I'm actually using the same tool to remove the foam in my 8-teen and is visible in one or two of the pics. It's working quite well but i ran into more snags today. I was hoping to get a little forward of the rear facing seat and get into dry foam (like you did) but the opposite happened. Then while trying to figure out how to strech my arm to get all the way to the front, i started looking at how I could cut the floor to get the foam out. I'm not sure how the 9-teen is but the front seats on my 8-teen have a molded seat base that molds to the sides and to the floor (pics attached). In some of the brochures it talks about having storage under the seats, this one is solid with 2 holes in the top for the legs of the lounge seats and then there are drain holes in the back so if water got in in there it would come out on the deck and then there are drain holes from the deck to the bilge area. Upon closer inspection in one of the holes, i see that the plywood under the seat is not protected. So now I know how so much water got in the hull. The drain hole that should release the water from under the seat is in the fiberglass mold that sits on top of the plywood, thus the water would have to be at least 1/4" deep to drain and water under 1/4" will either sit there on the plywood or can drain back between the plywood and fiberglass.

Now I have to determine if I want to go on and if so, how. I'm looking for advice from anyone.

If I continue, the only way I see I can get all the wet foam and plywood out is to cut around the inside edge of the boat to pull the seat mold and fiberglass floor out. That'll be the hardest part as I would like to keep the boat original. Pulling the plywood and foam out would be real easy at this point. I don"t see a problem putting the plywood back in and then putting the foam in. The last thing then would be to glass the floor to the sides and make it look good. Since I have to buy new seats anyway, the new seats would have to come with a base that I would attach to the new floor.

Thoughts anyone???
 

Attachments

  • 68 Aristocraft 23.jpg
    68 Aristocraft 23.jpg
    133.8 KB · Views: 1
  • 68 Aristocraft 24.jpg
    68 Aristocraft 24.jpg
    136.1 KB · Views: 1
  • 68 Aristocraft 25.jpg
    68 Aristocraft 25.jpg
    134.9 KB · Views: 1
  • 68 Aristocraft 26.jpg
    68 Aristocraft 26.jpg
    145.2 KB · Views: 1
  • 68 Aristocraft 27.jpg
    68 Aristocraft 27.jpg
    142.5 KB · Views: 1

Ricks Project

Seaman Apprentice
Joined
Jul 9, 2009
Messages
40
Re: 1968 8-teen project

More pics.
 

Attachments

  • 68 Aristocraft 28.jpg
    68 Aristocraft 28.jpg
    143.2 KB · Views: 1
  • 68 Aristocraft 29.jpg
    68 Aristocraft 29.jpg
    147.9 KB · Views: 1
  • 68 Aristocraft 30.jpg
    68 Aristocraft 30.jpg
    147.6 KB · Views: 1

cedarjunki

Chief Petty Officer
Joined
Aug 23, 2007
Messages
472
Re: 1968 8-teen project

got her in the water this morning(sunday). i didnt feel like having any problems on my own yesterday. so i got it ready and stopped and had it weighed too. boat and trailer 3000 pounds. i figure the trailer goes atleast 800 pounds.
floated on the trailer a few minutes just too make sure nothing leaked, all good. warmed it up and idled around about 20 minutes. ran nice and smooth. so i decided to head out of the river give her a run. i had the old man and my son with me, wide open and trimmed we pulled around 27 mph at 4100 rpms with about 1 foot chops. he lost a few mph dropping to a 120 but no biggie. i think he will benifit from it trolling wise. may need to re-prop for when shes loaded for fishing. up too around 3000 rpm the temp stayed down but at wide open it ran up on the higher side for about 40 minutes, then settled about midway on the gauge. i think it just needed time to work everything through again from sitting.
oil was good and clean so thats all good too. the motor does have a very slight knock but no where near as bad as the original. dads happy so far. now gotta clean it up and get the paint done.


i thought about where i should cut this one if i had too and came to the conclusion either between the seats where the storage locker is on the newer ones. it should give just enough arm room to reach. or cutting out the area under the seats. which wouldnt be too hard to glass back in place and have it looking original.

the only problem i found if i replaced all the plywood is.....the ply was molded in or the inner hull was molded around the plywood. since they were put together as 2 seperate hulls i couldnt see an easy way to secure the ply in place. others the plywood is glassed in on the edges of the outer hull. but these are molded seperate then the 2 hulls are put together.

contact aristocraft and see what they have to say about it.

i hope you find an easy solution so you dont give up..... keep us informed
 

Ricks Project

Seaman Apprentice
Joined
Jul 9, 2009
Messages
40
Re: 1968 8-teen project

Hey CJ,
Glad to hear the dunking went good. Sounds like you put it through the paces and it did good. Make sure we see some pics of the finale product. If not here at least on the pics thread Ziggy started. I love looking at the new pics on there.

Good thoughts on where I should cut the boat to complete the foam removal. I called Aristocraft and Scott looked at the pics of mine on this thread and had never seen an 8-teen without the seat bases cut out and used for storage. Also, the starbard rear seat is usually cut out and mine isn't. He even talked to Bill about it and they couldn't understand it. Anyway, what he recommended was to cut the seat bases and then the plywood to get to the foam and get that out. I really like that idea because I was really having a tuff time thinking I was going to have to cut all of that out and lose the originality. And I get some storage in the process. Anyone wanna take a wild guess at what I'm gonna be doing this weekend?

Just a side note but worth saying... I'm new to the boating scene and while looking for a purchase last year, my wife just happened by an ad on Craigslist for a boat for sale. I had no idea what to look for in a boat but i liked the style, the floorplan etc and so I bought it. I knew it needed work and was willing to do it. What's made it easier is having guys on this forum that don't know me from Adam, but are willing to take the time to read the posts and respond with very good information on what they've learned personally and what they've learned by reading other posts. And Bill and Scott at Aristocraft have been great. For them to support these boats with advice, knowledge, parts availability and encouragement after 42 years is unheard of in todays world. The boats are classics...the guys are class acts.
 

cedarjunki

Chief Petty Officer
Joined
Aug 23, 2007
Messages
472
Re: 1968 8-teen project

hope you have lots of fun this weekend ;)
i will deffinately post some pics. i was hoping to get the deck painted this week but mother nature isnt playing fair! this was taken at 7:20 am this morning.

although any pics i will have of the nineteen wont be anything pretty at all! like i said its only purpose in life is to be a fishing rig, so functionality comes before originality or even being pretty.

as far as the seat storage bases, the nineteen has them cut out but hes talking about having me rip the old back to backs out. glassing a section over the drivers area and installing an adjustable swivel pedestal seat. and a flip back solid seat facing the rear. and only one rear facing seat on the passenger side allowing room for a large fish cooler in the front.
but i think im gonna have too put that off till i get my boat ready first though.
gotta get in gear and get them both up and usable since theres 2 fishing derbys coming up in may!


if i understand you right.....your going to cut the top off the seat bases, which they should be anyway. then cut the floor out inside the bases. that was my second option. it will be a little harder to work inside of them but very doable! just make sure you leave atleast 2 or 3 inches there to reglass it back in.
 

Ricks Project

Seaman Apprentice
Joined
Jul 9, 2009
Messages
40
Re: 1968 8-teen project

I had enough of the snow this year and I'm glad that's not hear. Hope you're able to finish painting soon to make those derby's.

I did cut off the top of the seat bases but the wood was so rotted that there was no way to leave a couple inches to reglass back in. I haven't figured out how I'm gonna put the deck back in there but I've got time to think about it. Also, that made it alot easier to get the foam out than what I thought it would be. Not much more to come out and I'll be ready to flip it over and fix (inside and out) and paint the hull. It'll be easier to flip with a few hundred pounds of wet foam out of it. Not sure why there was a piece of wood glassed to the seat. You can see where I cut through it while cutting the seat base.

Found a guy in the area that rebuilt my outdrive so that's ready to go. We pulled the gimble housing off yesterday and I'm going to need to replace it because the exhaust tube is eat up and broke and it's not a replaceable part. The guy that rebuilt the outdrive has one that I'll be able to get. I also found an 8-teen on craigslist that I'm trying to figure out a time I can drive 8 hours away to pick it up out of a field to use for parts.
 

Attachments

  • 68 Aristocraft 33.jpg
    68 Aristocraft 33.jpg
    144.1 KB · Views: 1
  • 68 Aristocraft 34.jpg
    68 Aristocraft 34.jpg
    145.4 KB · Views: 1
  • 68 Aristocraft 35.jpg
    68 Aristocraft 35.jpg
    145.2 KB · Views: 1
  • 68 Aristocraft 38.jpg
    68 Aristocraft 38.jpg
    144.9 KB · Views: 1
  • 68 Aristocraft 36.jpg
    68 Aristocraft 36.jpg
    131.4 KB · Views: 1

cedarjunki

Chief Petty Officer
Joined
Aug 23, 2007
Messages
472
Re: 1968 8-teen project

I had enough of the snow this year and I'm glad that's not hear. Hope you're able to finish painting soon to make those derby's.

I did cut off the top of the seat bases but the wood was so rotted that there was no way to leave a couple inches to reglass back in. I haven't figured out how I'm gonna put the deck back in there but I've got time to think about it. Also, that made it alot easier to get the foam out than what I thought it would be. Not much more to come out and I'll be ready to flip it over and fix (inside and out) and paint the hull. It'll be easier to flip with a few hundred pounds of wet foam out of it. Not sure why there was a piece of wood glassed to the seat. You can see where I cut through it while cutting the seat base.

Found a guy in the area that rebuilt my outdrive so that's ready to go. We pulled the gimble housing off yesterday and I'm going to need to replace it because the exhaust tube is eat up and broke and it's not a replaceable part. The guy that rebuilt the outdrive has one that I'll be able to get. I also found an 8-teen on craigslist that I'm trying to figure out a time I can drive 8 hours away to pick it up out of a field to use for parts.

how bad is this one on craiglist??? might be suprised and in better shape maybe? if its been sitting with the bow up and able to drain its very possible it could still be in descent shape.

id have to guess that plywood on the base would be for support of the seats, with 2 openings cut in the bases. but thats just a guess... ill look at the 9-teen later.
 

Ricks Project

Seaman Apprentice
Joined
Jul 9, 2009
Messages
40
Re: 1968 8-teen project

The Craigslist boat looks okay but I know there is damage to the hull because it was moved with a fork lift...no holes just scratches. The gentleman was going to take more pics of the boat in areas I was needing items from but i haven't seen the email and phone calls and messages have not been returned. Not sure if the boat has already been sold or what the status is. I've been looking for a trailer to buy just in case it is still available but worried I won't need it. If it turns out it is still available I'll probably take mine off the trailer (since it's a lot lighter now) and make a bee line for South Jersey.

Cutting out the seat bases helped tremendously in pulling out the foam. I was even able to get down inside the starbard seat base and lay on the hull and dig out the foam. I'm guessing about 90 to 95% of the foam is out. I think i may be able to get it all from the bow without more cutting but I'm not so sure about the stern. I have the wood for the front motor mount blocking me from getting all of the foam. Also, I believe I smell "old fuel" in the soaked foam under the engine compartment. Smells "Varnishy". So will probably have to cut the floor in the engine compartment to remove the foam. Will then take a look inside the engine compartment to see how the fuel got in the foam. Since I have to rebuild the transom I'll already been in there and can make sure the area is sealed from the hull.
 

cedarjunki

Chief Petty Officer
Joined
Aug 23, 2007
Messages
472
Re: 1968 8-teen project

i would have rather smelled old fuel than the nasty swampy, sewer smell this one had!

i only replaced the foam under the bilge area/engine compartment.. it would have been to much to cut out under the seats and try to glass it all back in. those sections were only 2" thick or so of foam tapered to nothing on the nineteen. so i didnt worry about it. just got what i could reach.

might be a good idea to replace that motor mount though, the nineteens was mush and in 3 pieces.


(I was even able to get down inside the starbard seat base and lay on the hull and dig out the foam) what are you 4 foot tall and 75 pounds??? i would have paid to see that!
 

Ricks Project

Seaman Apprentice
Joined
Jul 9, 2009
Messages
40
Re: 1968 8-teen project

HTML:
what are you 4 foot tall and 75 pounds??? i would have paid to see that!

5'7" and 190lbs and really dedicated to getting this boat back in the water. I actually thought of having my wife take a pic of me inside there but didn't. Still have some foam to get out so I still may get a chance.

I don't know if I lost the New Jersey boat or not.:( The post is gone and I can't get an answer or return call on the phone number I was using to talk to the gentleman before. That makes 2 of these boats that I've found but because of 1 thing or another wasn't able to complete the deal. Because there isn't an abundance of parts for this boat I was trying to get one for parts. This last one didn't have a trailer and instead of trying to buy a trailer I guess I should have pulled mine off its trailer and headed north. Maybe next time.
 
Joined
Sep 25, 2005
Messages
6
Re: 1968 8-teen project

Hello Rick. Listen i too have purchased an atistocraft that i am attempting to restore Howevery my boat is a 1974 9-teen with a merc 165 hp. I have replaced. Many of the engine components and can get it to fire up. I have also replace the steering cable. I now need to replace the shift control lever(and housing) along with the shift cables. However I cannot seem to figure out how to get the lever off. I see no screws on the handle (accept for the 2 at the top which only holds the very top nob) and the rest of the mechanism is behind the paneling.If you could give me a clue i would appreciate it. Thank You . Leon
 

Ricks Project

Seaman Apprentice
Joined
Jul 9, 2009
Messages
40
Re: 1968 8-teen project

Hey Leon,
I wished I could help you on this one but my 8-teen throttle and shift control has 2 screws that go through it into the fiberglass with nuts on the back and I'm able to get my hand behind there to loosen. Ziggy has a 75 9-teen and Cedarjunki's dad has a early 70's 9-teen and they will be able to point you in the right direction.

I haven't been inside a 9-teen yet but if things work out we may be getting one this weekend.

BTW, throw up some pics of your project.
 

cedarjunki

Chief Petty Officer
Joined
Aug 23, 2007
Messages
472
Re: 1968 8-teen project

Hello Rick. Listen i too have purchased an atistocraft that i am attempting to restore Howevery my boat is a 1974 9-teen with a merc 165 hp. I have replaced. Many of the engine components and can get it to fire up. I have also replace the steering cable. I now need to replace the shift control lever(and housing) along with the shift cables. However I cannot seem to figure out how to get the lever off. I see no screws on the handle (accept for the 2 at the top which only holds the very top nob) and the rest of the mechanism is behind the paneling.If you could give me a clue i would appreciate it. Thank You . Leon

there should be a set screw on the bottom of the handle....loosen it up gently pull wiggling it off the splines. then pop off the chrome round cover and there should be 3 bolts holding the control on.
 

ziggy

Admiral
Joined
Jun 30, 2004
Messages
7,473
Re: 1968 8-teen project

leon, cj is right on...
also, go to the adults only sticky at the top of the i/o forum. in that thread look at #9. there you can get a copy of the mecruiser service manual that has all the pics and arrows in it along with exact service procedures that mercruiser want's you to follow to properly repair anything on your engine/drive. the service manual is a must have item and will be the best tool in your toolbox.

http://forums.iboats.com/showthread.php?t=288430

you want s/m #2..
 

Ricks Project

Seaman Apprentice
Joined
Jul 9, 2009
Messages
40
Re: 1968 8-teen project

Leon,
I knew CJ and Ziggy would come through for you, hope that helped you out. Those guys really know the 9-teen and I've read alot of posts where they have helped others. They've helped me for sure.

Okay guys, it looks like I might be back on for the Jersey 8-teen. I don't have an extra trailer but i'm going to pull mine off the trailer and use it. I'm real close to having all the foam out and ready to fix the hull on the inside and then flip the boat onto a table to fix the bottom of the hull. At that time I can go get the Jersey boat and pull the parts I need. If anyone needs anything from an 8-teen let me know.

I've pulled the windsheild from mine so when we flip it it wouldn't get broke. Plus it'll need to be off when it's painted. The only part I'm worried about now is getting the bolts needed to put the windsheild back. ALL of the ones that was in it had to be broken to be removed.
 

Ricks Project

Seaman Apprentice
Joined
Jul 9, 2009
Messages
40
Re: 1968 8-teen project

I haven't been working on the boat as much as I would have liked but wanted to show some pics of where I'm at so far. I've also posted a pic of the steering wheel that I would really like to replace with the same kind but in better shape. I'm going to start on the transome and hull this week and hopefully learn the art of fiberglassing. I may have to get some tips from CJ.
 

Attachments

  • IMG00026-20100529-1324.jpg
    IMG00026-20100529-1324.jpg
    151.6 KB · Views: 1
  • IMG00025-20100529-1323.jpg
    IMG00025-20100529-1323.jpg
    154.7 KB · Views: 1
  • IMG00032-20100531-2139.jpg
    IMG00032-20100531-2139.jpg
    137.1 KB · Views: 1
  • IMG00033-20100531-2140.jpg
    IMG00033-20100531-2140.jpg
    142.3 KB · Views: 1
Top