1973 Starcraft 15.5ft unknown model AMBITIOUS restoration

tcampbell011

Seaman
Joined
Aug 29, 2011
Messages
69
Thanks for checking this thread out, I'm a 21 year old Computer Science student. I've been building and troubleshooting computers for the last 5 years, but thats about as much expertise I have. Luckily I have a couple friends that know more than me about woodworking. I've been checking out these forums and tinboats.net both have given me a ton of ideas. I think my plan is a little ambitious but I figure if I'm doing it anyway, I might as well do it the way I want.

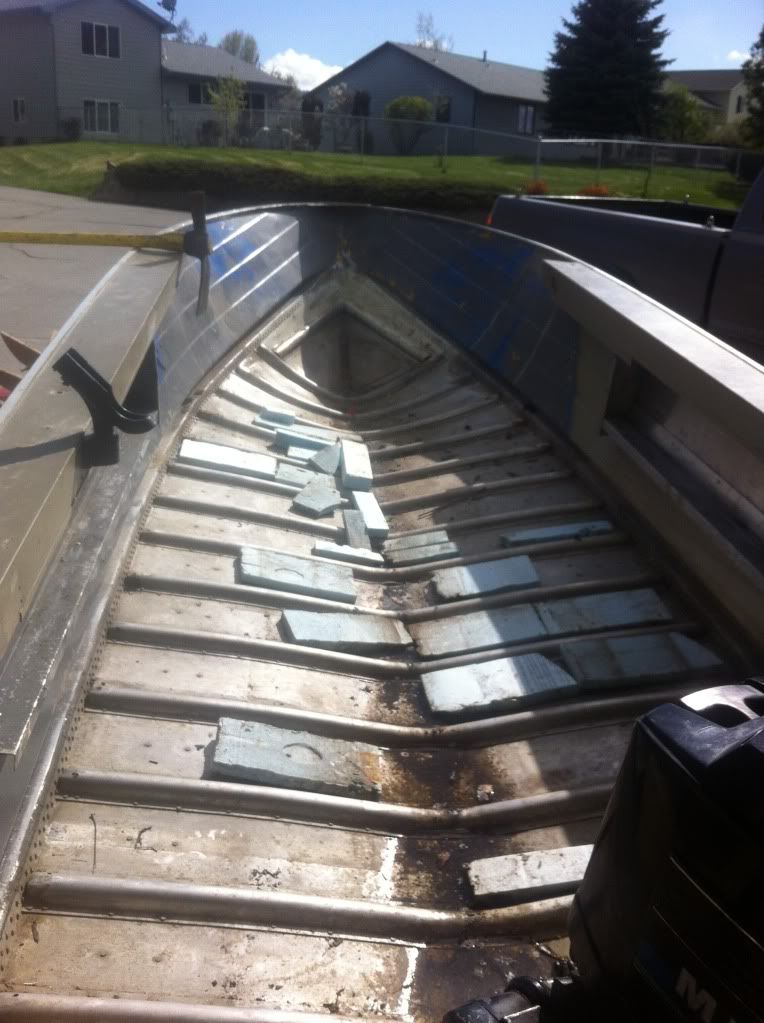
The boat was originally a runabout, but the previous owner had replaced the decking and turned her into a tiller style boat. That was okay but I really wanna make this into a quality fishing boat that I'll use for years.

The first thing I did was tear out the old floor, to me it seemed a lot heavier than it needed to be. The person who did it before me did it the same way a wooden deck or patio would be done. Most of the wood was somewhat rotten, there were horizontal 2x4s screwed into a frame underneath. I was thinking I would use a similar frame but lay down waterproofed plywood.

My first order of business is to clean out everything and apply gluvit to the seams. If anyone has any suggestions on applying or prepping for gluvit, I'd love to hear it. I had a couple questions about it.

1. My boat is outside right now and I know gluvit is sensitive to UV, is it okay to apply gluvit and let it dry in the sun for a week or so before painting over it? or should I cover the boat?

2. After applying gluvit do you have any suggestions on what paint to use on the inside of the hull? I'm planning on painting it white.
View attachment 144462View attachment 144463View attachment 144464
 

1973Chieftain

Lieutenant
Joined
May 31, 2010
Messages
1,298
Re: 1973 Starcraft 15.5ft unknown model AMBITIOUS restoration

Sounds like a sweet boat! The pics did not seem to work though... can see her! :(
 

boatnut74

Lieutenant Commander
Joined
Aug 29, 2010
Messages
1,835
Re: 1973 Starcraft 15.5ft unknown model AMBITIOUS restoration

Pics aren't working for me either.
 

tcampbell011

Seaman
Joined
Aug 29, 2011
Messages
69
Re: 1973 Starcraft 15.5ft unknown model AMBITIOUS restoration

ALright I am trying a new way to upload the photos, let me know if they work


jasoutside

Supreme Mariner
Joined
Dec 20, 2009
Messages
13,269
Re: 1973 Starcraft 15.5ft unknown model AMBITIOUS restoration

Howdy and welcome to iboats! Lot's of Starcraft wierdo's around here:D

Check it out, if you copy the "IMG CODE" over in photobucket and paste it here you get this...

photo5-1.jpg


Much better!

Now, as I see it, I think your first two steps ought to be (once your demo work is complete):

1. Figure out an aluminum stringer set up to replace those wood stringers. Click on the "Starcraft Rebuilds Link" in my signature and start reading. You'll basically see two different stringer set ups, one stringer right down the middle or two that would basically give you a little better structure.

2. You are going to want to fab up gunwale/deck structure for that bow. Click on the Jet Star link in my signature and give that a read. You'll basically need to do all that plus one extra step by having to start with raw sheet alum stock.

From there you've got a thousand more steps to go but it's totally doable. These two should be the crux ^^^ of your project (if done correctly).

Welcome to the dry dock and the Starcraft brotherhood!:D
 

jigngrub

Fleet Admiral
Joined
Mar 19, 2011
Messages
8,155
Re: 1973 Starcraft 15.5ft unknown model AMBITIOUS restoration

Welcome TC.

Don't get in too big of a hurry to put the Gluvit down, I suggest you do all the dirty work on the inside of the boat first.

If you want to paint the inside of your boat, I suggest you either strip or sand that old paint on the inside first. This will be messy and you don't want to make a mess on your gluvit.

You should also check your transom wood now to see if it needs replacing, if your transom wood isn't sealed I would go ahead and replace it no matter the condition.

After you've completed the 2 above steps pressure wash and scrub the inside clean. Then do a leak test by fillng you boat with 4 or so inches of water and looking for leaks on the outside. Replace any leaking rivets. After this is complete you can do the Gluvit. Follow the direction for surface prep and application.

If you're going to let your boat set outside after the Gluvit is applied I suggest covering your boat with a cheap $20 tarp and bungee cords to the trailer when you aren't working on it to minimize UV exposure.


Wood framing is the least desirable method in tin boat restoration, it is heavy and temporary at best. If you frame with aluminum it'll be lighter and permanant.

Some folks think you need a lot of special to work with aluminum, but you don't. All you need is a bi-metal blade for a skill saw, miter saw, or jig saw and a rivet setting tool. If you own an older riveted aluminum boat a rivet setting tool with come in very handy. Rivets are also much cheaper than stainless steel nuts and bolts.

Keep us updated on your progress and post lots of pics.
 

1988Starcraft

Seaman
Joined
Nov 30, 2011
Messages
72
Re: 1973 Starcraft 15.5ft unknown model AMBITIOUS restoration

I just finished a restoration of my 1988 Starcraft. There are a lot of similarities between your boat and mine when it comes to the floor. I can see from you pictures that the ends of the ribs have one or two holes in them. that's where the original floor was riveted to the hull. Mine is the same way. There was likely some kind of aluminum center support for the original floor too (mine is Z shaped) but that's gone so you'll need to fabricate something to take it's place. My boat is a little more than 4 feet wide and the floor is only supported on the edges and down the middle. The seats, console and storage compartments are screwed to the floor and certainly give it some stiffness as well. I don't know if you have anything attached above the floor or if it's basically a bare floor. You can always put two fore/aft supports in if you're worried about floor stiffness. My thread is "Replacing The Floor On My 14 Foot Starcraft". There's lots of pictures there that may help you figure out what to do with your floor. Good luck. 1988 Starcraft
 

jigngrub

Fleet Admiral
Joined
Mar 19, 2011
Messages
8,155
Re: 1973 Starcraft 15.5ft unknown model AMBITIOUS restoration

Mine is the same way. There was likely some kind of aluminum center support for the original floor too (mine is Z shaped) but that's gone so you'll need to fabricate something to take it's place.

He still has his "Z" channel if he didn't throw it away with the framing. You can see it in pics 3 and 4 in post #4.

photo4-2paint.jpg
 

jasoutside

Supreme Mariner
Joined
Dec 20, 2009
Messages
13,269
Re: 1973 Starcraft 15.5ft unknown model AMBITIOUS restoration

Good eye grub, I totally missed that.


Have ya still got it? That would be a big help if ya do.
 

tcampbell011

Seaman
Joined
Aug 29, 2011
Messages
69
Re: 1973 Starcraft 15.5ft unknown model AMBITIOUS restoration

Yup I still have it. Its got a couple screws thru it though. I still haven't checked out the other threads about making a stringer.

Does anyone have a link to some info on working with aluminum? I have no experience there.

jasoutside- I really like your Jet Star build, I am going to try to base it on your design somewhat (if thats okay!) Do you think this is also a Jet Star? On the boat's title it is only listed as a runabout.

PS thanks a ton@!!!
 

tcampbell011

Seaman
Joined
Aug 29, 2011
Messages
69
Re: 1973 Starcraft 15.5ft unknown model AMBITIOUS restoration

1988Starcraft - I really like your front casting deck, I think I might copy alittle of that too

jigngrub - Good points, now that you say something I think gluvit will be one of the final things I do before installing the deck. The transom seems okay to my untrained eyes, its very sturdy and it also seems like it has a thicker layer of paint. At the moment I don't have very many power tools. Just a 18v drill and a circular saw. I know I'll need more tools evuntually so I might have to purchase some for this build.
 

GA_Boater

Honorary Moderator Emeritus
Joined
May 24, 2011
Messages
49,038
Re: 1973 Starcraft 15.5ft unknown model AMBITIOUS restoration

Welcome to the Tin Crowd, TC. It looks like you have a good Jet or JetStar. You can do a lot with the rechargeable drill & circular saw. A jigsaw might come in handy,

Did Jason tell you he has a design fee if you copy any parts of his Jet? Yeah - Starmada dues for a year (very reasonable) and a big tub of potato salad or cake and ice cream. He ain't picky. LOL Have fun making a boat that fits your needs and above all, have fun. :D
 

boatnut74

Lieutenant Commander
Joined
Aug 29, 2010
Messages
1,835
Re: 1973 Starcraft 15.5ft unknown model AMBITIOUS restoration

Great lookin tinny! Looks like you got most of the demo work done and then the fun part begins :D
 

lakelover

Rear Admiral
Joined
Mar 26, 2003
Messages
4,386
Re: 1973 Starcraft 15.5ft unknown model AMBITIOUS restoration

1. My boat is outside right now and I know gluvit is sensitive to UV, is it okay to apply gluvit and let it dry in the sun for a week or so before painting over it? or should I cover the boat?

2. After applying gluvit do you have any suggestions on what paint to use on the inside of the hull? I'm planning on painting it white.
View attachment 144462View attachment 144463View attachment 144464

1. After you do the prep work suggested above pre-gluvit, I don't think the UV will damage it within a week at all, but I would cover it with a tarp to be on the safe side. Areas of my Gluvit application had minimal UV exposure for about a year (my mistake) and did have some deterioration, but by no means real serious damage. I just cleaned up the deteriorated areas and re-applied. Unmixed Gluvit has a pretty good shelf life, considering.

2. I and a lot of others have used Rustoleum with excellent results. Whatever brand paint you use, make sure you use the same brand primer and follow the mfr's instructions for prep & application. Here's "the" authoritative do-it-yourself painting thread: http://forums.iboats.com/showthread.php?t=384982&page=10&p=3302799#post3302799

Did Jason tell you he has a design fee if you copy any parts of his Jet? Yeah - Starmada dues for a year (very reasonable) and a big tub of potato salad or cake and ice cream. He ain't picky. LOL Have fun making a boat that fits your needs and above all, have fun. :D

I think that is Jason's Jet Star and someone has done it over before tcampbell got it--- ;):D---OHNOOOOO!!!!

(That'll make a real nice little fishing boat for you BTW!)
 

GA_Boater

Honorary Moderator Emeritus
Joined
May 24, 2011
Messages
49,038
Re: 1973 Starcraft 15.5ft unknown model AMBITIOUS restoration

I think that is Jason's Jet Star and someone has done it over before tcampbell got it--- ;):D---OHNOOOOO!!!!

(That'll make a real nice little fishing boat for you BTW!)

Can't be, LL. No Tide jugs, LOL
 

tcampbell011

Seaman
Joined
Aug 29, 2011
Messages
69
Re: 1973 Starcraft 15.5ft unknown model AMBITIOUS restoration

I was browsing Jas's build and on page 30 he attaches the deck to the boat. To me it looks like its being riveted to the aluminum ribs... is that right??
 

jasoutside

Supreme Mariner
Joined
Dec 20, 2009
Messages
13,269
Re: 1973 Starcraft 15.5ft unknown model AMBITIOUS restoration

I was browsing Jas's build and on page 30 he attaches the deck to the boat. To me it looks like its being riveted to the aluminum ribs... is that right??

Yup, you got it. On my Jet the ribs were nearly flat/straight. So, I skipped the stringer and attached the deck right to the ribs making for a slight concave to the deck.

You won't be going this route with your rig. You've got a deeper hull than what a Jet has (still not exactly sure what model you have there).

I'd be pulling that wood off and install the stringer right back were it was. Double your rivets and it'll make it much stiffer.

Have fun!:)

And yah, I'm not picky. A cold hot dog that fell on the ground would be totally fine. Just brush a little of the dirt off and I'm good;)
 

1988Starcraft

Seaman
Joined
Nov 30, 2011
Messages
72
Re: 1973 Starcraft 15.5ft unknown model AMBITIOUS restoration

Glad you still have the Z section. I didn't notice them in your pictures at first. Jigngrup is GOOD! Don't worry about the holes in it and don't try to hit the old holes exactly when you attach the floor to it. The attachment holes for the Z to the ribs should be pretty easy to hit so use them again. Working with aluminum is easy. For my 1988 Starcraft the only tools I used were an angle grinder (mostly to grind off the rivets I needed to remove during my dismantling process which you're done with), a portable drill with a 3/16" bit, a pop rivet gun, a jig saw with both a wood and a metal cutting blade or a sawsall with a metal cutting blade. Unless you build a casting deck like mine, you shouldn't have to do anything other than install pop rivets so you'll just need the drill, drill bit and pop rivet gun. For internal rivets the open ended ones are fine. I used wide flange rivets to attach my floor (7/16" Arauco Ply) to the ends of the ribs and to the Z section. One rivet in the end of each rivet except where two pieces of floor meet then attach both the corners to the same rib. Be careful drilling through the floor and into the ribs. I inadvertently drilled right through the hull in one spot creating a new leak to address. Not a big problem, but very frustrating and it made me feel pretty stupid.

My floor had very thin aluminum sheets that joined the three original floor sections together. I'm not sure what good they did but I put them back in anyway. I needed to add a floor joint (one of the original floor sections was more than 4 feet wide and 8 feet long) and I put in two similar sheets on my new joint but I really don't think they do much. All my floor joints were beneath seats and the live well and storage compartment so they were spanned with them and held in place by their screws so I can't imagine what the plates did for it. They're too thin to provide any stiffness but since I wasn't sure, I used them. Maybe someone else has an opinion about them.

My casting deck support frame is made up of 1.5X1.5X.125 aluminum angle and is held together with left over rivets (you'll have a bunch). There were some tricky cuts and two pieces had to be heated and bent to form the attachments to the hull. The hull in the bow is curving up and forward at the same time. If you decide to build a similar one, think it through carefully so you'll be able to install the pieces in the right sequence. I could sketch the details of the support frame and post it if you think you'll use it. The deck itself is made from left over Arauco Ply. I cut cardboard templates and fit them carefully before I cut the plywood. Building the deck was way harder than putting in the floor so do that first to build confidence.

Have fun. 1988 Starcraft
 

tcampbell011

Seaman
Joined
Aug 29, 2011
Messages
69
Re: 1973 Starcraft 15.5ft unknown model AMBITIOUS restoration

Cant wait to get started! Its gonna have to wait until after the weekend, its still baseball season and we're playing in Bosie, ID. Also have finals next week so that might distract me a bit :rolleyes:
 

tcampbell011

Seaman
Joined
Aug 29, 2011
Messages
69
Re: 1973 Starcraft 15.5ft unknown model AMBITIOUS restoration

What do you guys think about removing what I believe is called the gunwales. (the aluminum running up and down the sides of the boat)

I was thinking if I removed them it would give the impression of a wider boat, is there anything I'm missing here? are they important at all? It just seems like restoring would be a ton of unnecessary work when I could just cut them off lol. What tool would be best do you think? an angle grinder?
 
Top