1973 Starcraft 15.5ft unknown model AMBITIOUS restoration

lakelover

Rear Admiral
Joined
Mar 26, 2003
Messages
4,386
Re: 1973 Starcraft 15.5ft unknown model AMBITIOUS restoration

They are structural and add stiffness to the hull, don't remove them. Unless you're prepared to find some other way to stiffen the hull...
 

jasoutside

Supreme Mariner
Joined
Dec 20, 2009
Messages
13,269
Re: 1973 Starcraft 15.5ft unknown model AMBITIOUS restoration

are they important at all?

Yup, you need em for structure. Yur boat will be floppy with out them.

Edit: Lake beat me. I only got the one good hand and I was dropped as a baby:rolleyes:
 

jigngrub

Fleet Admiral
Joined
Mar 19, 2011
Messages
8,155
Re: 1973 Starcraft 15.5ft unknown model AMBITIOUS restoration

10-4 on the gunwales, and your bow is going to need stiffening where there aren't any gunwales. I personally would frame a deck from the bow back to where the gunwales start and down only about an inch or 2 from the top of the gunwales to stiffen that bow area up. You could have all kinds of good storage area under that deck too. It'll also give you something to tie the gunwales into so it doesn't look so bizarre... it'll look like it was made that way from the factory and you'll be able to install a pedestal seat and bow mount trolling motor up there.

About using rivets and rivet tools, rivet guns aren't very expensive... especially if you buy the from a place like Harbor Freight.
http://www.harborfreight.com/catalogsearch/result?q=rivet+tools

You'll also need to buy some closed end blind rivets and you can get them here:
http://www.rivetsonline.com/rivets-en/blind-rivets-en/closed-end-blind-rivets.html
Any rivets leftover will come in real handy when making repairs or modifications to your boat in the future.
 

North Beach

Commander
Joined
Sep 29, 2008
Messages
2,022
Re: 1973 Starcraft 15.5ft unknown model AMBITIOUS restoration

OK Bud I know you're getting a ton of advice here and all of it's good. What you need to remember is everyone has their way of doing things. The first thing you need to do is Read, Read, Read! There are several build threads that cover multiple ways of doing each and every step you are about to experience.

I'm gonna throw a little in here also.
As far as the decking goes all you need to do for sub structure is re-install that big stringer down the middle. Then you will need three or four strips of aluminum about 4" wide close to the same thickness as the stringer that will lay across the boat from gunwale to gunwale at each SEAM in the Plywood OVER the insulation/flotation. The plywood gets fastened to the stringer in the middle and to the flat strips at the edges. The last fastener near the gunwale on each side will also penetrate the rib that has risin up to just under the edge of the plywood. You can see all of this in several rebuild threads here. The insulation will hold the plywood up and the metal strips and fastening thru the center stringer along with all the stringers at the gunwale will stiffin that floor up all you need. Those wooden stringers are way overkill and just something else to rot under the deck. My boat had two bow to stern stringers but it was 22 feet so much wider than yours.

There are several of us here who went into great detail on our rebuild threads and the wood decking/insulation is well covered.

Next you can leave the bow open if you like. These boats are designed to NOT have any kind of side to side stiffiner up front. If you do leave it open you will need to do some sort of a small deck right up in the bow and you'll need to rebuild the tops of the gunwales. this boat originally was a closed bow and all that has deff been removed. Maybe look at some Mariner pictures of you want to leave it open.

So just read and ask a billion questions. Just be prepared for several different opinions :)
 

tcampbell011

Seaman
Joined
Aug 29, 2011
Messages
69
Re: 1973 Starcraft 15.5ft unknown model AMBITIOUS restoration

Alright do you guys think this is a good idea? Here is the aluminum stringer design. The middle peice would be the Z channel that I still have.

boatStringer.png


and if I understand it correctly this would be how I would lay out the deck...

boatDeck.png


thanks for all the help I really do appericate it!!!
 

North Beach

Commander
Joined
Sep 29, 2008
Messages
2,022
Re: 1973 Starcraft 15.5ft unknown model AMBITIOUS restoration

Bud you really dont need all those stringers....
 

tcampbell011

Seaman
Joined
Aug 29, 2011
Messages
69
Re: 1973 Starcraft 15.5ft unknown model AMBITIOUS restoration

the width of the plywood sheets determine how many there is going to be, correct?
 

North Beach

Commander
Joined
Sep 29, 2008
Messages
2,022
Re: 1973 Starcraft 15.5ft unknown model AMBITIOUS restoration

Right. Unless your boat is less than 4' wide you will need the strips (or stringers if you choose) every 4' so they occur at each seam in the plywood.
 

1988Starcraft

Seaman
Joined
Nov 30, 2011
Messages
72
Re: 1973 Starcraft 15.5ft unknown model AMBITIOUS restoration

With my 14 footer, there were stringers at each joint int he plywood. They are so thin that the only function they could serve is to keep the joint tight and maybe resist warping. In my boat the original joints were under the seats which were screwed to the plywood. They would have kept the plywood stable by themselves so I really don't know what good the stringers did. My original floor was made from plywood wider than 4 feet so they only had three pieces (two joints). My new plywood was 4 feet wide so I added a joint to the center section. it lined up with the live well and the storage compartment forward of the console so the screws from those attachments would have kept it stable by themselves. However, since I didn't know what the real purpose of the thin stringers was, and I had some thin aluminum sheets hanging around, I made a stringer for my new joint. My boat had no foam under the deck. The only floatation was in the seats and in void spaces behind the storage compartments and the live well. I replaced some of that (rodent nests) and stuffed the extra under the new floor. The foam does not support the floor, the ribs attachments and the centerline Z section are all that supports it. It's very stiff.

For what it's worth, there is a wide variety of opinions about sealing the floor. You'll see everything from epoxy resin to paint. My boat was mostly stored outside under a tarp and the floor lasted 24 years. The original floor was not sealed at all. It just had a vinyl non-skid covering on the top side. I chose to paint the underside of my new deck and cover all the edges and the top with Grizzly Grip non-skid coating. I figured that if the original floor lasted 24 years without any sealant, epoxy was overkill particularly since the boat is now inside my garage. A boat that's kept outside in the weather might be a different story.

Weigh all the advice and pick what fits your project best. There's no one answer to anyone's project challenges. 1988 Starcraft
 

North Beach

Commander
Joined
Sep 29, 2008
Messages
2,022
Re: 1973 Starcraft 15.5ft unknown model AMBITIOUS restoration

The strips are to hold down the edges of the plywood and to tie the center stringer/plywood/edge of the deck together. And for the record I used marine grade douglass fir plywood and glassed it. But as said above, there are many approaches you cant take.
 

tcampbell011

Seaman
Joined
Aug 29, 2011
Messages
69
Re: 1973 Starcraft 15.5ft unknown model AMBITIOUS restoration

Wow I don't know where I'd be without all this help... So I have ordered a rivet gun off amazon and I assume I can get rivets at the local hardware store. Once again I have a million questions, so I'll try to limit it to a couple.

1. I looked for aluminum last time I was in Home Deopt with no luck, where should I go to get aluminum angles and whatnot?

2. Is there a typical size rivet that everyone is using? I assume I'll just get SS rivets thats aren't too long.

Here is what I am thinking so far. I attach an aluminum angle to the Z-Channel to get a flatter surface. Something like this:

zChannel.png


Should the strips be aluminum angle? or square aluminum? or what?
 

lakelover

Rear Admiral
Joined
Mar 26, 2003
Messages
4,386
Re: 1973 Starcraft 15.5ft unknown model AMBITIOUS restoration

The size, especially the length of the rivet you need is determined by what you are fastening together, the length (grip range) being the most critical. In your case you should use aluminum rivets with aluminum shanks. You probably want 3/16" diameter.

Home Depot usually has their metal tucked away somewhere in or near the hardware dept. If you have a Lowe's near you, I've found that they have a better selection. Tractor Supply Store also has some, but here anyway, their selection isn't as good as the other two.
 

jigngrub

Fleet Admiral
Joined
Mar 19, 2011
Messages
8,155
Re: 1973 Starcraft 15.5ft unknown model AMBITIOUS restoration

Scrap yards and recycle centers are the best places to go for aluminum, they sell it for a fraction of the coast at Home Depot.

Lakelover is right about the length of the rivets, you should purchase your angle first before buying rivets. I'd go for the .063 (1/16") thick angle and the grip range of your rivets should be .126 - .250. I prefer the closed end aluminum blind rivets with the steel mandrel because they're the strongest, and I doubt your hardware store will have these... but you can buy them online here:
http://www.rivetsonline.com/rivets-en/blind-rivets-en/closed-end-blind-rivets.html
The PR64ASPH are the ones you want.

Your drawing is perfect for what you want to do. What program are you using to make drawings like that?
 

1988Starcraft

Seaman
Joined
Nov 30, 2011
Messages
72
Re: 1973 Starcraft 15.5ft unknown model AMBITIOUS restoration

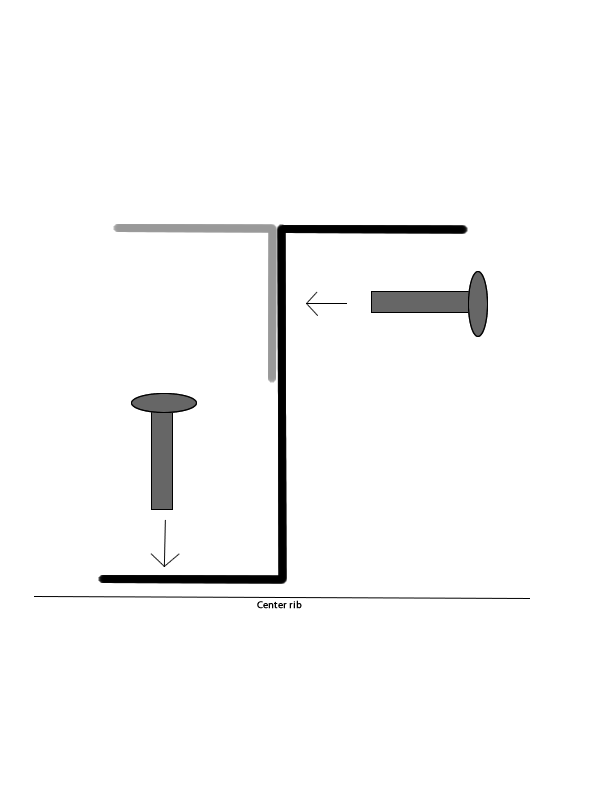
I don't know for sure how your Z section and the aluminum stringers were arranged before your demolition job but they didn't look like your drawing in my 14 footer. In my boat, the Z section runs fore-aft and is riveted through the bottom into the tops of each rib. From the pictures you posted, the Z section is also fore-aft and I can see the holes in the top of the ribs along the centerline where it was attached so I think your boat is put together just like mine. I don't have anything that I'd call a "center rib" as you've labeled in your sketch but if you meant the center of the rib, then the orientation of the Z section is fine. The stringer is going the wrong way though. My stringers run port to starboard, not parallel to the top of the Z section. They weren't riveted to the Z section other than as part of a sandwich where the floor covered the stringer and there was a rivet down through the floor. I'm not good with any drawing program but I've attached a couple pictures of my boat during demolition (note the 24 years of crud on the bottom) showing the Z section layout and the two stringers. The first picture is of the aft end looking starboard, and only the aft most floor section is removed. You can see the end of the Z section and half of the stringer (the other half is still under the next floor section) on the left side of the picture. The rivet hole at the end of the Z section is from a floor attachment rivet. There are no rivets going through the vertical part of the Z section. The second picture is with the floor all out looking forward. The forward stringer is still in but this part of the picture is kind of dark (sorry), but you'll get the idea.

The stringers on my boat were thin aluminum plates, about 4" wide by about 4' long and are riveted to each edge of the floor panels they joined. Unfortunately, I've never seen this kind of material in your normal hardware stores or HD or Lowes. You could use thin angle sections, but you'll have to break the stringer where it meets the Z section and you'll have to make it short enough (or taper it) so that it doesn't interfere with the ribs out toward the edge of your floor. I happened to have a couple scrap pieces from an old project laying around that were thin and flat so I used them for the new joint I added to my floor. To be honest, I think the stringers could be made from wood as long as you sealed the stringers too, but you'd still have to have a break where they crossed the Z section. I don't think that's a problem though since they just join the floor sections and don't provide any strength.

Good luck, 1988 Starcraft

2-17-12 Looking Starboard.jpg

2-22-12 Floor All Out.jpg
 
Last edited:

1988Starcraft

Seaman
Joined
Nov 30, 2011
Messages
72
Re: 1973 Starcraft 15.5ft unknown model AMBITIOUS restoration

I also meant to let you know which rivets I used for my 14 footer. I got them from www.rivetsonline.com like jigngrub recommended. I couldn't find the rivets I needed locally. I used all aluminum rivets to avoid any possibility of rust even though the steel mandrel rivets would have been stronger. The original rivets were all aluminum so that's what I used. Where I attached the floor (7/16 Arauco Ply) I used Large Flange Head PR610AAL rivets. The large heads were to keep from crushing the outer layers of plywood when the rivet got tight. I did a test on scrap pieces and the smaller head rivets often did damage. They were also long (grip range .501 - .625) so that I could go through the plywood and still get a good grip on the ends of the ribs. The rivets I used to fix leaks in the hull were either Closed End Blind Rivets PR62AAPH or PR64AAPH. The 64 is just a longer grip range than the 62. The longer grips worked well where I was fixing leaky rivets in the hull where they went through the rib flanges, but they stuck out too far for the attachments of the seats, console and storage areas so I used the shorter rivets for that. When I built my casting deck I used more of the large flange head rivets and the longer closed end blind rivets because because I had plenty of extras. If you can plan ahead, buy all your rivets at once and you'll save shipping charges. I paid more for shipping than I did for rivets but they were fast and just what I needed. Live and Learn. I hope the experience I gained with my project helps. 1988 Starcraft
 
Last edited:

tcampbell011

Seaman
Joined
Aug 29, 2011
Messages
69
Re: 1973 Starcraft 15.5ft unknown model AMBITIOUS restoration

Ok thanks for the input. I've been contemplating different ways to do the cross strips out of aluminum and the best idea I have came up with is to use this:

http://www.onlinemetals.com/merchant.cfm?pid=1130&step=4&showunits=inches&id=997&top_cat=60

Its essentially an aluminum board, 1/8" thick and 3" wide. I would rivet these to the Z channel. Then I could rivet the plywood to the aluminum flat pieces. What do you guys think?

I've got my last final tonight so the next couple days will be spent on preping the inside of the hull for gluvit. I saw a forum where someone used paint stripper on the aluminum. Do you think that's safe? / any suggestions on stripping and sanding procedure?
 

jigngrub

Fleet Admiral
Joined
Mar 19, 2011
Messages
8,155
Re: 1973 Starcraft 15.5ft unknown model AMBITIOUS restoration

I believe the Gluvit instructions/directions calls for a wipe down of laquer thinner prior to application. I would wire brush instead of sanding.

Have you performed a leak test yet? It's better to fix/repair all known leaks before applying the Gluvit, Gluvit works better as a preventive measure than a fix.
 

lakelover

Rear Admiral
Joined
Mar 26, 2003
Messages
4,386
Re: 1973 Starcraft 15.5ft unknown model AMBITIOUS restoration

I saw a forum where someone used paint stripper on the aluminum. Do you think that's safe? / any suggestions on stripping and sanding procedure?

If you are talking about removing the paint from aluminum with paint stripper, you can use it with no problem. Just be sure to thoroughly rinse off all the residue afterward. After trying a few different strippers, I found this to be the fastest (orange can, not red). If you use it, make sure to wear gloves and eye protection, it's really caustic to get on yourself.

w3DSC_3936.jpg
 

1988Starcraft

Seaman
Joined
Nov 30, 2011
Messages
72
Re: 1973 Starcraft 15.5ft unknown model AMBITIOUS restoration

1988 Starcraft again. The aluminum bars you choose will work fine. A few things you need to think about in advance. If .125" thick is as thin as you can find (Try a sheet metal,HVAC shop. That's where I got my thin aluminum sheet pieces. They may even have it as scrap) you probably don't want (or need) a continuous stringer that goes over the Z section. Using the .125" bars would give you a spot in the middle of your floor where there was a .125" bump. Just attach a stringer to the floor on either side of the Z section and it will still keep the plywood in place. The wood itself will need a rivet to the Z section at the end of the section anyway so the whole thing will still be fixed together. My opinion is that the stringers add no strength (at least the really thin ones in my boat certainly don't) and at most just serve as an alignment and anti-warping function so if they're not directly attached to the Z section it doesn't matter. If you use the .125" aluminum bars, you might want to buy some longer grip range rivets to make sure you can go through the aluminum, the plywood and whatever floor covering you apply. Mine went up to .625" but that would not leave you much extra if you use 7/16" plywood which was what my original (and new) floor uses.

As far as a construction sequence goes, Whether you find thin stringers and want to have them go over the Z section or not, don't rivet them to the Z section first. Start at an end floor section and attach the aluminum stringer(s) to it off hull first. Off hull it's easy to use clamps to keep the stringer where you want it and easier to drill through both at once. Tack that floor section into the boat with a few rivets to keep it in place (you can finish riveting it in after you're sure you've got it aligned right and everything fits perfect). Then install the next stringer (or pair of stringers) on the adjoining floor section (again off hull), align the second floor section, and tack it in place. That way it will be easier to get the stringers nice and square and you'll be able to drill through both the plywood and the aluminum stringer in one shot to attach the adjoining floor sections. Work your way forward (or aft) this way and you should be able to get everything aligned and drilled cleanly with minimum hassle. I used basically this sequence in my 14 footer and had no problems installing the floor. That job took about 4 hours with no help.

As far as cleaning the hull goes, I used a power washer and it came out very clean: just a little grit along the keel that I had to sponge up afterwards. The Gluvit does say to use lacquer thinner as a cleaning agent but only do that after you're done with the power washing. I used a couple small wire brushes I got at HD and liberally applied the thinner with the brush to every rivet and seam below the waterline. It's tedious work, but I didn't want to do anything that would keep the Gluvit from doing it's job. The whole boat brush-down took a few hours but when I was done it was spotless. As jigngrub mentioned do your leak checks before you apply the Gluvit because if you have to make repairs, you can seal up the new rivets at the same time.

I enjoy giving you the benefit of what I learned with my boat for your project. It kind of feels like payback for all the help I got with mine here at iBoats. 1988 Starcraft
 
Top