1975 Crestliner "Muskie" 775 - A New Project

avpaulb

Petty Officer 1st Class
Joined
Jun 19, 2011
Messages
298
Re: 1975 Crestliner "Muskie" 775 - A New Project

Well, although I took a couple days off from the ole project this week, a bet is a bet: I got the floor back in! Not bad for about 18 hours of total work!

For the record, I wound up keeping Mega-Box-Depot's resin and trying it out. It worked pretty well. To glass in the new floor supports and the entire deck, PB'd in, tabbed with 1708, and 3 layers of CSM took 5 gallons. I figured that's about the amount of a quality laminating resin I would have needed as well. So, I'm satisfied.

Only catch... I had to work NON-STOP for about 10 hours today between layers. Waxed resin. But SOLID. My two cents, if you're in a time crunch and have a Home Depot, don't be afraid of the 3M resin but be prepared to lay some glass!

New supports, wet:

IMAG0163.jpg

And yes, I thoroughly vacuumed and acetoned between all steps. Underside of decking wet and glassed with 1 CSM layer:

IMAG0164.jpg

Final test-fit with bottom glassed. Note stringers and supports are pre-marked:

IMAG0167.jpg

Screwed and glued with a LOAD of PB:

IMAG0173.jpg

Tabbed with 1708, and glassed with 3 layers CSM:

IMAG0174.jpg

I did ultimately manage to remove the gas tank and clear both sides of the engine compartment and re-glassed the deck all through. Core drilling of the decking in this area revealed good wood.

Hard to tell from the pics:

a) I was able to make the entire deck level using PB around the edges of the deck before glassing in.

b) A couple of air bubbles managed to sneak in. I'll deal with those tomorrow.

c) I actually did make a bulkhead for the center support. I didn't realize the picture didn't take until the deck was on.

Plans for the remainder of the week:

1. Sand and patch the deck as needed.

2. Build seat boxes for driver and passenger... adjustable with storage included! Reinstall rear seat boxes and bow cushions.

3. FOAM! Yippee.

3.1 New carpet en-route! Yippee.

4. Raise console area to accommodate window closing. (I tested this already... it worked... more to the story later)

5. Glue in fishing seat pedestal mounts. (Included with the boat... more to follow)

6. FIberglass bow fishing insert (hard to describe, but included from PO, and I like it. Short story: PO built a fishing deck with a swivel chair.)

7. Re-install tank, etc.

8. Light mechanical required on carb... I think.

9. Splash?! Walleye? Trout? Maybe...
 

avpaulb

Petty Officer 1st Class
Joined
Jun 19, 2011
Messages
298
Re: 1975 Crestliner "Muskie" 775 - A New Project

Looking to pour foam tonight! Had one quick question that I haven't seen addressed previously: should I block my drain holes leading to the bilge with something? Rather than tilting the bow-side down, I'm going to have to raise it to pour starting at stern-side. The open seating area of the boat has nothing to seal off the bow below, so I'm going to be working a bit backwards.

Seems like I should... but doesn't hurt to ask.
 

avpaulb

Petty Officer 1st Class
Joined
Jun 19, 2011
Messages
298
Re: 1975 Crestliner "Muskie" 775 - A New Project

Bueller?
 

Woodonglass

Supreme Mariner
Joined
Dec 29, 2009
Messages
25,929
Re: 1975 Crestliner "Muskie" 775 - A New Project

Drain Holes are kinda a moot point with a foam filled hull and a totally sealed deck, eh????
 

avpaulb

Petty Officer 1st Class
Joined
Jun 19, 2011
Messages
298
Re: 1975 Crestliner "Muskie" 775 - A New Project

Drain Holes are kinda a moot point with a foam filled hull and a totally sealed deck, eh????

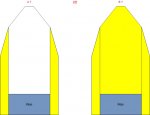
Some previous comments have suggested that I foam darn near everything from bow to stern below the deck, other than the bilge area under the motor.

The outside stringers are VERY close to the sides of the boat. If I only foamed here, we're talking about 4 inches in depth, 8 inches wide, by 8' long. Approximately 1/2 cubic foot of floatation per side, which amounts to about 30 lbs per side. Not nearly enough I'm thinking.

Conversely, if I foam the entire deck back to the bilge, I calculated about 11 cubic feet, or more. Now we're closer to 700 lbs. The lids is also foamed.

SO, the question is: which way to go? (See PIC)

Foam Draw.jpg

If I go with B option, I would have to temporarily plug the drain holes in the rear to keep the foam above the bilge area. Unplug when done.
 

avpaulb

Petty Officer 1st Class
Joined
Jun 19, 2011
Messages
298
Re: 1975 Crestliner "Muskie" 775 - A New Project

And... the "Pouring Foam ins and outs" sticky thread in this forum would also suggest option B...
 

jmmacky

Petty Officer 2nd Class
Joined
Jun 20, 2011
Messages
177
Re: 1975 Crestliner "Muskie" 775 - A New Project

I decided to completely seal and foam below the deck in my rebuild so that all drainage is now above deck. I just felt that I would rather not have water potentially pooling between the stringers and bulkheads. The only bits not foamed are the fuel tank compartment and bilge. There is a plug in the bulkhead aft of the fuel tank compartment which I can undo from the bilge periodically to make sure there is no water in there. I have seen some threads where people have foamed the fuel tank compartment as well. Hope this helps!
 

avpaulb

Petty Officer 1st Class
Joined
Jun 19, 2011
Messages
298
Re: 1975 Crestliner "Muskie" 775 - A New Project

My tank happens to be above deck, inside the engine compartment. Which I find strange.
 

avpaulb

Petty Officer 1st Class
Joined
Jun 19, 2011
Messages
298
Re: 1975 Crestliner "Muskie" 775 - A New Project

FOAMED! Letting everything cure for a bit, then I'm PB-ing the plugs back in.

For the record: foam is way more fun than it needs to be.
 

jackd1023

Petty Officer 1st Class
Joined
Aug 15, 2006
Messages
269
Re: 1975 Crestliner "Muskie" 775 - A New Project

Another side topic: wth is this? A tube running in the engine compartment connected to drains on the hull from low on the starboard side, under the engine, and back out low on the transom. Not connected to anything in between.

View attachment 189240

View attachment 189239[/QUOTE
This was probably for a livewell, pump in drain out
 

avpaulb

Petty Officer 1st Class
Joined
Jun 19, 2011
Messages
298
Re: 1975 Crestliner "Muskie" 775 - A New Project

[/QUOTE
This was probably for a livewell, pump in drain out[/QUOTE]

Now it's just an in and out. Immediate.
 

avpaulb

Petty Officer 1st Class
Joined
Jun 19, 2011
Messages
298
Re: 1975 Crestliner "Muskie" 775 - A New Project

Ice Cream Cone = 1 Teaspoon Foam:

IMAG0176.jpg

Parts A and B:

IMAG0181.jpg

Bow Seating Plug Cut:

IMAG0178.jpg

Bow Seatin Plug Done:

IMAG0187.jpg

Foam creeping up, mid-deck:

IMAG0182.jpg
 

avpaulb

Petty Officer 1st Class
Joined
Jun 19, 2011
Messages
298
Re: 1975 Crestliner "Muskie" 775 - A New Project

A bit messy, but successful flow into each plug, and filled with PB:

IMAG0188.jpg

Tomorrow, a bit of cleanup. Foam was a success bow to stern, so moving on to LOTS of vacuuming and acetone. Going to remove the throttle housing for painting, as well as the fuse and switch panel for wiring on Friday. Also going to get the window back to closed status.

More to follow! Lots of minor hole patching, carb work, stereo wiring, and hopeful float!
 

avpaulb

Petty Officer 1st Class
Joined
Jun 19, 2011
Messages
298
Re: 1975 Crestliner "Muskie" 775 - A New Project

Yes, I do exist!

I've got a bunch of small projects to get done now that the major structural is done! And time is short! It's supposed to actually be warm this weekend! (Snowed again today)

Project #1: Seats and Seat Boxes

I'm not a fan of rotating seats mounted on poles, which is what was installed when I picked this up. I'm also not a big fan of the back-to-back seat which would have originally been in here. Ultimately, I plan on a single fixed front seat, but for now:

IMAG0191.jpg

IMAG0192.jpg

IMAG0194.jpg

IMAG0197.jpg

The PO had purchased some cheesy rotating seats and put them in before. The boat is GLORIOUSLY lacking in storage, so I figured I'd build some seat boxes with a bit of space to put stuff in. I'm going to attempt to paint the seats to go along with the general 70's interior.

Also, removed the PUKE YELLOW throttle housing for painting. Tan or brown coming. A bit less yucky.

Anyway, just finished slapping some resin on these buggers. The plan is to come up with a detachable top to allow Captain Wifey to scoot forward a bit. Also allows for about a cubic foot of storage.

Lures? 6-Pack?

Removed gas can and re-painted. Epic carpet LOG also arrived. Once I'm done with the minor interior projects we'll start on that!
 

avpaulb

Petty Officer 1st Class
Joined
Jun 19, 2011
Messages
298
Re: 1975 Crestliner "Muskie" 775 - A New Project

And to clarify... I have a seat to go ON TOP of the boxes.

AND... the windows now close. Pics to follow someday.
 

avpaulb

Petty Officer 1st Class
Joined
Jun 19, 2011
Messages
298
Re: 1975 Crestliner "Muskie" 775 - A New Project

Anyone ever use that glue you use to glue carpet to concrete for their boat?

Cutting carpet today. Forgot to order glue. Oops.
 

Woodonglass

Supreme Mariner
Joined
Dec 29, 2009
Messages
25,929
Re: 1975 Crestliner "Muskie" 775 - A New Project

This will work...
8533_W_W00271_PPM.jpg
 

avpaulb

Petty Officer 1st Class
Joined
Jun 19, 2011
Messages
298
Re: 1975 Crestliner "Muskie" 775 - A New Project

This will work...
8533_W_W00271_PPM.jpg

Found some... worked pretty well!

Progress report: seat boxes are built, carpeting is in. Now working on reassembly! Many pics to follow! It's been a long 10 days or so so haven't had time to post.

In the meantime I did have a question that I'll add here, even though it's a bit more mechanical:

Getting the gas can back in...

One thing I noticed when I removed it was that the fuel line from the can to the pump ran UNDER the motor, probably touching the oil pan.

Is this possibly correct? Or should I run in somewhere else, if possible?
 
Top