1976 Century Arabian - Mercruiser 888 - Boat Restoration

jones01m

Petty Officer 1st Class
Joined
May 23, 2011
Messages
252
Re: 1976 Century Arabian - Mercruiser 888 - Boat Restoration

...as I was saying. Not sure how to just cancel a post once I started it.

MM, not sure how pulling out some poundage during the rebuild would change the vessel dynamics. Currently, the 22 gallon gas tank is in the bow and there isn't a great deal of change in the feel between full and empty, so that is a weight change of approximate 120 lbs (this might be an argument not to worry about weight?). What if I could pull out another 80-100lbs. The stern sits pretty flat where the engine sits so she seems pretty stable.

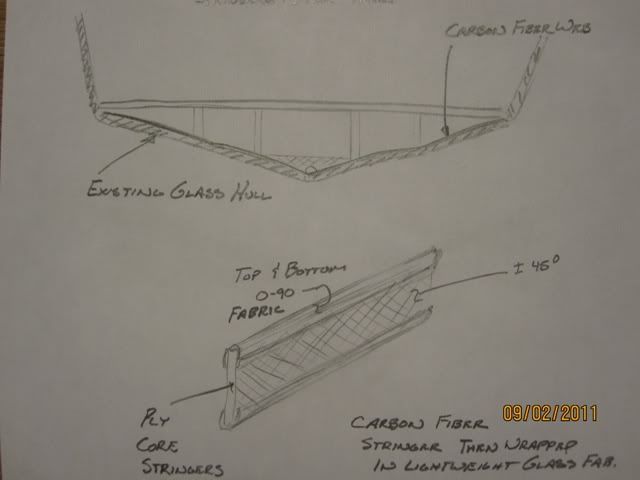
When I look at a transverse cross section through the hull it looks just like a truss. What if I lined the inside of the hull with a carbon fiber weave oriented 0-90 from stern to bow to behave as a stiff web attached (bonded with epoxy) to the bottom side of the stringers. As pressure from the water loads the web, the truss will absorb it, as it should. I could really stiffen the structure up by wrapping carbon fiber in the stringers oriented +-45 on the sides with bottom and top caps running 0-90 (considered using unidirectional on top and bottom). My thinking is the existing fiberglass hull just goes along for the ride and absorbes impact damage.

I'm thinking out loud here...

I sketched this out

IMG_2026.jpg
 

jones01m

Petty Officer 1st Class
Joined
May 23, 2011
Messages
252
Re: 1976 Century Arabian - Mercruiser 888 - Boat Restoration

I started in late last night and early this morning with my first glassing. Learned a good deal of lessons here. I think I'll start listing my lessons learned at each step in the process. Like I said, I am new to this, so I will be learning plenty.

Filling the strake radius with Peanut Butter

I made some peanut butter to make a better transition in the strake radius. Getting the PB mixture right is a bit of an art but I think I've got it: 9 squirts resin, 3 squirts hardener, 7 scoops (1/4 cup measure) cabosil, 1.5 scoops 1/4" glass fibers.
I found that if it slumps at all in the mixing container it needs more cabosil.
I used cut plastic milk containers and a broken plastic coat hanger to mix things up.

First I wiped the strake with MEK, then I ran a bit of epoxy on the strakes, followed by application of PB. I dished the PB out of the milk container with a plastic disposable knife, then used a plastic spreader for doing the rest. This spreader, purchased in a pack of ten at USComposits, was my best friend. I simply slopped the PB out into the strakes and then slid the spreader over the top down the strake from stern to bow and it made a perfect fillet.

Glassing

Sanded the previously applied PB and areas of epoxy with 60 grit and electric da with vaccuum attached. Wiped with MEK then laid down some prefit glass. Poured resin over the top and squegeed (sp?) it around with my new best friend the yellow plastic spreader. Wet out very nicely.

The photos show the work: filleted strakes and what appears to be a portion of the bow that is wet - this is the wetted out glass.

Lessons Learned

1) Mix the PB until it no longer slump in the mixing container. You fight it all the way if it sags on you
2) Limit the size of the glass used. It can be a bit frustrating when you get a fold or a bubble on a large sheet
3) When pre-fitting the glass try not to have it form around too many different transitions. You can squeegee in one direction and the glass moves to pull up off another transition.

I am pretty happy with the results so far.

Materials Used
IMG_2027.jpg


First glassing - EVER!!!
IMG_2028.jpg
 

MountaineerMiner

Petty Officer 2nd Class
Joined
Mar 9, 2010
Messages
146
Re: 1976 Century Arabian - Mercruiser 888 - Boat Restoration

Awesome progress!

My first attempt at PB was just short of a disaster, lol


I then found this technique to be most productive and least wasteful
I mixed the PB up in container A, and then poured that PB into a 1 gallon Ziploc bag that I held open by putting it inside another paint bucket like a garbage bag in a can. I then sealed the bag and cut a slit in one corner like a cake frosting bag. For forcing the PB into tight areas, like under a stringer it can?t be beat!

IMG_0530.jpg

IMG_0532.jpg

IMG_0534.jpg
 

jones01m

Petty Officer 1st Class
Joined
May 23, 2011
Messages
252
Re: 1976 Century Arabian - Mercruiser 888 - Boat Restoration

MM, That is some tight looking stringer work. What a great idea with the ziploc bag. I will try this next time around.
 

Friscoboater

Captain
Joined
Jul 3, 2009
Messages
3,095
Re: 1976 Century Arabian - Mercruiser 888 - Boat Restoration

Very nice. I tried that bag trick, but it did not work well with the Poly.
 

MountaineerMiner

Petty Officer 2nd Class
Joined
Mar 9, 2010
Messages
146
Re: 1976 Century Arabian - Mercruiser 888 - Boat Restoration

frisco,

Did it kick in the bag before you got it out? This happened to me the first time I tried it; to extend the working time I wait until I have all the PB in the bag then dump in the shot of MEPK and kneed it in the bag to mix it in, works well. I bet with the extended working time of epoxy it would be even better, I only worry about the heat melting the bag. Maybe I am not mixing my epoxy correctly but it tends to get extreamly hot, sometimes even melting the solvent resistant mixing cups (only when adding fillers for some reason).
 

parrisw

Ensign
Joined
Jun 8, 2009
Messages
985
Re: 1976 Century Arabian - Mercruiser 888 - Boat Restoration

Nice project, nice boat. I love the look of those boats.

Tip for mixing, I welded up some 1/4 steel rod to form a T, chuck it in a drill and now you have a powered mixer, I found that it saved me lots of time, and really helped when doing a big layup and mixing multiple buckets of resin, and also saved my arm and wrist and hand from cramping from mixing, it really helps with mixing of the PB, since it's so thick.
 

MountaineerMiner

Petty Officer 2nd Class
Joined
Mar 9, 2010
Messages
146
Re: 1976 Century Arabian - Mercruiser 888 - Boat Restoration

I like this....i will try it for sure next layup I do. like a small paint mixer
 

jones01m

Petty Officer 1st Class
Joined
May 23, 2011
Messages
252
Re: 1976 Century Arabian - Mercruiser 888 - Boat Restoration

Thank you for the comments and suggestions. The positive words help a great deal. No one understand what an undertaking this is exept those who have been through the process before. My neigbors just think its that crazy guy doing something in his garage again.

I have found so far that I am a bit too slow to mix large quantities of resin. When I lay the glass the max I can do is a 6 squirt batch. I am definitely going to construct a mixer for my next batch of peanut butter though.

--------------------------

Update: This weekend has been challenging. Laid my first glass Friday and was pretty happy with the results. I did notice that when the glass was aplied to the hull that it tended to pull away form the low spots leaving a bit of an air bubble. To correct this I mixed up some epoxy filler and filled the low spots followed by a full sanding with the dewalt da (random orbital) sander. Also, I laid down a little thickened resin prior to setting the glass. Both definitely helped. As kpiazzisi explained in his thread, CSM mat seems to be the perfect solution for providing a resin rich base to make up for the low spots. I am, however, using epoxy (for the reasons I explained earlier) so I would have to use a stitched CSM and not the standard mat that breaks down with the poly. This is where the poly guys are having a big chuckle. I wouldn't change my decision though, I just have to work through the solution.

Lessons Learned

1) When you don't use CSM against the hull substrate you must insure it does not have low spots
2) Fiberglass roller works well for working out air bubbles.
3) Once the first layer of glass is down, keep moving with additional layers. The added layers bond real easy without air bubbles. Keep using the FG roller.
4) Brushing some resin to the subtrate and letting it stand for some time to thicken helps
 

kpiazzisi

Petty Officer 2nd Class
Joined
Jun 19, 2005
Messages
164
Re: 1976 Century Arabian - Mercruiser 888 - Boat Restoration

Jones,

Looks like you are doing some excellent work! I am feeling itchy again just thinking about all that grinding you are doing. Thanks for the kind words. The only other thing I can suggest is to work " wet on wet" as much as possible. For example if you are tabbing in your stringers, pick a section to work on (not too large of an area). Make your PB and apply as quickly as possible. It doesn't have to be perfect...I'll explain why. Next, mix your resin. Brush a small amount of resin on the fillet (this will smooth it out a little). Finally, lay your fiberglass tape (1708) over the fillet and work the glass with brush, roller, squeegee, etc. If you are quick enough, what you will find is that the fillet will conform to the layup and you won't have air bubbles.

I haven't reinforced the entire hull with glass, so I am not sure how the "wet on Wet" would work in that situation. If you had two helpers, you could probably accomplish a wet on wet layup of the entire hull. You probably already know this, but when everything cures in one layup it's a chemical bond. If you put one layer down and then sand, the second layer will be a mechanical bond. The mechanical is not quite as strong but still sufficient. The main advantage of the wet on wet, if you can pull it off is the labor savings in not having to sand.

Try www.raka.com for your fiberglass. Larry is awsome, but the other are helpfull as well. I used US composites epoxies also. Raka also sells epoxies, but they are slightly more expensive. I talked to an employee at Raka who explained that they add an additive to their epoxies that reduces micro air bubbles. Apparently when you mix epoxies it's really easy to introduce tiny air bubbles. The air bubbles don't dissipate no matter how much you squeegee. You will still end up with a really strong laminate, but the micro bubbles do weaken the laminate. Raka also sells an epoxy called "tropical Formula" which is a super slow drying resin. I have used it and like the extra working time that it allows.

Good Luck!
 

jones01m

Petty Officer 1st Class
Joined
May 23, 2011
Messages
252
Re: 1976 Century Arabian - Mercruiser 888 - Boat Restoration

KP, thanks for the comments and suggestions.
With respect to bubble problem I ran a test this morning before work (4am I can't stop thinking about this). I thickened the epoxy mixture with cabosil to the point where it would not slump, then squeegeed it on the hull in a 2x2 foot area. I layed the glass on top and worked it into place with my hands followed by a wetting out of unthickened resin. I then rolled it over with the FG roller and any bubbles disappeared into the thickened bedding. It seemed to work like a charm - no bubbles.

If anyone sees a problem with this please comment. I don't want someone to repeat this if it is not a sound process
 

kpiazzisi

Petty Officer 2nd Class
Joined
Jun 19, 2005
Messages
164
Re: 1976 Century Arabian - Mercruiser 888 - Boat Restoration

If there were no air bubbles and the whole thing cured together, then that's the best you could hope for. Awesome!
 

parrisw

Ensign
Joined
Jun 8, 2009
Messages
985
Re: 1976 Century Arabian - Mercruiser 888 - Boat Restoration

If your laying up after the previous layer has cured, give it a good wipe with acetone, it softens it up pretty good and will give you a much better adhesion. I did my deck over a few days, 1 layer each day and it was fine.
 

jones01m

Petty Officer 1st Class
Joined
May 23, 2011
Messages
252
Re: 1976 Century Arabian - Mercruiser 888 - Boat Restoration

KP, thanks
parrisw, appreciate the tip. I soften the laminate up this mornign with some MEK. Man that stuff is strong.

---------------------------------

I'm making some good progress. Received some 1700 glass last night - what a difference in the layup. I read a post a couple of day ago from Yaht Dr. and he says that he pretty much does everything with 1708 and CSM. Well, I am using epoxy so I ordered the 1700, which is the same as 1708 without the CSM stitched to the back. Previous layups I was just doing some patching and thought I could get away with 8 harness woven satin glass - don't bother with this junk. My thought was I could get a super stong laminate with multiple layers and little resin. This may be true on a flat surface but when forming around contours nothing beats the 1700 (or 1708 for poly). This is the easiest stuff you can work with. Lay it down, soak the carp out of it with resin then roll, squeegee, or dab with a brush, and it lays right down with no air bubbles.

OK enough with that.

Bow Glassing

I finished the bow this morning. It had several areas that needed patching so I made several layers of patching then followed it up with one large covering of 1700 glass. I am very pleased.

Transom Started

Made a patern by ripping 1/8" masonite into 2" strips. Hot glued the strips to form the patern then transferred the pattern to 3/4 marine ply (Wurth lumber Charlotte). Set the ply into place and notice that this Century is not planer in the back. I set a straight edge everywhere and realized they made some curved surfaces in the transome. 12" either side of the stern drive is flat, so I am splitting the first layer of 3/4" ply into three pieces. When I put the second piece on it will span between the three to make one contiguous piece.

So, for the center section I do not want any through hull bolts to touch wood so I am oversizing the holes and filling them with PB then after setting in place I will redrill on assembly through the center so that the bolts just "see" epoxy. I chamfered all edges with the router for a smooth transition when I apply the glass.

I also had fun making a pattern out of a single glass sheet for mapping out the transom plate. This is just a piece of glass with resin and wax paper on one side. It sat in the oven @ 200 for 20 minutes and cured. Check out the starboard and port notes - I reverse these on accident.

Glassed Bow
IMG_2073.jpg


Transom Plate Pattern
IMG_2070.jpg


Masonite Pattern Transfer
IMG_2067.jpg


Final Transom Scribing
IMG_2069.jpg


Transome Center Section
IMG_2072.jpg
 

jones01m

Petty Officer 1st Class
Joined
May 23, 2011
Messages
252
Re: 1976 Century Arabian - Mercruiser 888 - Boat Restoration

A little more on the transom here. I woke up this morning thinking about the transom being out of plane. I placed a straight edge at the through hole in the transom down low where it meets the hull to insure there was no deflection that should not be there. It is showing approximately 3/4" arc from center to both the starboard and port - a bit difficult to see in the picture. The only resolution I could think of was to split the ply vertically into thirds. Now that it is split I want to make sure the whole assembly goes back together symmetrically. I am a little worried that when she is all bonded and clamped that I will skew the shape... permanently!!! Maybe I worry to much???

Any suggestions?


IMG_2078.jpg


IMG_2079.jpg
 

ezmobee

Supreme Mariner
Joined
Mar 26, 2007
Messages
23,767
Re: 1976 Century Arabian - Mercruiser 888 - Boat Restoration

Nice work!
 

MountaineerMiner

Petty Officer 2nd Class
Joined
Mar 9, 2010
Messages
146
Re: 1976 Century Arabian - Mercruiser 888 - Boat Restoration

Jones,

I really like the portable drill press idea! I wish I had done that!
 

jones01m

Petty Officer 1st Class
Joined
May 23, 2011
Messages
252
Re: 1976 Century Arabian - Mercruiser 888 - Boat Restoration

thanks EZ

MM, when I get the transom to the final thickness and the center section all laminated together, I plan on taking the assembly to a drill press. 1/2" x 2" long holes will be almost impossible to get straight. The portable jig works OK. I also transferred the transom plate pattern to 1/8" masonite jig to get an accurate gage of both the inner and outer plates. Getting this right seems so important.

-------------------------------------------

Really could use some suggestions on the curved transom shown by the picture with the red level in post #56. It has about 3/4" curve from center to outer edges by design. The center I must maintain thickness and parallelism but the side it appears I need to bow out. I am thinking about cutting reliefs with a circular saw 3/8" deep in the back of the side panels and then filling with epoxy PB when I assemble to shell to get the correct curve??
 

parrisw

Ensign
Joined
Jun 8, 2009
Messages
985
Re: 1976 Century Arabian - Mercruiser 888 - Boat Restoration

Really could use some suggestions on the curved transom shown by the picture with the red level in post #56. It has about 3/4" curve from center to outer edges by design. The center I must maintain thickness and parallelism but the side it appears I need to bow out. I am thinking about cutting reliefs with a circular saw 3/8" deep in the back of the side panels and then filling with epoxy PB when I assemble to shell to get the correct curve??

That would work, but youd have to make darn sure you got all the kerf cuts filled. Or you could build a laminated transom out of 1/4 ply and hold it to the proper curve while the glue sets.
 
Top