1977 Cruise Boats Restore

Joined
Aug 17, 2009
Messages
941
Greetings to everyone in this forum.

Well I have finally decided to start a thread on my boat restoration project. But first I want to say thanks to everyone here for all of the helpful posts and pics on every aspect of boat rebuilding. This is truly an amazing site, packed full of expertise from all around the world.

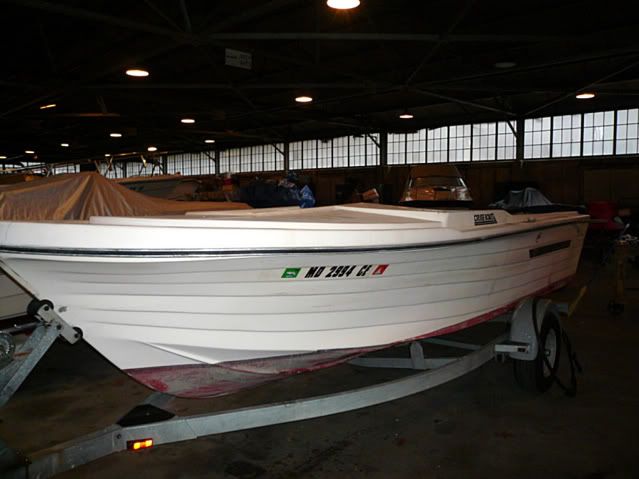
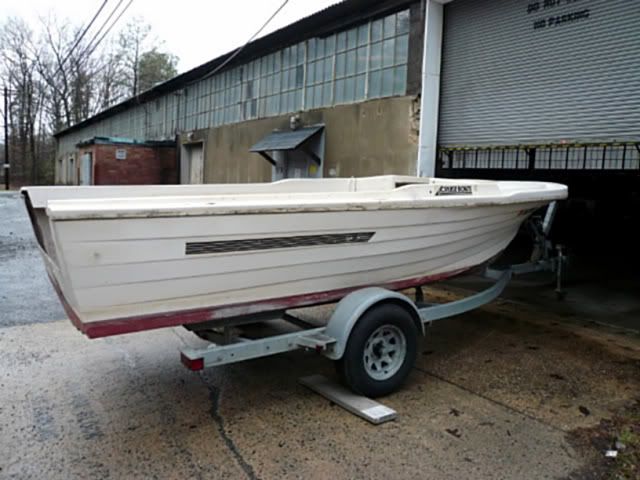
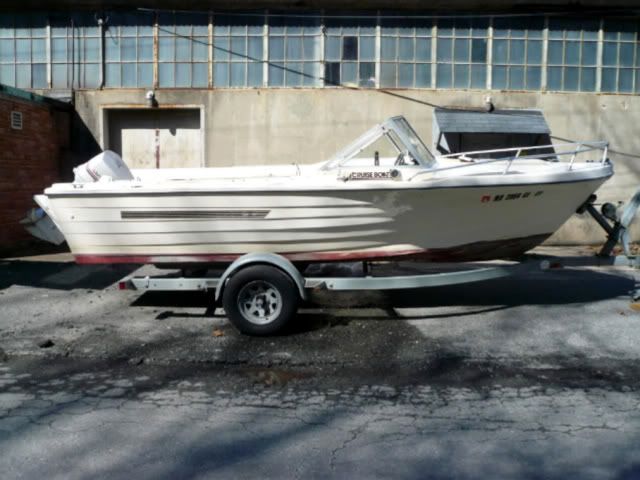
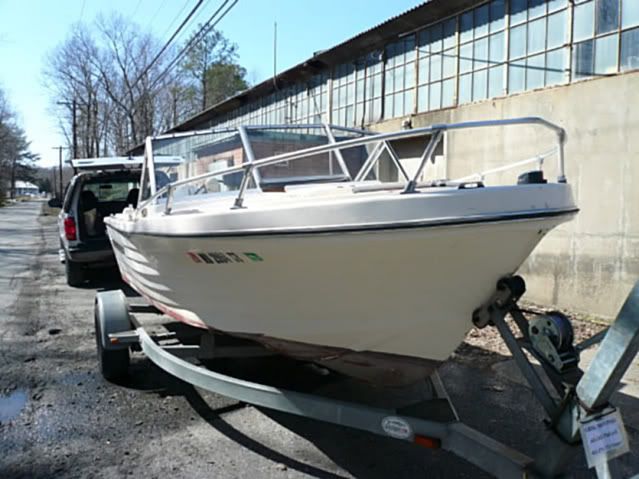
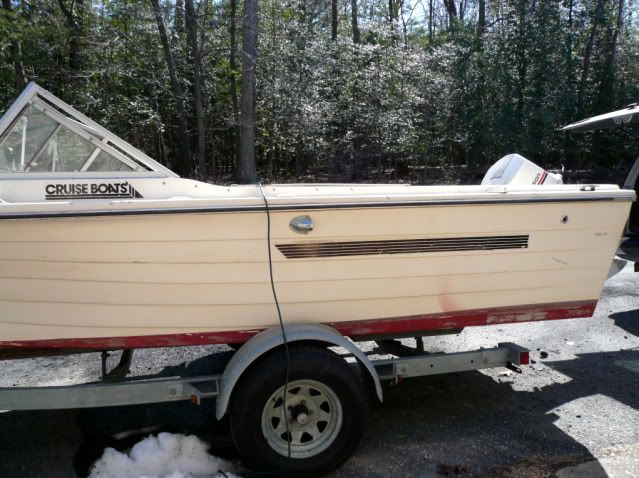
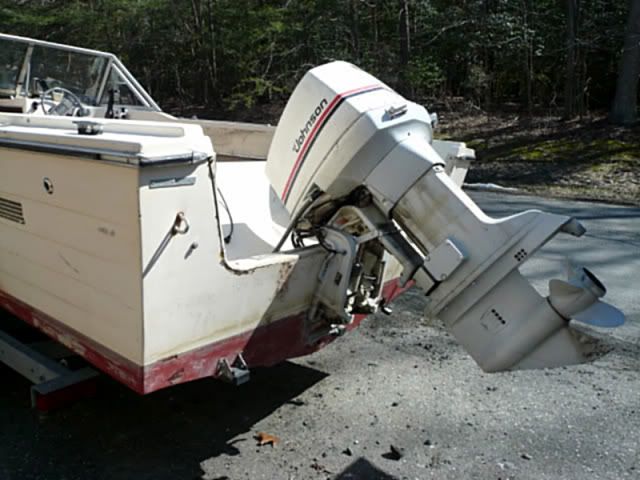
I picked-up a 1977 Cruise Boats 17? fiberglass runabout with a 1983 115 Hp Johnson outboard last summer. I wished that I had read more here before buying but I was looking for a project boat and I sure found one. The plus side was the trailer was fairly new and in great shape. Also the outboard runs very well and I sorted out what few problems it had before starting the rebuild. I did run the boat a few times last summer and it seemed to run pretty good but I could tell that it was probably water logged so I decided to take the plunge and started the rebuild back in March of this year. My plan was to finish by September but I am only a little more than halfway there which is okay because I will definitely have this baby complete by next spring. So, here we go:

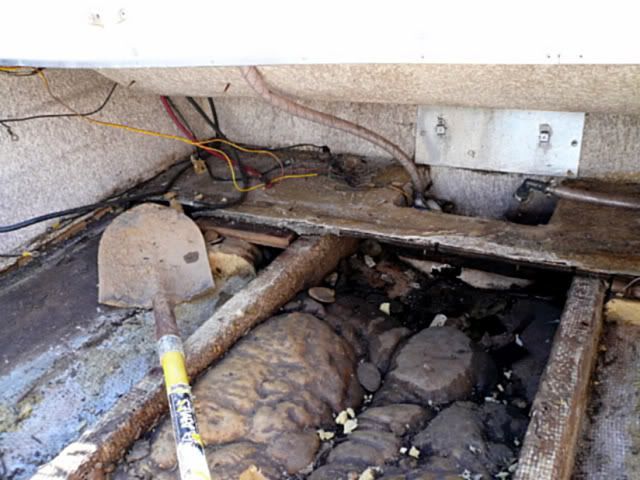
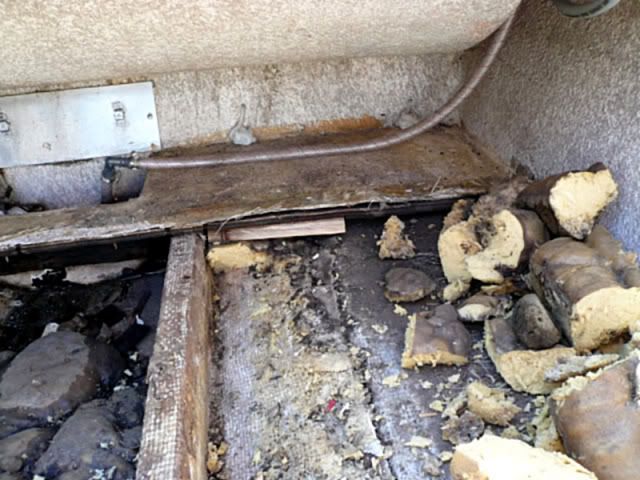
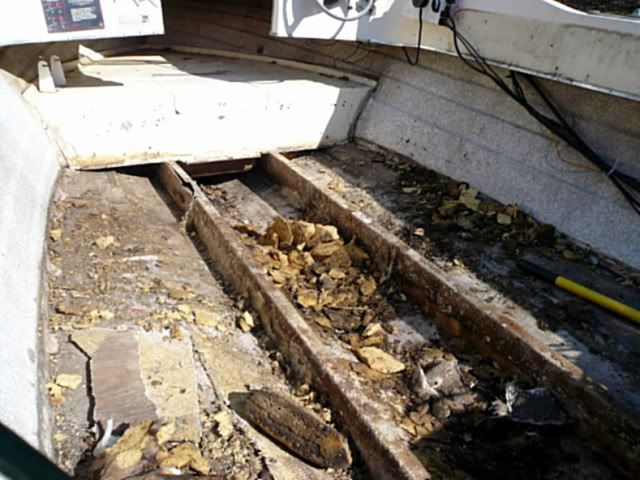
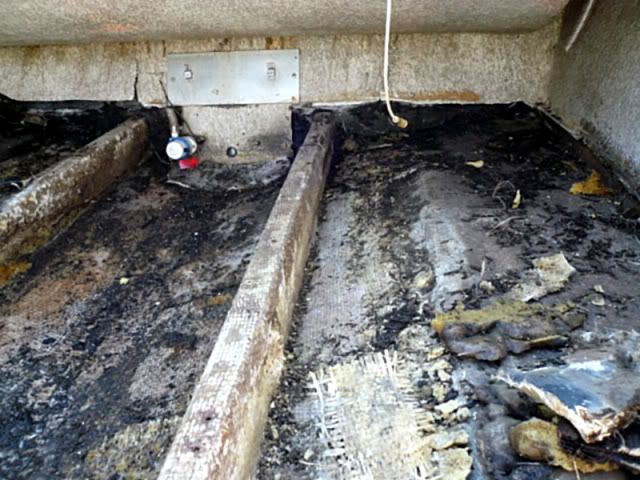
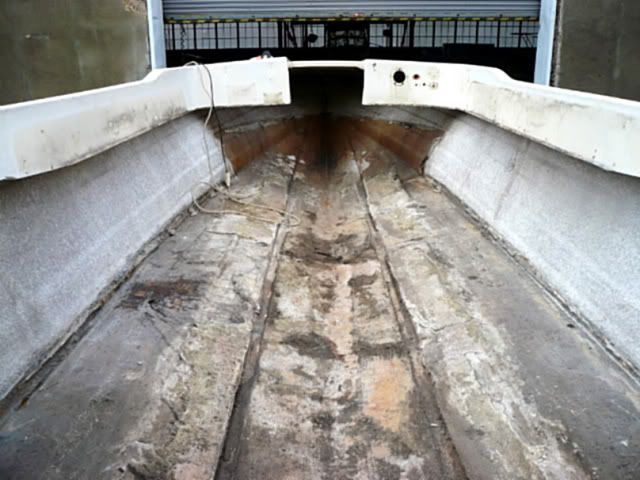
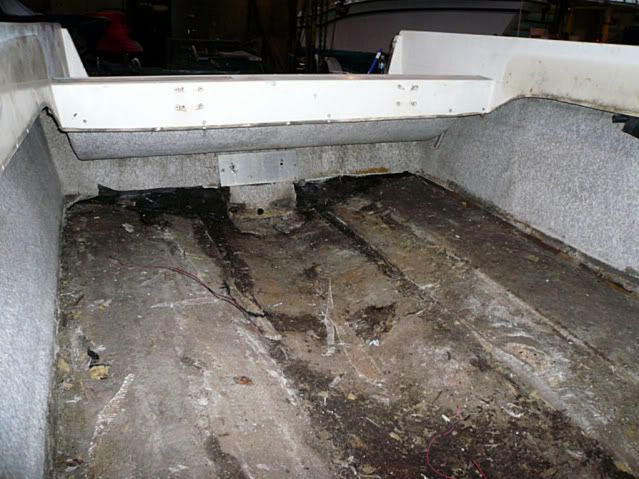
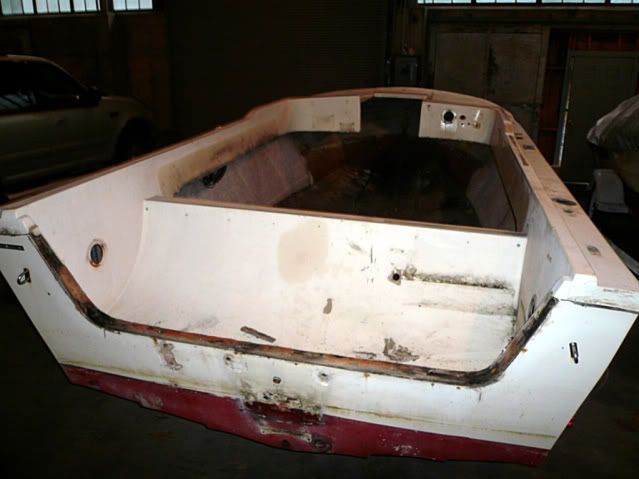
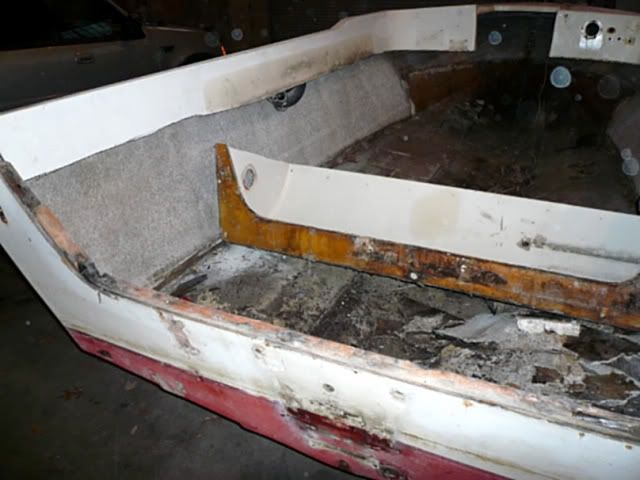
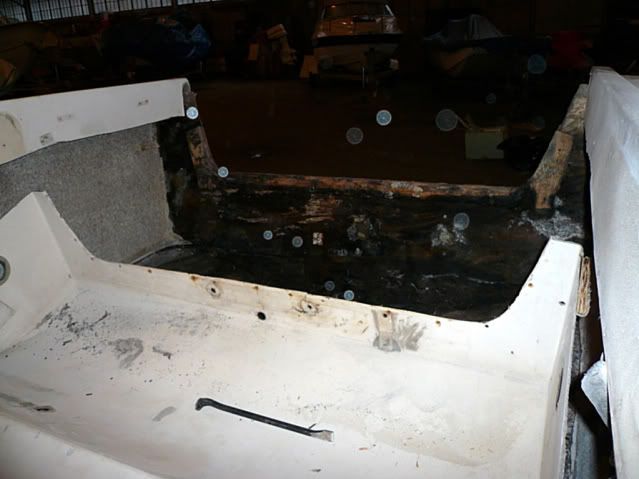
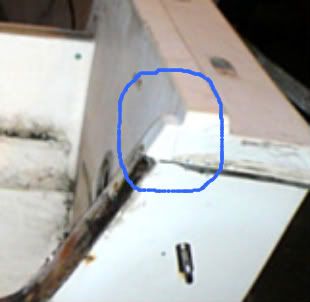
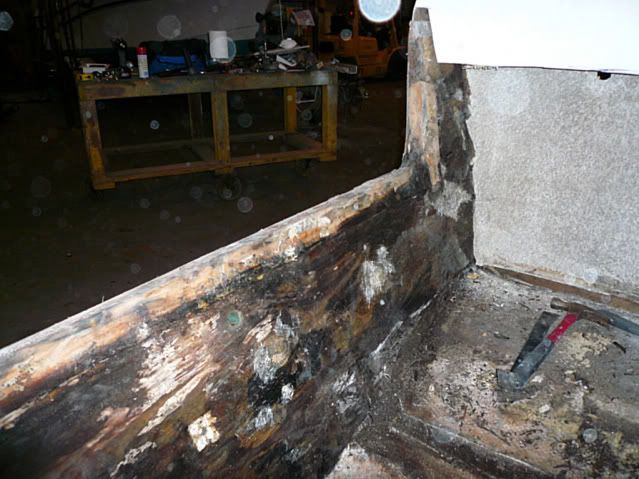
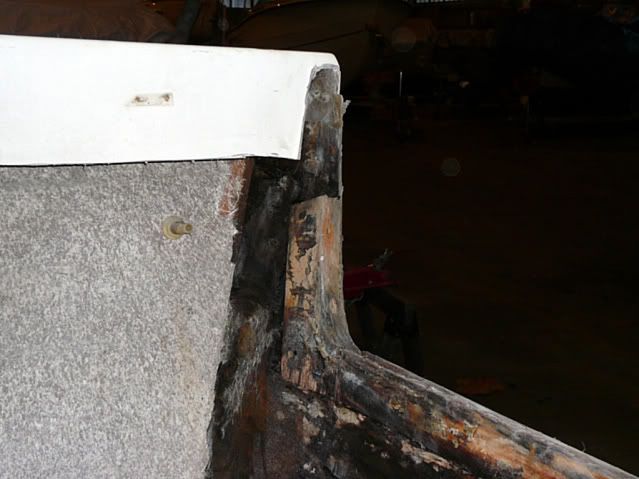
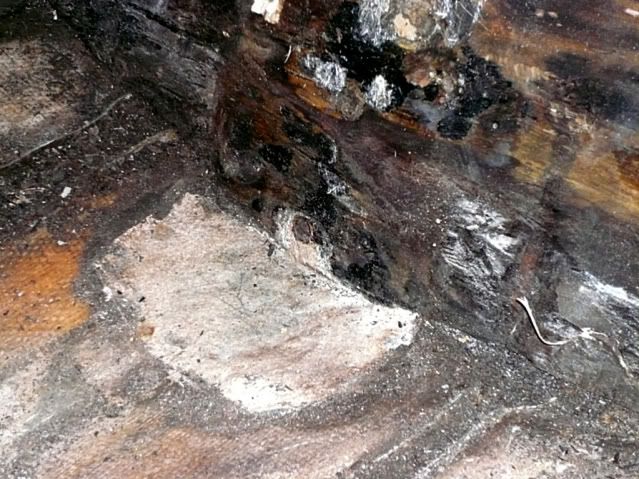
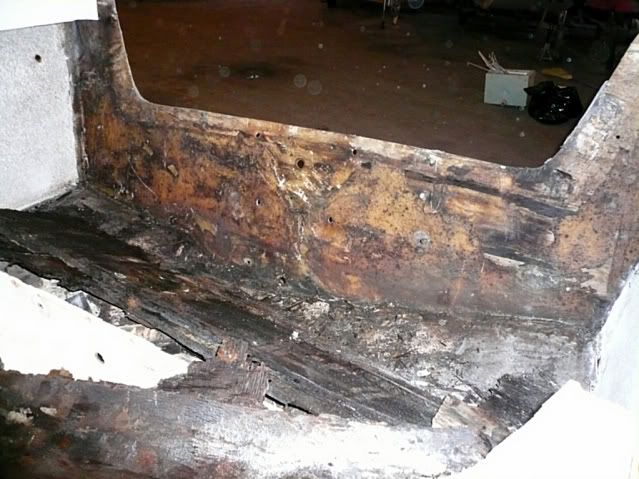
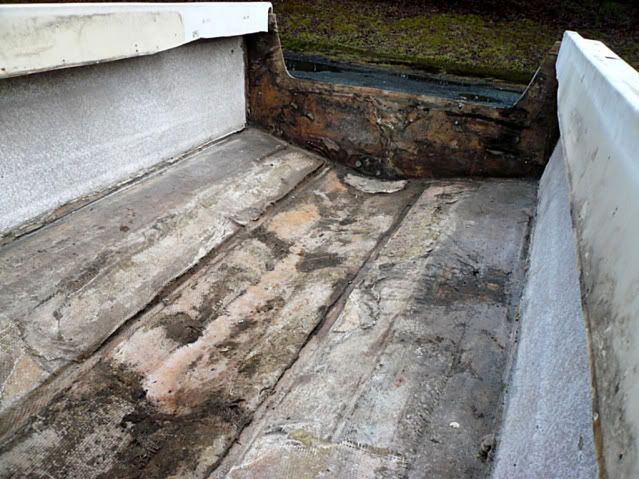
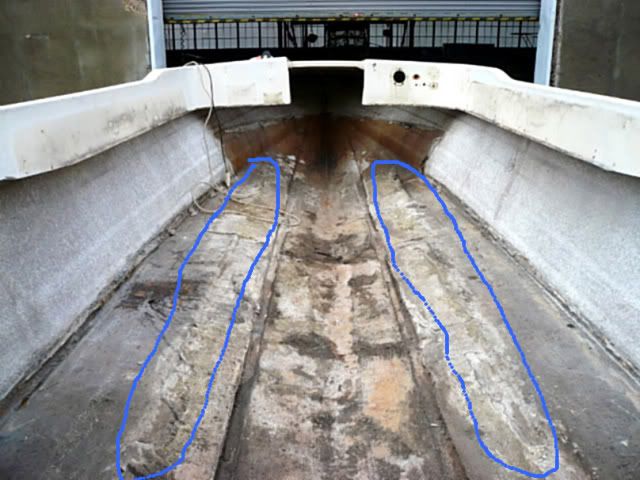
Here are some of the before shots. (I took many photos with my cell phone when I originally got the boat and through part of the rebuild process, but I proceeded to drop said cell phone into my glass of ice tea earlier this summer thus eliminating those photos?mainly of the interior layout and the grinding phase.)

P1010832.jpg


P1010833.jpg


P1010834-1-1.jpg


P1010835.jpg


The inside is a basic dual console layout with twin back-to-back lounge seats and nasty ugly brown carpet.

One of the original owners of the boat replaced the floor at one point along with the console supports. The rebuild plan is as follows:

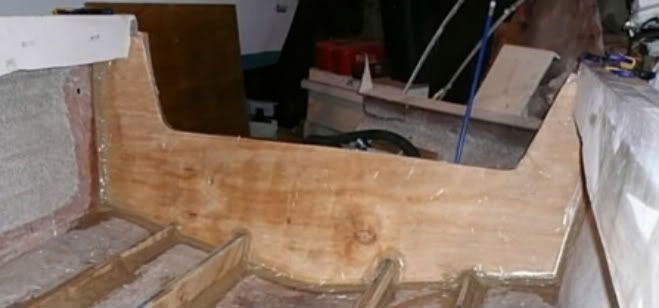
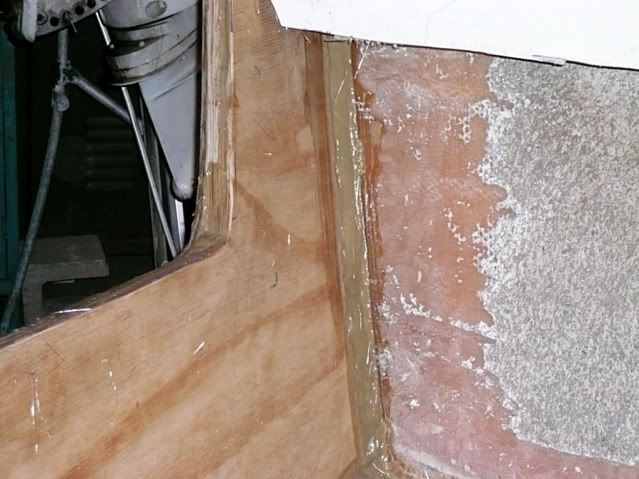
1. Completely gut the boat
2. Install new stringers, transom, floor and console supports
3. Paint exterior and interior
4. Install new steering system and steering wheel
5. Install engine and controls
6. Install windshield, bow rail and new deck hardware
7. Install all new wiring

Wow, is that all. Piece of cake. ;)
 
Last edited:
Joined
Aug 17, 2009
Messages
941
Re: 1977 Cruise Boats Restore

Okay the first step in this project was to remove the deck and check out what was what. I fully expected there to be some rot for sure. I first removed the console supports. Then I pried up the deck. The deck came up pretty easy since the screws holding it down where put into rotted stringers and only calking around the edges. The deck was heavy and made from ?? PT ply.

Here is what was underneath?nastiness!
P1010836.jpg


P1010840.jpg


You can see here in the stern where the original floor was cut to put in the new floor.
P1010838.jpg


P1010839.jpg


P1010841.jpg


P1010843.jpg


As usual around this place, lots of water logged foam and rotted stringers. Notice the sistered 2?x6? screwed to the rotted port stringer (top pic). I also found various other small pieces of wood jammed under the deck to shore it up whenever the original owner put the new deck in. Obviously he knew then the guts were bad.

The port stringer was completely rotten in several places (notice the holes through the roven). The starboard stringer was very wet and rotten in spots. I am sure the transom is gonzo for sure.

That big triangular shaped piece of fiberglass in the bow was only epoxied in place to the hull. It mostly contained floataion foam and a small cooler box in the front. It was also used as a step to climb up through the windshield. Of course the lid was buckled from all the stepping on and the cooler had a drain tube out of the bottom and ran down the keel and into the bidge area. Good idea however the tube was cracked and broken in several places as well it was completely disconnected under the box. I wonder how many years it held ice which melted and rain straight into the foam. Nice!

Time to clean everything up and remove the remaining pieces.
 
Last edited:

NoKlu

Senior Chief Petty Officer
Joined
Feb 23, 2008
Messages
786
Re: 1977 Cruise Boats Restore

I keep rubbing my eyes but still can't see your pics. Go to the non boating technical topics forum and you will find the instructions to post pics. Re size them to 640x480 as nobody likes to klik on thumbnails.
 
Joined
Aug 17, 2009
Messages
941
Re: 1977 Cruise Boats Restore

NoKlu,

The pics should not be showing up as thumbnails. They are embeded in the text and are easy to see. I used the process Woodonglass decribed to post pics. Seemed to work just fine and when I view the thread everything looks great.

Anyone else having problems seeing the pics?
 

ezmobee

Supreme Mariner
Joined
Mar 26, 2007
Messages
23,767
Re: 1977 Cruise Boats Restore

I can't see 'em either.

Trying to host pics on iboats isn't worth the trouble. Set up an account on photobucket and link to them from here. Much easier and probably better for a long term project.
 
Joined
Aug 17, 2009
Messages
941
Re: 1977 Cruise Boats Restore

Crap! :(

Alright. I have them all on Photobucket. I just need to resize them and reload. Sorry. They looked great going in.

I'll have them up in this afternoon.

Thanks.
 

drewpster

Commander
Joined
Oct 17, 2006
Messages
2,059
Re: 1977 Cruise Boats Restore

Here is another little tip. If your digi camera has settings to size the pictures you are taking, set it to the medium setting. That way you do not have to resize them. Photobucket is a bit cumbersome for resizing.
 

ezmobee

Supreme Mariner
Joined
Mar 26, 2007
Messages
23,767
Re: 1977 Cruise Boats Restore

Here is another little tip. If your digi camera has settings to size the pictures you are taking, set it to the medium setting. That way you do not have to resize them. Photobucket is a bit cumbersome for resizing.

Even better tip.....photobucket can be set to automatically resize pics upon upload (Just click on "more options" when you go to upload). That way you can still have full quality pics for yourself and smaller ones for iboats.
 
Joined
Aug 17, 2009
Messages
941
Re: 1977 Cruise Boats Restore

Alright the above photos should be viewable now. Thanks for patience
 
Joined
Aug 17, 2009
Messages
941
Re: 1977 Cruise Boats Restore

It was very apparent that everything inside was going to be mush and that I was looking at a complete rebuild of this boat. So, off to Harbor Freight for a bunch of tools. I purchased their heavy duty 4.5? grinder, oscillating multifunction power tool, a small shop blower, several 36 grit flapper discs, and some other miscellaneous stuff.
On to the next step?finish clearing out the inside. I used a shovel to remove most of the foam. The foam was waterlogged and heavy. What I couldn?t get out with the shovel, I used a stiff scraping blade to clear the foam away from the stringers and such. After all of the foam was removed (at least ten 30 gal trash bags full), I started work on the bow piece of fiberglass (floatation and cooler). I used a small chisel following behind it with wedges and letting the force of the wedge do most of the work. I just slowly work the chisel around breaking the epoxy glue holding it in place. Once all that was done I pulled the entire piece back and lifted it out (with lots of help). This piece alone weighed over 250lbs. What a beast!

P1010841.jpg


P1010839.jpg


P1010843.jpg


P1010844-1.jpg


After that was out of the way I work on ripping out the stringers. I used my new multifunction tool with the half moon saw blade and cut along the bottoms of the stringers. This tool worked very well but the fiberglass will eat the blade up quick. The metal cutting blades lasted longer. Once each stringer was freed I lifted them out in whole pieces. The original manufacturer used what appeared to be 2?x6?x 12? for the stringers. They were soaking wet and heavy as all get out. Between the wet foam and the stringers I know I removed about 175lbs of wet crap. Add to that the bow fiberglass piece and wow! That is A LOT of extra weight!

P1010861.jpg


P1010848-1.jpg
 
Joined
Aug 17, 2009
Messages
941
Re: 1977 Cruise Boats Restore

Now that the basic guts were out I started stripping down the boat. First, I took off the engine and placed it on an engine stand and set it aside. Next the controls came out. Careful attention to the throttle linkages/cable adjustment ends will prevent set-up problems when re-installing everything. I then removed the steering cable. The steering was well worn out in this boat and I plan on replacing it with a new system. I used the old cable to measure for the new steering cable to be installed later. Also I noticed on this boat that the steering hub had a 20 degree trim bezel and mount. I kept all these pieces to be reused on the new unit since the new steering unit only comes with a 90 degree mount and bezel. I then proceeded to remove the bow rail and remaining deck hardware and trim pieces. I plan on painting this boat so I also removed the rub rail to facilitate the painting later on.

P1010850-1.jpg


P1010846-1.jpg


P1010860.jpg
 
Joined
Aug 17, 2009
Messages
941
Re: 1977 Cruise Boats Restore

Now that everything was stripped off I needed to attack the transom. In order to get to the transom I either needed to separate the cap or cut out the splash well. I really didn?t want to lift the cap off the boat for a couple of reasons?I am working by myself and lifting the cap could be a little unwieldy for one person and no real access advantage is gained by doing so. Also I didn?t want to deal with a possible misshapen hull during reconstruction. So I decided to cut out the splash well instead. This gave me very good access to the transom and the future bilge area. So, I cut out the splash well following natural lines of the gunwales. Once the cuts were made on each side, it was easy to separate the well from the transom since the transom was wet and rotted.

P1010851-1.jpg


P1010853.jpg


P1010852-1.jpg


After the splashwell was cut out I carefully cut the caps that transition the gunwale to the transom. I will reuse these when I re-install everything back in.

P1010851-1-1.jpg
 
Joined
Aug 17, 2009
Messages
941
Re: 1977 Cruise Boats Restore

The next step in the process was to remove the transom wood from the outer skin. You can notice in the pictures that someone previously scabbed in new wood (light colored) along the top of transom.

P1010854-1.jpg


P1010855-1.jpg


Lots of rot.

P1010857-1.jpg


I use a small pry bar and a hammer to gently wedge the bar in between the outer skin and the wood breaking the bond as it went. It didn't take very long to have the transom completely dislodged and separated. Luckily I was able to save enough pieces to reconsruct the basic shape of the transom for the rebuild process.

P1010859-1.jpg


Here she all ready for the grinding phase to begin.

P1010862-1.jpg
 
Joined
Aug 17, 2009
Messages
941
Re: 1977 Cruise Boats Restore

Thanks EZ. It nice to hear from someone on here. ;)

I know this part can be a little mundane to folks on here. I want to try and capture as many of the nuances and learning points along the way for the newbies.
 

SBTOM

Petty Officer 1st Class
Joined
Jul 22, 2009
Messages
275
Re: 1977 Cruise Boats Restore

Looks like you are just getting to the itchy part! Should be a fun project!
 
Joined
Aug 17, 2009
Messages
941
Re: 1977 Cruise Boats Restore

SB,

I am actually past the itchy part since I started this project back in March. But I am getting ready to tell everyone about it now. :D
 
Joined
Aug 17, 2009
Messages
941
Re: 1977 Cruise Boats Restore

Alright, so now I am on to the grinding/cleaning phase of the project. In my first post above I mentioned my cell phone taking a dive into my ice tea. Well unfortunately my photos of the grinding part were on the phone. So, I lost those pictures. The only positive thing about this is there isn't much to look at while or immediately after grinding. But I will point out a few interesting things.

First off let's talk safety. Please heed the warnings of fellow senior posters about using the proper safety gear when you grind fiberglass. The amount of itchiness afterwards is much reduced by the amount of coverage of your body before hand. I wore a long sleeve shirt, long pants, socks and sturdy shoes. Over that I wore a full hooded tyvek coverall (get a size that is twice your normal size shirt), goggles, gloves and a particulate filtering respirator (NOT a cheap dusk mask). Besides the proper clothing here are a few additional tricks to aid in post grinding comfort. Apply baby powder around your calves, ankles and wrists before you suit up. These are generally the entry point of glass dust when you move around working. In addition to the powder you can also duct tape the suit closed at your ankles and wrists. I also used a shop blower to help blow the air away from me carrying the dust with it so I wasn?t constantly working in a cloud of crap. Some other obvious things are start early in the morning when it is coolest and plan your grinding so you can get all done in one outing. No sense in having to suit up three or four times. It?s a PITA! One final note on safety?be careful when using the grinder. I accidently brushed against my legs in two spots while the grinder was running and it sliced through all my clothing and took a chunk out of my skin in a split second?like a severe road rash. Very painful and takes a long time to heal.

As far as tools go, almost all of grinding can be accomplished with a 4?? angle grinder with 36 grit flapper wheels. You can use finer grits but it makes the process slower. Don?t use anything finer than 60 grit. Home Depot also carries some 20 grit silicone grinding discs at a good price. Just be careful because those babies will chew through anything pretty quick. What you cannot get with the grinder you will have to use coarse sand papers and your hands or a specialty tool. In the end tools are a personal choice.

Here is what I started with.

P1010862-1.jpg


P1010861.jpg


Now imagine this all clean and smooth. I have photos coming up that will show the cleaned out hull with the new stringers and transom installed. The grinding goes easily and you will eat up flapper discs quickly so have about 8 or so available.

One interesting thing I found was that there were two strips of ?? x1? ply laid flat under the glass in this section. This is where a second chine is located in the hull bottom. So that had to come out as well since the wood was wet.

P1010861-1.jpg
 
Joined
Aug 17, 2009
Messages
941
Re: 1977 Cruise Boats Restore

Okay now onto the next step?building the transom. I used exterior grade ?? plywood to construct my transom. I use two pieces laminated together using PL premium and 1 ?? deck screws. I was able to salvage enough pieces of the old transom to piece together a template. I also took measurements of the inside of the outer skin to confirm and tweak the final tracing to ensure a good fit. So I traced the template onto one piece of ply and cut it out. I test fitted this piece first to make sure it fit well. I then tweaked the areas that need sanding to optimize the fit. Once that was done, I used that piece of ply as a pattern for the next piece to ensure exact matching of the first. I thoroughly coarse sanded each piece and applied the PL premium to one side of one piece. When using the PL premium you need to slightly dampen the surfaces being glued first with water to promote curing. I use a ?? notched trowel to spread the PL evenly all over the surface. I then placed the second piece over that and pressed together, carefully maintaining alignment of each piece. I then used the deck screws to screw the two pieces together. I evenly placed screws every eight inches or so to create a uniform clamping action of the two pieces together. I wiped off the excess glue. Once that was complete, I cleaned the inside of the ground clean transom skin with acetone. Since the skin surface to be glued was a little uneven/rough I applied the PL to both the skin and the new transom piece. Again I trowel out the PL evenly across all surfaces. One note, I applied the PL to the side of the transom with the screw heads. That way the heads would be facing the inside of the outer skin so they didn?t show and would be sealed in. I then slid the new transom in place and firmly pressed it to the inside of the outer skin. To clamp the transom in place and draw it up tight, I used pieces of scrap 2?x 2? running along the outside of the outer skin. I predrilled and screwed these pieces into the transom from the outside. The screw went into the new transom and drew against these pieces of 2?x 2? clamping the transom against the inside of the outer skin. The small holes in the outer skin would be filled with a PB mix prior to finishing. I then wiped off any excess glue. I had about a 1/8? gap all around the transom between the new wood and the fiberglass hull sides and bottom. I used the PL to fill that gap and to create a filet for laying in the glass. I know a lot of folks here don?t like this method but it is quicker and easier than mixing up a large amount of PB mix. The only caution in using the PL this way is it generates small air bubbles as it cures. The bubbles can rise to the surface making for a slightly uneven filet.

P1010864-1.jpg


P1010868.jpg
 
Top