1984 Skeeter Champ 16' Restore

fmjnax

Chief Petty Officer
Joined
Jul 21, 2011
Messages
457
Re: 1984 Skeeter Champ 16' Restore

I hope the tape comes off well. Usually you pull the tape within 30 minutes. If you have left the tape on all this time and thru all the various coats you might get some chipping. Hopefully not.

I think I was posting while you posted. I guess I got "lucky" with the tape, then. No chipping at all (but it did "leak" on the top line). It peeled cleanly 100%... but maybe that is because of the [abnormally?] weak adhesive in frog tape? The stuff self-pulled within hours of being firmly pressed. I washed the hull before I taped it, so it should have adhered better. I guess in the end, it actually helped me huh? ;)
 

JDA1975

Lieutenant
Joined
Aug 27, 2011
Messages
1,385
Re: 1984 Skeeter Champ 16' Restore

the frog tape does have weaker adhesive, but that's what makes it good for this type of stuff...I used a combination of both blue and green and i had a few peels with the blue stuff...unfortunately also has some spots where the frog bubbled allowing the paint to get underneath it. nothing a few touch-ups wont handle. It looks good though, nice and simple...maybe i should take a lesson from you cause I go overboard on everything lol
 

ezmobee

Supreme Mariner
Joined
Mar 26, 2007
Messages
23,767
Re: 1984 Skeeter Champ 16' Restore

Blue tape is the devil. All hail the green tape!
 

fmjnax

Chief Petty Officer
Joined
Jul 21, 2011
Messages
457
Re: 1984 Skeeter Champ 16' Restore

Ya know, I wanted to do something a little creative but I just don't have a creative bone in my body... plus, the wife thought that using the same simple scheme that it had from the factory was a better idea. I like how it has turned out. It exceeds my expectations for sure!
 

JDA1975

Lieutenant
Joined
Aug 27, 2011
Messages
1,385
Re: 1984 Skeeter Champ 16' Restore

Hope you didn't take that wrong, I think it looks good, was a compliment saying i should have done same, because once you start going over the top you need to continue or it looks like it isn't finished....it has been keeping up at night trying to picture how I will paint the cap to keep the scheme going...but I have some ideas and we shall see...would have been a lot simpler if I just went like the factory had it lol
 

fmjnax

Chief Petty Officer
Joined
Jul 21, 2011
Messages
457
Re: 1984 Skeeter Champ 16' Restore

Oh, I know Judge. It never even crossed my mind as a negative comment. :D I always tend to over build and overdo things so I really had to discipline myself not to overdo it with the paint job. KISS (keep it simple, stupid)! I'm not going for a show quality boat here so no reason to be flashy. Heck, in the end, it's still an old 1984 tri-hull 16 footer. It will never be a head turner.
 

JDA1975

Lieutenant
Joined
Aug 27, 2011
Messages
1,385
Re: 1984 Skeeter Champ 16' Restore

Oh, I know Judge. It never even crossed my mind as a negative comment. :D I always tend to over build and overdo things so I really had to discipline myself not to overdo it with the paint job. KISS (keep it simple, stupid)! I'm not going for a show quality boat here so no reason to be flashy. Heck, in the end, it's still an old 1984 tri-hull 16 footer. It will never be a head turner.

hey now...mines 2 years older and 1 foot shorter...but I hope it turns heads! lol hopefully I can get back to work hard on it soon...it is getting colder and my body is telling me. Winter and Summer shut me down, I have bad reaction to the extreme cold and heat...spring and fall I can do stuff more since the temperature is moderate.
 

fmjnax

Chief Petty Officer
Joined
Jul 21, 2011
Messages
457
Re: 1984 Skeeter Champ 16' Restore

I got off work late tonight and it was pretty pretty good so I decided to skip wetsanding tonight and instead jumped a bit forward and started thinking about my seating. Originally, I was going to try some vinyl dye on my current seats. They're pretty much brand new so I didn't have much to lose. If it didn't work out, I was doing to disassemble them to make patterns and recover them. After talking with my mom, she seems to think that maybe would could make our own. I have experience with sewing vinyl and she is quite handy with the sewing machine and making patterns, so what the heck, let's give it a shot!

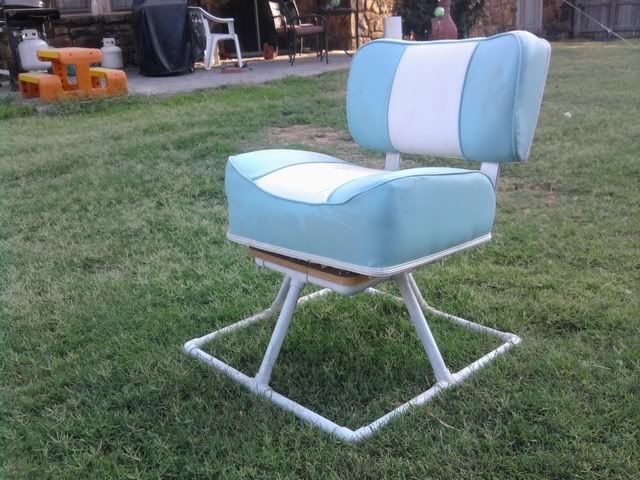
When I bought the boat, the previous owner had raised the seating about 8" off of the factory base. I had converted that space to be usable by hinging the seats forward to allow us access to the box for storage. While it may have looked a bit goofy having the seats stick up more than normal, it sure was nice! I enjoyed the extra leg room (I'm a bigger guy at 6'3" and 260 lbs) and the extra storage was excellent (this boat doesn't have much storage space). I think that may have been the ONLY thing the previous owner did right to the boat.

So, sticking with the raised seating/extra storage, I drafted up some first-run scale sketches of what I think will fit nicely. I've got to run it by my mother to see if she thinks we can do it, but I think I like it. I may lower the box from 8" to 6" so that there is a little more surface area for the back of the seat, but time will tell. The plan is to make the seats in 2 parts; a back and a base. The back will be permanently attached to the cap back with the brackets the previous owner used. The base will be hinged at the front and have a pull strap attached at the rear so that it can be pulled forward for access to the storage box.

All 3 bases will be identical. The driver and passenger backs will also be identical. The middle back will be a lower to allow easy step-over access to the back. In terms of dimensions, the bases are pretty much 16" by 16". I'm going to use 4" foam for all bases and backs (and the wife has started the lookout for donor couches to use for foam). All of the backs will be 16" wide. The driver/passenger backs will be 16" tall from the base... well, actually closer to 20" with the lower point that will merge with the base. The middle back will be 8" tall, or closer to 12" with the lower point. The wife picked the color scheme, but I really don't know if I like the idea. It may be too much maroon (the top cap will be maroon and the carpet also maroon).

If mom gives it the ok, we will begin patterning it out. The biggest challenge is going to be doing all of the inner seams and contouring the foam to accept it. I see a lot of trial and error going on with it. Hopefully I can find a couple of couches for cheap/free!

20111220002617794.jpg

20111220002634978.jpg
 

Woodonglass

Supreme Mariner
Joined
Dec 29, 2009
Messages
25,929
Re: 1984 Skeeter Champ 16' Restore

fmj,

A $12 Electric Carving Knife from Walmart will cut your "Donor Couch" Foam like Hot Butter! You can contour it to any shape you want. Here's what my Ranger Seats looked like with the Covers off...

attachment.php


Let me know if you need any help. I have good sources for the Marine Vinyl, Thread, Needles, Piping foot, Hidem, etc....
 

fmjnax

Chief Petty Officer
Joined
Jul 21, 2011
Messages
457
Re: 1984 Skeeter Champ 16' Restore

Wood, that picture is PRICELESS for me! I've been searching on Google for hours trying to figure out how to contour the seats and back (pretty much exactly like your picture). I didn't know if I contoured the foam itself or if I used a smaller piece and did a 'roll-n-tuck' type procedure and then adhere it to the main body of foam.

Thanks for the tip on the knife as well! I've got a few requests out for sample marine vinyl to see what color I need, but I'm all ears for more marine vinyl sources!

Tell me if my initial thinking is wrong here. I'll take my donor foam and contour it to the shape I need. Then, for each "section" (a section being defined by the seams; such as the left wing, right wing, and center of the cushion your picture) I lay out my pattern cloth and mark it along the seams. I cut this pattern 1" larger around the perimeter. I then sew it together, inside-out of course, slip it over the foam/base, stretch, staple, etc.

My main question in this is how do I keep the vinyl conformed to the contour of the foam? For example, the two side wings are higher at the edge than the center section. When I slip on the vinyl and pull/staple it, what keeps the center section from pulling up level with the wings? If I keep the vinyl loose, well then that's an obvious problem.

My best experience with vinyl was sewing a seat for my friends motorcycle. We ended up doing a 'roll-n-tuck'. Basically, we had a base piece of foam and a thinner material-backed piece of foam. We stitched seams through the vinyl and the material-backed foam to create the rolls on the seat. We then adhered this to the main base foam and then stretched/stapled it. I was thinking that maybe this type of process would work for the seats to keep the contour, but the picture above kind of says otherwise.
 

Woodonglass

Supreme Mariner
Joined
Dec 29, 2009
Messages
25,929
Re: 1984 Skeeter Champ 16' Restore

Your over all plan is pretty much correct. The Base "Skirting" piece is what makes the vinyl conform to the "Wings". I worried about that too but when it was all sewn and stapled it conformed perfectly as you can see...
Photo0280.jpg

I used Piping between my seams to give it a more finished look. You don't have too, it was on the originals so I kept it.
I get all my vinyl from a Dealer on Ebay out of Florida. Good Quality stuff and REAL good to work with. They sent me the wrong color once and took it back NO QUESTIONS asked and paid return shipping. They ship same day and will combine shipping costs.

http://stores.ebay.com/trimjobbercanvasvinylandfabric
 

fmjnax

Chief Petty Officer
Joined
Jul 21, 2011
Messages
457
Re: 1984 Skeeter Champ 16' Restore

Awesome! Thanks again Wood. I think I understand how it would keep it from pulling up. The side skirt pulls a vertical force and not a lateral force (which would certainly pull the low spot up). With all edges of the skirting being pulled vertically, it should pull the cover onto the foam like a glove. As long as I keep my corner seam true on the corner, I won't be over-pulling. And as long as I cut and sew with close enough precision, the vinyl won't be loose on the top. Makes sense now... I think. ;)
 

JDA1975

Lieutenant
Joined
Aug 27, 2011
Messages
1,385
Re: 1984 Skeeter Champ 16' Restore

watched a shows on doing car seats and if the had buckets, they glued the part that wouldn't pull down to the foam to bring it down tight, if it needs it, could also be an option
 

craigweaver

Chief Petty Officer
Joined
Oct 24, 2011
Messages
550
Re: 1984 Skeeter Champ 16' Restore

Love your idea on the seats! pretty much what I was thinking for mine, although my original had a metal storage box under it. I can't wait to see how they turn out.
 

fmjnax

Chief Petty Officer
Joined
Jul 21, 2011
Messages
457
Re: 1984 Skeeter Champ 16' Restore

Thanks Craig! I think they will turn out pretty nice. My parents are donating an old recline to the cause so hopefully there will be some foam in there that I can use to at least practice on.

The best I can tell and comparing with the picture on the original brochure, the seats were anchored to a raised "base" on the cap, which is only 4" higher than the deck. This means that, by default, you would only be sitting about 10" off the floor. There is no way in heck that would work for my 6'3" frame!!! The previous owner definitely had the right idea to elevate the seats (though he didn't make use of the added storage space, oddly enough). With an 8" storage box, it will put me about 16" off the floor, which is a lot more comfortable... but also looks odd having the seats tower that high. I may go with a 6" storage box and maybe a lower back on the seat, but we'll see once I get some sort of mock-up made.
 

Woodonglass

Supreme Mariner
Joined
Dec 29, 2009
Messages
25,929
Re: 1984 Skeeter Champ 16' Restore

I been dealing with this alot lately and experimenting and I am 6'4". I am making my bases 6" high and my seat is 4" thick and the back is 17" tall. It seems to be perfect for my set up. I'm not sure what my hull sides measure. I'll try and get that tonite and let you know.
 

fmjnax

Chief Petty Officer
Joined
Jul 21, 2011
Messages
457
Re: 1984 Skeeter Champ 16' Restore

Christmas vacation officially started today at noon for me. No more work until January 3rd!

I began by wheeling the hull out and finishing the wetsand... well, as far as I am going to finish it at this point anyway. I will finish the maroon stripes and the section that joins to the top cap when the boat is flipped back over. I just wanted to get the bottom and half of the sides done so that I could get some wax on it and it flipped back on the to the trailer.

I did at least hit the stripes with 600 just to see what it would look like and I think I've got something wrong (I sure hope not, but it's not looking too good). After hitting it, washing it off, and drying it, the maroon dried with a white haze. With water, there is no haze... but once it dries, it is back. You can kind of see it in the pictures if you look carefully. I really HOPE it will wash off and correct itself with more work, but it's got me worried right now. Any ideas?

My bunk carpet was shipped today and expected to get here on the 24th (yeah, right!) so after I get back from camp on the 27th, I will begin the trailer reassembly.

Anyway, the hull has been sanded with 1000 grit and given a light wash. There is still some sanding dust on it, so I will give it a full wash with soap tomorrow. Once dry, I'll give it an acetone bath and then get to applying the wax. It's cloudy outside so the pictures/colors aren't crisp, but just trust me that it looks good! You can see the shine that is peeking through the dust, and if it stays like that after being fully clean and waxed up, I'll be one happy camper!
20111222150752454.jpg

20111222150734881.jpg

20111222150814317.jpg
 

GT1000000

Rear Admiral
Joined
Jul 13, 2011
Messages
4,916
Re: 1984 Skeeter Champ 16' Restore

I did at least hit the stripes with 600 just to see what it would look like and I think I've got something wrong (I sure hope not, but it's not looking too good). After hitting it, washing it off, and drying it, the maroon dried with a white haze. With water, there is no haze... but once it dries, it is back. You can kind of see it in the pictures if you look carefully. I really HOPE it will wash off and correct itself with more work, but it's got me worried right now. Any ideas?

No worries, wet sanding is just to prepare the surface for final buffing and polishing. Usually, you wet sand just enough to smooth out the surface of the finished paint without breaking through to the color/primer underneath...each progressively finer grit, 800, 1000, 1200, 1500, etc... will smooth the surface just a little bit more, then you hit it with some buffing compound and finally some polishing compound...for your peace of mind, you can do a small test area...go through all the steps until you acheive the final high gloss. The buffing and polishing can be done with elbow grease or you can get an inexpensive random orbital polisher at a place like Harbor Freight.

Should look amazing when you are done.

Merry Christmas and Happy New Year to you and yours.
 

JDA1975

Lieutenant
Joined
Aug 27, 2011
Messages
1,385
Re: 1984 Skeeter Champ 16' Restore

it will look dull, you just sanded off the shine..but it is smooth now and when you polish it, it will get its shine back, I like the look man, lots of hard work for you and it has paid off! If we all get together this spring we will have some heads turning for sure...most of the folks around here have pontoons, there are a couple bassers floating around too though!
 

Decker83

Commander
Joined
Apr 5, 2011
Messages
2,593
Re: 1984 Skeeter Champ 16' Restore

I think you have done a excellent job. Your color scheme looks awesome.

I agree with the rest of the comments. Once you buff, polish and wax it will be great.

Kent
 
Top