1986 Sea Ray Seville Restoration

SDSeville

Lieutenant
Joined
Mar 19, 2010
Messages
1,481
Re: 1986 Sea Ray Seville Restoration

Well, haven't gotten anything done the last few days. I threw my back out being stupid. I wanted my boat another 10 feet up the driveway and instead of just hooking it up to the truck, I pushed it up myself. All was good until I bent over the next morning to pick up a file and fell on my face.

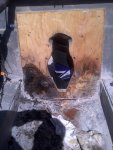
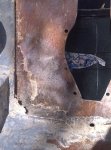
I finally got everything out (pics tomorrow AM) today. A local welder I have worked with for years is going to weld the transom plate. He said it will be stronger than new.

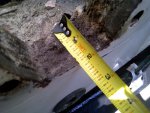
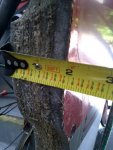
My transom thickness appears to be between 1 7/8" to 1 15/16" around the out drive opening, including the glass/gel outer skin and the glass inner skin. It looks like 2 pieces of 3/4" plywood. Tink - mine must be a little different than yours - I remember you used 2 pieces of 3/4" plus 1 piece of 1/2".

I will start grinding tomorrow.
 

Friscoboater

Captain
Joined
Jul 3, 2009
Messages
3,095
Re: 1986 Sea Ray Seville Restoration

It should be two 3/4" pieces of ply plus a skin. According to Mercruiser you should be 2"-2 1/4" inches thickness. Can somone confirm this for me? I made mine 2 1/4
 

SDSeville

Lieutenant
Joined
Mar 19, 2010
Messages
1,481
Re: 1986 Sea Ray Seville Restoration

Here are a couple pics of the transom measurements. I think just to be safe I will go with 2" on the new one.
 

Attachments

  • trahsom thickness1.jpg
    trahsom thickness1.jpg
    86.5 KB · Views: 0
  • transom thickness.jpg
    transom thickness.jpg
    65.2 KB · Views: 0

RIDEPATE

Petty Officer 1st Class
Joined
Jul 8, 2001
Messages
324
Re: 1986 Sea Ray Seville Restoration

I'd agree SD. With age, moisture, and the crushing of the transom-plate, there's bound to be some shrinkage. It was probably 2 to begin with.
 

SDSeville

Lieutenant
Joined
Mar 19, 2010
Messages
1,481
Re: 1986 Sea Ray Seville Restoration

I finally got back to cutting and grinding again. I forgot how much that sucked.

Inner skin came off pretty easy. Complete mush in lower left corner. Wet in the lower right corner. Totally dry upper 1/2. You can tell where the leak was and where I snapped my inner transom plate.
 

Attachments

  • IMG-20110527-00365.jpg
    IMG-20110527-00365.jpg
    146.7 KB · Views: 0

SDSeville

Lieutenant
Joined
Mar 19, 2010
Messages
1,481
Re: 1986 Sea Ray Seville Restoration

Got the wood out. Wow, what a PITA. After I got the mushy bottom parts out, it was quite a bit of work. Used a chisel and grinder.

OK, ran into an issue here. It appears that the outer skin is about 3/8" glass/gel and there is an additional layup (if that is the right name) of 1/8" to 1/4' glass on the inside of the skin before the wood went on. My problem is that the inner layer is coming off in lower left corner where the wood was completely rotten. It is completely solid over the rest of the transom area.

What should I do? Grind off that corner area and put new glass until it is at the same level as the rest?
 

Attachments

  • IMG-20110527-00369.jpg
    IMG-20110527-00369.jpg
    143.8 KB · Views: 1
  • IMG-20110527-00371.jpg
    IMG-20110527-00371.jpg
    146.7 KB · Views: 1
  • IMG-20110527-00368.jpg
    IMG-20110527-00368.jpg
    145.7 KB · Views: 1

SDSeville

Lieutenant
Joined
Mar 19, 2010
Messages
1,481
Re: 1986 Sea Ray Seville Restoration

It should be two 3/4" pieces of ply plus a skin. According to Mercruiser you should be 2"-2 1/4" inches thickness. Can somone confirm this for me? I made mine 2 1/4

Friscoboater - you are right. Everything I have read says 2 to 2 1/4". Mine must of squished a little or shrunk like RIDEPATE said. BTW, nice threads and youtube videos. I learned a lot from them.
 

Friscoboater

Captain
Joined
Jul 3, 2009
Messages
3,095
Re: 1986 Sea Ray Seville Restoration

Thanks! I am by no means the all knowing guru on this, but I try.
 

SDSeville

Lieutenant
Joined
Mar 19, 2010
Messages
1,481
Re: 1986 Sea Ray Seville Restoration

Done grinding. Woohoo!!

Gonna buy the wood (3/4" ply) tomorrow, cut it, and glue it with PL.
 

SDSeville

Lieutenant
Joined
Mar 19, 2010
Messages
1,481
Re: 1986 Sea Ray Seville Restoration

Grinding sucks huh?

It sure does. My neighbors thought so too. I put an easy-up over the boat and draped sheets down the sides so no dust would get out, but the wind really picked up and some got out.
 

tinkeringwackyone

Chief Petty Officer
Joined
May 2, 2008
Messages
415
Re: 1986 Sea Ray Seville Restoration

Keep on going Glen, my transom was 2" as I measured it before I cut mine out. sorry to hear about your back, I know the feeling as I had surgery in Nov. of 09.

you'll be in the water before no time.

sail on.....tink
 

69rrvert

Petty Officer 1st Class
Joined
May 9, 2010
Messages
211
Re: 1986 Sea Ray Seville Restoration

Glen,

Just to be on the safe side, how does the wood look beyond the center part of the transom? Mine was similar to yours and I ended up having to cut out the whole transom because the rot had worked its way to the outside of the large sheet of plywood. Here is a pic of the lower starboard side of my transom. I hope yours is all good but I just wanted to make sure you did not overlook additional rotten wood on the outer transom. Thanks, Steven

Center of transom:
resized100_2370.jpg


Starboard outer transom under the deck (rotten wood):
StarboardTransombottom.jpg
 

SDSeville

Lieutenant
Joined
Mar 19, 2010
Messages
1,481
Re: 1986 Sea Ray Seville Restoration

Hi Steven,

They must have changed the design on the newer Rays like yours. My starboard and port transoms are only large enough to bolt the swim platforms/ladder in place (maybe 12"X18") and the rest is all glass. Except in the center, the bottom 10" has no wood at all.
 

SDSeville

Lieutenant
Joined
Mar 19, 2010
Messages
1,481
Re: 1986 Sea Ray Seville Restoration

Steven, just checked out your thread. Nice work and sweet boat! It looks like Sea Ray went to the full transom when they added the built in swim platform like you have. Mine is just straight up all the way with two small platforms bolted to the outside.
 

lrcustom

Petty Officer 2nd Class
Joined
Mar 2, 2010
Messages
172
Re: 1986 Sea Ray Seville Restoration

Glen,
Finally got back to your thread. Sorry bout the transom but these Sea Rays seem to always rot out. Sounds like you got it under control. Grind, Grind, Grind and when your done oh my more grinding to do LOL.

Later

LR
 

SDSeville

Lieutenant
Joined
Mar 19, 2010
Messages
1,481
Re: 1986 Sea Ray Seville Restoration

Great to hear from you LR! How is your Ray coming along?

I haven't done much the past week or so. I am coaching my son's little league team and we are in the end of the season City tournament playoffs. We have been playing every night.

I finally finished my new transom today during my lunch break. It is exactly the same as the old one, including the fact that it is slightly crooked. I traced it from the hull and the hole in the hull is crooked as well. The little holes you see are where I screwed it together while gluing the 2 pieces together. I am hoping to glue it in and glass it this weekend.

I am surprised that the very bottom section is barely more than 2". It seems like that would be more important than the large top piece.
 

Attachments

  • new transom.jpg
    new transom.jpg
    62.3 KB · Views: 0

tinkeringwackyone

Chief Petty Officer
Joined
May 2, 2008
Messages
415
Re: 1986 Sea Ray Seville Restoration

looks like a great start, keep us posted, btw I haven't done a thing on mine in a month.
 

SDSeville

Lieutenant
Joined
Mar 19, 2010
Messages
1,481
Re: 1986 Sea Ray Seville Restoration

Thanks Tink. I have a question for you. How did you waterproof the holes you drilled in the transom to attach the gimbal housing and transom plate? The original had no sealer at all -- just dry (and some wet) wood.
 

tinkeringwackyone

Chief Petty Officer
Joined
May 2, 2008
Messages
415
Re: 1986 Sea Ray Seville Restoration

the way I waterproofed my holes was this. after the transom is adhered to the transom, I took a small drill bit and angled my drill from the outside in, at the same angle as the transom, and drilled small holes in the center of outside existing holes. I then went inside the boat and used these as guides, I used an oversized spade bit, (don't remember the size) but a 5/8" or 3/4" would work. this gives you an oversize hole in which to fill with a thickened mixture of resin. make sure that you seal the outside of the boat with something, I used packing tape, but it is a little difficult to get off.

fill the holes from the hull side, let cure and fill any low spots, then grind flat and glass over the top. just make sure they are oversized enough that if you drill a little crooked that you have enough resin to make the hole a little bigger. hope this helps
 
Top