1990 4.3 Century 2000 - Floor,Transom,Stringer,Upholstery Project

Chris51280

Ensign
Joined
Jan 24, 2018
Messages
932
For finishing the deck, i was thinking doing a wet on wet application for less resin use and better adhesion. The 6oz on top of the 1.5csm should work good. The 6oz comes in 60inch wide and the csm in 50inch wide. Not sure how to make that work and if I can reach that far. I wonder how difficult 6oz is to lay down and if I should just do them seperately.
 

kcassells

Fleet Admiral
Joined
Oct 16, 2012
Messages
8,738
Just cut the area that you can comfortably get to todo the layup. Where the next one meets the prior installed give it a 2" overlap. Come back grind it down and feather it with those glass bubbles/fairing.
Wet on wet is the strongest but do what's in your reach.
That's the thing to me about poly....it's a 2 step deal which seems like it would slow down the process.
Just make yourself a comfort call. They all will work.
Look at you GO Boy!
 

Chris51280

Ensign
Joined
Jan 24, 2018
Messages
932
First layer of gelcoat. Missed the upper left area but that is not important since nobody will ever see it. There will be two additional coats with the last one have the wax in it.
I started glueing down the test strip with 3m 4000uv. I will see tomorrow how it will turn out.
after all the fiberflass closing up my drain holes, a dremel with a stone in it works really good.
 

Attachments

  • photo312103.jpg
    photo312103.jpg
    125.1 KB · Views: 4
  • photo312104.jpg
    photo312104.jpg
    154.9 KB · Views: 4
  • photo312105.jpg
    photo312105.jpg
    137.8 KB · Views: 4

steve_h7

Chief Petty Officer
Joined
Sep 16, 2018
Messages
401
Gelcoat looks nice. I look forward to hearing how your tests go with the 3M 4000.
 

Chris51280

Ensign
Joined
Jan 24, 2018
Messages
932
I have two outdrive assemblies. both are gen1. The difference is the spare one has these two bolts on top and my current one does not. The current one is faded and pitted from being in the water for long periods of time. I'd like to use the donor with the two additional bolts. Is this the only change? They are interchangeable, correct? I would just drill the holes through the transom. Would be a better setup since it has more bolts and the it will definitely be sturdier.
 

Attachments

  • photo312126.jpg
    photo312126.jpg
    56.1 KB · Views: 2

Chris51280

Ensign
Joined
Jan 24, 2018
Messages
932
Well, ignore my previous post. After looking closer, those are there on both assemblies.
I ordered a new grommet for the water tube. Better safe than sorry.
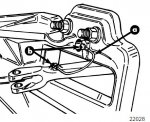
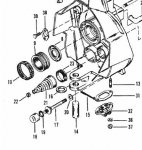
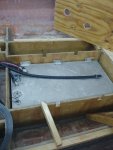
There are the bottom aluminum bolts with the anode that have a square head. There is a rubber washer that I cannot find anywhere online. There is however a rubber washer between the anode and the bolt. Where can i get the rbber washer that seals the transom off?

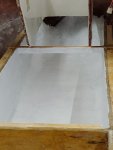
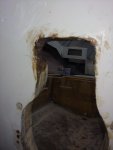
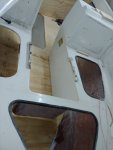
Painted the ski locker with the 3rd coat and wax. I don't know if I will sand it to smooth it out more and then paint again. Maybe I'll leave it and throw a rubber mat down there. Nobody will see it anyways. I added the off white to it so the dirt doesn't stick out too much. Otherwise it would be bright white.

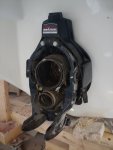
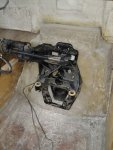
test fitted the assembly which took longer than I thought. The holes I drilled were 1/8 off. I drilled them,straight but i noticed when I took it apart that even from the factory they botched the job and drilled again a little offset. Well I did the same. Put it back the way it was they say.:facepalm:
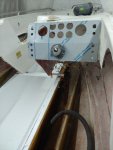
The new panel for the gauges is not exactly how I thought it would go. Unfortunately the bend is sloping a little and therefor will screw with my new panel. I measured it in one spot but off course, nothing on boats is square. Eventually I want to make a fiberglass panel in the future. This one is temporary to get by.
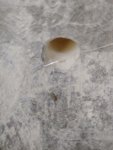
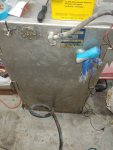
the test glue with 3m 4000uv Was somewhat good. It stuck and needed twisting to get off but not as strong as gorrila epoxy. So i will be using the epoxy glue. Maybe another test could be pl premium glue.
 

Attachments

  • photo312153.jpg
    photo312153.jpg
    136.5 KB · Views: 2
  • photo312154.jpg
    photo312154.jpg
    127.7 KB · Views: 2
  • photo312155.jpg
    photo312155.jpg
    196.6 KB · Views: 2
  • photo312156.jpg
    photo312156.jpg
    175.9 KB · Views: 2
Last edited:

Chris51280

Ensign
Joined
Jan 24, 2018
Messages
932
Looks like I found my washer. #20
12-32620
I hope thats the right one.
 

Attachments

  • photo312167.jpg
    photo312167.jpg
    45.3 KB · Views: 0

Chris51280

Ensign
Joined
Jan 24, 2018
Messages
932
So here are my test results
epoxy gorilla glue and pl premium are on the same level in strength bonding to neoprene.
still ok but not favourable in my opinion is the 3m4000uv. It will work but it never dries hard and will stay flexible.
 

Attachments

  • photo312235.jpg
    photo312235.jpg
    238.5 KB · Views: 1

Chris51280

Ensign
Joined
Jan 24, 2018
Messages
932
Pressure tested the tank. Check.
test fitted the transom plate.
Front deck panels are in and foam holes cut. I will leave the sides open so the foam can escape if needed.
tank strips glued in. After glueing down with epoxy, which sucked because it didn't want to stay down, i decided to glue it with pl premium and that helped. The glue actually creates suction that helps. Real sticky stuff. Tomorrow will be tank hoses and cross braces. Tuesday hopefully the rest of the deck and foaming. Im planning on a motor install by memorial day.
 

Attachments

  • photo312387.jpg
    photo312387.jpg
    237.1 KB · Views: 4
  • photo312388.jpg
    photo312388.jpg
    161.4 KB · Views: 4
  • photo312389.jpg
    photo312389.jpg
    253.1 KB · Views: 4
  • photo312390.jpg
    photo312390.jpg
    269.7 KB · Views: 4

sopwithcamel74

Petty Officer 1st Class
Joined
Aug 15, 2018
Messages
203
Pressure tested the tank. Check.
test fitted the transom plate.
Front deck panels are in and foam holes cut. I will leave the sides open so the foam can escape if needed.
tank strips glued in. After glueing down with epoxy, which sucked because it didn't want to stay down, i decided to glue it with pl premium and that helped. The glue actually creates suction that helps. Real sticky stuff. Tomorrow will be tank hoses and cross braces. Tuesday hopefully the rest of the deck and foaming. Im planning on a motor install by memorial day.


Really nice progress, man... Problem solving on the go!
 

Chris51280

Ensign
Joined
Jan 24, 2018
Messages
932
Not much progress today. A lot of little steps. Sealed the transom with csm. I will cut the excess off tomorrow. I just ripped it thinner since it is only for sealing and I did not want to build up much.
tank screw on pieces needed a coat of poly too before I install it tomorrow. Cut my foam fill holes in all boards.
 

Chris51280

Ensign
Joined
Jan 24, 2018
Messages
932
Not sure. Seems to take forever. I can only mix 400ml each part and it takes 3-4 of them to fill each of my cavities. Im heating everything up with a heat gun.
I got the 2 5gal buckets. Should be good for 2400 lbs. Boat weighs 2700. Now I know that the 2700 is air weight and is not the same in water. As long as I fill each cavity it is the way it was build.
 

chevymaher

Commander
Joined
Mar 29, 2017
Messages
2,932
I did the formulas when I did mine. It is easily less than half the boats weight. Even if you include people and cargo you got plenty. You would be floating high in the water.
 

steve_h7

Chief Petty Officer
Joined
Sep 16, 2018
Messages
401
All foamed. On to sealing it up and hopefully by the weekend i can lay the csm and 6oz

Any surprises not tabbing the deck and leaving it open to till after foaming? I want to do the same and looking for any heads up as to what to expect. Congrat's on another big step completed! :thumb:
 

Chris51280

Ensign
Joined
Jan 24, 2018
Messages
932
It actually still popped one of the panels up. It was an end piece that was only glued down. Be sure you do not fill it too much even with the sides open. There is alot of pressure during the expansion.. The extra foam,can easily be ground away. I'm almost through the 80cuft foam. Glad it was just enough. Make sure it is warm enough.,heat both, the cavity and the foam before mixing. Dont wait too kong to clean the cups out or it will be too hard. Used alot of cups. I think 10. Always use 2 to fill to leveland a 3rd to mix it. Stir really good. Noticed the difference when you mix good for 20 seconds or more. Pour and wait, then poursome more to get the idea how much you need.
 
Top