1994 Bayliner Capri 1850 LS restore

RollTide13

Cadet
Joined
Jan 13, 2010
Messages
14
*** I changed the title of the thread since I've moved from a few fixes to a restore (step #1 denial) ***


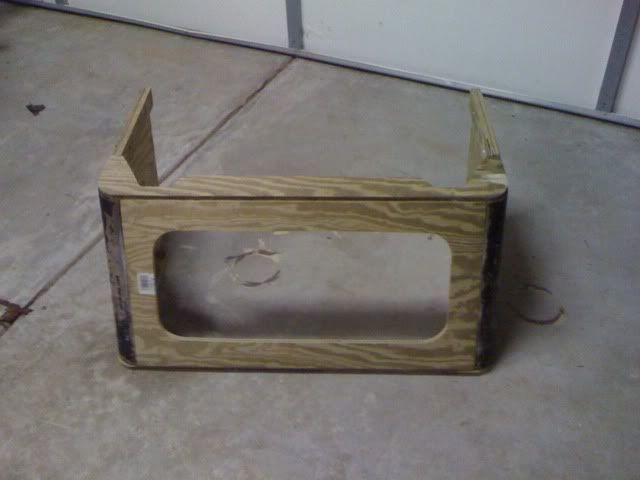
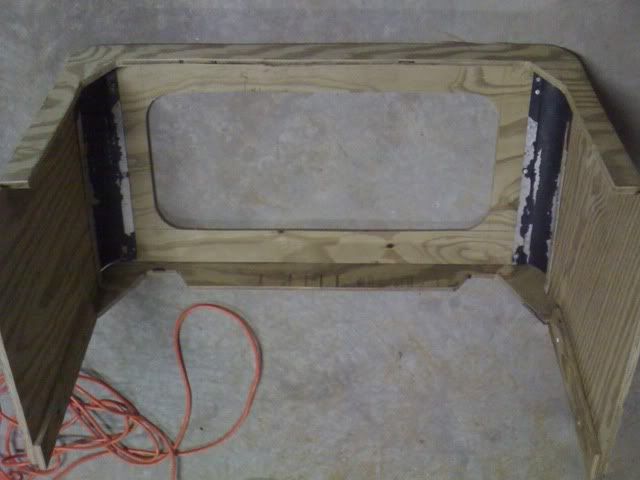
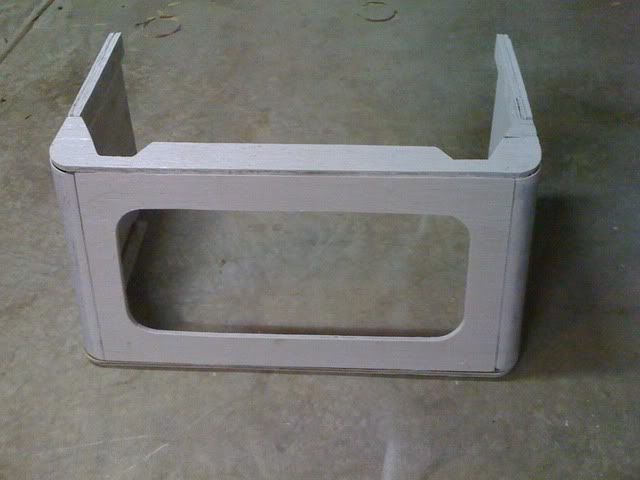
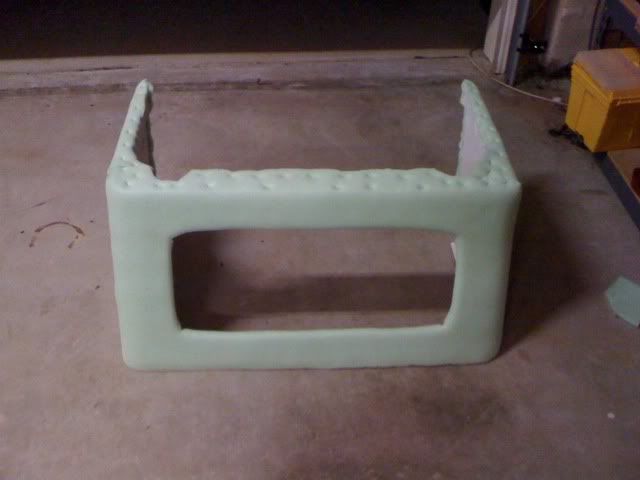
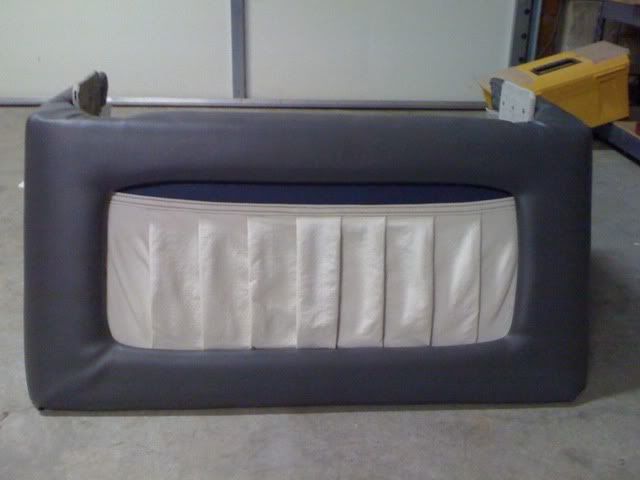
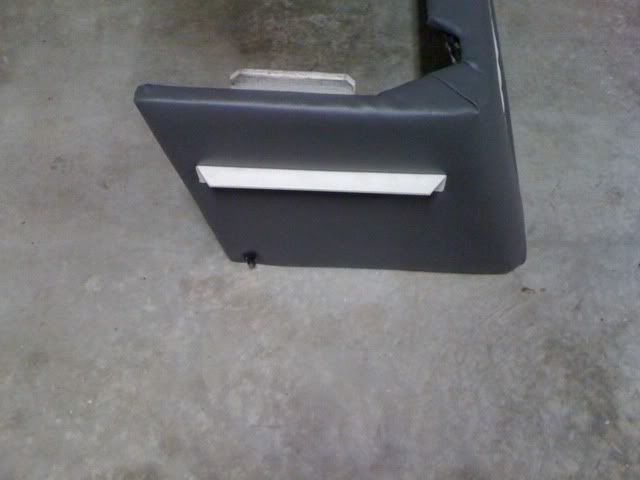
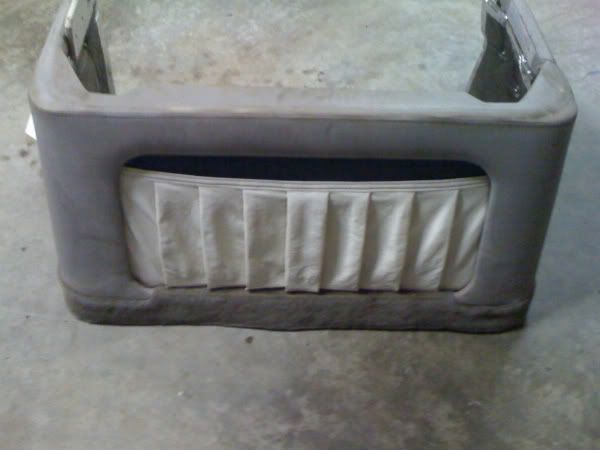
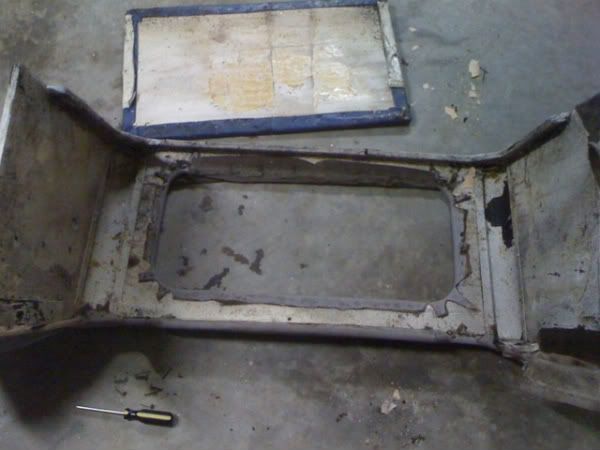
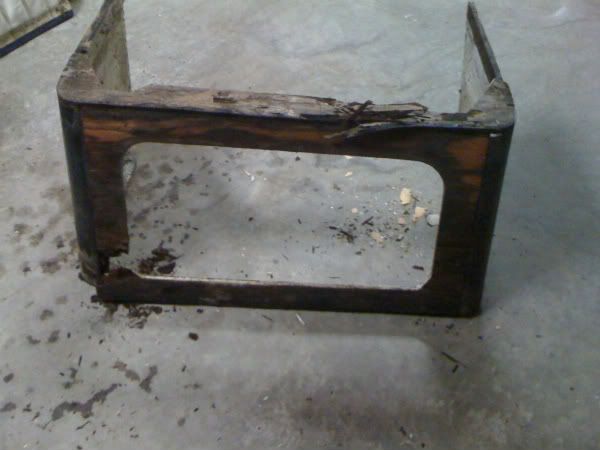
I'm thinking about fabricating a new motor cover for my 1994 Bayliner Capri.

I'm sure guys have done this before. I did search through the archives and couldn't find an example (walkthough).

The frame won't be a problem, but the current cover has curved corners, and I was wondering if anyone had experience curving plywood or if there was another material that you would recommend.

Thx!
 
Last edited:

Bondo

Moderator
Staff member
Joined
Apr 17, 2002
Messages
71,089
Re: Rounded corner help for a motor cover?

Re: Rounded corner help for a motor cover?

or if there was another material that you would recommend.

Ayuh,.... Fiberglass,..??
 

jspano

Senior Chief Petty Officer
Joined
Oct 30, 2009
Messages
790
Re: Rounded corner help for a motor cover?

Re: Rounded corner help for a motor cover?

if your looking for a material to use as a mold to form some glass around, i have seen a product that looks like peg board without the holes that's bendable to an extent. if you take some thin plywood and cut it to width and keep it 8 ft length you can bend it gradually and do it to 2 pcs and then cut and put them together. i know we use to bend drywall to cover arches by weting a 8 foot pc cut to width and placing on saw horses to allow them to bend overnight.
 

RollTide13

Cadet
Joined
Jan 13, 2010
Messages
14
Re: Rounded corner help for a motor cover?

Re: Rounded corner help for a motor cover?

Thanks guys.

Sorry if the questions seem elementary, I have no experience in any of this - just learning as I go.
 

jspano

Senior Chief Petty Officer
Joined
Oct 30, 2009
Messages
790
Re: Rounded corner help for a motor cover?

Re: Rounded corner help for a motor cover?

heck, i'm new to all this too! i just try to think outside the box. doesn't make me wrong or right... just thinking out loud

when people say you can't do that it just makes me want to do it even more

good luck
 

thrillhouse700

Senior Chief Petty Officer
Joined
Aug 5, 2009
Messages
778
Re: Rounded corner help for a motor cover?

Re: Rounded corner help for a motor cover?

You prob already did this but take the old one apart and see how its made?
 

BobsGlasstream

Commander
Joined
Sep 11, 2009
Messages
2,128
Re: Rounded corner help for a motor cover?

Re: Rounded corner help for a motor cover?

RollTide13,
You could always use the old one as a model to build the new one if you liked the way it looked.
Just use a release agent (mold release) and then apply gel coat, fiberglass on the gel coat and then separate the two and use the layup for your mold for the new one. There's a little more to it but that's the basic idea.
Bob
 

RollTide13

Cadet
Joined
Jan 13, 2010
Messages
14
Re: Rounded corner help for a motor cover?

Re: Rounded corner help for a motor cover?

Well I 'assumed' I would need to round some plywood. foam, etc. But it turns out that there were already curved plastic pieces in the original construction.

Here are some pictures of the new motor cover (the quality isn't the best - I used my cell phone).

Let me know what you think. I'll post pictures of the old cover and its condition when I get home.

Thx


IMG_0030.jpg

New cover with treated plywood.

IMG_0031.jpg

New cover with treated plywood from the back. Notice the plastic corner pieces.

IMG_0032.jpg

Some paint to clean it up.

IMG_0033.jpg

Foam in place.

IMG_0034.jpg

Finished cover - front.

IMG_0035.jpg

Finished cover - side
 

scipper77

Commander
Joined
Sep 30, 2008
Messages
2,106
Re: Rounded corner help for a motor cover?

Re: Rounded corner help for a motor cover?

That is some of the best non professional work I have seen! Nice job.
 

Robert4Winns

Petty Officer 2nd Class
Joined
Oct 28, 2009
Messages
146
Re: Rounded corner help for a motor cover?

Re: Rounded corner help for a motor cover?

Very nice work!
 

Squid Billy

Petty Officer 2nd Class
Joined
Jun 3, 2008
Messages
152
Re: Rounded corner help for a motor cover?

Re: Rounded corner help for a motor cover?

Very Nice Job!!!!!

A simple way to get shapes that are rounded or contoured in flowing shapes, is to use foam. It doesn't really matter what kind, but for myself, ... I prefer the blue foam as it is dirt cheap and shapes extremely well and as Bond-o said; "Fiberglass?"

All that is needed is an imagination, sand paper and EPOXY "only" if you use a styrene based foam (white, blue, pink). If you use the Urethane foam, usually amber in color but comes in other colors if it's in sheet form, then you can use either polyester, viynlester "OR" epoxy.
 

BobsGlasstream

Commander
Joined
Sep 11, 2009
Messages
2,128
Re: Rounded corner help for a motor cover?

Re: Rounded corner help for a motor cover?

RollTide13,
i can't find anything wrong with what you did.
Very nice work.
Should last a long time as long as it is sealed good.
Bob
 

RollTide13

Cadet
Joined
Jan 13, 2010
Messages
14
Re: Rounded corner help for a motor cover?

Re: Rounded corner help for a motor cover?

Thanks for all the comments guys.

I'm pretty happy with how it turned out. It could be better, but it's the first time I've ever upholstered anything.

Of course now that I've done one piece in the boat, I'm going to have t redo the rest of the interior. I'm sure you guys can understand! LOL


Here are a few pictures of what it used to be for comparison.

IMG_0019.jpg

Old cover - front view

IMG_0021.jpg

Old cover - back view

IMG_0022.jpg

The vinyl is off. It was all I could do to keep it standing up without crumbling!
 

Mark42

Fleet Admiral
Joined
Oct 8, 2003
Messages
9,334
Re: Rounded corner help for a motor cover?

Re: Rounded corner help for a motor cover?

Good decision going with treated ply. Will last a long time. Really nice job. Looks factory!
 

RollTide13

Cadet
Joined
Jan 13, 2010
Messages
14
Re: 1994 Bayliner Capri 1850 LS restore

Ok, I've changed the name of my initial thread from questions about rebuilding the lower motor cover to a restore thread. I guess I've passed the denial phase..lol

The boat sat uncovered for at least a year. All the cushions are cracked and water logged. The engine runs but needs a new head gasket and trim adjustment according to the PO (we will see). The floor feels pretty solid but if the rest of the boat is any indication, it will need to be replaced. I'm just hoping to use it this summer and do the 'big' work next winter.


So here is what I'm planning on and my 'tentative schedule':

Phase 1 (Pre-Summer):
----------------------------------
1) replace all cracked and ruined upholstery
2) replace all rotted wood in side panels, seats, bolsters, ski locker cover with treated ply and oil based paint
3) have engine evaluated and fixed (not an engine guy so I'll pay for this)
4) have all electrical systems evaluated and fixed
5) restore yellowed and oxydized fiberglass
6) replace tires on trailer
7) use boat this summer

Phase 2: (Next Winter)
----------------------------------
1) Replace floor, carpet, stringers
2) strip and repaint hull
3) strip and restore trailer


What do you guys think. Does it make sense?
 

ezmobee

Supreme Mariner
Joined
Mar 26, 2007
Messages
23,767
Re: 1994 Bayliner Capri 1850 LS restore

I'd get the motor/drive checked out and made fully operational before I spent a DIME on anything else. After that though, I see no issue with your plan. Just be careful with all the work you do this season to make sure it is able to be easily removed (without damage) next winter when you tear it apart again to do the floor.
 

RollTide13

Cadet
Joined
Jan 13, 2010
Messages
14
Re: 1994 Bayliner Capri 1850 LS restore

I'm doing the upholstery myself (I'll post pictures soon). I've recovered most of the seat cushions and now I'm moving on the the bow bolsters, trim and side panels.

Last night I removed the bow bolsters. There were three screws accessible through the dash panel. After that there were two metal clips that attached to holes in the wood backing. The only problem I had is that there was another screw further down. The wood was soft so it just pulled out, but now I don't know what I'm going to do to replace that screw.

There is no way I could have reached it unless I popped the cap off. I was thinking that maybe one of those plastic fasteners used in cars might work. I just don't know. The other funny thing is that the screw on the other bolster was in a completely different place.

Any ideas?

Bolster removed
IMG_0037.jpg


Close up
IMG_0040.jpg
 

RollTide13

Cadet
Joined
Jan 13, 2010
Messages
14
Re: 1994 Bayliner Capri 1850 LS restore

I'd get the motor/drive checked out and made fully operational before I spent a DIME on anything else. After that though, I see no issue with your plan. Just be careful with all the work you do this season to make sure it is able to be easily removed (without damage) next winter when you tear it apart again to do the floor.


I agree with you EZ. I've already called around and priced a full rebuild or used replacement and worst case is about $2000 installed. We've decided to keep the boat for awhile so I'm fine with that.

Also, I figured that restoring the interior should help with resale whenever the time comes. I only paid $575 for the boat and trailer combined and have probably put another $300 in it with vinyl, wood, radio and speakers.
 

lgrouper03

Cadet
Joined
Nov 28, 2007
Messages
21
Re: 1994 Bayliner Capri 1850 LS restore

rolltide,

I have a 93 1850 Capri and at some point would like to re-do the seats, etc. Maybe next year, because right now I am in the teardown stage for stringers and transom (just got past the denial stage about a week ago). Anyway, I'm very comfortable working on engines and fairly comfortable with this project I'm diving into right now. But when it comes to upholstery I have no idea. Are there any secrets to it, or is it mostly initiative with some wise judgement?

Thanks, lgrouper
 
Top