1999 Celebrity 190 - Engine Mount and Stringer Repair

jbcurt00

Moderator
Staff member
Joined
Oct 25, 2011
Messages
25,111
Re: 1999 Celebrity 190 - Engine Mount and Stringer Repair

Just don't make the fillets TOO big, it'll just use up more PB.....

Good luck w/ the transom install
 

bvetter

Petty Officer 1st Class
Joined
Jun 2, 2013
Messages
263
Re: 1999 Celebrity 190 - Engine Mount and Stringer Repair

Does anyone see any issues with laminating three sheets of 1/2" ply to get to 1.5 thickness? I originally planned on using two sheets of 3/4", but cannot without risking being over 2.25" overall transom thickness. Here is why:

In the above pictures, looking at the transom after the centre section has been removed, the outer wings still have the inner glass skin equating to between 3/16" and 1/4" thickness. If I lay a full width piece to span across the two wings, that new piece will have 3/16" to 1/4" of glass between it and the existing wings. This will in effect make my transom 1/4" thicker than it already was, assuming I use 3/4" plywood. If I use 1/2" to span the wings, then I could laminate a 1" thick piece in the centre to bridge the gap where the old centre piece was removed. This would give me 1.5" of plywood, plus 3/16" PB, plus 3/16" outer skin, plus 1/8" inner skin for a total of 2" thickness. Unfortunately I cannot find any 1" thick exterior grade ply in my area. So, would it be OK to laminate three layers of 1/2" ply to achieve a centre section thickness of 1.5"? Obviously good distributed clamping would be key.
 

Woodonglass

Supreme Mariner
Joined
Dec 29, 2009
Messages
25,929
Re: 1999 Celebrity 190 - Engine Mount and Stringer Repair

You don't want to starve the PB from the transom and outer skin during clamp up by clamping it too hard. Moderate clamping pressure is all that's required or desired. Once the PB starts to ooze out then stop clamping and start using the spoon!!! 3/16 to 1/4" is fine. Sooo, with the exisiting thicknes of the outer skin + the PB + the 1 1/2" of the plywood you're prolly gunna be just shy of 2". Now you'll have resin and a couple layers of 1708 and CSM for the inner skin so, your're gunna end up with right at 2 1/4" for your final thickness and that's just about PERFECT!!!! You did a nice job on grinding your transom. It looks Great!!!!
 

bvetter

Petty Officer 1st Class
Joined
Jun 2, 2013
Messages
263
Re: 1999 Celebrity 190 - Engine Mount and Stringer Repair

You don't want to starve the PB from the transom and outer skin during clamp up by clamping it too hard. Moderate clamping pressure is all that's required or desired. Once the PB starts to ooze out then stop clamping and start using the spoon!!! 3/16 to 1/4" is fine. Sooo, with the exisiting thicknes of the outer skin + the PB + the 1 1/2" of the plywood you're prolly gunna be just shy of 2". Now you'll have resin and a couple layers of 1708 and CSM for the inner skin so, your're gunna end up with right at 2 1/4" for your final thickness and that's just about PERFECT!!!! You did a nice job on grinding your transom. It looks Great!!!!

Thanks Wood!

Do you see any issues with laminating 3 layers of 1/2" ply to achieve 1.5" overall as noted in my last post?
 

bvetter

Petty Officer 1st Class
Joined
Jun 2, 2013
Messages
263
Re: 1999 Celebrity 190 - Engine Mount and Stringer Repair

Went ahead and bought two sheets of 1/2" exterior ply today. Measured and cut out the transom pieces.


I noticed I have some high spots in the glass on the wings of the original transom where the deck tabbing was, so I think I'll do a little more grinding to even out the surfaces.

Other than that, I've been prepping the ski locker floor. All the edges including a drain cutout, have been soaked and wrapped with CSM. Also have one layer of CSM on the bottom side, just a little more work yet before installing it.
 

tpenfield

Moderator
Staff member
Joined
Jul 18, 2011
Messages
18,140
Re: 1999 Celebrity 190 - Engine Mount and Stringer Repair

:thumb:

I hope to be doing similar plywood work in a month (or 2) . . . My only comment would be to make sure you get the wood really dried out before you do the installation and glassing work. For short money, you can get a moisture meter to check the wood for moisture content.
 

JASinIL2006

Vice Admiral
Joined
Feb 10, 2012
Messages
5,714
Re: 1999 Celebrity 190 - Engine Mount and Stringer Repair

If glued and clamped well, I can't see any reason three layers of 1/2" wouldn't work.
 

bvetter

Petty Officer 1st Class
Joined
Jun 2, 2013
Messages
263
Re: 1999 Celebrity 190 - Engine Mount and Stringer Repair

My parents got back into the province from a month long vacation in the US Virgin Islands, they are staying at our place for a couple nights to visit with their granddaughter (not us obviously). So I put pop to work today helping me out with laminating the transom, he took some pictures as we went along.

Rather than using wood glue to laminate the three sheets of 1/2" ply, I decided to use epoxy. Here is why.
-Wood glue needs ALOT of pressure in order make a proper bond (from what I've been reading on various woodworking forums lately). The area of the lamination I am working on is 32"x25"=800 sq in. To get 3 PSI over then entire surface, I would need 2400lbs of well distributed weight. Not that 3PSI is a definite requirement, but I don't think it's too far off (likely conservative if anything). Vacuum bagging would be a perfect way of evenly distributing the clamping forces over the entire surface area, but then I would be at the mercy of whatever shape the finished lamination takes as there is nothing to "hold" the plywood surface flat.
-The 1/2" sheets are not nearly as rigid as 3/4", so clamping with wood clamps and using screw "may" cause undulations in the finished product, with low spots where the clamping pressure is. High spots with build up of wood glue would be weak spots.
-In consultation with West Systems Epoxy technical services line, only moderate pressure is required for laminating. Only enough pressure to squeeze out product is required.
-Using epoxy, I could lay the plywood on a flat surface, the concrete floor in my garage for example, once everything is set up, put enough distributed weight on the laminations to just squeeze out the epoxy. Once the epoxy hardens, the transom should maintain a perfectly flat shape as it's been set up on the floor.
-Also, epoxy is stronger than the wood, so the lamination adhesive should add strength.

Picked up the epoxy from a local woodworking supplier, Lee Valley. 32oz container of resin, and 7 oz of hardener ran around $60.


First we built a clamping assembly which will eventually be used when I install the transom plywood in the boat. This will be used on the outside of the transom skin in order to evenly distribute the clamping forces and maintain a consistently flat surface around the keyhole. We built this today and also used it for distributing the weigh when we did the plywood laminations.

The plywood side will go against the outer skin. It is dead flat when we checked with a straight edge.


Mixing epoxy. 5 parts 105 resin, 1 part 205 hardener.


bvetter

Petty Officer 1st Class
Joined
Jun 2, 2013
Messages
263
Re: 1999 Celebrity 190 - Engine Mount and Stringer Repair

Rolled on a layer of epoxy on all of the surfaces that would be clamped in order to soak in. Then mixed up a batch thickened with cabosil. Troweled it on all of the surfaces.


Once all the laminations were in place, we put on our handy weight distributor thingy, a wood planer, 5 gallon pail of resin, air compressor, and patio bricks around the edges. All added up to maybe 250lbs of weight, or 0.3PSI distributed across the surface area.


Got a little oozing out of the two layers.


bvetter

Petty Officer 1st Class
Joined
Jun 2, 2013
Messages
263
Re: 1999 Celebrity 190 - Engine Mount and Stringer Repair

Earlier I had added a pin to two of the corners to hold the three layers in place.


Cleaned up the edges after a few minutes, then repeated once more.


So hopefully it turns out Ok. I plan to leave it for 24hrs to set up, garage thermostat is set to 22 degrees C, concrete floor is cooler but should be just fine overnight.

Then went on to do some work inside the boat to prep the transom skin. I filled in a valley all around the centre portion with PB. I bought a "cute" pail from Home Depot, didn't even know they sold these 2 gallon pails until the other day. Also bought a mixer used for morter. It worked unbelievably well for mixing up a large batch of PB.


We'll see what tomorrow brings.
 

bvetter

Petty Officer 1st Class
Joined
Jun 2, 2013
Messages
263
Re: 1999 Celebrity 190 - Engine Mount and Stringer Repair

I wanted to share this table. It is in the catalogue of a very well respected woodworking supplier up here, Lee Valley Tools. I'm not sure of the legitimacy of the data, but it is interesting none the less. Looks like Gorilla Glue has some advantages over Titebond III.

West System Epoxy is listed in the first three lines.


jbcurt00

Moderator
Staff member
Joined
Oct 25, 2011
Messages
25,111
Re: 1999 Celebrity 190 - Engine Mount and Stringer Repair

I typically recommend using TiteBond3 for laminating transoms, and occasionally GorillaGlue. I used Gorilla Glue & couldn't have been happier w/ the results for my Duracraft's transom.

If you use epoxy, make sure it isn't anywhere you plan to follow up w/ polyester resin or gelcoat.
 

JASinIL2006

Vice Admiral
Joined
Feb 10, 2012
Messages
5,714
Re: 1999 Celebrity 190 - Engine Mount and Stringer Repair

Gorilla Glue is great; I've used it on a bunch of projects. I used Titebond III for my transom, though. Gorilla Glue can be a pain to work with, especially cleaning up any seepage from seams. My guess is that both would work equally well, especially in fiberglass- or expoxy-encased wood.

I found this when casting about on the web about glue comparisons: Glue strength testing. Interesting, I think.
 

bvetter

Petty Officer 1st Class
Joined
Jun 2, 2013
Messages
263
Re: 1999 Celebrity 190 - Engine Mount and Stringer Repair

If you use epoxy, make sure it isn't anywhere you plan to follow up w/ polyester resin or gelcoat.

Yup. I used a flush cut router bit to clean up all the edges. The only exposed epoxy is in the lamination seam, approx 1/32" thickness around the entire edge. Will post pics of the laminated transom tonight.
 

bvetter

Petty Officer 1st Class
Joined
Jun 2, 2013
Messages
263
Re: 1999 Celebrity 190 - Engine Mount and Stringer Repair

Gorilla Glue is great; I've used it on a bunch of projects. I used Titebond III for my transom, though. Gorilla Glue can be a pain to work with, especially cleaning up any seepage from seams. My guess is that both would work equally well, especially in fiberglass- or expoxy-encased wood.

I found this when casting about on the web about glue comparisons: Glue strength testing. Interesting, I think.

Interesting indeed. I did a of couple bonding comparison tests myself with leftover thickened epoxy and PB on some MDF I had laying around. Will post pics tonight.
 

bvetter

Petty Officer 1st Class
Joined
Jun 2, 2013
Messages
263
Re: 1999 Celebrity 190 - Engine Mount and Stringer Repair

The other day when I laminated my transom plywood and did a little PB work on the existing transom skin, I had some thickened epoxy and PB left over, so I though I would do some bonding tests.

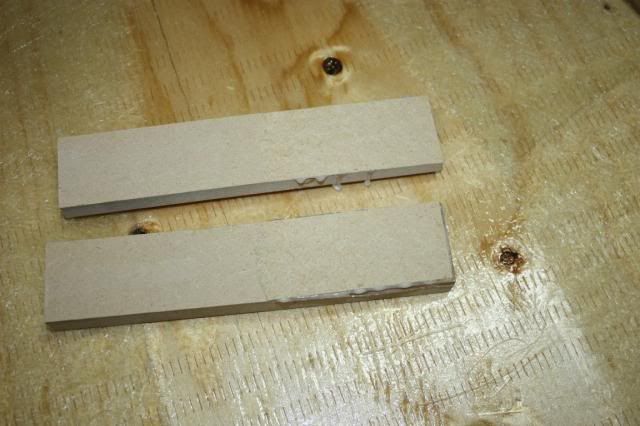
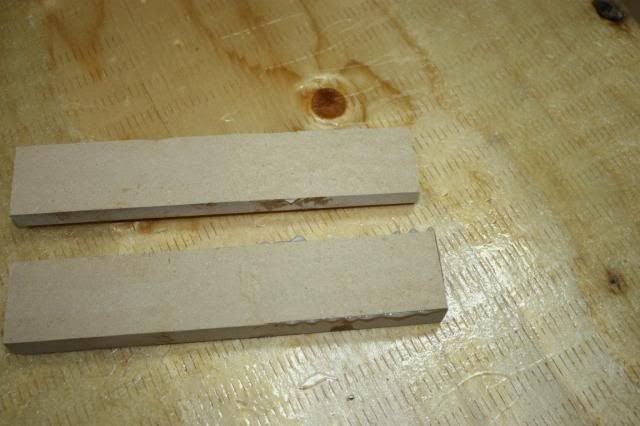
Please bear in mind this was a highly scientific experiment performed under maximum scrutiny within the confines of my laboratory (garage). The test subjects were left over strips of 8"x1.5"x0.75" medium density fibreboard, or as those of us in the scientific community like to call it, MDF. Each test, and there were four in total, involved a very carefully monitored application of bonding adhesive to the test location, which was a 2" long area on the end of each test strip. Two strips were used per test, after the bonding adhesive was carefully applied, the two strips were clamped together, and allowed to cure overnight.

Ambient conditions were as follows:
Air temperature - 20 degrees C nominal, min 18, max 22
Humidity - Somewhere between 0 and 100%

As per standard scientific procedures, no control test was performed as my methodology for evaluation was to be rock solid, noted below.

Test 1 - Thickened epoxy, 1lb clamping pressure, +/- 1lb
Test 2 - Thickened epoxy, placed in vise at max clamping force my measly little arms could produce
Test 3 - Hairy PB, 1lb clamping pressure, +/- 0.5kg
Test 4 - Hairy PB, clamped using a standard 8" C-clamp using a generous amount of clamping pressure

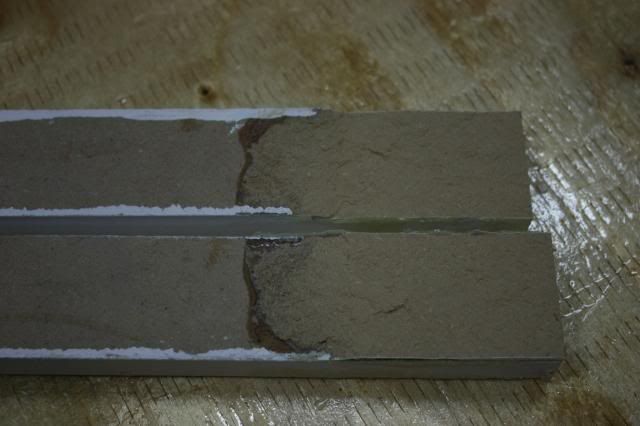
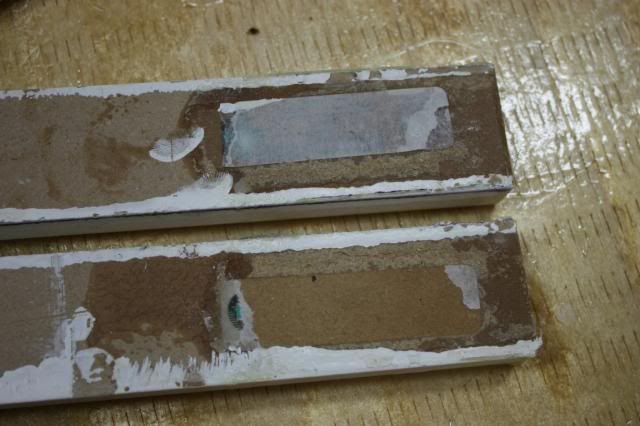
The unaudited results were as follows. In all four cases, I could not separate the two test strips by hand, I used a highly calibrated splitting device (chisel) to open up the test strips until such time the bonding or test strips failed. Yes, that was the rock solid evaluation criteria.

Both tests using thickened epoxy yielded identical results, no notable difference, interesting as previous research had led this highly trained scientist to believe too much clamping pressure would in fact degrade bonding performance. Note to self, Google may or may not return accurate information.

Test 3 required the most effort of all test cases to split the joint. In fact, as you will see in the below photos, the bond removed the greatest amount of material to a greater depth than any of the other cases. Hmmmm, better resin absorption properties than epoxy could be conjured up as a possible theory.

Test 4 required the least effort, in fact, the bond failed, not the MDF. I did however note that a barcode sticker was left directly in the bonding test area prior to the PB application, sloppy scientific work on my part. Either way, I would surmise that too much clamping pressure when bonding with PB would affect it's final strength in an inversely proportional manner.

The below photos were taken post experiment:

Test 1 - Thickened Epoxy, lightly clamped


Test 2 - Thickened Epoxy, tightly clamped


Test 3 - Hairy PB, lightly clamped


Test 4 - Hairy PB, tightly clamped


This concludes our experiment, I hope everyone learned something. In my case, I learnt that a trip to the gym now and then would help out with splitting strips of MDF previously bonded together using thickened epoxy or PB.

Later dudes.
 

bvetter

Petty Officer 1st Class
Joined
Jun 2, 2013
Messages
263
Re: 1999 Celebrity 190 - Engine Mount and Stringer Repair

On to more serious notes, got a little more prep work done yesterday and tonight. I did a rough cut of the keyhole in the new transom, left about 3/8" extra material all around the keyhole, I plan on using a flush cut router bit to clean it up once installed. With the keyhole cut out, here is a pic of the laminations, you can see the three layers of 1/2" ply, and the two layers of epoxy.


I had to cut back some of the inner section of the transom. On the existing skin, the outside edges of the centre section are much thicker than in the middle near the keyhole, this thickness is built up on the inside (engine side) of the skin, not the gelcoat side. So I used a flush cut bit, set at a depth of around 3/16".


Some pics of the assembly after sanding and rounding the edges.


Last edited:

bvetter

Petty Officer 1st Class
Joined
Jun 2, 2013
Messages
263
Re: 1999 Celebrity 190 - Engine Mount and Stringer Repair

And finally, tonight, added a single layer of CSM to the inside face of the transom .


Hopefully tomorrow it will go in it's new home.

Picture of the clamping gear all ready to go.

 
Top