305 to 350 build questions

Rick Stephens

Admiral
Joined
Aug 13, 2013
Messages
6,118
Glad you didn't get the aluminum heads. I am strongly of the opinion that mixing aluminum with cast iron is a great way to always have problems. I think you're much better off the route you took.

Enjoy the build - sounds like fun.

Ric
 

gr8shot

Seaman
Joined
May 30, 2019
Messages
73
The 190 is a great boat. same as the 2002 I had (left over 2001 production, registered as 2002)

no problem with a low mileage truck motor (just make sure you add up all the costs directly and compare
buy a 5.7 vortec truck motor from a 1996-1999 truck (about $500). keep in mind the LS motors came out in truck starting in 1999
pull the long block apart
toss the steel core plugs, the steel head gaskets, and the steel water pump
install brass core plugs (about $11)
install marine head gaskets and new torque to yield bolts (about $170)
install a new marine water pump (about $75)
while at it, I would install a decent marine cam, like the XM264HR and a new timing set. this will require the valve seal bosses to be machined for clearance ($532 for the cam, lifters and timing set, $100 for the head work)
Install a new damper (about $50)

that is $1338 so far ($806 without the cam)

if you want to go 4-barrel, now is the time - (About $750 for intake and carb and spark arrestor)

that is $2088 so far

transfer the flywheel, knock sensors, and accessories over. (you will need to get the right knock module for a 5.7)
new exhaust gaskets to install your existing manifolds (about $25)

add misc., incidentals, etc. and you are at $2250 for installing a used truck motor with a new marine cam

where the new 5.7 vortec marine motor with an intake and carb and warranty is just a bit more.

Kind of scary to see how accurate this is lol. Here's where I'm at so far.

Head machining: $650
Block machining: $600
Carb (found a new edelbrock 1409 on facebook): $250
Edelbrock EPS intake manifold: $279
Engine gasket kit: $99
Head Bolts: $38
Had to buy an engine stand (used): $50
Other engine assembly tools, fluids etc: $120
Bearings & Rings: $165
Lifters: $120
Oil Pump: $40
Brass freeze plugs: $12

So thats $2,423 so far. Plus $400 for the core long block I bought to tear down and rebuild, and the fuel to get it, fuel to drive an hour and 20 minutes to the closest machine shop each way.

And I still have a few things left to buy, like a timing cover, break in oil & filter, and I'm sure there will some other stuff I forgot.

I'm using the marine cam from the 305 and it's in immaculate shape, so no cost for a cam, same with the timing gear and chain from the 305.
 

Scott Danforth

Grumpy Vintage Moderator still playing with boats
Staff member
Joined
Jul 23, 2011
Messages
50,239
I use amazon to buy Rotella T4 15W40 diesel oil. its about same cost as wally-world without the weird wal-martians
 

gr8shot

Seaman
Joined
May 30, 2019
Messages
73
I use amazon to buy Rotella T4 15W40 diesel oil. its about same cost as wally-world without the weird wal-martians

I've got about 20 gallons of Mobil Delvac 15w40, are you saying use a diesel oil for break in? I had planned on buying some specific break in oil.
 

Scott Danforth

Grumpy Vintage Moderator still playing with boats
Staff member
Joined
Jul 23, 2011
Messages
50,239
I like to run the Rotella diesel because it has high amounts of zinc, especially for break-in.
 

matt167

Rear Admiral
Joined
Sep 27, 2012
Messages
4,168
I like to run the Rotella diesel because it has high amounts of zinc, especially for break-in.

Not since a few years now. Shell lowered the amount substantially from what it was.. However Mobile has their VR1 motorcycle oil in 20W50, 10W30 and SAE 50 and all of them have 1,200 PPM of ZDDP. It is the best zinc oil you can actually buy these days.. Bars leaks makes a ZDDP addative that creates 1,500-1,800 PPM average oil out of any oil when used with 5 quarts of oil.
 

Scott06

Admiral
Joined
Apr 20, 2014
Messages
6,732
:nono: this is NOT an oil thread

you’re right it’s a break in oil thread.... fwiw my new long block from Michigan motorz they were adamant that I use rotella for break in. I’m sure the OPs Delvac will do the same just fine.

gr8sht you’re at about half of what I spent for a new base engine including carb , intake, distributor, and exhaust manifolds and elbows. I’d say that’s a pretty good savings for a rebuilt engine.
 

gr8shot

Seaman
Joined
May 30, 2019
Messages
73
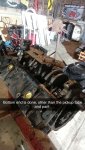
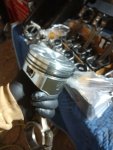
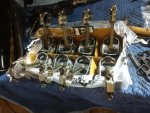
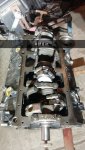
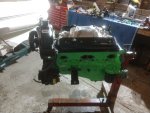
Well I've got the bottom end together other than the oil pickup tube and putting the pan on. All the main bearings were right at 0.020" on the money. All the rods were good as well, 7 and 8 were closer to .015" than to .020" but thats still within spec so I put them together. Couple friends that I talked to said they've never filed rings before and not to worry about it. But I checked a couple before I started putting them on pistons and they were way too tight. Turns out all of the compression rings needed filing to get the right gap. Every one of the first and second rings were tight. They all measured about 0.008-0.010". I opened them up to 0.020" for the top and 0.023" for the second compression ring.

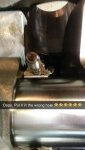
I did have one close call, after I put the bearings on the rods, I put one of the caps back on backwards, i must have just glanced at the cap when looking at which way to orient the piston and rod, and I put a piston/rod in the wrong way, so the big chamfer on the rod was facing in, instead of towards the crank. Luckily I was taking my time and caught it, so no harm done.

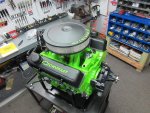
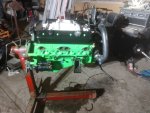
I'll be working on it this week as much as I can. Going to get the pan and heads on, and then I want to give the whole engine a coat of paint. I saw a picture of an engine that was lime green, with all the black hardware. I'm sure a few of you purists will flame me for not going black, but it looked so good, I'm going to go with green for the engine.

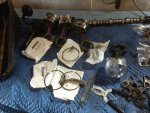
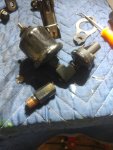
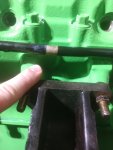
Here's a few pics since everyone likes to see pictures!
 

Attachments

  • photo326036.jpg
    photo326036.jpg
    84.9 KB · Views: 2
  • photo326037.jpg
    photo326037.jpg
    129.4 KB · Views: 7
  • photo326038.jpg
    photo326038.jpg
    141.8 KB · Views: 2
  • photo326039.jpg
    photo326039.jpg
    134.1 KB · Views: 2
  • photo326040.jpg
    photo326040.jpg
    160.8 KB · Views: 2
  • photo326041.jpg
    photo326041.jpg
    298.6 KB · Views: 2
  • photo326042.jpg
    photo326042.jpg
    266 KB · Views: 2
  • photo326043.jpg
    photo326043.jpg
    311.1 KB · Views: 2

gr8shot

Seaman
Joined
May 30, 2019
Messages
73
Making progress. Bottom end is buttoned up. Cam and timing set is in. Rest of the top end is going to go on today, along with accessories and everything else if I have time. Last nice day for what looks to be quite a while here, so I'm making a big push to get as much done as possible today.

Pained the pan and block bright green this week too. Looks badass! I'll paint the heads too once I get them torqued down.
 

Rick Stephens

Admiral
Joined
Aug 13, 2013
Messages
6,118
You're gonna hafta practice your scottish accent. People see that motor and ask you what it is, you'll have to let out "it's green", like Scottie in Star Trek.
 

Scott Danforth

Grumpy Vintage Moderator still playing with boats
Staff member
Joined
Jul 23, 2011
Messages
50,239
when you get the motor in the boat, hose it down with a can of boeshield or fluid film to prevent corrosion and to keep it looking nice.
 

Bondo

Moderator
Staff member
Joined
Apr 17, 2002
Messages
71,083
Ayuh,...... 'n people make fun of Me, paintin' my 4.3l Cat Yellow, or my latest, a Gold SBC,......

fetch
 

Scott Danforth

Grumpy Vintage Moderator still playing with boats
Staff member
Joined
Jul 23, 2011
Messages
50,239
Ayuh,...... 'n people make fun of Me, paintin' my 4.3l Cat Yellow, or my latest, a Gold SBC,......

I did mine in wrinkle black and red...... then polished the exhaust...... I wouldnt make fun of you painting a motor

fetch


fetch


fetch
 

gr8shot

Seaman
Joined
May 30, 2019
Messages
73
Things are mostly complete now. Heads are on and painted, lifters are in, valves are set. Intake manifold is on, valve covers are on. Got the water pump, power steering pump, alternator and starter put on. Ran into a couple minor issues though. One being that there's a threaded hole in the old 305 block thats used for a cushion clamp to hold the dipstick tube in place. There isn't a hole in the same place on the 350 block. So I'll have to improvise. Also, I used the truck's oil pan instead of the pan from the 305, and as a result the dipstick tube was too long, it was bottoming out in the oil pan before it was fully seated in the block. So I had to trim a couple inches off the dipstick tube, and I'll have to probably trim the dipstick itself and make a new full mark on it so I know where full is.

I also broke a little fitting for the senders or whatever they are that come off the oil filter housing. Looks like they're just brass NPT fittings, so hopefully I can get them at a local parts store rather than ordering online and hoping I got the right stuff. And I found a broken wire on the floor under my alternator. So I need to find a picture or diagram of the wires for the alternator so I get it put back on correctly and everything works as it should in the boat. Trivial and time consuming stuff, but important none the less.

We're supposed to get 6" of snow tonight and tomorrow, and have crappy cold weather til mid next week. So sadly I won't get to drop it in the boat until then.
 

Bondo

Moderator
Staff member
Joined
Apr 17, 2002
Messages
71,083
I also broke a little fitting for the senders or whatever they are that come off the oil filter housing. Looks like they're just brass NPT fittings, so hopefully I can get them at a local parts store

Ayuh,..... Plain ole brass fittin's, available at 'bout any hardware store,......
 

gr8shot

Seaman
Joined
May 30, 2019
Messages
73
I forgot the pictures, because everyone likes pictures right?
 

Attachments

  • photo326200.jpg
    photo326200.jpg
    203.2 KB · Views: 2
  • photo326201.jpg
    photo326201.jpg
    269.5 KB · Views: 2
  • photo326202.jpg
    photo326202.jpg
    238.5 KB · Views: 2
  • photo326203.jpg
    photo326203.jpg
    266.3 KB · Views: 2
  • photo326204.jpg
    photo326204.jpg
    181.5 KB · Views: 2

Scott Danforth

Grumpy Vintage Moderator still playing with boats
Staff member
Joined
Jul 23, 2011
Messages
50,239
1/4" NPT to 1/8" bushing into the block, 1/8" NPT T-fitting for the switch and sender.
 
Top