74 Starcraft Holiday resto

SkidRowBill

Petty Officer 1st Class
Joined
Jun 8, 2015
Messages
295
I saw a 150 merc 4 stroke on an open 16ft lund the other day... some of the lakes around here are as long as 40 miles... none the less I prefer to arrive alive
 

SkidRowBill

Petty Officer 1st Class
Joined
Jun 8, 2015
Messages
295
The world is going by plenty fast enough... when in Gods country I enjoy the sceenery almost as much as catching fish... Moderation is the key here...
 

dozerII

Admiral
Joined
Oct 25, 2009
Messages
6,527
The bow out is normal after taking out the transom wood. When installing the new one you have to make sure to clamp the aluminum flat to the transom wood with a straight edge I use an old level, then drill all your holes to ensure the transom skin lays flat on the transom wood.
 

Watermann

Starmada Splash of the Year 2014
Joined
Jan 12, 2013
Messages
13,822
Yeah all that white is galvanic corrosion and has to be cleaned off with a wheel. I see you've been working on the outer skin. It would be a much easier job getting getting the ply out and cleaning with the splashwell removed. Every transom I've had was bowed some after the wood was removed, especially the monster sheet of AL in my I/O Chief.
 

SkidRowBill

Petty Officer 1st Class
Joined
Jun 8, 2015
Messages
295
The transom was bowed more with the wood in... I could see at least a 1/2 inch outward bow... without the wood the transom bow has subsided.
 

SkidRowBill

Petty Officer 1st Class
Joined
Jun 8, 2015
Messages
295
So my question is do I cut the transom wood a hair less wide??? also does anyone know about this STARBOARD... I believe that wood will absorb more engine vibration than any metal... to me the vibration of the metal will reverberate throughout the entire boat... but what do I know... I am a lowly Cadet... need help here... or a miller...
 

SkidRowBill

Petty Officer 1st Class
Joined
Jun 8, 2015
Messages
295
The bow out is normal after taking out the transom wood. When installing the new one you have to make sure to clamp the aluminum flat to the transom wood with a straight edge I use an old level, then drill all your holes to ensure the transom skin lays flat on the transom wood.

I will use angle Iron clamped to the transom... thank you for letting me know... you guys are great... this is working out fine albeit in slow motion... gives me time to understand the issues at hand as this build goes on...
 

SkidRowBill

Petty Officer 1st Class
Joined
Jun 8, 2015
Messages
295
should the transom be bowed out a bit once the wood is installed??? as it was be4 I removed it...
 

Watermann

Starmada Splash of the Year 2014
Joined
Jan 12, 2013
Messages
13,822
I would use AL too if my boat originally had a pad and there were holes that needed filled not to mention pitting to hide. My OB boat didn't have one though so I didn't face the issue. Most boats made don't have a wooden pad on the outside, it was a bad idea since it's always getting wet so they rot, delaminate and create corrosion. If the pad did lessen the vibration, heck that would take away from the experience of having an outboard motor!
 
Last edited:

Grandad

Lieutenant Commander
Joined
Jun 7, 2011
Messages
1,504
If you can afford Starboard for the motor pad, I suggest you use it. It'll stand up better than plywood no matter how you try to preserve it. I used similar material for the 1/2" thick shim required on the inside of the transom for my I/O. It was actually signboard material that I had lying about. I believe both it and Starboard stand up well to UV, but you may not be able to paint it, I dunno. - Grandad
 

hayko1971

Starmada Splash of the Year 2015
Joined
May 24, 2013
Messages
448
Hey Bill, when I removed my transom wood my transom skin was bowed out also, I thinks that's pretty typical. When you get the new transom wood in there the putter skin will clamp flat. There will be no bow when done.
I didn't reinstall a transom motor pad when I did mine. I just plugged up the holes in the skin. Six less holes in my new transom wood to worry about. I have no vibration issues at all.
It's looking really good.
I will suggest that you consider removing the splashwell, it makes life so much easier. And really there are only a few pop rivets holding it on now, easy to drill out and replace with new ones.

Cheers
 

will w.

Petty Officer 2nd Class
Joined
Mar 30, 2009
Messages
120
I just replaced this same transom but on an 18' 1977 holiday. Looks to have identical shaped wood and splash well. I too noticed the bow in the skin. After replacement, the skin pulled in tight. For the motor pad, I used 1/2 inch ply with two coats of gluvit, then followed by two coats of rusto gloss white industrial. Gluvit was used as i already had it for another project. Paint was added while gluvit was still tacky. It was a rush job to have the boat on the 4th so thinking I would save time the splash well was left on. Before it was over, I really wished I had taken the time for splash well removal.

After seeing where the original transom wood took the brunt of moisture and rot, I have some thoughts to share on sealing corner caps as well as drilling a drain hole or two bottom side of rails and 3-4'' infront of corner caps.( Maybe a pic would better explain) The slope on the gunnels guide water out to the rub rails. With the bow tilted up, this sends water back and under the corner caps where it then runs down the top outside corner and edges of the transom wood. My son and I witnessed this while working on the boat with the nose sticking out of the garage door during a rain. My 95 SFM caps were sealed and it showed with zero staining or wetness in the top corners of the transom.
 

SkidRowBill

Petty Officer 1st Class
Joined
Jun 8, 2015
Messages
295
Great info men... especially will's comment on my truck, she is a 75 and has 40,000 miles on her now... I will be taking my boat to the tin knocker on the 27th or 28th... My plan is to let him see the splash well in place... he may remove it that day If we can agree on a reasonable price and I will bring the boat back and install the transom wood... then return the boat to the tin knocker so that he can install the splash well and repair the inside transom to floor brace... I will also have him make a custom cap that will cover the transom wood from one end to the other(instead of stopping at the gunwale end caps) and replace the corner caps at the same time... probably not in that order... I will need to look at this StarBoard to understand its dexterity... the plywood hanging on the back of my transom is only 3/8s(should I use a different thickness?)... it comes in white so there will be no need to paint... Now that I think of it I probably could and should install the floor before returning it to the tin knocker, leaving out the 24 inch piece that will go under the splash well, but send it along in case it is needed for whatever reason... What do you guy's think... I am thinking that I need to put some paint inside of the boat... probably would be alot easier without all that stuff in the boat... or do you guys think that I would be better off glueing carpet to the exposed insides and bow... I do enjoy quiet and carpet will help that... enough for now... thanks for the feed back and Please keep it comming... all my best... Bill from Maine
 

Watermann

Starmada Splash of the Year 2014
Joined
Jan 12, 2013
Messages
13,822
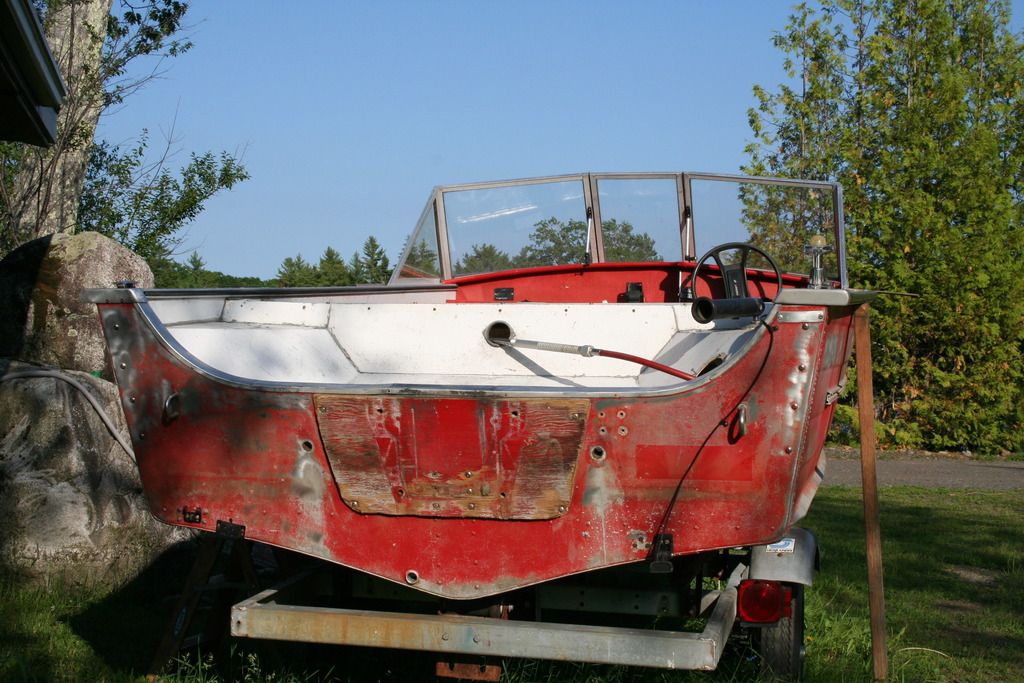
Tell me... how do I move up in rank... I feel like an E-5 at least

Your rank seems to be a little fouled up, you're a Cadet - Seaman. :lol:

At 75 posts you'll be a Petty Officer 3rd class, no more galley time peeling spuds. :whoo:
 

SkidRowBill

Petty Officer 1st Class
Joined
Jun 8, 2015
Messages
295
Great info Will... pics would be very informative should you have them... I am removing most of the wood flooring never to return...
 

SkidRowBill

Petty Officer 1st Class
Joined
Jun 8, 2015
Messages
295
I am ready to do the transom wood now... I feel a little anxious... The old wood was 1/2 to 1 inch short in the corners under the gunwale caps... I feel a raise coming on... can anyone tell me how to avoid the tax man???
 
Top