'93 Monark Pro 1900 rebuild

jbcurt00

Moderator
Staff member
Joined
Oct 25, 2011
Messages
25,111
Re: '93 Monark Pro 1900 rebuild

They do make plasti-weld, but for plastic gas tanks? A GOOD CLEAN surface to bond to may prove challenging, even if it's empty & out of the boat.

Can't hurt to try & call them:

JB Weld
Customer Service
P.O. Box 483
Sulphur Springs, TX 75483
Phone: (903) 885-7696
Email: customerservice@jbweld.com
 

redneckpunk

Petty Officer 2nd Class
Joined
Nov 19, 2008
Messages
130
Re: '93 Monark Pro 1900 rebuild

So I removed the last section of decking today and thinking now that the holes in the tank are, as alluded to, vent holes. I discovered 2 more similar holes toward the back half of the tank and when I checked the deck board removed there were again no holes. And since the decking is original, still attached to the pour in foam, I can only assume they have a purpose. Woohoo! One less thing to worry about fixing as I saw no indication on the bottom of the decking of any splash through of fuel.

So all the major deconstruction is completed and 75% of glue removal and cleanup is done. Will post pics this evening when I find where I left the camera yesturday.:confused:. I will also be doing some more reading about vinyl installation and probably have a couple ?? for you experts
 

jigngrub

Fleet Admiral
Joined
Mar 19, 2011
Messages
8,155
Re: '93 Monark Pro 1900 rebuild

If those holes are intended to be vents, they're home made redneck vents and would be better plugged than not. Gasoline fumes in an enclosed area isn't good, especially in a boat.... ya can't just get out and walk home yanno.
 

Teamster

Lieutenant Commander
Joined
Nov 8, 2010
Messages
1,923
Re: '93 Monark Pro 1900 rebuild

Yeah, I wouldn't want to be in that boat know there were holes in the tank,....

If they can't be safely plugged I would start looking for a new replacement tank, Maybe one with more capacity just for the sake of it,...
 

jbcurt00

Moderator
Staff member
Joined
Oct 25, 2011
Messages
25,111
Re: '93 Monark Pro 1900 rebuild

Are we sure they are THRU holes to the interior of the tank? Might be part of the blow-molding/thermo-forming process, or the OEM pressure testing....


Seem to be too similar, even and in the same location at either end of the tank to be random holes drilled in the tank as venting by a previous owner............ Was there any gas smell coming from them? If you press on the tank w/ the fill neck covered, does it 'exhale' thru those holes?

Is there any maker's info on the tank? I initially thought the holes might have been where a keeper strap might have been 'attached' to the tank................
 

redneckpunk

Petty Officer 2nd Class
Joined
Nov 19, 2008
Messages
130
Re: '93 Monark Pro 1900 rebuild

Is there any maker's info on the tank? I initially thought the holes might have been where a keeper strap might have been 'attached' to the tank................

I think we have a winner!! I did some more snooping around while working on it today and found the holes dont seem to be through holes, actually angled towards one another, and no air coming through when tank is pushed on.

And as promised, a little more boat demo porn. Demo is complete and just have a section of about 5 feet left to scrape glue off. Next step is measuring and pricing vinyl and while waiting for delivery getting new fuel fill hose, vent hose and livewell fill hose. Also, plan on some rewiring while its all apart
002_zpsfa80c5fa.jpg

006_zps9ec800d6.jpg

004_zps0e5bfe4a.jpg

005_zps7478791c.jpg
 

redneckpunk

Petty Officer 2nd Class
Joined
Nov 19, 2008
Messages
130
Re: '93 Monark Pro 1900 rebuild

So today was a "cleanup" day as my g/f and I started stripping carpet and cleaning the side panels and consoles. Had a good system setup that she would pull or cut the carpet off and I would hit the panels with the wire wheel to clean and scuff. As I was cleaning one section she started knocking on the table to get my attention. When I looked up she said "I cut myself" and opened her arm to show me. Evidently she didnt get the safety memo regarding cutting away from yourself. So chalk up the first casualty of this resto. Luckily, after a 6hr ER visit and 3 staples the nurse gave us the staple gun used, fully loaded, for the next incident.
009_zpsba9ad3c6.jpg
 

jbcurt00

Moderator
Staff member
Joined
Oct 25, 2011
Messages
25,111
Re: '93 Monark Pro 1900 rebuild

Carp, good it wasn't any worse, lots going on @inside of the elbow :faint2:

Hmmm. surgical stapler....... Gotta be a use around the garage for one of them. Did it come w/ some staples? Likely to need it again working on a tinny. Glasser's revenge so to speak....

Good work up to the INCIDENT........
 

jigngrub

Fleet Admiral
Joined
Mar 19, 2011
Messages
8,155
Re: '93 Monark Pro 1900 rebuild

That's a tough girl friend you got there RP!

... but if you do the same thing we expect you to wrap a rag around it and keep workin'.;)

Did the g/f get a tetanus shot? You should get one too if you aren't up to date, when was the last time you had one?
 

jbcurt00

Moderator
Staff member
Joined
Oct 25, 2011
Messages
25,111
Re: '93 Monark Pro 1900 rebuild

That's a tough girl friend you got there RP! ... but if you do the same thing we expect you to wrap a rag around it and keep workin'.;)

Duct tape w/ or w/out the rag is also acceptable..........
 

Teamster

Lieutenant Commander
Joined
Nov 8, 2010
Messages
1,923
Re: '93 Monark Pro 1900 rebuild

Use super glue and there is no need to waste perfectly good duct tape,............:lol:
 

redneckpunk

Petty Officer 2nd Class
Joined
Nov 19, 2008
Messages
130
Re: '93 Monark Pro 1900 rebuild

That's a tough girl friend you got there RP!

... but if you do the same thing we expect you to wrap a rag around it and keep workin'.;)

Did the g/f get a tetanus shot? You should get one too if you aren't up to date, when was the last time you had one?

Funny thing was it wasnt bleeding much and she suggested just Super Gluing it. I was thinking about the tetanus shot while she was getting hers and have to put in a call to Dr to find out. Last one I remember for certain was 2005 but possibly had one in 2009 when I had a treble hook removed from my thumb.

And yes, the staple gun he gave us was fully loaded

~RNP
 

redneckpunk

Petty Officer 2nd Class
Joined
Nov 19, 2008
Messages
130
Re: '93 Monark Pro 1900 rebuild

Spent the day scraping off carpet and glue on all the inside "stuff" getting it ready for vinyl. Got all but the helm console done because I havent disassembled it.

So a couple questions for you guys that have done vinyl. Ive read and gotten different opinions on glue and still uncertain if I can use the same glue on both the alum and the plywood decking or should I use different. And what glue do you suggest? Also, having never worked with the vinyl Im still a bit apprehensive about its plyability and how well I can "mold" it around some of the odd angles. The bottom pic has an example of one of the edges I will be attempting to cover. Think it will be an issue? Should I do it in steps, ie glue and clamp one 90 degree bend, wait for that to cure then do the next? Or can it all be done at the same time? I'm just looking for the best option to get the best fit and hold. I've put in this much work and time so I want it done right.

002_zps81297266.jpg

001_zps35919949.jpg


Four bags of carpet and counting
003_zpsa82a6b55.jpg


005_zps2c531131.jpg


~RNP
 

jigngrub

Fleet Admiral
Joined
Mar 19, 2011
Messages
8,155
Re: '93 Monark Pro 1900 rebuild

Whelp, this is my experience with vinyl:
http://forums.iboats.com/boat-resto...ir/97-tracker-pro-deep-v-facelift-509163.html

... and as far as I'm concerned there's only one way to put vinyl on aluminum pieces like that, and that way is to use Weldwood Contact Cement:
DSC02224.jpg


The bond and holding power is immediate which is real important when working with vinyl on metal. Vinyl is very unruly when trying to use the slower bonding/curing adhesives on metal because it naturally wants to curl back to the shape it was in on the roll. The contact cement tames it nicely and it stays put when you apply it.

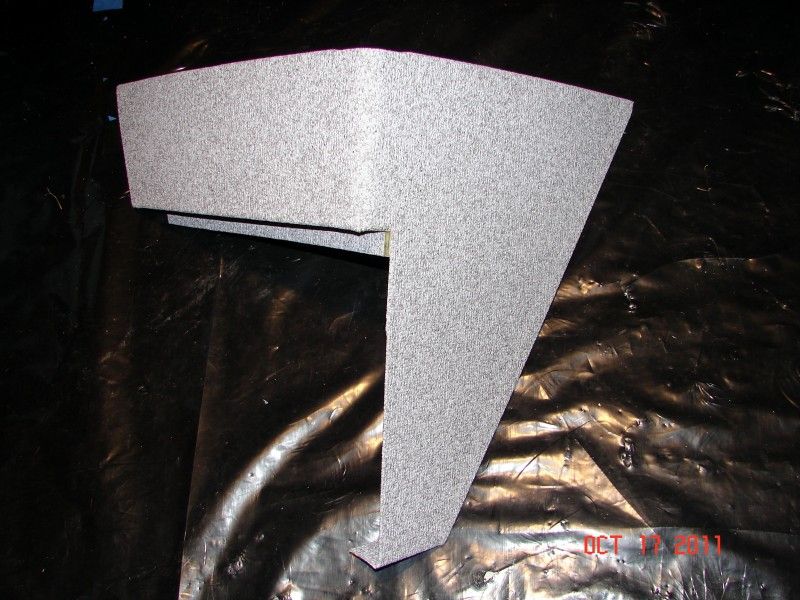
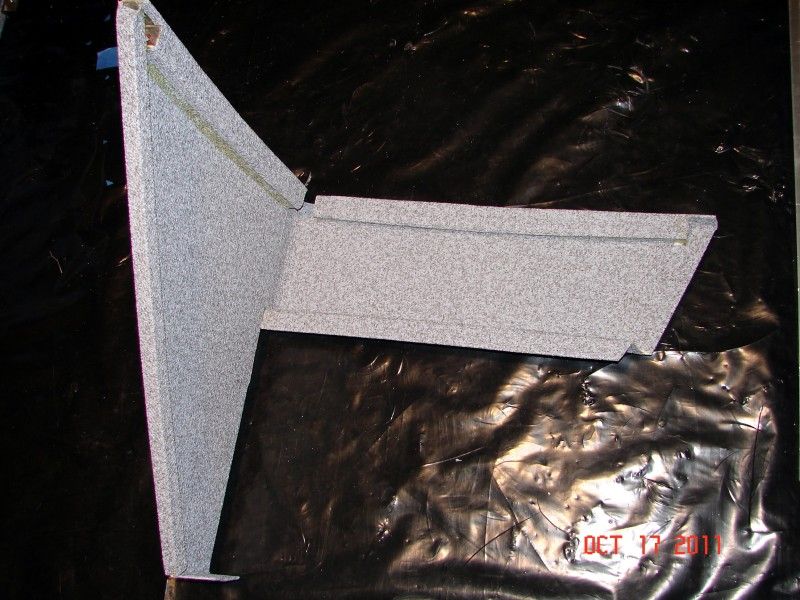
That piece you show in the last pic aint diddle-squat for the contact cement to hold, take a look at this piece I did:
DSC02244.jpg

DSC02245.jpg


That's my steering console base with all kinds of bends and a nice radius. The contact cement whipped that things butt!

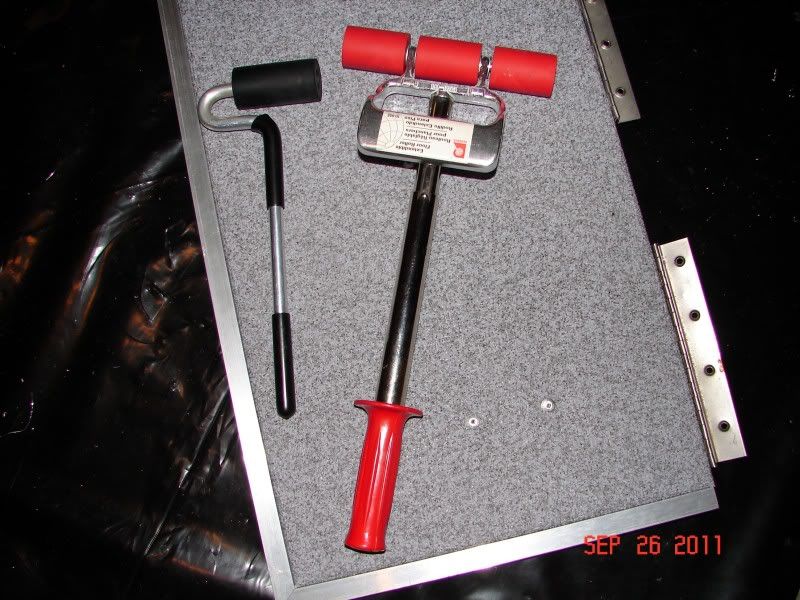
Two tools you can't do without when doing vinyl are these two rollers:
DSC02229.jpg

They roll out any and all air bubbles (and you'll have those, believe me) and they also embed the vinyl backing into the cement. The big one is a hand held carpet roller and the small one is a laminate "J" roller. You'll use the big one for large areas and the little one for for smaller pieces and those hard to get into bends and crooks. Both rollers are available at Home Depot, the big one in the flooring dept and the little one in the cabinet dept.

When applying the contact cement, apply it to both the vinyl and the aluminum. Apply one coat to the vinyl first, then a coat on the aluminum, then a second coat to the vinyl... the vinyl backing is porous and will absorb the first coat while you're coating the aluminum, so a second coat is needed on the vinyl. The aluminum is fine with just one coat.

Buy a gallon of the contact cement, about $40 at Home Depot, you'll probably need more.

Apply the vinyl to your smaller pieces first to get the hang of working with the contact cement before tackling the larger pieces.

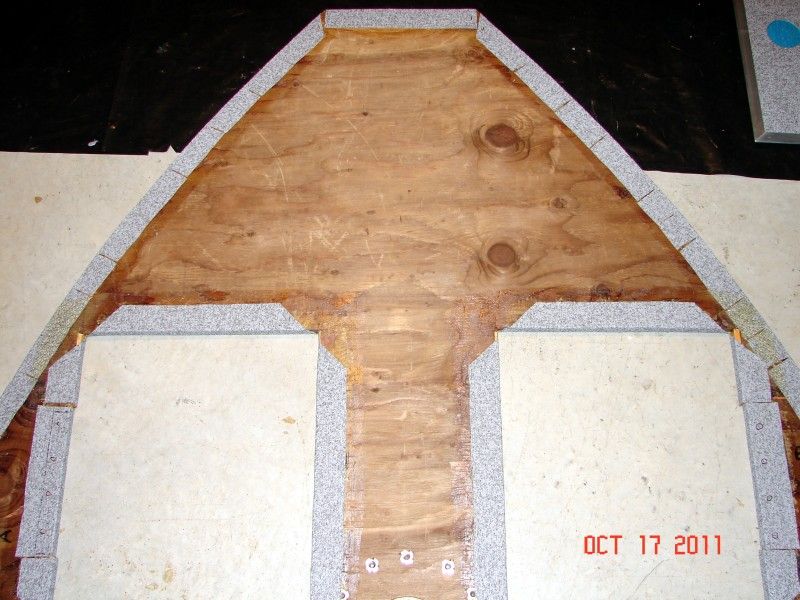
Make sure to cut your vinyl pieces big enough to wrap the vinyl around the back of each piece by 1-1/2" - 2" like this:
DSC02239.jpg


Vinyl has a directional grain just like carpet so you have to be careful and to which way you turn it when applying it. To make this easy I designate one end of the roll of vinyl as the "bow of the boat" and mark "bow" on each piece of vinyl and each piece of aluminum or plywood to help keep the vinyl turned the right way for everything.

If you have any questions just give a holler.
 

redneckpunk

Petty Officer 2nd Class
Joined
Nov 19, 2008
Messages
130
Re: '93 Monark Pro 1900 rebuild

"Grain" was one concern I had when Im doing my measurements. I can get the 52" wide roll and its wide enough to cover the sides when rolled out bow to stern. However, because the deck boards are 72"x48" at its widest, I'd have to put it on side to side rather than bow to stern. I havent been able to find wider than 72". I'm thinking that as long as sides are same direction and all of floor is opposite it should make too much difference. Thoughts, if this makes sense? Also, is the weldwood suitable for the deck boards as well? Be alot easier, especially on pocket book, if I can use same on both.

Jig, I love the way that console came out! Was wondering if it was going to be possible, now my mind is resting a bit easier. Thanks for all the help.

~RNP
 

jigngrub

Fleet Admiral
Joined
Mar 19, 2011
Messages
8,155
Re: '93 Monark Pro 1900 rebuild

The deck won't really be opposite, it'll just be turned to a right angle. This should be fine.

The Weldwood works just as well on wood as it does metal. Do you plan on sealing your wood before applying the vinyl?
 

redneckpunk

Petty Officer 2nd Class
Joined
Nov 19, 2008
Messages
130
Re: '93 Monark Pro 1900 rebuild

was planning on using spar marine urethane on the under side of the deck boards. Wasnt sure how much difference it would make to do top and if it would effect adhesion.
 

jigngrub

Fleet Admiral
Joined
Mar 19, 2011
Messages
8,155
Re: '93 Monark Pro 1900 rebuild

Go ahead and do both sides and all 4 edges. I sealed mine with epoxy resin and it didn't hurt a thing.
 

redneckpunk

Petty Officer 2nd Class
Joined
Nov 19, 2008
Messages
130
Re: '93 Monark Pro 1900 rebuild

Thanks! Trying to figure out now how to make more room in the garage so I can do it. Probably have to hit someone up to store the Harleys for a couple weeks while I do the work. I always thought having a 3 car garage would be plenty....guess not!!
 
Top